

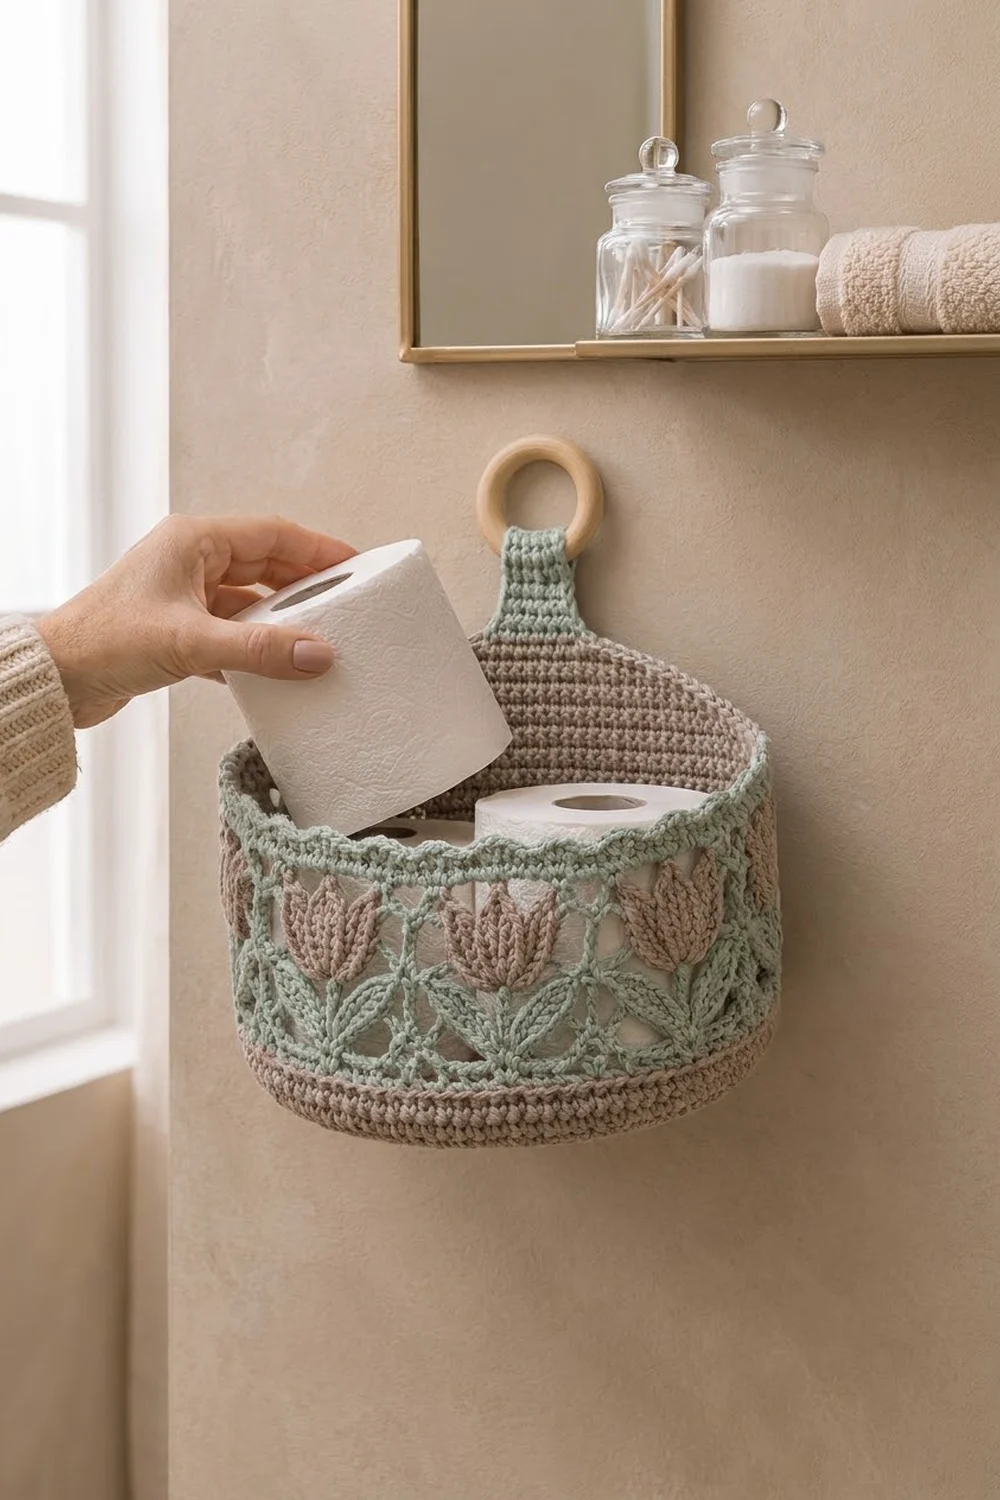
This wall basket holds two standard toilet paper rolls side by side. A flat back panel holds it against the wall, and it hangs from a natural wooden ring. Most of the basket is solid taupe single crochet, so it is firm enough to keep its shape when full.
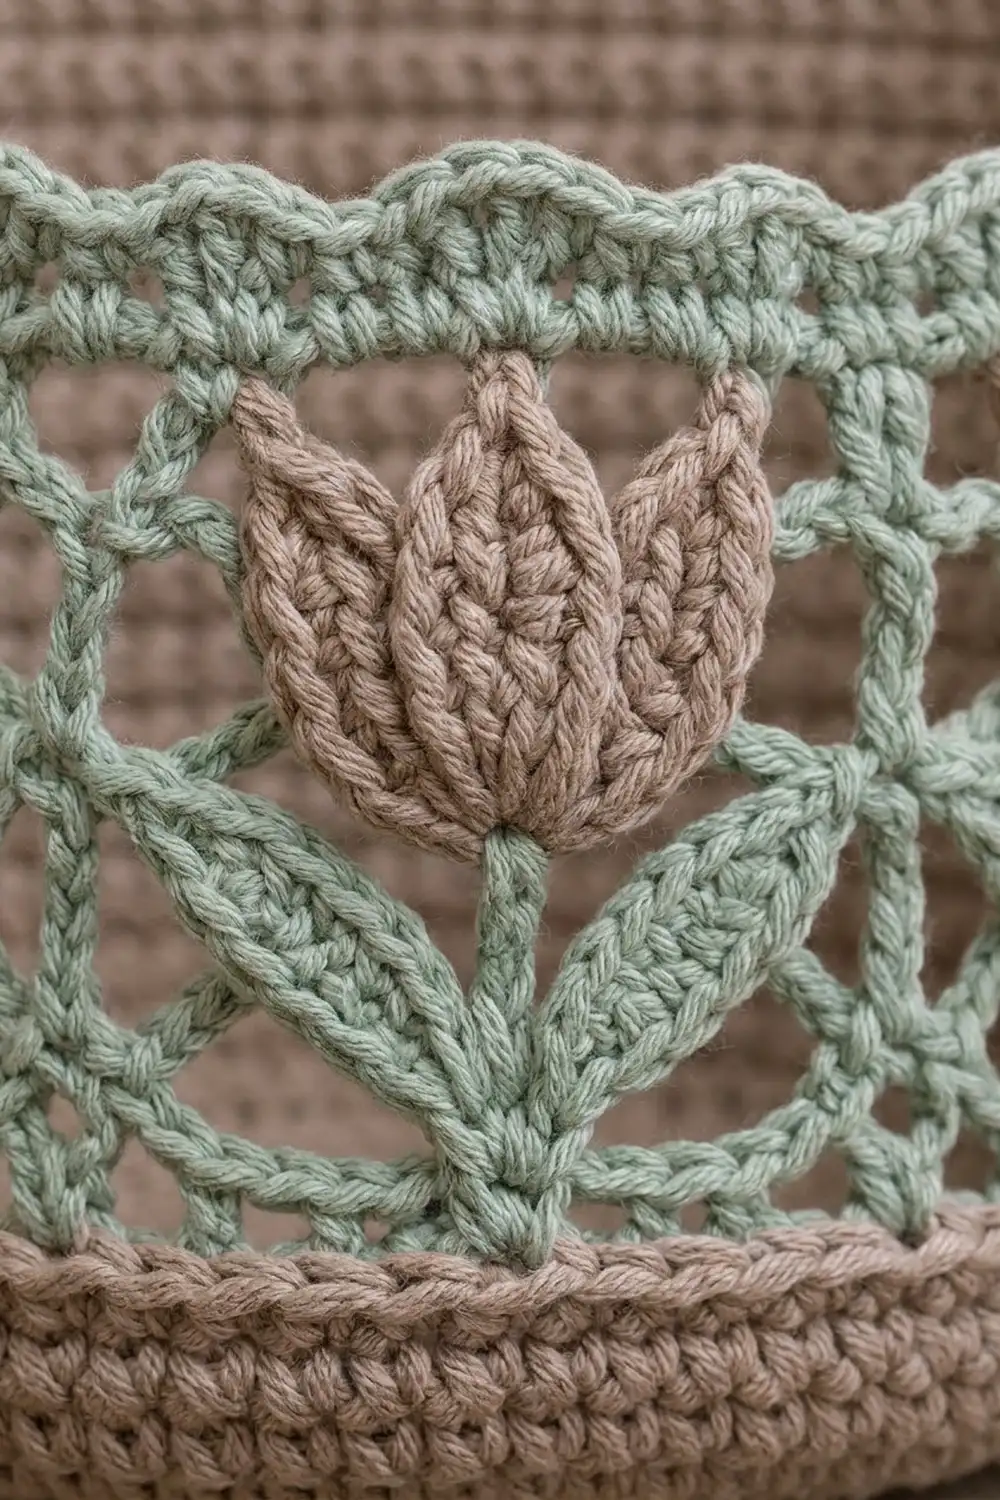
A sage lattice band runs around the walls. Each front and side window holds a taupe tulip with three pointed petals on a sage stem with two leaves. A sage crab-stitch edge outlines the rim and the domed back panel, and a sage tab wraps around the ring.
The pattern uses US crochet terms. The finished basket is about 10.25 in (26.0 cm) wide, 4.75 in (12.1 cm) deep and 5 in (12.7 cm) tall at the front. The back panel rises about 3.5 in (8.9 cm) above the rim. Including the ring, the whole piece is about 12 in (30.5 cm) tall.
You work an oval base in rounds and then the walls straight up, including the lace band. Next, you work the back panel in rows from the back part of the rim and add the tab. Last, you add the edging, sew 10 small tulip appliqués into the windows and fold the tab over the ring.
Finished Size and Construction
- Finished size: 10.25 in (26.0 cm) wide × 4.75 in (12.1 cm) deep × 5 in (12.7 cm) front height; about 12 in (30.5 cm) overall with ring
- Skill level: Intermediate
- Terminology: US
- Yarn weight: Worsted (#4), cotton or cotton blend
- Hook: 4.0 mm (G-6)
- Number of pieces: 1 basket body with back panel and tab, plus 10 tulip appliqués (10 heads, 10 stem-and-leaf pieces)
- Layout: One oval pocket; the back panel is centered on the flat back side
- Base size: 10.25 in × 4.75 in (26.0 cm × 12.1 cm), with a 26 in (66.0 cm) perimeter
- Size before border: walls 4.9 in (12.4 cm) tall; panel 3.5 in (8.9 cm) above the rim
- Border depth: about 0.1 in (0.3 cm), one round of crab stitch
Materials
Use a smooth worsted cotton or cotton blend of about 170 m per 100 g. Cotton gives the firm walls and crisp lace this basket needs. Acrylic will work, but the basket will be softer.
- Taupe: 100 g (about 170 m), for the base, walls, back panel and tulip heads
- Sage: 50 g (about 85 m), for the lace band, stems, leaves, edging and tab
- 4.0 mm (G-6) hook
- 1 wooden ring, 2.5 in (6.4 cm) outer diameter
- Tapestry needle
- 4 stitch markers
- Scissors and a tape measure
- Spray bottle and a small towel for blocking
These quantities include a margin of about 15–20% for swatching and tension differences.
Abbreviations (US Terms)
- ch – chain
- sl st – slip stitch
- sc – single crochet
- hdc – half double crochet
- dc – double crochet
- tr – treble crochet
- sc2tog – single crochet 2 together
- BLO – back loop only
- sp(s) – space(s)
- st(s) – stitch(es)
- rnd(s) – round(s)
- RS – right side
- WS – wrong side
Special stitch: crab stitch (reverse sc). Work from left to right (from right to left if you crochet left-handed). Insert the hook into the next stitch to the right, yarn over, pull up a loop, then yarn over and draw through both loops.
Gauge and Checkpoints
- Gauge: 16 sc × 18 rnds = 4 in (10.2 cm), worked firmly.
- Lace gauge: 2 dc rnds = 1 in (2.5 cm).
Instead of a separate swatch, work the base first and measure it. That is your test piece.
- After Rnd 10: the base is 10.25 in × 4.75 in (26.0 cm × 12.1 cm).
- After Rnd 16: the taupe wall is about 1.3 in (3.3 cm) tall.
- After Rnd 23: the wall is about 4.25 in (10.8 cm) tall, and the band is about 3 in (7.6 cm).
- After Rnd 26: the wall is about 4.9 in (12.4 cm) tall.
- Panel Row 1: 10.5 in (26.7 cm) wide.
- Panel Row 16: 3.5 in (8.9 cm) wide.
If the base is more than 0.25 in (0.6 cm) too big, go down half a hook size. If it is too small, go up half a size. Keep the stitch counts the same.
Base
Chain loosely, then work in joined rounds. Ch 1 at the start of each round does not count as a stitch. Begin each round in the same stitch as the join, and join each round with a sl st to the first st.
With taupe, ch 25.
Rnd 1: 3 sc in 2nd ch from hook, sc in next 22 ch, 3 sc in last ch. Working along the opposite side of the chain, sc in next 22 ch. Join. (50 sc)
Each round now has a curved end of 3 sts, a 22-st side, a second curved end and a second 22-st side.
Rnd 2: [2 sc in each of next 3 sts, sc in next 22 sts] twice. (56)
Rnd 3: [(sc in next st, 2 sc in next st) 3 times, sc in next 22 sts] twice. (62)
Rnd 4: [(sc in next 2 sts, 2 sc in next st) 3 times, sc in next 22 sts] twice. (68)
Rnds 5–10: Repeat the same pattern. In each round, the number of plain sc before each increase grows by 1 (3 in Rnd 5, up to 8 in Rnd 10). The 22 side sts never change.
- Rnd 5 (74)
- Rnd 6 (80)
- Rnd 7 (86)
- Rnd 8 (92)
- Rnd 9 (98)
- Rnd 10: [(sc in next 8 sts, 2 sc in next st) 3 times, sc in next 22 sts] twice. (104)
Each curved end now has 30 sts and each side has 22: (30 + 22) × 2 = 104.
Checkpoint: the base measures 10.25 in × 4.75 in (26.0 cm × 12.1 cm).
Walls
Rnd 11: Sc BLO in each st. (104) This makes a crisp edge at the base.
Rnds 12–16: Sc in each st. (104)
Fasten off taupe after Rnd 16.
Checkpoint: the wall is about 1.3 in (3.3 cm) tall.
Tulip Lattice Band
Rnd 17: Join sage. Sc in each st. (104)
Rnd 18: Ch 3 (counts as dc here and throughout), dc in next st, [ch 6, skip 6 sts, dc in next 2 sts] 12 times, ch 6, skip last 6 sts. Join to top of ch-3. (26 dc, 13 ch-6 sps)
Each repeat uses 8 sts: 13 × 8 = 104. Each ch-6 sp starts a window about 2 in (5.1 cm) wide.
Rnd 19 (V round): Ch 3, dc in next dc, [ch 3, sc in next ch-6 sp, ch 3, dc in next 2 dc] 12 times, ch 3, sc in last ch-6 sp, ch 3. Join. (26 dc, 13 sc, 26 ch-3 sps)
Rnd 20 (bar round): Ch 3, dc in next dc, [ch 6, skip (ch-3, sc, ch-3), dc in next 2 dc] 12 times, ch 6. Join. (26 dc, 13 ch-6 sps)
Rnd 21: Repeat Rnd 19.
Rnd 22: Repeat Rnd 20.
The paired dc posts make the window frames. The ch-6 bars pulled down by the V rounds form the diamond lattice inside each window.
Rnd 23 (conversion round): Ch 1, [sc in next 2 dc, 6 sc in next ch-6 sp] 13 times. Join. (26 sc in dc + 78 sc in sps = 104)
Fasten off sage.
Checkpoint: the wall is about 4.25 in (10.8 cm) tall.
Upper Wall
Rnds 24–26: Join taupe. Sc in each st. (104)
Fasten off.
Checkpoint: the wall is about 4.9 in (12.4 cm) tall.
Number the sts of Rnd 26 from the join:
- sts 1–30: curved end A
- sts 31–52: front side
- sts 53–82: curved end B
- sts 83–104: back side
Place a marker in st 73 and another in st 10.
Back Panel
The panel is worked in turned rows over 42 sts: the last 10 sts of end B, the 22 back sts and the first 10 sts of end A.
Row 1: Join taupe with a standing sc in st 73. Sc in sts 74–104 and sts 1–10. Turn. (42)
Rows 2–6: Ch 1, sc in each st, turn. (42)
Checkpoint: the panel is about 1.3 in (3.3 cm) above the rim and 10.5 in (26.7 cm) wide.
Row 7: Ch 1, sc2tog, sc to last 2 sts, sc2tog, turn. (40)
Row 8: Ch 1, sc in each st, turn. (40)
Rows 9–11: Repeat Row 7. (38, 36, 34)
Rows 12–16: Ch 1, sc2tog twice, sc to last 4 sts, sc2tog twice, turn. (30, 26, 22, 18, 14)
Fasten off.
Checkpoint: the panel is about 3.5 in (8.9 cm) tall above the rim, and Row 16 is 3.5 in (8.9 cm) wide.
Hanging Tab
Row 1: Skip the first 2 sts of Row 16 and join sage in the 3rd st. Sc in the next 10 sts (sts 3–12), turn. (10) Two sts stay unworked on each side: 2 + 10 + 2 = 14.
Row 2: Ch 1, sc2tog, sc in next 6 sts, sc2tog, turn. (8)
Row 3: Ch 1, sc2tog, sc in next 4 sts, sc2tog, turn. (6)
Rows 4–16: Ch 1, sc in each st, turn. (6)
Fasten off and leave a 12 in (30.5 cm) tail. The tab flares from 2.5 in (6.4 cm) at its base to 1.5 in (3.8 cm) wide.
Tulip Appliqués (Make 10)
Tulip head (taupe):
Ch 5.
Row 1: Sc in 2nd ch from hook and next 3 ch, turn. (4)
Row 2: Ch 1, 2 sc in first st, sc in next 2 sts, 2 sc in last st, turn. (6)
Row 3: Ch 1, sc BLO in each st, turn. (6) The front-loop ridge adds texture.
Row 4: [Sl st in next st, (dc, tr, dc) in next st] 3 times. (3 petals)
Fasten off and leave a 10 in (25.4 cm) tail. The head is about 1.5 in (3.8 cm) wide.
Stem with leaves (sage):
Ch 9. Sl st in 2nd ch from hook and next 3 ch.
Leaf: Ch 7, sl st in 2nd ch from hook, sc in next ch, hdc in next ch, dc in next ch, hdc in next ch, sc in next ch. Sl st in the same stem ch where the leaf began.
Make a second leaf the same way, then sl st in the remaining 4 stem ch. (8 stem sl sts, 2 leaves)
Fasten off and leave a 10 in (25.4 cm) tail. The stem is about 1.6 in (4.1 cm) long, and each leaf is about 1.25 in (3.2 cm). The assembled tulip is about 2.5 in (6.4 cm) tall.
Assembly
Tulips: Sew each head over the top end of its stem.
The 13 windows are numbered from the start of Rnd 18. Windows 11–13 sit on the flat back side and stay plain. Place one tulip in each of windows 1–10, five on each side of the post pair at the center front.
Sew each tulip over its lattice, centered in the window. Angle the leaves upward and catch the petal tips and leaf points to the chain bars. The edges may overlap the posts slightly.
Ring: Fold tab Rows 4–16 around the wooden ring to the back. Whipstitch Row 16 to the back of Row 4, going through both layers.
Border: Rim and Panel Edging
Border gauge: 1 crab st in each sc and in each row end.
Join sage in st 11 of Rnd 26, with the outside of the basket facing you. Work 1 round of crab stitch as follows:
- Front rim: 1 crab st in each of sts 11–72. (62)
- Panel side edge: 1 crab st in each row end. (16)
- Top beside tab: 1 crab st in each of the 2 unworked sts. (2)
- Across the tab: sl st into the row end of tab Row 1. (1 sl st)
- Top beside tab: 1 crab st in each of the 2 unworked sts. (2)
- Second panel side edge: 1 crab st in each row end. (16)
Join and fasten off. Total: 98 crab sts + 1 sl st.
Why the math works: the 104 rim sts split into 42 under the panel and 62 along the open front: 42 + 62 = 104. The panel has 16 rows on each side, so each edge gets 16 row ends, and the four top sts are exactly what the 10-st tab leaves free: 14 − 10 = 4. Sc rows are slightly shorter than sc sts are wide, but the twist of crab stitch takes up that difference, so the edge lies flat without ruffling.
Final Blocking
- Weave in all ends.
- Mist the basket evenly until it is damp.
- Fill the pocket with a rolled towel, or two rolls in a plastic bag, so the walls stand straight.
- Lay it face up and pin the back panel flat into a smooth dome.
- Use your fingers to square up the window posts and open each lattice diamond.
- Pat the tulip petals and leaves into points.
- Let it dry completely, at least 24 hours.
Final Quality-Control Checklist
- The base measures 10.25 in × 4.75 in (26.0 cm × 12.1 cm) and sits flat.
- The walls stand straight with 104 sts all the way up.
- There are 13 windows, with paired posts and diamond lattices.
- There are 10 tulips, symmetrical around the center front.
- The panel is centered on the back side, with a smooth, even dome.
- The edging lies flat around the rim and panel.
- The tab is secure on the ring and the basket hangs level.
Troubleshooting
- Base cups or ripples: If it cups, your tension is too tight; go up half a hook size. If it ripples, go down half a size.
- Pointed oval ends: Shift each round’s increases by one st to stagger them. Counts stay the same.
- Band pulls in: Chain more loosely, or work the chains with a hook one size larger.
- Panel is off-center: Move both markers the same number of sts so the panel lines up with the flat back side.
- Basket tips forward: Sew the back panel corners to Rows 24–26 to stiffen the back, or add more rows to the tab.
- Petals curl: Re-block the tulips flat, or use a light starch.
Care
Hand wash in cool water and lay flat to dry, reshaping it over a towel. Remove the wooden ring before washing, or keep it dry.
Final Notes
The measurements build on each other:
- The 104-st base sets a 26 in (66.0 cm) perimeter.
- That perimeter fits 13 windows of 8 sts each.
- The conversion round restores the 104 sts.
- Of the 104 rim sts, 42 become a panel 10.5 in (26.7 cm) wide.
- The panel tapers to 14 sts, which carries a 10-st tab.
- The edging uses the 62 open rim sts, 16 row ends on each side and the 4 free top sts.
If each checkpoint matches, the basket will hold two rolls and hang straight from its ring.
Happy crocheting!