

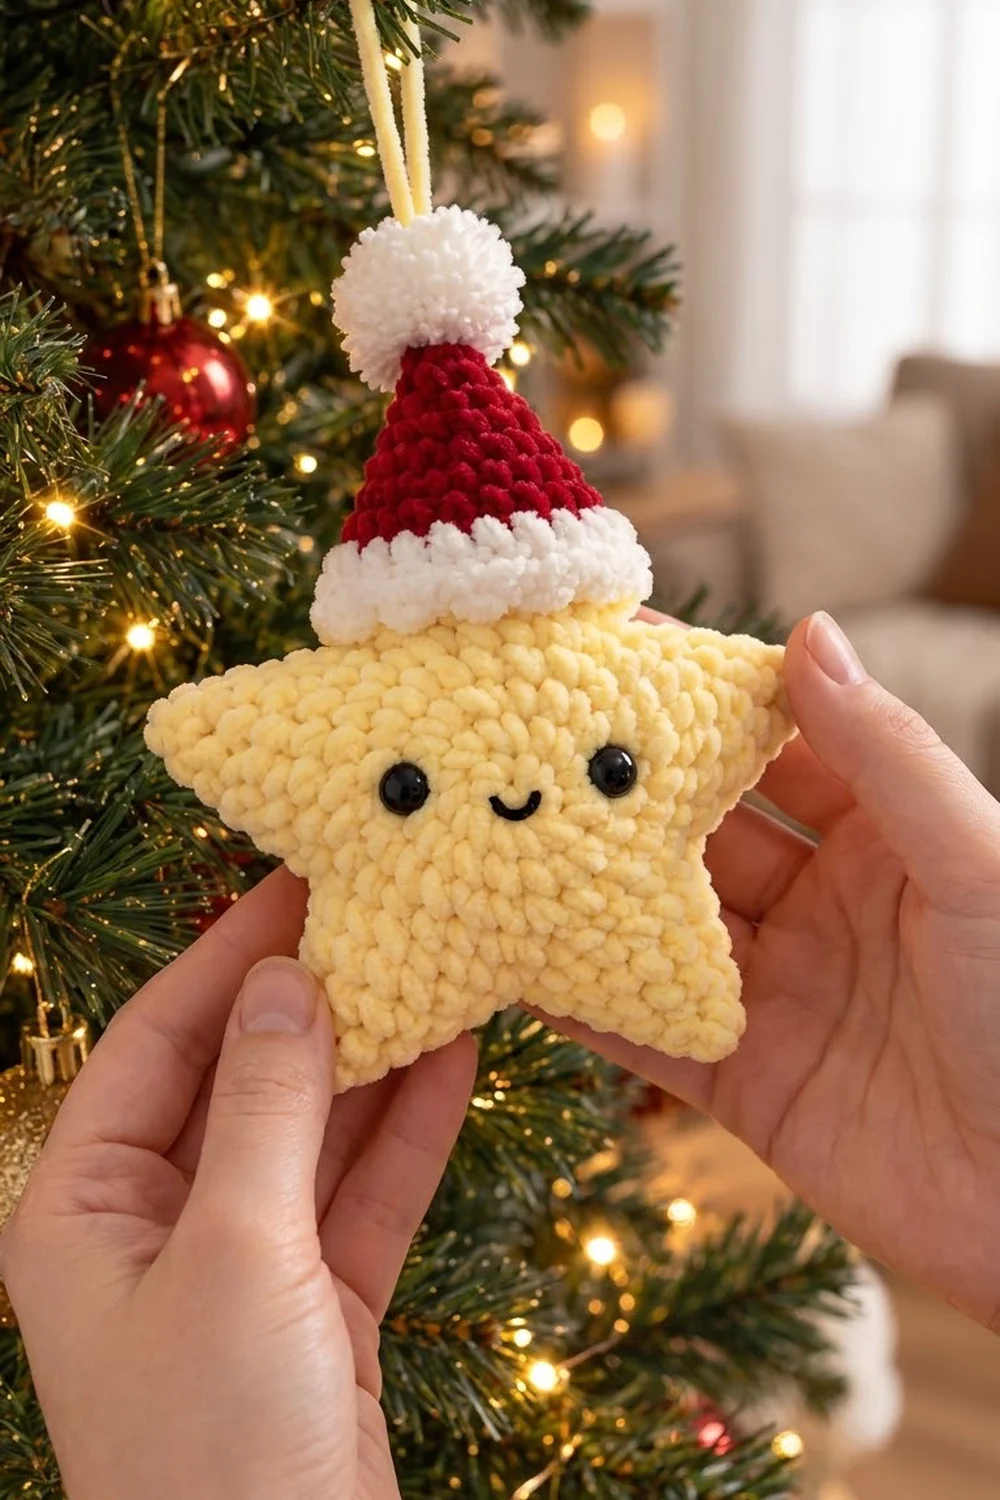
This little Christmas star is plump, soft, and full of personality. It is a puffy five-pointed star in pale butter-yellow velvet yarn with a sweet face: two shiny black safety eyes and a tiny embroidered smile. A red Santa hat with a fluffy white brim and a white pompom ball sits at a slight tilt over the top point.
The colors are classic and cozy: pale yellow, Christmas red, bright white, and black for the face. The velvet yarn gives a bumpy, plush texture that hides small tension changes and makes the ornament feel like a tiny plush toy.
This pattern uses US crochet terms. The finished star measures about 5.5 in (14.0 cm) wide and 5.25 in (13.3 cm) tall after the joining border. With the hat and pompom, the ornament is about 7 in (17.8 cm) tall, not counting the loop.
You crochet two identical flat star panels. Each one has a small center circle worked in rounds, then five points worked in short rows. The front panel gets the face. Then you hold both panels together and work a single crochet border through both layers, stuffing as you go. Last, you make a small cone hat, a pompom ball, and a loop.
Finished Size and Construction
- Finished size: 5.5 in (14.0 cm) wide x 5.25 in (13.3 cm) tall (star only); about 7 in (17.8 cm) tall with hat
- Skill level: Easy (advanced beginner)
- Terminology: US crochet terms
- Yarn weight: Bulky (#5) velvet or chenille yarn; scrap of worsted (#4) black yarn
- Hook: 4.5 mm (US 7)
- Number of pieces: One finished ornament, built from four crocheted parts (2 star panels, 1 hat, 1 pompom ball)
- Layout: Single ornament; no grid
- Piece size (one star panel): 5.25 in (13.3 cm) wide x 5 in (12.7 cm) tall
- Size before border: 5.25 in (13.3 cm) x 5 in (12.7 cm)
- Border depth: about 1/8 in (0.3 cm) per edge, 1 round of single crochet through both layers
Materials
Choose a bulky velvet or chenille yarn that feels smooth and dense. These yarns hide stitch definition, so use stitch markers and good light.
- Pale yellow (main color): 35 g / 33 m (36 yd) for both star panels, the border, and the loop
- Red: 8 g / 8 m (9 yd) for the hat
- White: 8 g / 8 m (9 yd) for the brim and pompom ball
- Black worsted (#4): about 1 m (1 yd) for the smile
Quantities include a margin of about 20 percent for swatching and tails.
Tools:
- 4.5 mm (US 7) crochet hook
- Two 9 mm black safety eyes with backs
- Polyester fiberfill, about 10 g
- Stitch markers
- Tapestry needle
- Scissors and pins
Abbreviations (US Terms)
- ch – chain
- sl st – slip stitch
- sc – single crochet
- hdc – half double crochet
- inc – 2 sc in the same stitch
- sc2tog – single crochet 2 together
- MR – magic ring
- st(s) – stitch(es)
- RS / WS – right side / wrong side
Special stitch – valley sc2tog (border only): Insert the hook through both layers at the Row 1 row-end on the left edge of one point and pull up a loop. Insert through both layers at the Row 1 row-end on the right edge of the next point and pull up a loop. Yarn over and pull through all 3 loops.
Gauge and Checkpoints
Gauge: 12 sc and 13 rows = 4 in (10.2 cm) in velvet yarn with a 4.5 mm hook.
Velvet yarn is hard to swatch, so make one star panel first as your test. It is small and tells you everything you need to know.
Checkpoints:
- After Round 3 of the center: the circle is 2.5 in (6.4 cm) across.
- After one point: it is 1.5 in (3.8 cm) tall from Round 3 to the tip and 2 in (5.1 cm) wide at its base.
- Finished panel: 5.25 in (13.3 cm) wide x 5 in (12.7 cm) tall.
- After the border: 5.5 in (14.0 cm) x 5.25 in (13.3 cm).
- Hat after Round 8: 6 in (15.2 cm) around and 3 in (7.6 cm) wide laid flat.
If your panel is too big, go down to a 4.0 mm hook. If it is too small, go up to a 5.0 mm hook. Being 0.25 in (0.6 cm) off is fine for an ornament, but the two panels must match each other exactly. Use the same hook for both.

Star Panel (Make 2)
Use pale yellow. Make both panels the same way. The side facing you while you work the center rounds is the RS.
Center Circle
Round 1: MR, ch 1 (does not count as a st), 10 hdc in ring, pull the ring closed, sl st to first hdc. (10 sts)
Round 2: Ch 1, 2 hdc in each st around, sl st to first hdc. (20 sts)
Round 3: Ch 1, hdc in next st, 2 hdc in next st; repeat from * 9 more times, sl st to first hdc. (30 sts)
Checkpoint: the circle lies flat and is 2.5 in (6.4 cm) across. The 30 sts split into five groups of 6, one group per point.
Points
Each point is worked in short rows over 6 sts of Round 3. Do not fasten off between points.
Point 1, Row 1 (RS): Ch 1, sc in the same st as the join and in the next 5 sts, turn. (6 sts)
Row 2: Ch 1, sc2tog, sc in next 2 sts, sc2tog, turn. (4 sts)
Row 3: Ch 1, sc in each st across, turn. (4 sts)
Row 4: Ch 1, sc2tog twice, turn. (2 sts)
Row 5: Ch 1, sc2tog. (1 st) This is the tip.
Travel down: Ch 1, then sl st into the left-edge row-ends of Rows 4, 3, 2, and 1 (4 sl sts). You are now at the base of the point, next to the first unworked st of Round 3.
Points 2–5: Ch 1, sc in the next 6 unworked sts of Round 3, turn. (6 sts) Work Rows 2–5 and the travel down exactly as for Point 1. Repeat from * 3 more times.
After the fifth travel down, sl st into the base of Point 1. Fasten off and weave in ends on the WS.
Checkpoint: 5 points x 6 sts = 30 sts, so every st of Round 3 is used. Each point is 1.5 in (3.8 cm) tall, and the panel is 5.25 in (13.3 cm) x 5 in (12.7 cm).
Face (Front Panel Only)
Choose one point to be the top. The face sits in the lower half of the center circle.
- Put the 9 mm safety eyes in between Rounds 2 and 3, on the half of the circle opposite the top point. Leave 5 sts of Round 3 between the eye posts and keep the eyes level.
- Check the placement from the front, then press the backs on firmly from the WS.
- With black worsted yarn, embroider a small U-shaped smile about 2 sts wide on Round 2, centered between and just below the eyes. Tie off on the WS.
Border and Joining Round
This single round finishes the edge and joins the two panels. Work it in pale yellow through both layers at once.
Border gauge: about 3 sc per 1 in (2.5 cm) along the edges, matching the main gauge.
Setup: Place the panels WS together with the front panel facing you. Line up all five points and their row-ends, then pin each point.
Border Round: Join pale yellow through both layers at the right-edge row-end of Row 2 on the top point, then ch 1. Work this sequence for each point, starting with the top point and moving left:
- Sc in the right-edge row-ends of Rows 2, 3, and 4 (3 sc)
- 3 sc in the tip st (Row 5) (3 sc)
- Sc in the left-edge row-ends of Rows 4, 3, and 2 (3 sc)
- Valley sc2tog across the Row 1 row-ends of this point and the next point (1 st)
Per point: 3 + 3 + 3 + 1 = 10 sts.
Stuffing: After the fourth point, stuff the star through the opening with about 8 g of fiberfill. Push small tufts into each tip with the back of the hook. Aim for about 1 in (2.5 cm) of thickness at the center. Finish the fifth point. Its valley sc2tog uses the Row 1 row-end of Point 5 and the Row 1 row-end of the top point. Sl st to the first sc. (50 sts) Fasten off and hide the tail inside.
Why the math works: Each side of a point has 5 row-ends. Rows 2–4 get one sc each, so the sides stay straight without stretching. Row 5 is a single st, and putting 3 sc in it turns the sharp tip. At each valley, the two Row 1 row-ends become one sc2tog, which pulls the inner corner in and keeps it crisp. 5 points x 10 sts = 50 sts. The border adds about 1/8 in (0.3 cm) per edge, so the star grows to 5.5 in (14.0 cm) x 5.25 in (13.3 cm).
Santa Hat
Use red. Work in continuous rounds and mark the first st of each round.
Round 1: MR, 6 sc in ring. (6 sts)
Round 2: Sc in each st around. (6 sts)
Round 3: Sc in next st, inc; repeat from * 2 more times. (9 sts)
Round 4: Sc in each st around. (9 sts)
Round 5: Sc in next 2 sts, inc; repeat from * 2 more times. (12 sts)
Round 6: Sc in next 3 sts, inc; repeat from * 2 more times. (15 sts)
Change to white.
Round 7 (brim): Sc in each st around. (15 sts)
Round 8 (brim): Sc in next 4 sts, inc; repeat from * 2 more times. (18 sts)
Sl st to the next st. Fasten off and leave a 12 in (30.5 cm) tail for sewing.
Checkpoint: the hat is about 2.25 in (5.7 cm) tall, 6 in (15.2 cm) around the brim, and 3 in (7.6 cm) wide laid flat.
Pompom Ball
Use white.
Round 1: MR, 6 sc in ring. (6 sts)
Round 2: Inc in each st around. (12 sts)
Round 3: Sc in each st around. (12 sts)
Round 4: Sc2tog 6 times. (6 sts)
Stuff firmly with a pinch of fiberfill. Fasten off with an 8 in (20.3 cm) tail, weave it through the front loops of the last round, and pull closed. The ball is about 1 in (2.5 cm) across. Use the tail to sew it to the hat tip.
Hat and Loop Assembly
- Stuff the hat lightly with about 1 g of fiberfill so the cone holds its shape.
- Slide the hat over the top point so the brim covers the top 1.25 in (3.2 cm) or so. Tilt it slightly to one side.
- Pin the hat, then whipstitch the brim’s last round to the star all the way around with the white tail.
- Cut a 10 in (25.4 cm) strand of pale yellow. Thread it down through the top of the pompom and back up 1 st away. Knot the ends to make a loop about 4 in (10.2 cm) long, and tuck the knot into the pompom.
Final Blocking
Never iron velvet yarn or steam it hard, because heat crushes the pile.
- Lay the ornament face up on a towel.
- Mist it lightly with cool water. Do not soak it.
- Pinch each point into a neat triangle and press the valleys inward.
- Pin the tips so the star measures 5.5 in (14.0 cm) x 5.25 in (13.3 cm).
- Straighten the hat so the brim sits evenly.
- Let it dry fully, then take out the pins.
Final Quality-Control Checklist
- Both panels were 5.25 in (13.3 cm) x 5 in (12.7 cm) before joining.
- The border has 50 sts, 10 per point.
- All five tips are sharp and evenly stuffed.
- The valleys are crisp, with no gaps between the layers.
- The eyes are level and 5 sts apart, with backs fully on.
- The smile is centered.
- The hat has 18 sts at the brim and is sewn on all the way around.
- The pompom is secure and the loop knot is hidden.
Troubleshooting
The center circle ruffles. Your hdc tension is loose. Go down half a hook size for the center.
The center circle cups. Your tension is tight. Go up half a hook size for the center only.
The points look blunt. Make sure Row 5 is a single sc2tog and that you work 3 sc into that tip in the border.
There are holes at the valleys. Work each valley sc2tog through both panels, not just the front one.
The panels don’t line up. Count the rows on each point. Every point needs exactly 5 rows.
The velvet yarn slips out. Weave tails in three directions and tie a small knot on the WS before joining.
Care
Spot clean with cool water and mild soap, then air dry flat. Store it in a box with tissue so the points and hat keep their shape.
Final Notes
Each measurement leads to the next one. The 2.5 in (6.4 cm) center circle holds 30 sts, which split into five points of 6 sts. Each point grows to 1.5 in (3.8 cm), which makes a 5.25 in (13.3 cm) x 5 in (12.7 cm) panel. The 50-st border joins the two panels and brings the star to 5.5 in (14.0 cm) x 5.25 in (13.3 cm). The 18-st hat is 3 in (7.6 cm) wide and sits over the top point, so the ornament ends up about 7 in (17.8 cm) tall. If you check each stage as you go, the next one will fit.
Happy crocheting!