
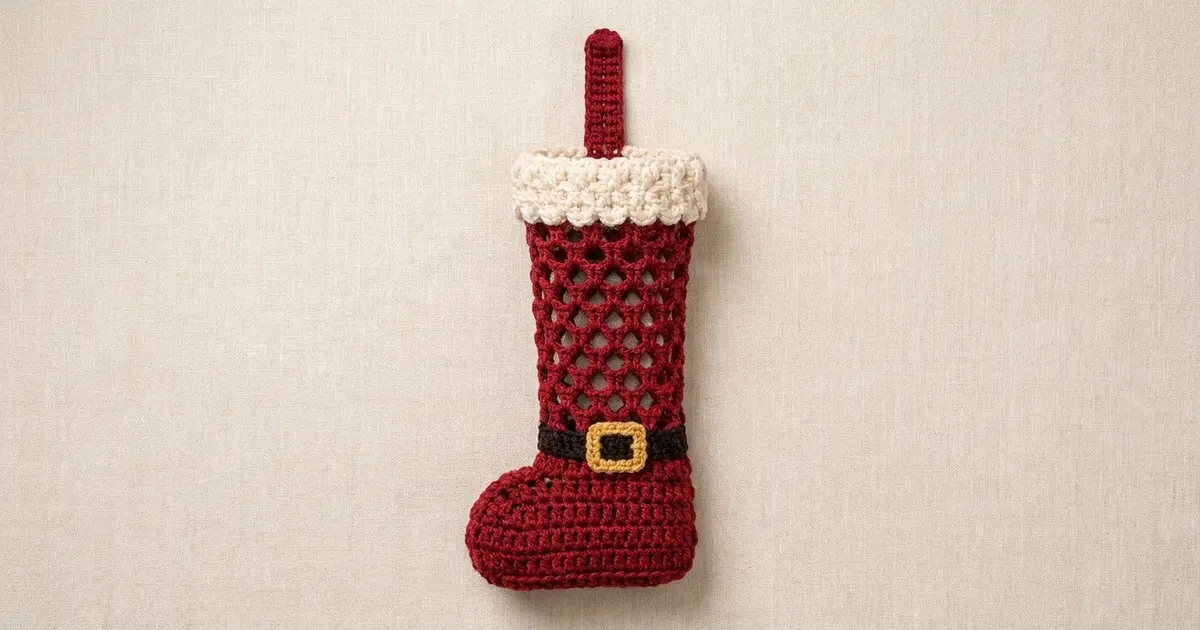
Santa’s Pantry Boot is a holiday bag holder shaped like a small Santa boot. It hangs from a cabinet knob or hook. You push used plastic grocery bags in through the top and pull them out one at a time through an opening in the sole. The foot is solid, the leg is an open mesh so you can see the bags inside, and the top has a soft cream cuff.
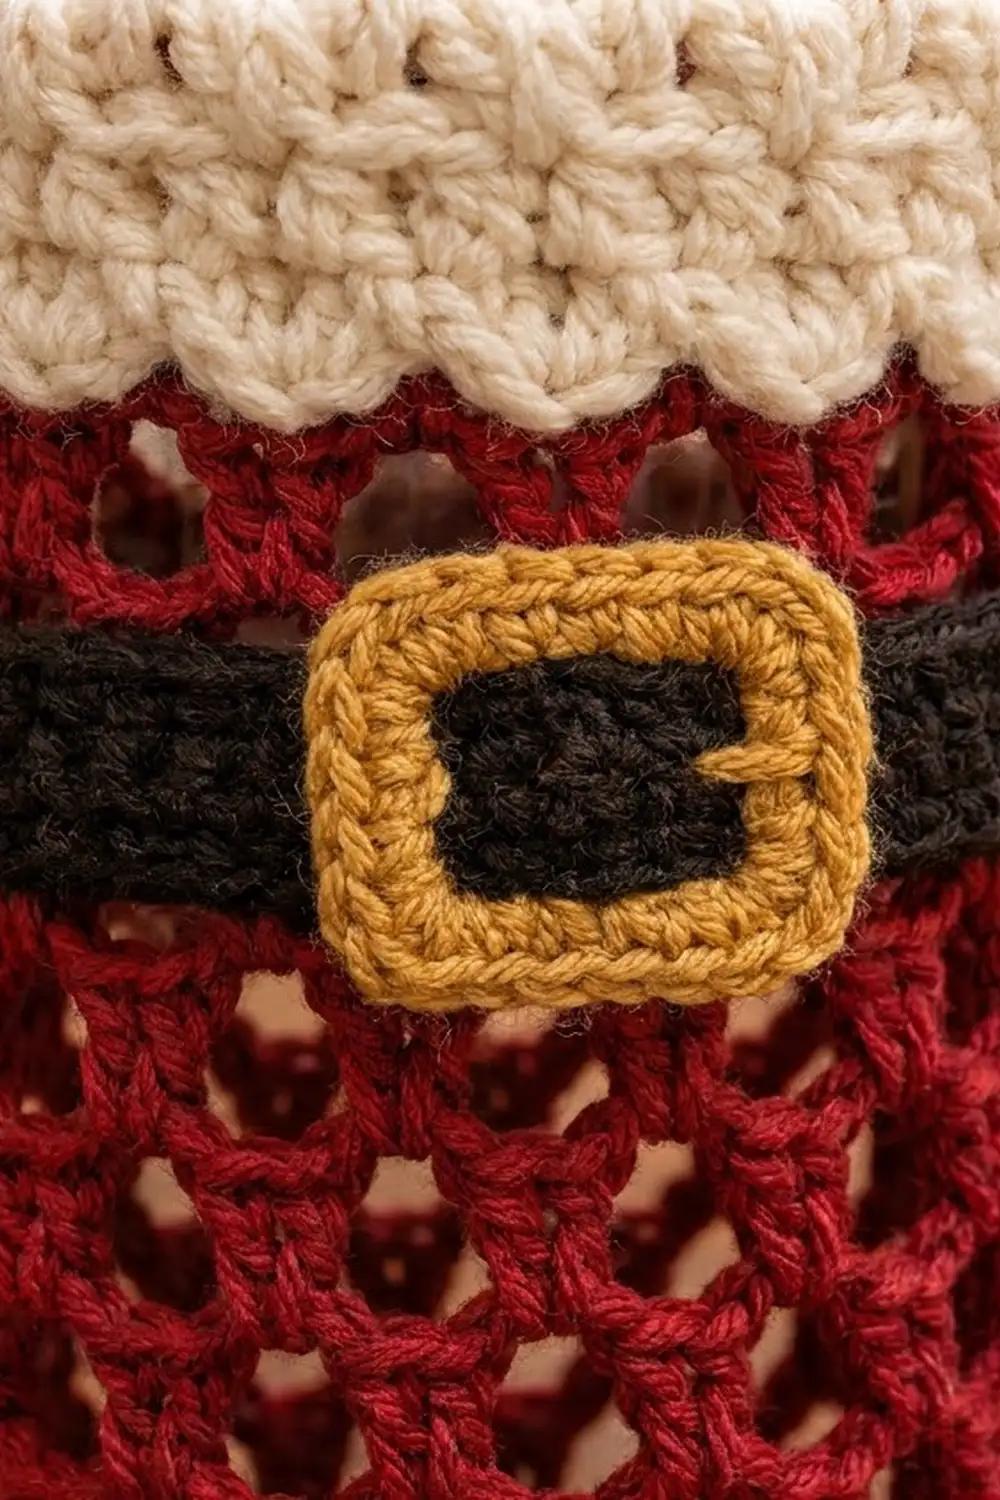
The colors are classic: deep cranberry red for the boot, ivory cream for the cuff, black for the belt band and mustard gold for the buckle. For an elf version, swap the red for forest green and change nothing else.
This pattern uses US crochet terms. The finished boot is about 10 in (25.4 cm) tall without the hanging loop, 4.5 in (11.4 cm) wide across the leg when flat, and about 5.5 in (14.0 cm) long at the sole.
Construction is simple. You start at the sole by working around a chain ring, which leaves the dispensing opening. You then build up the sides of the foot and shape the toe with decreases. The mesh leg comes next, followed by one solid round. The cream cuff is worked on top as the border, and a scallop trim is added along its lower edge. Last, you sew on a black belt, a gold buckle and a red strap.
Finished Size and Construction
- Finished size: about 10 in (25.4 cm) tall × 4.5 in (11.4 cm) wide at the leg, laid flat
- Skill level: Easy / Advanced beginner
- Terminology: US
- Yarn weight: Worsted (medium #4)
- Hook: 4.0 mm (G-6)
- Number of pieces: 1 boot body plus 3 small pieces sewn on (belt, buckle, strap)
- Layout: one piece worked in the round, with no grid and no joining
- Piece size before border: about 8.2 in (20.8 cm) tall, 9 in (22.9 cm) around the leg
- Border (cuff) depth: about 1.75 in (4.4 cm)
- Hanging loop: about 2.75 in (7.0 cm) tall
Materials
Yarn: Use worsted-weight cotton or a cotton blend, roughly 95 m per 50 g. Cotton holds the boot’s shape and the mesh holes stay open. Acrylic also works, but the mesh will stretch more.
- Cranberry red (MC): 70 g / 133 m
- Cream (CC1): 15 g / 29 m
- Black (CC2): 5 g / 10 m
- Mustard gold (CC3): 3 g / 6 m
These amounts include a margin of about 15%.
Tools:
– 4.0 mm (G-6) crochet hook
– Tapestry needle
– 2 locking stitch markers
– Scissors
– Measuring tape
– Rust-proof pins and a spray bottle for blocking
Abbreviations (US Terms)
- ch – chain
- sl st – slip stitch
- sc – single crochet
- hdc – half double crochet
- dc – double crochet
- sc2tog – single crochet 2 together
- BLO / FLO – back loop only / front loop only
- sp(s) – space(s)
- st(s) – stitch(es)
- MC, CC1, CC2, CC3 – main color and contrast colors
Special stitch – griddle pattern: Alternate sc and dc. On the next round, work a dc into each sc and an sc into each dc. This makes the bumpy texture on the cuff.
Gauge and Checkpoints
Gauge: 16 sc and 18 rounds = 4 in (10.2 cm) in sc with a 4.0 mm hook.
Before you start the boot, work the sole (Rounds 1–5) as your gauge test. It is small, and you will keep it if it measures correctly.
Checkpoints:
– After Round 5 (sole): about 5.5 in × 3 in (14.0 × 7.6 cm), with 13.5 in (34.3 cm) around the edge. The center opening is about 2.5 in (6.4 cm) long.
– After Round 16 (foot): the foot sides are about 2.4 in (6.1 cm) tall. The ankle measures 9 in (22.9 cm) around.
– After Round 30 (mesh leg): the mesh measures about 5.6 in (14.2 cm) from Round 17. Each mesh round adds about 0.4 in (1.0 cm).
– After cuff Round 6: the body is about 10 in (25.4 cm) tall in total.
If your sole is too big, go down to a 3.75 mm (F-5) hook. If it is too small, go up to a 4.5 mm (7) hook. Do not change stitch counts to fix size. The decreases and the mesh repeat depend on them.
Pattern
Sole
With MC, ch 24 and sl st into the first ch to form a ring, making sure the chain is not twisted. This ring becomes the dispensing opening.
Round 1: Ch 1 (does not count as a stitch here or in later rounds). Sc in each of the next 9 ch, 2 sc in each of the next 3 ch; repeat from * once more. Join with a sl st to the first sc. (30 sts)
Round 2: Ch 1. Sc in each of the next 9 sts, [sc in next st, 2 sc in next st] 3 times; repeat from * once more. Join. (36 sts)
Round 3: Ch 1. Sc in each of the next 9 sts, [sc in each of next 2 sts, 2 sc in next st] 3 times; repeat from * once more. Join. (42 sts)
Round 4: Ch 1. Sc in each of the next 9 sts, [sc in each of next 3 sts, 2 sc in next st] 3 times; repeat from * once more. Join. (48 sts)
Round 5: Ch 1. Sc in each of the next 9 sts, [sc in each of next 4 sts, 2 sc in next st] 3 times; repeat from * once more. Join. (54 sts)
Your sole now has four sections, in this order from the start of the round:
- Side 1: sts 1–9
- Heel end: sts 10–27
- Side 2: sts 28–36
- Toe end: sts 37–54
Put a marker in st 37 to mark the start of the toe.
Foot
Round 6: Ch 1, sc in BLO of each st around. Join. (54 sts) Working in the back loops makes the edge turn up and form the sides of the foot.
Rounds 7–12: Ch 1, sc in each st around. Join. (54 sts)
Round 13: Ch 1, sc in each of the next 36 sts, [sc in next st, sc2tog] 6 times. Join. (48 sts: 36 + 12)
Round 14: Ch 1, sc in each of the next 36 sts, sc2tog 6 times. Join. (42 sts: 36 + 6)
Round 15: Ch 1, sc in each of the next 30 sts, sc2tog 6 times. Join. (36 sts: 30 + 6) These last decreases use the final 6 sts of Side 2 and the 6 remaining toe sts. This pulls the toe in and up into a rounded instep, while the heel end stays straight and upright.
Round 16: Ch 1, sc in each st around. Join. (36 sts)
Check that the ankle measures 9 in (22.9 cm) around.
Mesh Leg
Round 17: Ch 1, sc in the first st. Ch 3, skip 1 st, sc in next st; repeat from * until 2 sts remain. Ch 3, skip the last st, and join with a sl st to the first sc. (18 ch-3 sps)
Round 18: Sl st into the first ch-3 sp, ch 1, sc in the same sp. Ch 3, sc in next ch-3 sp; repeat from * around. Ch 3 and join to the first sc. (18 ch-3 sps)
Rounds 19–30: Repeat Round 18. (18 ch-3 sps each round)
Each sc sits in the middle of a loop from the round below, so the loops line up into the diamond mesh. You will have 14 mesh rounds, about 5.6 in (14.2 cm) tall.
Round 31 (conversion round): Sl st into the first ch-3 sp, ch 1, 2 sc in each ch-3 sp around. Join. (36 sts = 18 sps × 2) Fasten off MC.
This solid round firms up the top of the leg and gets you back to 36 sts for the cuff.
Border: Cream Cuff
Border gauge: The griddle pattern works to about 16 sts per 4 in (10.2 cm), the same as sc, so it lies smoothly on top of the leg. For the counts below, think of each round as two halves, front and back, as the boot lies flat.
Cuff Round 1: Join CC1 in BLO of any st of Round 31. Ch 1. Working in BLO, sc in each of the next 5 sts, 2 sc in next st; repeat from * 5 more times. Join. (42 sts = 36 worked one in each st + 6 extra; 21 per half)
Keep the free front loops of Round 31. You will use them for the scallop trim.
Cuff Round 2: Ch 1. Sc in next st, dc in next st; repeat from * around. Join. (42 sts; 21 per half)
Cuff Round 3: Ch 2 (does not count). Dc in next sc, sc in next dc; repeat from * around. Join. (42 sts; 21 per half)
Cuff Rounds 4–5: Repeat Rounds 2 and 3. (42 sts; 21 per half)
Cuff Round 6: Ch 1, sc in each st around. Join. (42 sts; 21 per half) Fasten off.
Scallop trim: Turn the boot upside down. Join CC1 with a sl st in any free front loop of Round 31; this sl st is the first one of the round. 3 hdc in next free loop, sl st in next free loop. Repeat from * around. End with 3 hdc in the last loop, then join to the first sl st. (18 scallops = 18 sl sts + 54 hdc; 9 scallops per half) Fasten off.
Why the math works: Round 31 has 36 sts, or 18 per half. The 6 increases in Cuff Round 1 add 3 per half, so each half has 21 sts. That makes the cuff about 0.75 in (1.9 cm) wider around than the leg, so it flares slightly like a fur trim. Griddle pattern has a 2-st repeat, and 42 divides evenly into 21 repeats, so the texture lines up all the way around. The scallops use 1 free loop for each sl st and 1 for each 3-hdc group, so 36 loops give exactly 18 scallops. The cuff, including its edging, is about 1.75 in (4.4 cm) deep.
Belt (CC2)
Ch 37.
Row 1: Sc in the 2nd ch from the hook and in each ch across. (36 sts)
Rows 2–3: Ch 1, turn, sc in each st across. (36 sts)
Fasten off and leave a long tail. The strip measures 9 in × 0.7 in (22.9 × 1.8 cm).
Buckle (CC3)
Ch 14 and sl st into the first ch to form a ring, making sure it is not twisted.
Round 1: Ch 1. 3 sc in next ch, sc in each of the next 3 ch, 3 sc in next ch, sc in each of the next 2 ch; repeat from * once more. Join. (22 sts)
Fasten off and leave a long tail. The buckle is a rectangular frame about 1.3 in × 1 in (3.3 × 2.5 cm).
Strap (MC)
Ch 5.
Row 1: Sc in the 2nd ch from the hook and in each ch across. (4 sts)
Rows 2–32: Ch 1, turn, sc in each st across. (4 sts)
Fasten off. The strap measures 7 in × 1 in (17.8 × 2.5 cm).
Assembly
- Wrap the belt around the ankle over mesh Rounds 17–18, with the short ends meeting at the back. Sew the ends together. Then whipstitch the top and bottom edges of the belt to the mesh.
- Center the buckle on the front of the belt. Sew around both the outer and inner edges of the frame so the black belt shows through the middle.
- Fold the strap into a U shape. On the inside back of the cuff, place each end so it overlaps the cuff by 0.75 in (1.9 cm), with the two ends 1 in (2.5 cm) apart. Sew each end down securely. This gives a hanging loop about 2.75 in (7.0 cm) tall.
- Weave in all ends on the inside.
Final Blocking
- Lightly mist the boot until it is damp but not wet.
- Fill the boot with a rolled towel or plastic bags so the mesh opens into even diamonds.
- Lay it flat and shape the leg to 4.5 in (11.4 cm) wide and the cuff to about 5.25 in (13.3 cm) wide.
- Pin the scallops so they point downward. Push the toe gently into a rounded shape.
- Let it dry completely, then remove the filling.
Final Quality-Control Checklist
- Sole is 5.5 × 3 in (14.0 × 7.6 cm) and the opening stays clear
- Ankle has 36 sts and measures 9 in (22.9 cm) around
- Leg has 18 even mesh loops in every round, with no twisting
- Body is about 10 in (25.4 cm) tall
- Cuff has 42 sts, and the trim has 18 scallops
- Belt sits level and the buckle is centered on the front
- Strap ends are secure enough to hold a full load of bags
- All ends are woven in on the inside
Troubleshooting
- Sole cups upward: Your tension is too tight. Go up a hook size, or loosen up on the increase rounds.
- Sole ripples: Your tension is too loose. Go down a hook size.
- Mesh spirals: Make sure every sc goes into a ch-3 sp, never into a sc. Join each round in the first sc.
- Leg flares: Change the ch-3 loops to ch-2 loops. The stitch counts stay the same.
- Bags fall out of the sole: Work one extra sc round around the inside of the starting chain ring to make the opening smaller.
- Strap stretches: Sew the strap ends through both the cuff and Round 31.
Care
Hand wash in cool water and lay flat to dry. Reshape while damp, and don’t put it in the dryer.

Final Notes
Here is the measurement chain:
- Sole of 54 sts: 5.5 × 3 in (14.0 × 7.6 cm)
- Toe shaping to 36 sts: ankle of 9 in (22.9 cm)
- 14 mesh rounds: 5.6 in (14.2 cm)
- Round 31 back to 36 sts, then a 42-st cuff: 1.75 in (4.4 cm)
- Finished boot: about 10 in (25.4 cm) tall, plus a 2.75 in (7.0 cm) loop
If your sole matches at Round 5, every later checkpoint should follow. Make one in red for Santa and one in green for an elf.
Happy crocheting!