

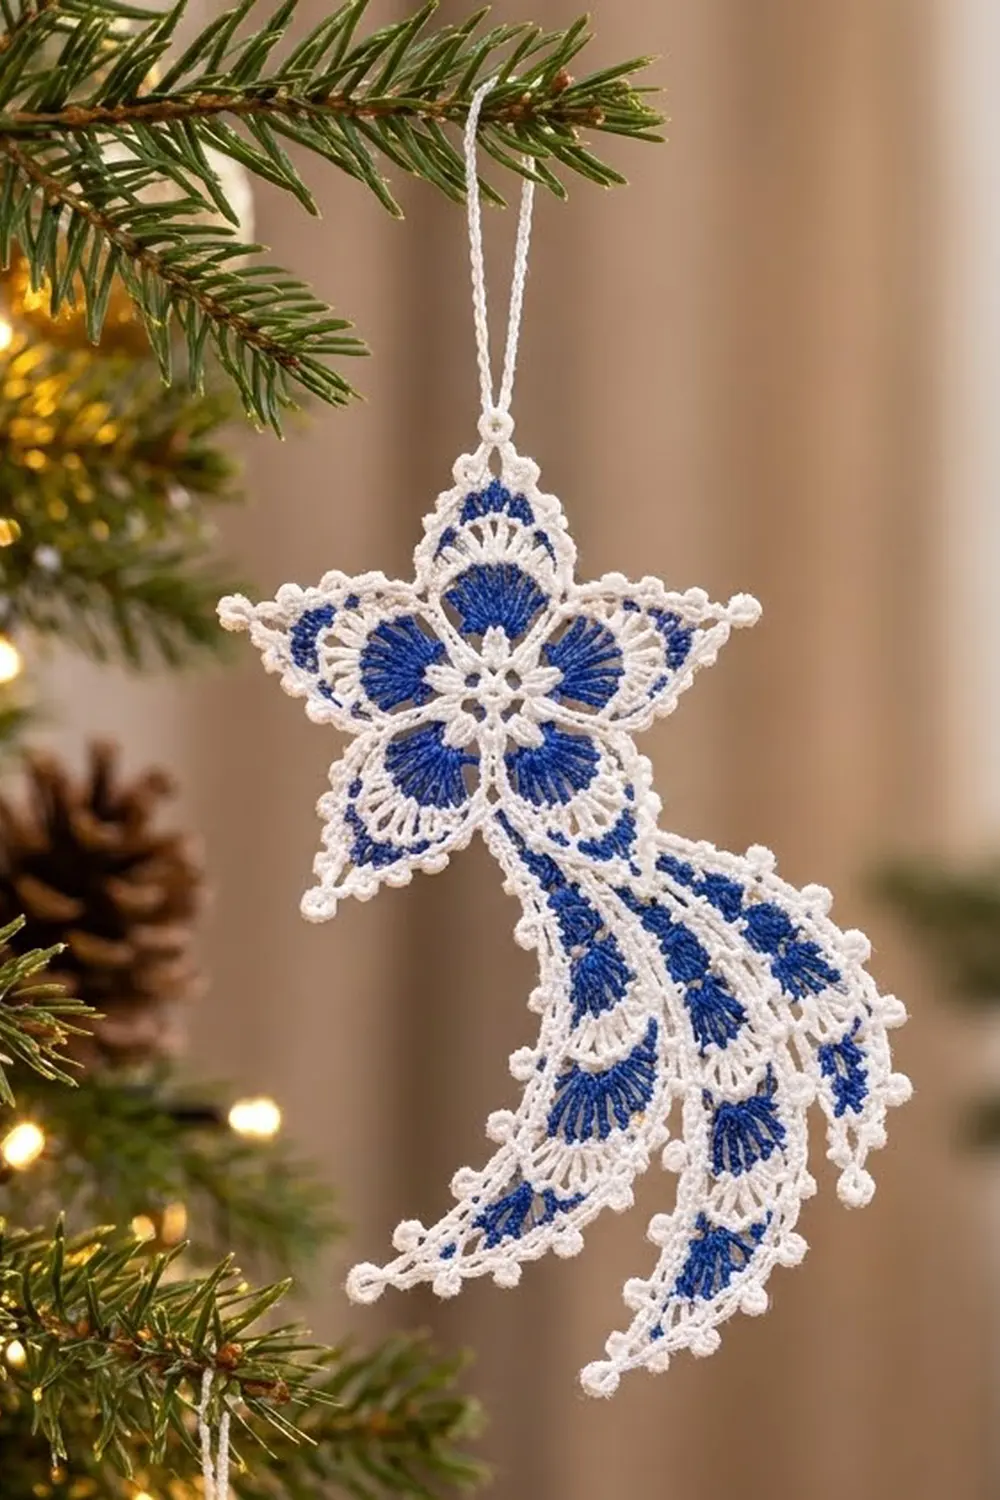
The Sapphire Comet Star is a lacy shooting-star ornament in crisp white and deep cobalt blue. A five-pointed star sits at the top. Its flower center is surrounded by blue fans, and each point ends in a tiny picot. Three curved plumes sweep away from one side to form the comet’s tail.
The two-color look is clean and wintry, a bit like blue-and-white porcelain. It looks best in size 10 cotton thread, which keeps the stitches sharp and the openwork clear. It is a lovely heirloom piece for the tree or a gift tag.
This pattern uses US crochet terms. The finished star measures about 3.5 in (8.9 cm) from point to point. The full ornament is about 6.5 in (16.5 cm) long from the top point to the tip of the longest plume, not counting the hanging loop, and about 4 in (10.2 cm) wide.
You work the star in the round, from the center outward, in eight rounds. Next, you make three plumes in short rows, each built on a foundation chain. Then you sew the plumes into one valley of the star and shape everything during blocking.
Finished Size and Construction
- Finished size: star 3.5 in (8.9 cm) point to point; full ornament about 6.5 x 4 in (16.5 x 10.2 cm)
- Skill level: Intermediate (thread crochet)
- Terminology: US
- Yarn weight: Size 10 cotton crochet thread (Lace, weight 0)
- Hook: 1.75 mm (US steel 6)
- Number of pieces: 1 finished ornament (1 star + 3 plumes, sewn together)
- Layout: single ornament, so there is no grid
- Star size before border (after Round 7): 3.25 in (8.3 cm)
- Border depth (Round 8): about 0.125 in (0.3 cm) per side
- Plume lengths: about 3 in (7.6 cm), 2.5 in (6.4 cm), and 2 in (5.1 cm)
- Hanging loop: about 1.5 in (3.8 cm) tall
Materials
Thread: Use a mercerized size 10 cotton. Mercerized cotton holds starch well and shows the picots clearly. Avoid fuzzy or very soft threads, because the lace will blur.
- Color A, White: 8 g, about 23 m
- Color B, Cobalt Blue: 4 g, about 11 m
These quantities include a margin for swatching and sewing tails.
Tools:
– 1.75 mm (US steel 6) crochet hook
– Fine tapestry needle
– Scissors
– Blocking board or foam mat
– Rustproof pins
– Fabric stiffener or spray starch
– Removable stitch marker
Abbreviations (US Terms)
- ch – chain
- sl st – slip stitch
- sc – single crochet
- hdc – half double crochet
- dc – double crochet
- tr – treble crochet
- BPsc – back post single crochet: insert the hook from back to front to back around the post of the stitch, then complete an sc
- sk – skip
- sp – space
- st(s) – stitch(es)
- RS – right side
- WS – wrong side
Special stitch – Picot (p): ch 3, sl st in the 3rd ch from the hook. The picot does not count as a stitch.
Gauge and Checkpoints
Gauge: 10 sc = 1 in (2.5 cm) with size 10 thread and a 1.75 mm hook.
Make the star first, before you start any plume. It is the best gauge test. Check its size at each of these stages:
- After Round 1: ring about 0.5 in (1.3 cm) across
- After Round 3: flower about 1.25 in (3.2 cm) across
- After Round 5: fans about 2.25 in (5.7 cm) across
- After Round 6: about 2.5 in (6.4 cm) across
- After Round 7: 3.25 in (8.3 cm) point to point
- After Round 8: 3.5 in (8.9 cm) point to point
If the star after Round 7 is more than 0.25 in (0.6 cm) too big, change to a 1.5 mm hook. If it is too small, change to a 2.0 mm hook. Make the plumes with the same hook as the star so the tail stays in proportion.
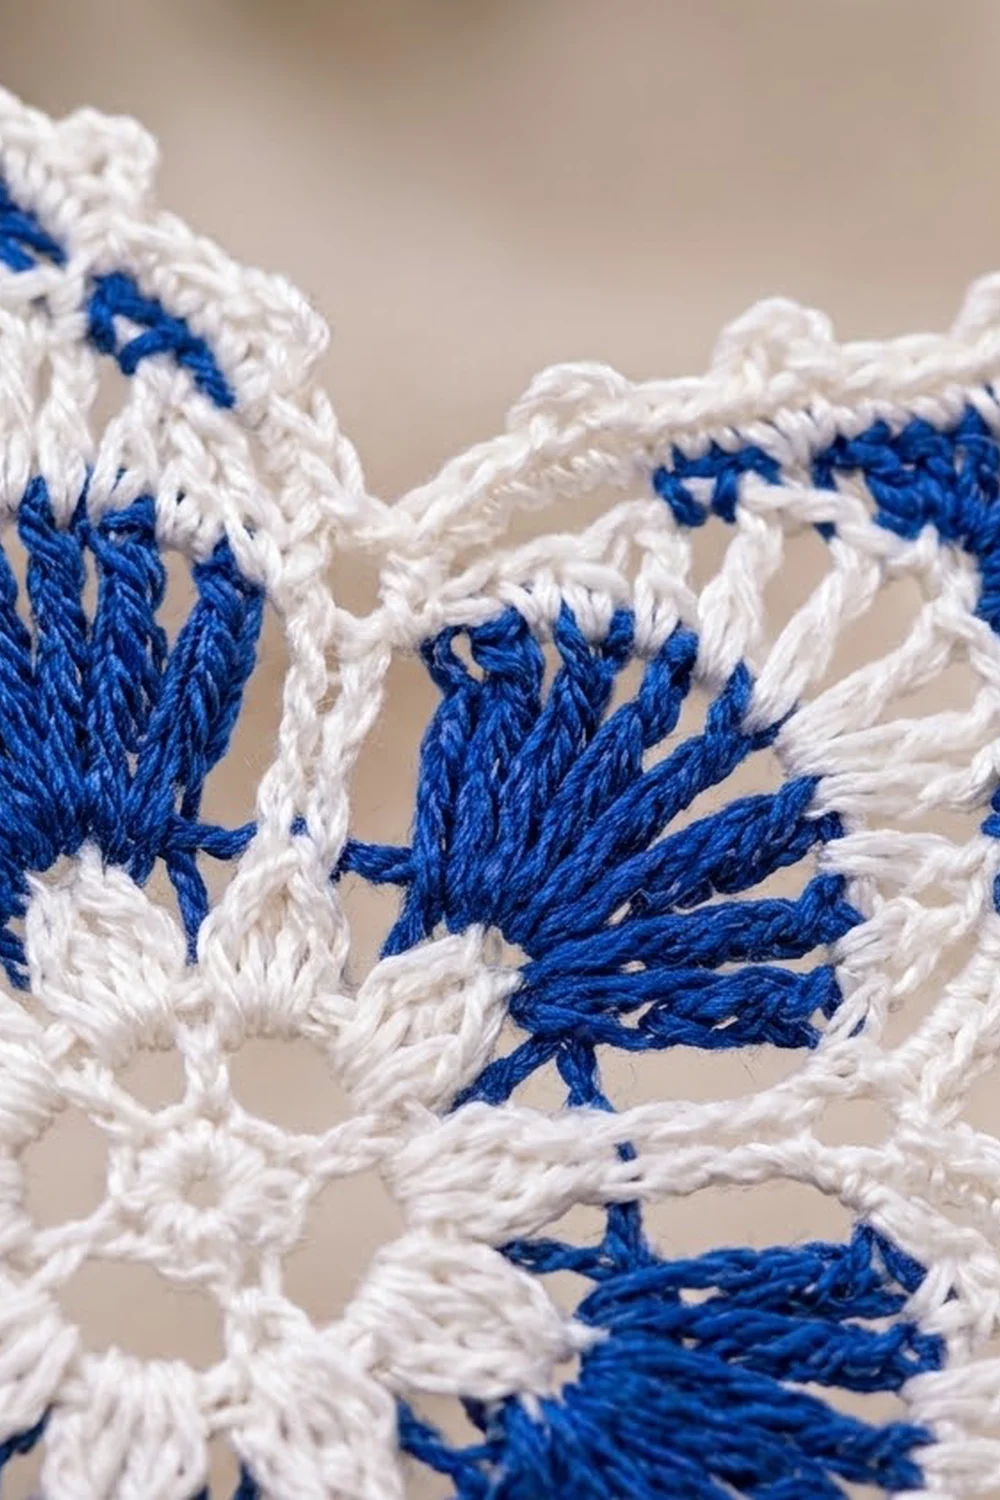
Star
Round 1 (White, ring)
With A, ch 5 and sl st to the first ch to form a ring.
Round 1: Ch 1, work 15 sc in the ring. Join with a sl st to the first sc. (15 sc)
Round 2 (White, petal loops)
Round 2: Ch 1, sc in the next sc, ch 4, sk 2 sc. Repeat from * 4 more times. Join with a sl st to the first sc. (5 sc, 5 ch-4 loops)
Round 3 (White, flower petals)
Round 3: Sl st into the first ch-4 loop. Work (sc, hdc, 3 dc, hdc, sc) in each ch-4 loop around. Join with a sl st to the first sc. (35 sts: 5 petals of 7 sts)
Fasten off A. The rounded white flower is now complete.
Round 4 (Blue, loops behind the petals)
Fold the petals toward you so you can see the Round 2 sc behind them.
Round 4: Join B with a BPsc around any Round 2 sc. Ch 5, BPsc around the next Round 2 sc, ch 5. Repeat from * 3 more times. Join with a sl st to the first BPsc. (5 BPsc, 5 ch-5 loops)
These loops sit behind the petals. That placement is what makes the blue fans look layered under the white flower.
Round 5 (Blue, fans)
Round 5: Sl st into the first ch-5 loop. Ch 3 (counts as dc) and work 10 dc in the same loop. Then work 11 dc in each of the next 4 loops. Join with a sl st to the top of the beginning ch-3. (55 dc: 5 fans of 11 dc)
Fasten off B. Each fan lines up with the gap between two petals and points out into a future star arm.
Round 6 (White, openwork arches)
Round 6: Join A with an sc in the first dc of any fan. (Ch 3, sk 1 dc, sc in the next dc) 5 times, so you have sc in dc 1, 3, 5, 7, 9, and 11. Ch 1, then sc in the first dc of the next fan. Repeat from * around. Replace the final sc with a sl st to the first sc. (30 sc, 25 ch-3 sps, 5 ch-1 sps)
Round 7 (White, star points)
Work this round only into spaces. Skip all the Round 6 sc.
Round 7: Sl st into the first ch-3 sp of any fan. *Work these five spaces and the ch-1 sp as follows:
– sp 1: (sc, hdc)
– sp 2: 3 dc
– sp 3: (2 tr, ch 3, 2 tr), which is the point
– sp 4: 3 dc
– sp 5: (hdc, sc)
– ch-1 sp: sc, which is the valley
Repeat from * around and join with a sl st to the first sc.
Count: 15 sts per point. (75 sts and 5 ch-3 tip sps)
The stitch heights rise from sc to tr and then drop back down. That change in height is what builds the sharp star points. Your star should now measure 3.25 in (8.3 cm) point to point.
Plumes (Make 3)
Each plume uses one stitch count per length, written as [long / medium / short]. All three plumes follow the same steps.
Foundation and Row 1 (White)
With A, ch [32 / 26 / 20].
Row 1 (RS): Sc in the 2nd ch from the hook and in each ch across. [31 / 25 / 19 sc]
Fasten off A.
The count of 31, 25, or 19 follows the formula 6k + 1, where k is the number of fans: 5, 4, or 3.
Row 2 (Blue, fans)
Keep the RS facing you. Do not turn.
Row 2: Join B with an sc in the first sc of Row 1. Sk 2 sc, 7 dc in the next sc, sk 2 sc, sc in the next sc. Repeat from * [5 / 4 / 3] times in total. [5 / 4 / 3 fans; 6 / 5 / 4 sc + 35 / 28 / 21 dc = 41 / 33 / 25 sts]
Fasten off B.
Each repeat uses 6 Row 1 sc. That is why k repeats plus 1 closing sc uses exactly 6k + 1 stitches.
Base end
Leave the starting end of each plume unfinished for now. It becomes the base that you sew to the star. When you start the plume edging (in the Border section), leave an 8 in (20.3 cm) tail of A at this end.
Border
The border is Round 8 on the star and one edging round on each plume. Both use sc worked 1 per stitch, so the counts follow directly from the round underneath.
Border gauge: 10 sc = 1 in (2.5 cm). This adds about 0.125 in (0.3 cm) to each edge.
Star Round 8 (White, picot edge)
Round 8: Ch 1. *Work these steps for one point:
1. Sc in the first 2 sts (sc, hdc), p.
2. Sc in the next 3 dc, p.
3. Sc in the next 2 tr.
4. Work (2 sc, p, 2 sc) in the ch-3 tip sp.
5. Sc in the next 2 tr, p.
6. Sc in the next 3 dc, p.
7. Sc in the next 2 sts (hdc, sc).
8. Sc in the valley sc.
Repeat from * around and join with a sl st to the first sc.
Count per point: 7 sc + 4 tip sc + 7 sc + 1 valley sc = 19 sc, and 5 picots.
Hanging loop: At the point you choose as the top, replace the tip picot with ch 30. Sl st into the last sc made, then work the remaining 2 sc of that tip.
Total: 95 sc, 24 picots, and 1 hanging loop.
Why the math works: Round 7 has 15 stitches per point. Round 8 works 1 sc into each of those 15 stitches and adds 4 sc in the tip space, giving 15 + 4 = 19 per point. Then 19 x 5 = 95. Fasten off and weave in the ends.
Plume Edging Round (White)
Edging: With the RS facing, join A with an sc in the first sc of Row 2. Leave the 8 in (20.3 cm) tail here.
Along the fans: Sc in the next 2 dc, p, sc in the next 3 dc, p, sc in the next 2 dc, sc in the next sc. Repeat from * across.
This side has [41 / 33 / 25 sc and 10 / 8 / 6 p]. That is 1 sc in every Row 2 stitch: 1 + 8 per fan.
Tip: Ch 4 and sl st in the 4th ch from the hook. This forms a pointed tip picot.
Inner edge: Rotate the plume and work along the remaining loops of the foundation chain. Sc in each loop, adding a picot after every 6th sc. This gives [31 / 25 / 19 sc and 5 / 4 / 3 p]. Sl st to the first sc of the edging.
Fasten off, leaving the base tail. Each plume should measure about [3 in (7.6 cm) / 2.5 in (6.4 cm) / 2 in (5.1 cm)] long and about 0.75 in (1.9 cm) wide.
Assembling the Tail
- Lay the star RS up with the hanging loop at the top. Find the valley between the right point and the lower-right point.
- Stack the plumes at that valley. Put the long plume on the outside, the medium plume in the middle, and the short plume on the inside. Their base ends should overlap the back of the star by about 0.25 in (0.6 cm).
- Using the base tails, whipstitch each plume base to the WS of Rounds 7–8 at the valley. Keep the stitches invisible from the front.
- Curve all three plumes downward and toward the left so the blue fans face the outside of the curve.
- Where neighboring plumes touch, tack them together in 1–2 places with a few stitches of A. This holds the sweep in place.
Weave in all ends along the matching colors.
Final Blocking
- Soak the ornament in a fabric stiffener solution, or wet it and starch it later.
- Press it gently in a towel. Do not wring it.
- Pin the star RS up on the board. Pin each point 1.75 in (4.4 cm) from the center, which gives 3.5 in (8.9 cm) point to point.
- Pin each valley so it lies slightly inward from the points.
- Shape the plumes into a smooth crescent. The long plume tip should end about 6.5 in (16.5 cm) from the top point.
- Pin out every picot with a pin tip or a fingertip.
- Spray with starch if you did not use stiffener, and let the piece dry completely.
- Unpin and check that the piece lies flat.
Final Quality-Control Checklist
- The star measures 3.5 in (8.9 cm) point to point.
- All 5 blue fans are visible behind the white petals.
- Each point has 19 sc and 5 picots, and one point has the hanging loop instead of a tip picot.
- The valleys are even and all 5 points are the same size.
- The plumes have 5, 4, and 3 fans, and each has a pointed tip picot.
- The tail comes from a single valley, and the plume bases do not show from the front.
- The full length is about 6.5 in (16.5 cm).
- All ends are hidden and trimmed.
Troubleshooting
- The fans hide behind the petals. Your Round 4 chains are too short or too tight. Work them with ch 6.
- The star cups or ruffles. Round 7 is too tight or too loose. Change the hook size and rework the round.
- The points look rounded. Pull the ch-3 tip snug, and pin the points sharply when blocking.
- The plume twists. Row 2 was worked from the WS. Always keep the RS facing.
- The plume is too long. Your foundation chain is loose. Make the chain with a hook one size smaller.
- The tail droops. Use more stiffener, and add a second tack between the plumes.
Care
Hand wash in cool water with mild soap and press dry in a towel. Re-block and re-starch as needed, and store flat in tissue.
Final Notes
The measurement chain is:
– 0.5 in (1.3 cm) ring
– 1.25 in (3.2 cm) flower
– 2.25 in (5.7 cm) fans
– 3.25 in (8.3 cm) after Round 7
– 3.5 in (8.9 cm) star after the border
– plumes of 3 in (7.6 cm), 2.5 in (6.4 cm), and 2 in (5.1 cm)
– a finished comet of about 6.5 x 4 in (16.5 x 10.2 cm)
Check each stage as you go, and your comet will block out crisp and balanced.
Happy crocheting!