

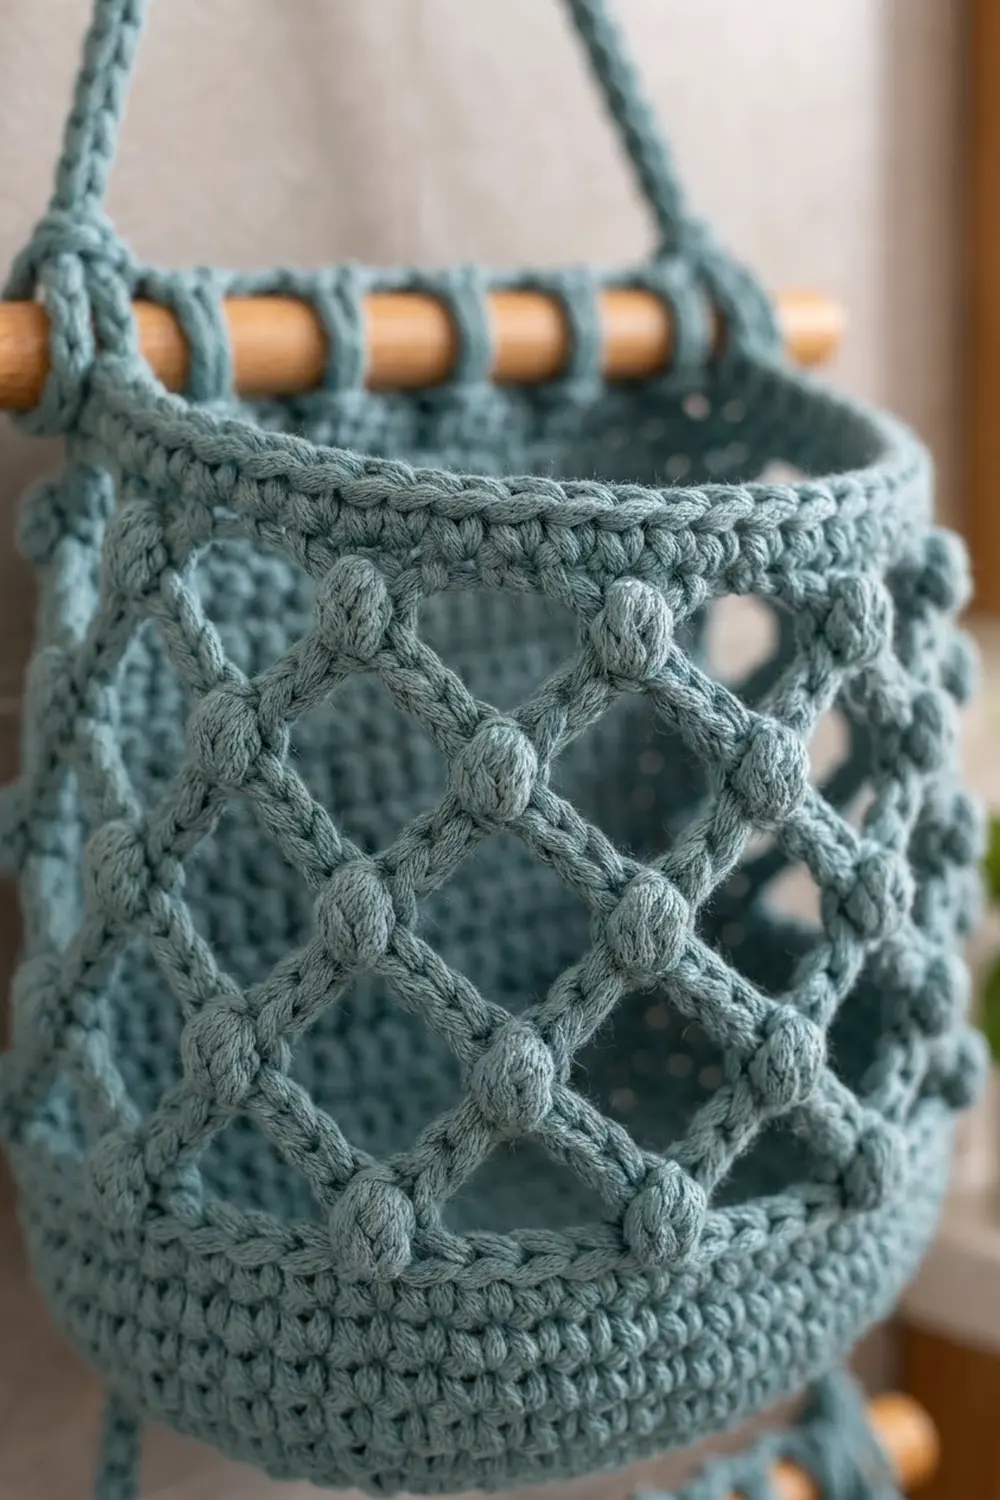
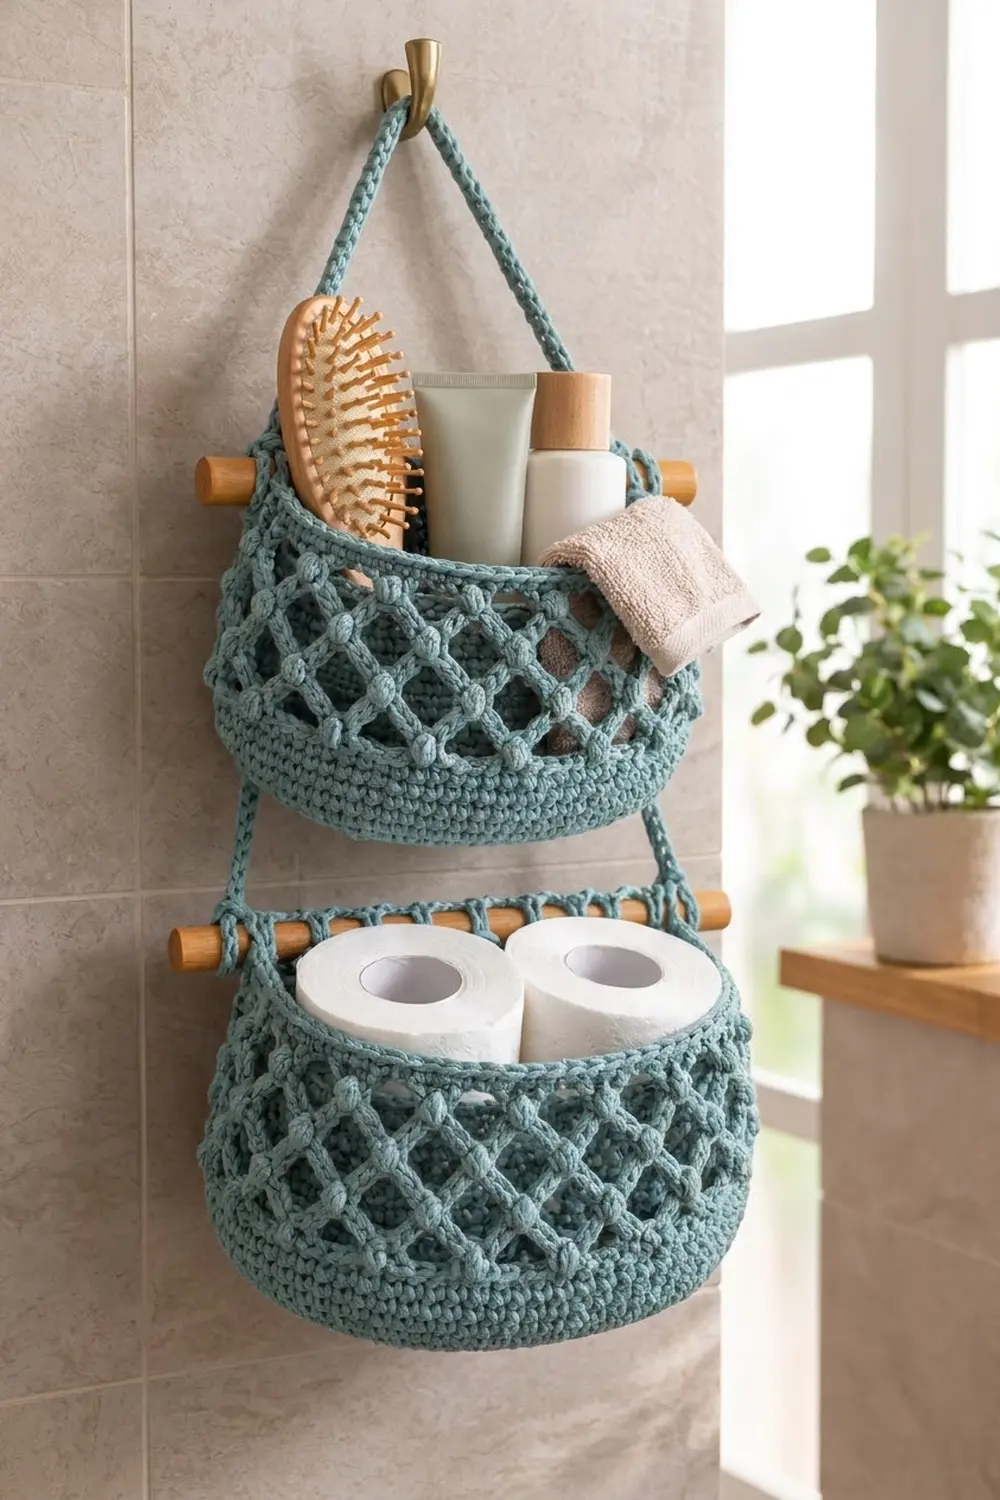
This two-tier hanging organizer gets bathroom clutter off the counter and onto the wall. It has two oval baskets in a soft dusty teal. Each one has a solid base and lower wall, an open diamond lattice with a round bobble at every crossing, and a firm rim with a corded edge.
A wooden dowel slides through each rim to hold the basket open and level. Crocheted slip-stitch cords link the two tiers and form the hanging triangle at the top. The upper basket suits bottles, tubes and a brush. The lower basket holds two standard toilet paper rolls.
The pattern uses US crochet terms. The finished upper basket is about 9.5 in (24.1 cm) wide, 3.75 in (9.5 cm) deep and 6 in (15.2 cm) tall. The lower basket is about 11.5 in (29.2 cm) wide, 4.75 in (12.1 cm) deep and 7.25 in (18.4 cm) tall. The whole organizer hangs about 23 in (58.4 cm) from the hook to the bottom of the lower basket.
Each basket is worked in continuous joined rounds from an oval base up to the rim. You make three cords separately, then assemble everything with the dowels. There is no sewing between the baskets themselves.
Finished Size and Construction
- Finished size (assembled): about 23 in (58.4 cm) tall, hanging
- Upper basket: 9.5 in × 3.75 in × 6 in (24.1 × 9.5 × 15.2 cm)
- Lower basket: 11.5 in × 4.75 in × 7.25 in (29.2 × 12.1 × 18.4 cm)
- Skill level: Intermediate
- Terminology: US
- Yarn weight: Bulky (#5) cotton or cotton-blend cord
- Hook: 5.0 mm (H-8)
- Number of pieces: 5 crocheted (2 baskets, 1 top cord, 2 side cords) plus 2 dowels
- Layout: vertical stack, with the upper basket hanging above the lower basket
- Base size before the walls: upper 9.5 × 3.75 in (24.1 × 9.5 cm); lower 11.5 × 4.75 in (29.2 × 12.1 cm)
- Rim (“border”) depth: 5 rounds, about 1.4 in (3.6 cm)
Materials
Yarn: Use a smooth, firm bulky cotton, about 120 m per 100 g. Cotton holds its shape and makes crisp bobbles. Avoid fuzzy or very stretchy yarns, because the baskets will sag under weight.
- Dusty teal: 500 g total (about 600 m)
- Lower basket: 250 g (300 m)
- Upper basket: 190 g (228 m)
- Cords: 60 g (72 m)
These quantities include a margin of about 10% for swatching and frogging.
Tools:
– 5.0 mm (H-8) crochet hook
– 2 wooden dowels, 5/8 in (1.6 cm) diameter: one 15 in (38.1 cm) long, one 13 in (33.0 cm) long
– 4 locking stitch markers
– Tapestry needle
– Scissors and a measuring tape
– Fine sandpaper for the dowel ends (optional)
Abbreviations (US Terms)
- ch – chain
- sc – single crochet
- sl st – slip stitch
- dc – double crochet
- BLO – back loop only
- sk – skip
- sp – space
- st(s) – stitch(es)
- rev sc – reverse single crochet (crab stitch)
- rep – repeat
Special stitches
- Bobble (bo): [Yarn over, insert hook in the indicated space, yarn over, pull up a loop, yarn over, pull through 2 loops] 4 times, then yarn over and pull through all 5 loops on the hook.
- Beginning bobble (beg bo): Ch 2, then [yarn over, insert hook in the space, yarn over, pull up a loop, yarn over, pull through 2 loops] 3 times, then yarn over and pull through all 4 loops.
- Reverse sc (rev sc): Working from left to right (right-handed), insert hook in the next stitch to the right, pull up a loop, yarn over, pull through both loops.
Gauge and Checkpoints
Gauge: 13 sc and 14 rounds = 4 in (10.2 cm) in sc worked in the round.
Lattice depth: each lattice round adds about 0.6 in (1.5 cm) of height.
Make the upper basket base first and treat it as your test piece. Measure at these points:
- Upper base after Rnd 6: 9.5 × 3.75 in (24.1 × 9.5 cm), 76 sts.
- Lower base after Rnd 8: 11.5 × 4.75 in (29.2 × 12.1 cm), 92 sts.
- Solid wall: upper 1.75 in (4.4 cm) after 6 rounds; lower 2.25 in (5.7 cm) after 8 rounds.
- Lattice section: upper about 3 in (7.6 cm); lower about 3.5 in (8.9 cm).
- Rim: 1.4 in (3.6 cm) for both baskets.
If your base is too big (more than 0.25 in / 0.6 cm over), go down a hook size. A loose base will bulge outward and sag. If it’s too small, go up a hook size. A small base won’t fit the rolls, and the dowels will stick out unevenly. If the base ruffles, you’re working too loosely at the ends. If it cups, you’re working too tightly.
Upper Basket
Oval Base
Ch 23.
Rnd 1: Sc in 2nd ch from hook, sc in next 20 ch, 3 sc in last ch. Turn the work to go along the other side of the foundation chain: sc in next 20 ch, 2 sc in the same ch as the first sc. Sl st to the first sc. (46 sts)
The 3 sc at one end and the 1 + 2 sc at the other give you 6 sts on the curves, like the 6 sts that start a flat circle.
From here on, work 3 increases on each curved end every round, so 6 increases per round. Keep the increases evenly spaced and stacked over the curves. The straight sides stay at the same count.
Rnd 2: Ch 1, sc in each st, working 2 sc in each of the 3 sts on each end. Sl st to first sc. (52 sts)
Rnd 3: Ch 1, sc around, working 2 sc in every 2nd st across each curved end (3 increases per end). Join. (58 sts)
Rnd 4: As Rnd 3, with increases every 3rd st on the curves. Join. (64 sts)
Rnd 5: As Rnd 3, with increases every 4th st on the curves. Join. (70 sts)
Rnd 6: As Rnd 3, with increases every 5th st on the curves. Join. (76 sts)
Checkpoint: 9.5 × 3.75 in (24.1 × 9.5 cm).
Solid Wall
Rnd 7: Ch 1, sc in BLO of each st around. Join. (76 sts) This makes the turning ridge where the base meets the wall.
Rnds 8–12: Ch 1, sc in each st around. Join. (76 sts)
Checkpoint: the wall measures 1.75 in (4.4 cm) from the ridge.
Bobble Lattice
Rnd 13 (net set-up): Ch 1, sc in first st, ch 5, sk 3 sts, sc in next st; rep from * 17 more times, ch 5, sk 3 sts, sl st to first sc. (19 sc, 19 ch-5 loops)*
Check: 19 repeats × 4 sts = 76. Every stitch of Rnd 12 is used.
Rnd 14: Sl st into the first ch-5 loop, then work a beg bo in that loop. Ch 5, bo in the next ch-5 loop; rep from * around, ch 5, sl st to the top of the beg bo. (19 bobbles, 19 ch-5 loops)*
Each bobble sits at the center of a loop from the round below. This half-repeat shift is what forms the diamonds, with a bobble at each crossing.
Rnds 15–17: Rep Rnd 14. (19 bobbles, 19 ch-5 loops each round)
That gives 4 rows of bobbles. The ch-5 loops are a little longer than the 4 sts they span, so the lattice bellies outward gently.
Top Rim
Rnd 18 (conversion): Ch 1, sc in the top of each bobble and 3 sc in each ch-5 loop. Join. Count: 19 (1 per bobble) + 57 (3 per loop) = 76 sts.
Rnd 19: Ch 1, sc around. Join. (76 sts)
Flatten the basket so the straight sides lie front and back. Place a marker in the center stitch of each short end. The start of the round must be at least 3 sts away from either marker. If it isn’t, sl st forward 6 sts and start the next round there.
Rnd 20 (dowel openings): Ch 1, sc to 2 sts before the marker, ch 4, sk 4 sts (the marked st is the 3rd one skipped); rep from * once more, sc to end. Join. (68 sc + 2 ch-4 sps)*
Rnd 21: Ch 1, sc in each sc and 4 sc in each ch-4 sp. Join. Count: 68 + 8 = 76 sts. Work loosely over the chains so each opening stays open.
Rnd 22: Ch 1, rev sc in each st around. Join. (76 sts) Fasten off and weave in the ends.
Lower Basket
Oval Base
Ch 25.
Rnd 1: Sc in 2nd ch from hook, sc in next 22 ch, 3 sc in last ch. Working along the other side of the chain: sc in next 22 ch, 2 sc in the same ch as the first sc. Join. (50 sts)
Rnds 2–8: Increase exactly as for the upper basket, with 3 increases on each curved end per round. The space between increases grows by 1 st each round.
– Rnd 2: 56 sts
– Rnd 3: 62 sts
– Rnd 4: 68 sts
– Rnd 5: 74 sts
– Rnd 6: 80 sts
– Rnd 7: 86 sts
– Rnd 8: 92 sts
Checkpoint: 11.5 × 4.75 in (29.2 × 12.1 cm). The 22-st straight section is about 6.75 in (17.1 cm). The curves add the rest.
Solid Wall
Rnd 9: Ch 1, sc in BLO around. Join. (92 sts)
Rnds 10–16: Ch 1, sc around. Join. (92 sts)
Checkpoint: 2.25 in (5.7 cm) from the ridge.
Bobble Lattice
Rnd 17 (net set-up): Ch 1, sc in first st, ch 5, sk 3, sc in next st; rep from * 21 more times, ch 5, sk 3, sl st to first sc. (23 sc, 23 ch-5 loops)* Check: 23 × 4 = 92.
Rnds 18–22: Work as for upper Rnd 14. (23 bobbles, 23 ch-5 loops each round)
That gives 5 rows of bobbles.
Top Rim
Rnd 23 (conversion): Sc in each bobble and 3 sc in each loop. Count: 23 + 69 = 92 sts.
Rnd 24: Sc around. (92 sts) Place the end markers and check the start of the round, as for the upper basket.
Rnd 25: Make the dowel openings as for upper Rnd 20. (84 sc + 2 ch-4 sps)
Rnd 26: Count: 84 + 8 = 92 sts.
Rnd 27: Rev sc around. (92 sts) Fasten off.
Make All Pieces
All pieces use dusty teal:
- 1 upper basket
- 1 lower basket
- 1 top cord
- 2 side cords
Cords
The cords use a slip-stitch-in-back-bump construction, which is firm, round-looking and hardly stretches.
Top cord: Ch 8, sl st in the first ch to form Ring A. Ch 77, then ch 8 more and sl st in the 8th ch from the hook to form Ring B. Work 12 sc in Ring B. Sl st in the back bump of each of the 77 ch. Work 12 sc in Ring A, then sl st to the first sc. Fasten off.
The length between the rings should be about 22 in (55.9 cm).
Side cords (make 2): Work as for the top cord, but with ch 25 between the rings. The length between the rings should be about 7 in (17.8 cm).
Layout Grid
              [ HOOK ]
             /        \
       top cord      top cord
         /                \
 (A)[====== 13 in upper dowel ======](B)
        |   [ UPPER BASKET ]   |
     side cord             side cord
        |                      |
(C)[======= 15 in lower dowel =======](D)
        |   [ LOWER BASKET ]   |
Points A–D are dowel ends. Each one sticks out 1.75 in (4.4 cm) past its basket.
Joining (Assembly)
Method: Sand the dowel ends if needed. Slide the 15 in (38.1 cm) dowel through both openings of the lower basket and center it. It should stick out 1.75 in (4.4 cm) on each side, because 15 − 11.5 = 3.5 in, split between two sides. Do the same with the 13 in (33.0 cm) dowel and the upper basket: 13 − 9.5 = 3.5 in, again 1.75 in per side.
Ring logic: Each dowel end takes the rings in a fixed order.
- Upper dowel ends (A and B): one top-cord ring first, then one side-cord ring, sitting next to each other.
- Lower dowel ends (C and D): the remaining ring of each side cord.
Push every ring up against the basket rim, about 0.5 in (1.3 cm) from the opening. That leaves about 1.25 in (3.2 cm) of dowel bare at each tip.
Tension advice: The rings should slide on snugly, not loosely. If a ring spins freely, tack it to the rim next to the opening with 3–4 whipstitches using a length of yarn. This keeps the dowel from sliding out sideways.
Size checkpoint: Hang the top cord’s center on a hook.
- The triangle should be about 9.25 in (23.5 cm) from the hook to the upper dowel.
- There should be 7 in (17.8 cm) from the upper dowel to the lower dowel.
- The lower basket hangs about 6.75 in (17.1 cm) below its dowel.
In total that’s about 23 in (58.4 cm). The gap between the bottom of the upper basket and the lower dowel should be about 1.5 in (3.8 cm).
Border: Top Rim and Corded Edge
On these baskets, the rim does the job of a border. It firms up the opening, carries the dowel and gives a clean finished edge.
Border gauge: the same 13 sc = 4 in (10.2 cm) as the body. If your rim flares, go down 0.5 mm for the rim rounds only.
Counts per side (front half / back half):
| Round | Upper (front / back / ends) | Lower (front / back / ends) |
|---|---|---|
| Conversion | 38 / 38 total halves = 76 | 46 / 46 = 92 |
| Plain sc | 76 | 92 |
| Openings | 34 sc / 34 sc / ch-4 each end | 42 sc / 42 sc / ch-4 each end |
| Refill | 34 + 4 + 34 + 4 = 76 | 42 + 4 + 42 + 4 = 92 |
| Rev sc | 76 | 92 |
Why the math works: The conversion round gives each lattice repeat back its original 4 sts (1 on the bobble + 3 in the loop), so the rim matches the wall exactly. Each opening’s ch 4 replaces 4 skipped sts, and the 4 sc worked into it put those 4 sts back. Nothing is added or lost, so the rim lies flat and stays the same width as the base.
Final Blocking
- Remove the dowels and cords.
- Spray each basket lightly until damp, but not soaked.
- Stuff each basket firmly with a folded towel shaped into the oval.
- Pinch every bobble so it stands up round, and straighten the lattice diagonals.
- Shape the rim upright and press the corded edge so it lies smooth.
- Let it dry completely, usually 24 hours.
- Put the dowels and cords back on, and check the hanging measurements again.
Final Quality-Control Checklist
- Upper base 9.5 × 3.75 in (24.1 × 9.5 cm); lower base 11.5 × 4.75 in (29.2 × 12.1 cm)
- Stitch counts are 76 and 92 on every solid round
- Upper basket has 19 bobbles × 4 rows; lower has 23 bobbles × 5 rows
- Bobbles line up diagonally with no skipped loops
- Dowel openings sit exactly opposite each other
- Dowels stick out 1.75 in (4.4 cm) on each side
- Both baskets hang level, and the rings are secured
- All ends are woven in on the inside
Troubleshooting
Base ruffles: your increases are crowding on the curves. Spread them across the full curve and check your round counts.
Base cups into a bowl: your tension is too tight, or you’ve missed an increase. Recount, or go up a hook size.
Lattice is lopsided: a loop was skipped, or a bobble was worked into the wrong loop. Count bobbles every round.
Bobbles are flat: pull through all 5 loops firmly, then push each bobble out from the inside.
Basket tilts: the openings aren’t centered. Re-mark the end centers and redo the rim.
Rings slide off: tack them to the rim, or make the rings 1 ch smaller.
Care
Remove the dowels, then hand wash in cool water and lay the baskets flat over a stuffed shape to dry. Don’t wring them or tumble dry.
Final Notes
The size chain is straightforward. Gauge sets the base size: 76 sts for the upper basket and 92 for the lower. The walls keep that count. The lattice divides it evenly by 4, and the rim brings it back to the full count before the dowel openings. The dowels add a fixed 1.75 in (4.4 cm) on each side, and the cords set a hanging height of 23 in (58.4 cm). Check each link as you go and the organizer will hang level and hold its shape.
Happy crocheting!