

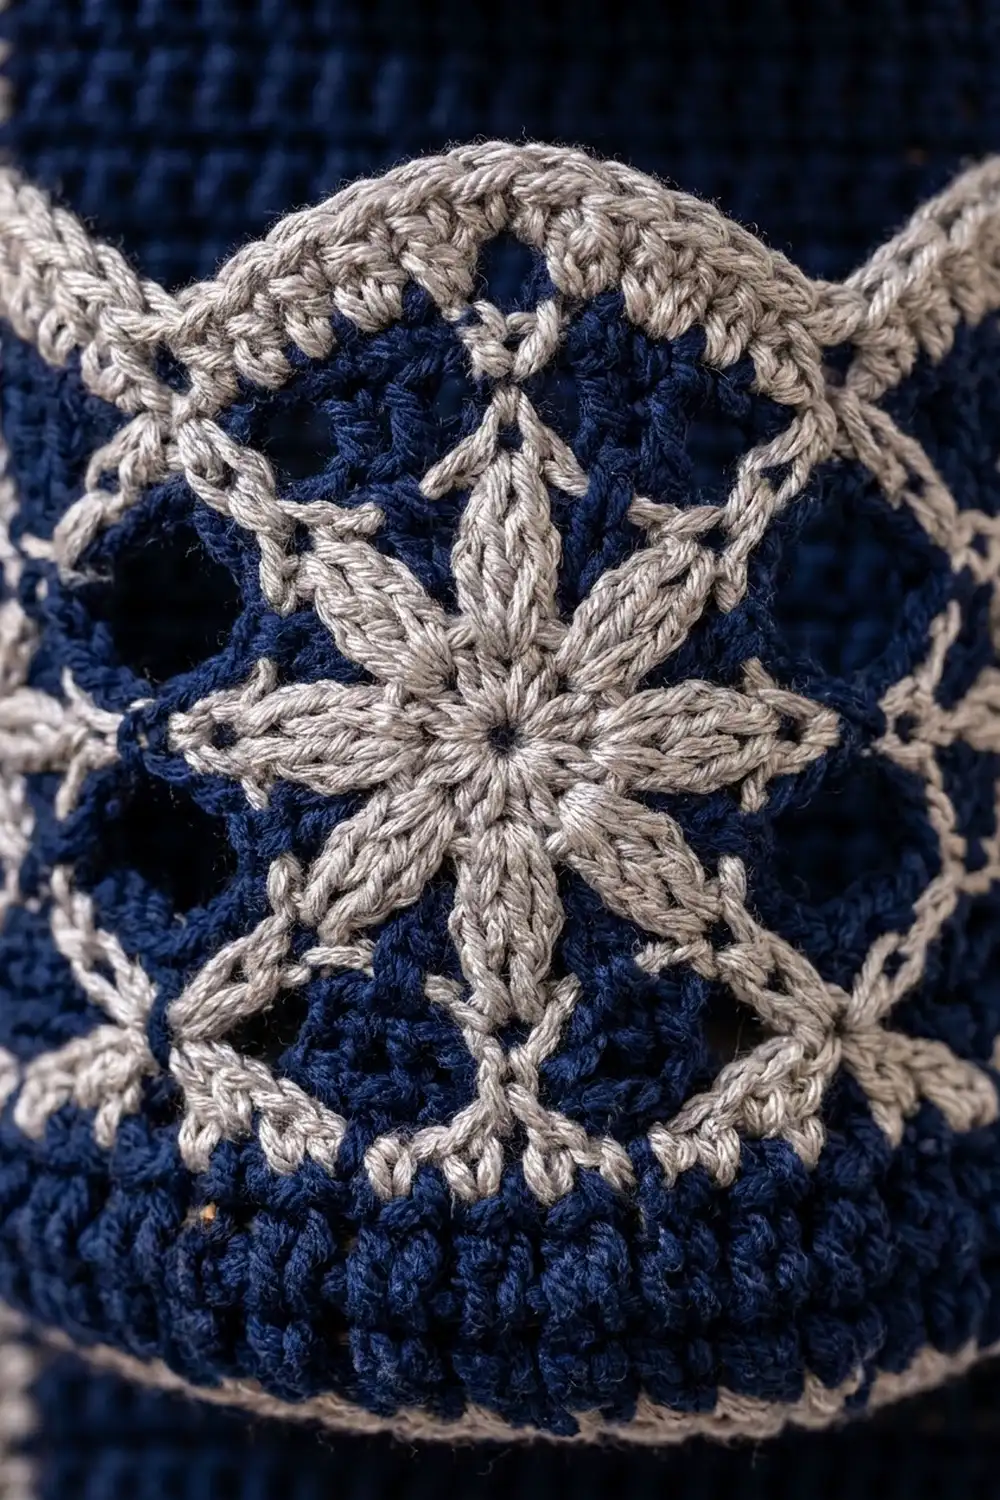
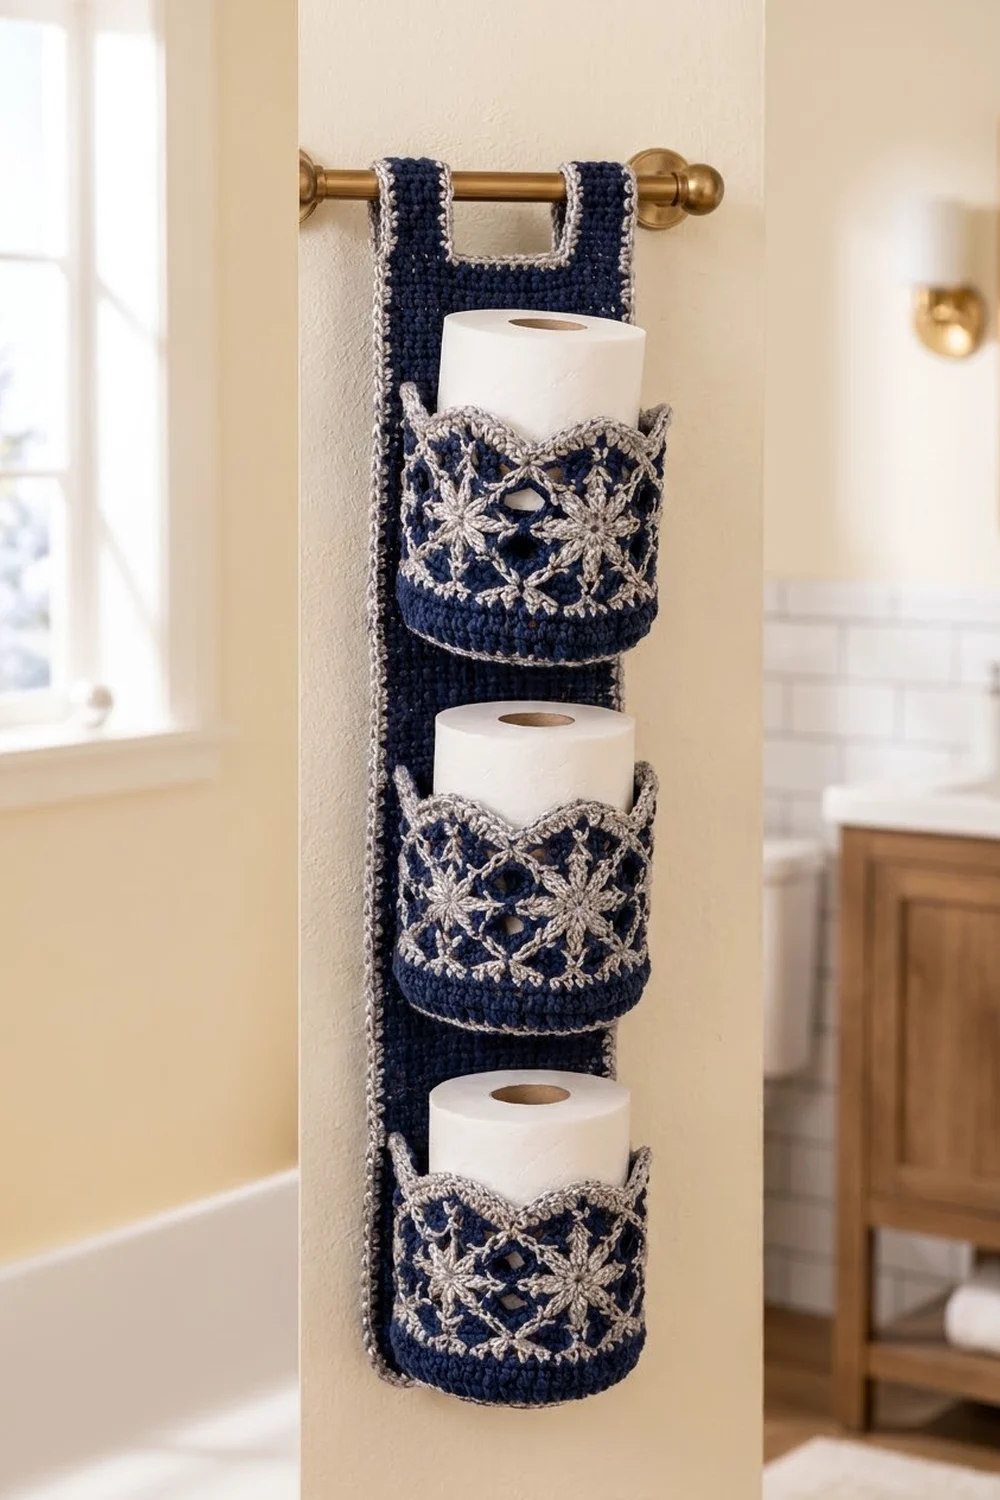
This hanging toilet paper holder stores three spare rolls on one narrow strip of wall. A long navy back panel hangs over a towel bar from two strap loops. Three round pockets are sewn down its front, each with a silver diamond lattice, a stitched-on snowflake, and a scalloped top edge.
The palette is deep navy and silver-gray. Navy carries the solid areas, and silver-gray picks out the lattice, the scallops, the snowflakes, and the rope-style edging. It looks wintry and calm, and it suits a bathroom year-round.
This pattern uses US crochet terms. The finished panel measures 6 in x 35 in (15.2 cm x 88.9 cm) laid flat with the border. With the straps folded into loops, it hangs about 31.75 in (80.6 cm) long. Each pocket is 4.8 in (12.2 cm) across and 3.6 in (9.1 cm) tall to the tips of the scallops.
Here is how it goes together. You work the panel flat in single crochet rows and split the top into two straps. Each pocket starts as a flat circle, turns upward to form a wall, and is then worked in tapestry crochet for the lattice band. You embroider the snowflakes, sew the pockets to the panel, add the border, and form the strap loops last.
Finished Size and Construction
- Finished size: 6 in x 35 in (15.2 cm x 88.9 cm) flat; about 31.75 in (80.6 cm) hanging length
- Skill level: Intermediate
- Terminology: US crochet terms
- Yarn weight: Worsted (#4)
- Hook: US H-8 (5.0 mm)
- Number of pieces: 4 (1 back panel and 3 pockets)
- Layout: One vertical column of 3 pockets on 1 panel
- Pocket size: 4.8 in (12.2 cm) across, 3.6 in (9.1 cm) tall, 60 stitches around
- Panel size before border: 5 in x 34 in (12.7 cm x 86.4 cm), including 6 in (15.2 cm) straps
- Border depth: 0.5 in (1.3 cm), worked in 2 rounds
Materials
Use a smooth worsted yarn with good stitch definition. Cotton or a cotton blend holds its shape best around the rolls. A soft acrylic also works well and is easy to wash. The quantities below assume about 180 m (197 yd) per 100 g.
- Color A, Navy: 360 g, about 650 m (711 yd)
- Color B, Silver-Gray: 170 g, about 300 m (328 yd)
Both quantities include roughly a 15% margin for your gauge swatch, the yarn you carry inside the colorwork, and the embroidery.
Tools:
– US H-8 (5.0 mm) crochet hook
– Tapestry needle
– 4 stitch markers
– Rust-proof pins
– Measuring tape
– Scissors
– Blocking mat and spray bottle
Abbreviations (US Terms)
- ch – chain
- sc – single crochet
- dc – double crochet
- sl st – slip stitch
- BLO – back loop only
- rev sc – reverse single crochet (crab stitch)
- st(s) – stitch(es)
- sk – skip
- rep – repeat
- RS / WS – right side / wrong side
- A / B – Navy / Silver-Gray
Special stitch, tapestry sc: Work sc as usual while you lay the unused color along the top of the previous round, so each new stitch encloses it. To change color, work the last stitch in the old color until 2 loops remain on the hook. Yarn over with the new color and pull it through both loops.
Reverse sc: Work from left to right (or right to left if you crochet left-handed). Insert the hook into the next st to the right, yarn over, and pull up a loop. Yarn over again and pull through both loops.
Gauge and Checkpoints
Gauge: 16 sc and 18 rows = 4 in (10.2 cm) in single crochet, blocked.
That works out to 4 sts and 4.5 rows per inch. Every measurement in this pattern depends on it.
Test one piece first. Make one complete pocket before you start the panel. It acts as your gauge swatch, and it proves the cup fits your rolls.
Checkpoints:
– Pocket base after Round 10 (60 sts): about 4.75–4.8 in (12.1–12.2 cm) across, lying flat
– Pocket wall after Round 24: 3.1 in (7.9 cm) tall from the base ridge
– Finished pocket: 3.6 in (9.1 cm) tall to the scallop tips; a standard roll about 4.5 in (11.4 cm) across should slide in with a little ease
– Panel after Row 45: 5 in x 10 in (12.7 cm x 25.4 cm)
– Panel after Row 126: 5 in x 28 in (12.7 cm x 71.1 cm)
If your piece is too big, go down one hook size. If it is too small or too tight, go up one hook size. Tapestry crochet often tightens a little, so you may want a hook 0.25 mm larger for Rounds 14–23 only.
Back Panel
With A, ch 21.
Row 1 (RS): Sc in 2nd ch from hook and in each ch across. (20 sc)
Rows 2–126: Ch 1, turn, sc in each st across. (20 sc)
Checkpoint: The panel should measure 5 in x 28 in (12.7 cm x 71.1 cm). Do not fasten off.
Right Strap
Row 1: Ch 1, turn, sc in the first 5 sts. Leave the rest unworked. (5 sc)
Rows 2–27: Ch 1, turn, sc in each st across. (5 sc)
Fasten off. The strap is 1.25 in (3.2 cm) wide and 6 in (15.2 cm) long.
Left Strap
On Row 126, skip the next 10 unworked sts, which leaves a 2.5 in (6.4 cm) gap. Join A in the next st with the same side facing as for Row 1 of the right strap.
Rows 1–27: Ch 1, sc in the same st and in the next 4 sts, then turn at the end of each row. (5 sc)
Fasten off. The panel now measures 5 in x 34 in (12.7 cm x 86.4 cm).
Pockets (make 3)
Work in joined rounds with the RS always facing. To join a round, sl st to the first sc, then ch 1 (the ch 1 does not count as a stitch). The joins line up at center back.
Base
With A, make a magic ring.
Rnd 1: 6 sc in ring. (6)
Rnd 2: 2 sc in each st. (12)
Rnd 3: (Sc in next st, 2 sc in next st) 6 times. (18)
Rnd 4: (Sc in next 2 sts, 2 sc in next st) 6 times. (24)
Rnd 5: (Sc in next 3 sts, 2 sc in next st) 6 times. (30)
Rnd 6: (Sc in next 4 sts, 2 sc in next st) 6 times. (36)
Rnd 7: (Sc in next 5 sts, 2 sc in next st) 6 times. (42)
Rnd 8: (Sc in next 6 sts, 2 sc in next st) 6 times. (48)
Rnd 9: (Sc in next 7 sts, 2 sc in next st) 6 times. (54)
Rnd 10: (Sc in next 8 sts, 2 sc in next st) 6 times. (60)
Checkpoint: The base is 4.75–4.8 in (12.1–12.2 cm) across and lies flat.
Wall
Rnd 11: Sc BLO in each st. This turning round forms the base ridge. (60)
Rnd 12: Sc in each st. (60)
Rnd 13: Change to B on the join of Rnd 12. Sc in each st, carrying A. (60)
Lattice Band (Rounds 14–23)
Use tapestry sc and carry the unused color throughout. Repeat the 10-st sequence 6 times in each round, for 60 sts per round.
- Rnd 14: (1 B, 8 A, 1 B)
- Rnd 15: (1 A, 1 B, 6 A, 1 B, 1 A)
- Rnd 16: (2 A, 1 B, 4 A, 1 B, 2 A)
- Rnd 17: (3 A, 1 B, 2 A, 1 B, 3 A)
- Rnd 18: (4 A, 2 B, 4 A)
- Rnd 19: Rep Rnd 18.
- Rnd 20: Rep Rnd 17.
- Rnd 21: Rep Rnd 16.
- Rnd 22: Rep Rnd 15.
- Rnd 23: Rep Rnd 14.
The diagonals cross in the middle of each repeat on Rnds 18–19, and at the repeat boundaries on Rnds 14 and 23. That makes 6 full navy diamonds centered on the boundaries, with half-diamonds above and below them.
Rnd 24: With B, sc in each st. (60) Cut A and weave in the end.
Checkpoint: The wall is 3.1 in (7.9 cm) tall from the ridge.
Scalloped Edge
Rnd 25: With B, ch 1, sl st in the same st. Sk 2 sts, 7 dc in the next st, sk 2 sts, sl st in the next st. Rep from * 8 more times. Then sk 2 sts, 7 dc in the next st, sk 2 sts, and join to the first sl st.
That gives 10 shells: 70 dc and 10 sl sts. Each shell uses 6 sts, and 10 x 6 = 60. Fasten off.
Snowflakes
Use B and a tapestry needle. The center front of each pocket falls between sts 30 and 31.
- Large snowflake: Center it on the front diamond. Work 8 lazy daisy (detached chain) petals radiating from one center point, each 1 in (2.5 cm) long. At the tips of the 4 straight-up, straight-down, and side petals, add a small straight-stitch V. Finish with a French knot in the center. The snowflake spans about 2.25 in (5.7 cm) and overlaps the lattice slightly.
- Small stars: Center one on each of the diamonds between sts 20/21 and sts 40/41. Work 8 straight stitches from the center, each 0.375 in (1 cm) long, so each star is 0.75 in (1.9 cm) across.
Leave the back diamonds plain, since they sit against the panel.
Make All Pieces
- Panel: 1 in A
- Pockets: 3, each in A and B, with embroidery in B
Layout, front view:
 [Strap]  gap  [Strap]     rows 1–27 of straps
|                     |    rows 112–126
|     POCKET 3        |    seams rows 95–108
|                     |
|     POCKET 2        |    seams rows 50–63
|                     |
|     POCKET 1        |    seams rows 5–18
|_____________________|    row 1
Joining
Weave in all pocket ends first. Lay the panel RS up.
Placement: On the panel, mark st columns 6 and 15. These are 10 sts apart, inclusive, which is 2.5 in (6.4 cm). On each pocket, mark wall columns 56 and 5. They frame the 10 back sts (sts 56–60 and 1–5), centered on the round joins.
Stitch-to-stitch logic: The pocket rounds and the panel rows share the same gauge of 4.5 per inch, so 1 pocket round matches 1 panel row.
- Flatten the back of Pocket 1 against the panel. Line up its base ridge (Rnd 11) with panel Row 5, and pocket columns 56 and 5 with panel columns 6 and 15.
- Whipstitch the 10 back ridge loops to the 10 matching sts of Row 5, using A.
- Whipstitch up pocket column 56 to panel column 6, one round per row, through Rnd 24 (panel rows 5–18, 14 rows). Repeat on column 5 to column 15.
- Attach Pocket 2 at rows 50–63 and Pocket 3 at rows 95–108 the same way.
Tension: Snug each stitch just until the seam closes. If you pull harder than that, the panel puckers.
Size checkpoint: The pocket bases are 45 rows apart, which is 10 in (25.4 cm). The panel should still measure 5 in (12.7 cm) wide with flat edges.
Border
Border gauge: 4 sc per inch along every edge. Along row ends, that means 8 sc per 9 rows, because 9 rows measure 2 in (5.1 cm) and 8 sc also measure 2 in.
In this border, each corner is a separate ch-2 space. The side counts below do not include corners.
Round 1: With the RS facing, join B at the bottom right corner. Work around the whole outline:
- Bottom edge: 20 sc, one in each foundation ch
- Right outer edge: 136 sc across 153 row ends (126 + 27)
- Right strap top: 5 sc
- Right strap inner edge: 24 sc across 27 row ends
- Gap: 10 sc
- Left strap inner edge: 24 sc
- Left strap top: 5 sc
- Left outer edge: 136 sc
Work ch 2 at each of the 6 outer corners: the 2 bottom corners and 2 at the top of each strap. At the 2 inner corners where the straps meet the gap, add nothing. Join. (360 sc and 6 ch-2 sps)
Round 2: Rev sc in each sc and 2 rev sc in each ch-2 sp. Join and fasten off. (372 rev sc)
Why the math works: 153 rows ÷ 9 = 17, and 17 x 8 = 136. 27 rows ÷ 9 = 3, and 3 x 8 = 24. All of these counts match 4 sts per inch, so the edges neither ruffle nor pull in. The 2 rounds add 0.5 in (1.3 cm) on every side, which takes the panel to 6 in x 35 in (15.2 cm x 88.9 cm).
Strap loops: Fold each strap toward the WS. Whipstitch its top edge to the WS of the panel just below the gap. Each loop fits a bar up to about 1 in (2.5 cm) thick.
Final Blocking
- Mist the whole piece until it is evenly damp.
- Pin the panel flat to 6 in x 35 in (15.2 cm x 88.9 cm), and keep the strap loops open.
- Stuff each pocket with a dry roll wrapped in a plastic bag so the cylinders set round.
- Pin each scallop point up and out.
- Let everything dry completely, then remove the rolls and pins.
Final Quality-Control Checklist
- Panel is 6 in (15.2 cm) wide along its full length
- All 3 pockets are 60 sts around, with 10 shells each
- Lattice diagonals line up at every crossing
- Large snowflakes are centered on the front of each pocket
- Pocket seams are on panel rows 5–18, 50–63, and 95–108
- Border corners lie flat and the rev sc edge is even
- All ends are woven in and the strap loops are secure
Troubleshooting
- Pocket base cups or ruffles: Recount the increases. Each round should end on a multiple of 6.
- Lattice band narrower than the base: Go up 0.25 mm for Rounds 14–23 and carry the yarn more loosely.
- Carried yarn shows through: Hold the carried strand flat along the top of the round and keep your stitches snug around it.
- Panel edges wave: You worked too many sc along the row ends. Recheck the 8-per-9 ratio.
- Roll fits too tightly: Add 6 sts by working Rnd 11 as (sc in next 9 sts, 2 sc in next st) 6 times, for 66 sts. Then adjust the lattice repeats to suit.
Care
Hand wash in cool water, press out the water in a towel, and dry flat. Reshape the pockets around a roll while damp.
Final Notes
The measurement chain is short. Gauge of 4 sts and 4.5 rows per inch gives a 5 in x 28 in (12.7 cm x 71.1 cm) body with 6 in (15.2 cm) straps. Each 60-st pocket is 4.8 in (12.2 cm) across, and the pockets are sewn 10 in (25.4 cm) apart. The 0.5 in (1.3 cm) border brings the panel to 6 in x 35 in (15.2 cm x 88.9 cm). Check each stage as you go, and the finished holder will hang straight and hold your rolls neatly.
Happy crocheting!