

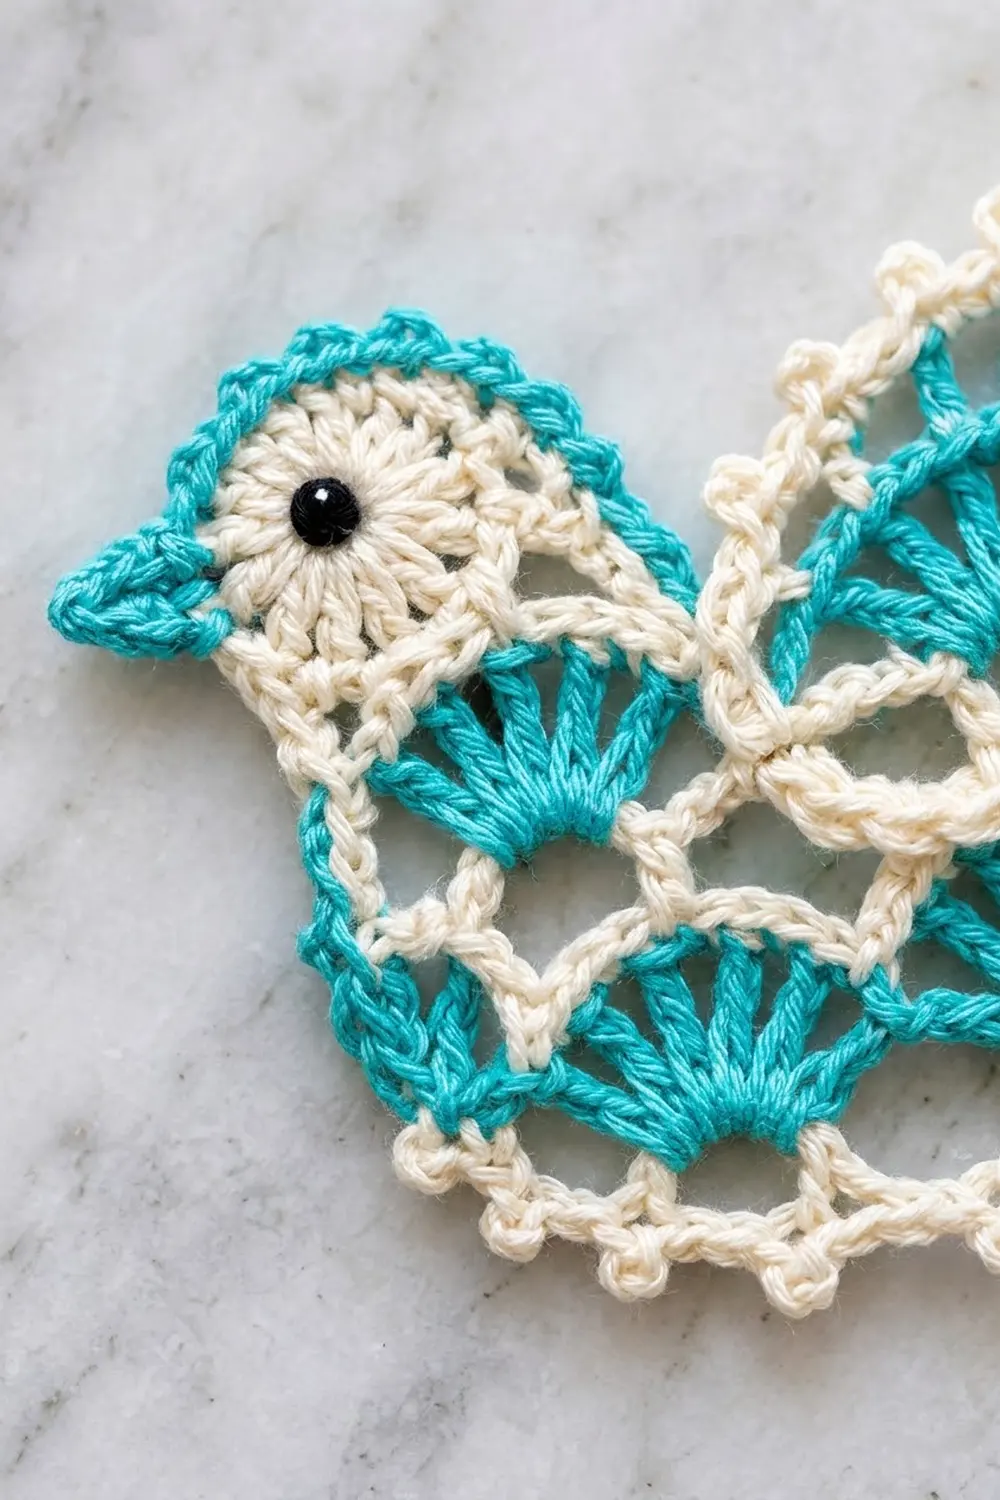
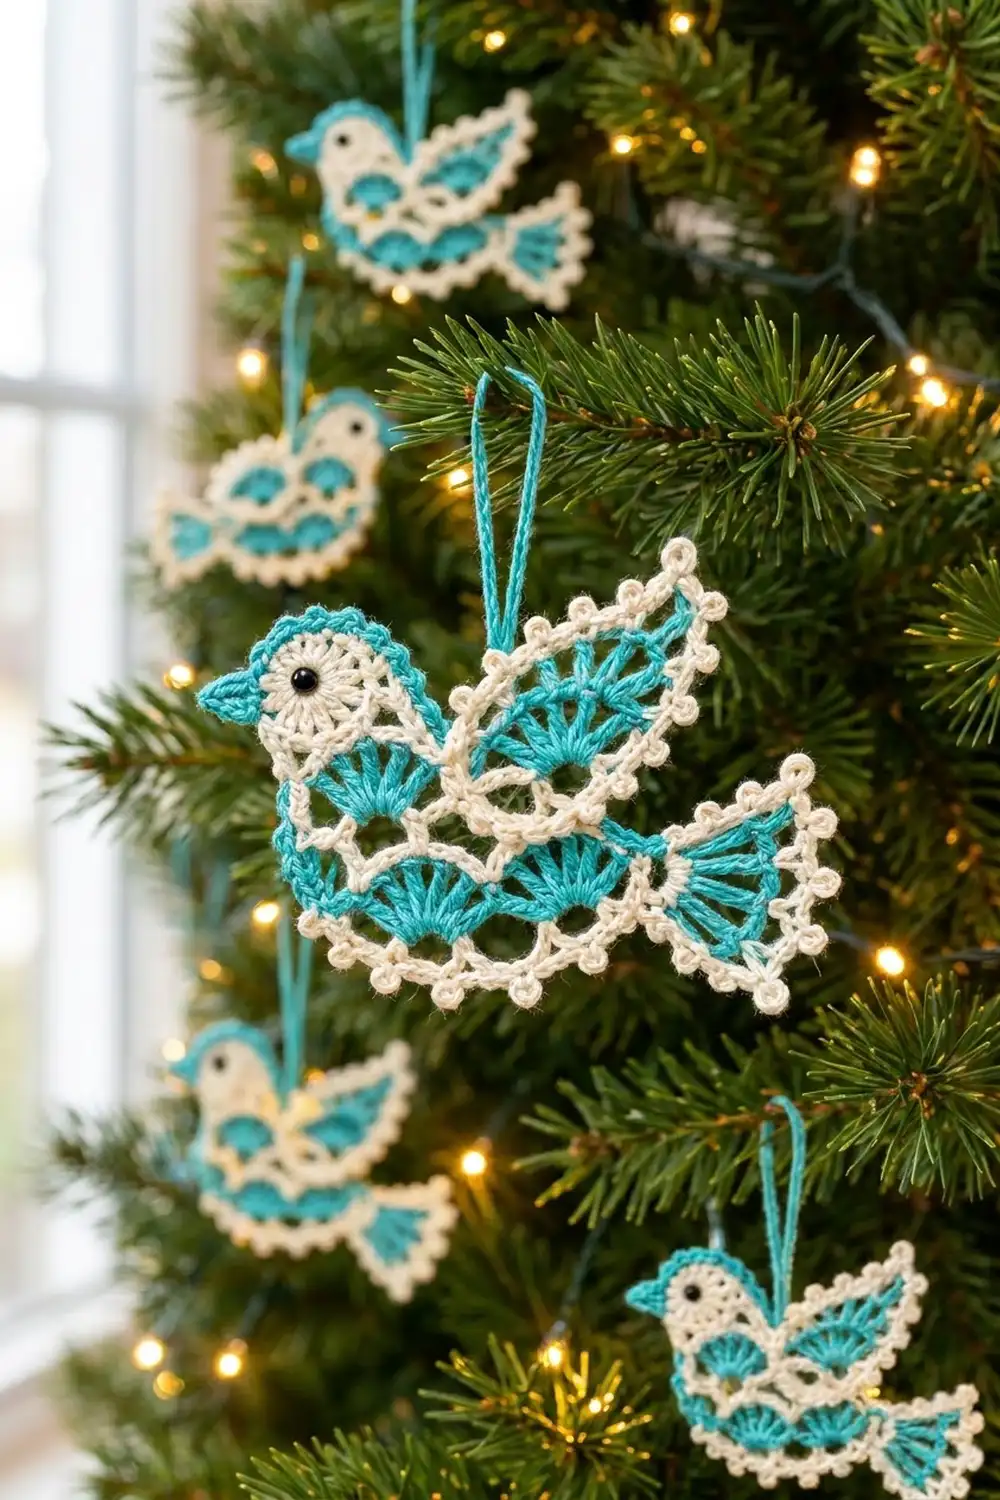
This little songbird is a flat lace ornament in cream and bright turquoise. Rows of turquoise fans sit inside wavy cream outlines, so the body looks like overlapping feathers. The bird has a round cream head with a black eye, a small turquoise beak, a raised fan wing and a fanned tail.
A cream picot edging runs around the outline. A turquoise chain loop at the top lets the bird hang on a tree, a gift or a window. The style is light and Scandinavian-inspired, with just two main colors and a scrap of black.
This pattern uses US crochet terms. The finished bird is 5.5 in (14.0 cm) from beak tip to tail tip and 3.25 in (8.3 cm) tall, not counting the 2 in (5.1 cm) hanging loop.
You work the body flat in short rows and change color every row. Next you add a fan wing on top and a fan tail at the side. Then you slip-stitch a round head onto the front corner. One cream picot round outlines everything, and turquoise crown, beak and loop details finish the bird. The result is one single piece.
Finished Size and Construction
- Finished size: 5.5 in (14.0 cm) wide x 3.25 in (8.3 cm) tall, plus a 2 in (5.1 cm) loop
- Skill level: Intermediate
- Terminology: US
- Yarn weight: Fingering / #1 super fine mercerized cotton
- Hook: 2.5 mm
- Number of pieces: 1 (head, wing and tail are worked onto the body)
- Layout: single ornament, bird facing left
- Body panel size: 3.5 in (8.9 cm) wide x 1.4 in (3.6 cm) tall
- Size before border: 4.5 in (11.4 cm) wide x 2.75 in (7.0 cm) tall, without the beak
- Border depth: 0.25 in (0.6 cm) on each edge; the beak adds 0.5 in (1.3 cm)
Materials
Use a smooth mercerized cotton in fingering weight, about 170 m per 50 g. Cotton keeps the fans crisp and blocks flat. Avoid fuzzy or stretchy yarns, because they blur the lace.
- Cream (Color A): 8 g, about 27 m, for the outline rows, head and border
- Turquoise (Color B): 5 g, about 17 m, for the fans, tail, crown, beak and loop
- Black: about 30 cm of embroidery floss, or one 4 mm black bead, for the eye
These quantities include a margin of about 20% for swatching and tails.
Tools:
- 2.5 mm crochet hook
- Tapestry needle
- Scissors
- 3–4 locking stitch markers
- Ruler or tape measure
- Blocking mat, rust-proof pins and a spray bottle
- Optional: light spray starch
Abbreviations (US Terms)
- ch: chain
- sl st: slip stitch
- sc: single crochet
- hdc: half double crochet
- dc: double crochet
- tr: treble crochet
- st(s): stitch(es)
- sk: skip
- RS: right side
Special stitches:
- Fan: 9 dc in the same stitch.
- Half fan: 5 dc in the same stitch. When a half fan starts a row, ch 3 counts as the first dc, then work 4 dc.
- Picot: ch 3, sl st in the 3rd ch from the hook.
Gauge and Checkpoints
Gauge: 24 sc and 20 sc rows = 4 in (10.2 cm). That works out to 6 sc per 1 in (2.5 cm), and each sc row is 0.2 in (0.5 cm) tall. One fan row is 0.4 in (1.0 cm) tall.
The head, wing and border counts are all matched to the body width. Work Rows 1–2 first and measure them before going on.
Checkpoints:
- After Rows 1–2: 3.5 in (8.9 cm) wide x 0.6 in (1.5 cm) tall.
- After Row 5: 3.5 in (8.9 cm) x 1.4 in (3.6 cm).
- After Row 9: the wing is 1.8 in (4.6 cm) wide, and the height at the wing is 2.6 in (6.6 cm).
- Head: 0.75 in (1.9 cm) across after Rnd 1 and 1.25 in (3.2 cm) after Rnd 2.
- Before the border: 4.5 in (11.4 cm) x 2.75 in (7.0 cm).
- After the border: 5.0 in (12.7 cm) x 3.25 in (8.3 cm). With the beak, the width is 5.5 in (14.0 cm).
If your piece is too big: go down 0.25 mm in hook size.
If your piece is too small: go up 0.25 mm in hook size. Blocking can fix a difference of 0.1 in (0.3 cm).
Pattern Notes
- From Row 2 on, work every row with the RS facing, from right to left. Do not turn.
- Cut the yarn at the end of each row and join the next color at the right edge. Leave 4 in (10.2 cm) tails.
- Number the 21 body stitches 1–21 from right to left. St 1 is at the tail end and st 21 is at the head end.
- If you crochet left-handed, work from left to right. Your bird will face right.
Body
The body has two tiers of fans. The lower tier has 2 full fans. The upper tier is offset and has 1 full fan in the middle with a half fan at each end.
Row 1 (Color A): Ch 22. Sc in 2nd ch from hook and in each ch across. Fasten off. (21 sc)
Turn the piece so the RS faces you and the last sc you made is at the right edge.
Row 2 (Color B): Join in st 1, ch 1, sc in same st, [sk 4, fan in next st, sk 4, sc in next st] twice. Fasten off. (2 fans; 1 + 9 + 1 + 9 + 1 = 21 sts)
Each fan stands point-down with its top spread open.
Row 3 (Color A): Join in first st, ch 1, sc in same st and in each st across. Fasten off. (21 sc)
This row follows the fan tops and makes the first wavy cream outline.
Row 4 (Color B): Join in st 1, ch 3 (counts as dc), 4 dc in same st, sk 4, sc in st 6, sk 4, fan in st 11, sk 4, sc in st 16, sk 4, 5 dc in st 21. Fasten off. (5 + 1 + 9 + 1 + 5 = 21 sts)
Each sc in this row sits on the peak of a lower fan, so the upper fans nest between the lower ones.
Row 5 (Color A): Join in top of ch-3, ch 1, sc in same st and in each st across. Fasten off. (21 sc)
Checkpoint: 3.5 in (8.9 cm) x 1.4 in (3.6 cm).
Wing
Work the wing over Row 5 sts 1–11, above the tail end.
Row 6 (Color B): Join in st 1, ch 1, sc in same st, sk 4, fan in st 6, sk 4, sc in st 11. Fasten off. (1 fan; 11 sts)
Row 7 (Color A): Join in first st, ch 1, sc in same st and in each st across. Fasten off. (11 sc)
Row 8 (Color B): Join in first st, ch 3 (counts as dc), 4 dc in same st, sk 4, sc in st 6, sk 4, 5 dc in st 11. Fasten off. (5 + 1 + 5 = 11 sts)
Row 9 (Color A): Join in top of ch-3, ch 1, sc in same st and in each st across. Fasten off. (11 sc)
Checkpoint: the wing is 1.8 in (4.6 cm) wide, and the height at the wing is 2.6 in (6.6 cm). Row 5 sts 12–15 stay open as the back. Sts 16–21 are saved for the head.
Tail
Tail (Color B): With the RS facing, join in the row end of Row 3 at the right edge. Ch 4 (counts as tr), 10 tr in the same row end. Fasten off. (11 tr)
The tail fans out to the right, about 0.75 in (1.9 cm) long.
Head
Rnd 1 (Color A): Make a magic ring. Ch 3 (counts as dc), 11 dc in ring. Pull the ring closed but leave a small center hole. Join with sl st to top of ch-3. (12 dc)
Rnd 2: Ch 1, 2 sc in each st around. Join with sl st to first sc. (24 sc)
Checkpoint: 1.25 in (3.2 cm) across.
Eye: Sew a 4 mm black bead into the center hole, or work a black French knot there with 3 wraps. Secure it on the back.
Attach the head: Place the head above the left end of Row 5. Match head sts 1–6 to Row 5 sts 16–21, one to one. Join Color A at the first pair, then sl st through both layers in each of the 6 pairs. Fasten off.
Head sts 7–24 are now free, which leaves 18 sts for the border.
Border
The border is one round of Color A, worked with the RS facing around the whole outline.
Border gauge: 6 sc per 1 in (2.5 cm), the same as the body. On row ends, work 1 sc per sc row and 2 sc per fan row.
Start at the bottom-left corner, on the underside of the foundation chain. Number the foundation chains 1–21 from left to right.
Section 1 (bottom edge): Join in ch 1, ch 1, sc in same ch, [ch 2, picot, ch 2, sk 3 ch, sc in next ch] 5 times. (6 sc and 5 picot arches; 1 + 5 x 4 = 21 ch used)
Section 2 (right edge below the tail): 1 sc in Row 1, 2 sc in Row 2. (3 sc)
Section 3 (tail): [Sc in next 2 tr, picot] 5 times, sc in last tr. (11 sc, 5 picots)
Section 4 (right edge up to the wing tip): 2 sc in Row 4, 1 sc in Row 5, 2 sc in Row 6, 1 sc in Row 7, 2 sc in Row 8, 1 sc in Row 9, picot for the wing tip. (9 sc, 1 picot)
Section 5 (top of the wing): Across Row 9, [sc in next 2 sts, picot] 5 times, sc in last st. (11 sc, 5 picots)
Section 6 (back edge of the wing): 1 sc in Row 9, 2 sc in Row 8, 1 sc in Row 7, 2 sc in Row 6. (6 sc)
Section 7 (back): Sc in Row 5 sts 12–15. (4 sc)
Section 8 (head): Sc in each free head st. (18 sc)
Section 9 (left edge): 2 sc in Row 4, 1 sc in Row 3, 2 sc in Row 2, 1 sc in Row 1. Join with sl st to the first sc. Fasten off. (6 sc)
Round total: 6 + 3 + 11 + 9 + 11 + 6 + 4 + 18 + 6 = 74 sc, plus 16 picots (5 + 5 + 1 + 5).
Why the math works: each border sc is about 0.167 in (0.4 cm) wide. One sc covers a sc row end, which is 0.2 in (0.5 cm) tall. Two sc cover a fan row end, which is 0.4 in (1.0 cm) tall. That small shortfall keeps the edge snug and flat instead of rippling. On stitch edges you work 1 sc per stitch, so the border counts match the row counts. The bottom arches use exactly 21 chains, so nothing is crowded or skipped.
Checkpoint: 5.0 in (12.7 cm) x 3.25 in (8.3 cm).
Crown, Beak and Loop
Number the 18 head border sc from back to front. St 1 is next to the back and st 18 is at the throat.
Crown and beak (Color B): Join in head border st 3. [(Sc, ch 2, sc) in next st, sl st in next st] 5 times, which covers sts 3–12. For the beak: ch 4, sl st in 2nd ch from hook, sc in next ch, hdc in next ch, sl st in st 14. Fasten off.
The beak adds 0.5 in (1.3 cm), so the bird is now 5.5 in (14.0 cm) wide.
Loop (Color B): Join in the 2nd of the 4 back sc from Section 7. Ch 24, sl st in same st. Fasten off. The loop stands 2 in (5.1 cm) tall.
Final Blocking
- Weave in the tails along stitches of the same color.
- Soak the ornament in cool water, then press it between towels. Do not wring it.
- Lay it RS up on the blocking mat.
- Pin the bottom edge of the body to 3.5 in (8.9 cm).
- Pin each bottom picot arch into an even curve.
- Spread the tail and pin its picots.
- Lift the wing tip up and to the right, then pin the wing picots.
- Round the head, with one pin at the beak tip.
- Check that the bird measures 5.5 in (14.0 cm) x 3.25 in (8.3 cm).
- Mist with starch if you like, and let it dry completely.
Final Quality-Control Checklist
- Each body row has 21 sts and each wing row has 11 sts.
- The upper fans nest between the lower fans.
- The tail has 11 tr and 5 picots.
- The head has 24 sc: 6 joined and 18 free.
- The border has 74 sc and 16 picots.
- The eye is secure and the crown has 5 bumps.
- The loop is centered and no tails show on the RS.
Troubleshooting
Fans curl: your dc are too tight. Go up a hook size.
Fans look floppy: go down a hook size.
Upper fans don’t nest: check that the Row 4 sc land in sts 6 and 16.
Border ripples: you added extra sc on the row ends. Use 1 sc per sc row and 2 sc per fan row.
Head tilts: redo the join so head sts 1–6 match Row 5 sts 16–21 exactly.
Bird hangs crooked: move the loop one stitch toward the heavier side.
Care
Hand wash in cool water and lay flat to dry. Block or starch again if the shape relaxes.
Final Notes
Each stage builds on the one before:
- 21 sc at 6 per inch make a 3.5 in (8.9 cm) body.
- Five rows bring the body to 1.4 in (3.6 cm) tall.
- The wing raises the height to 2.6 in (6.6 cm).
- With the head and tail, the bird is 4.5 in (11.4 cm) x 2.75 in (7.0 cm).
- The border brings it to 5.0 in (12.7 cm) x 3.25 in (8.3 cm).
- The beak makes the final width 5.5 in (14.0 cm).
If your checkpoints match, the rest will fall into place. Make one bird, then make a flock.
Happy crocheting!