
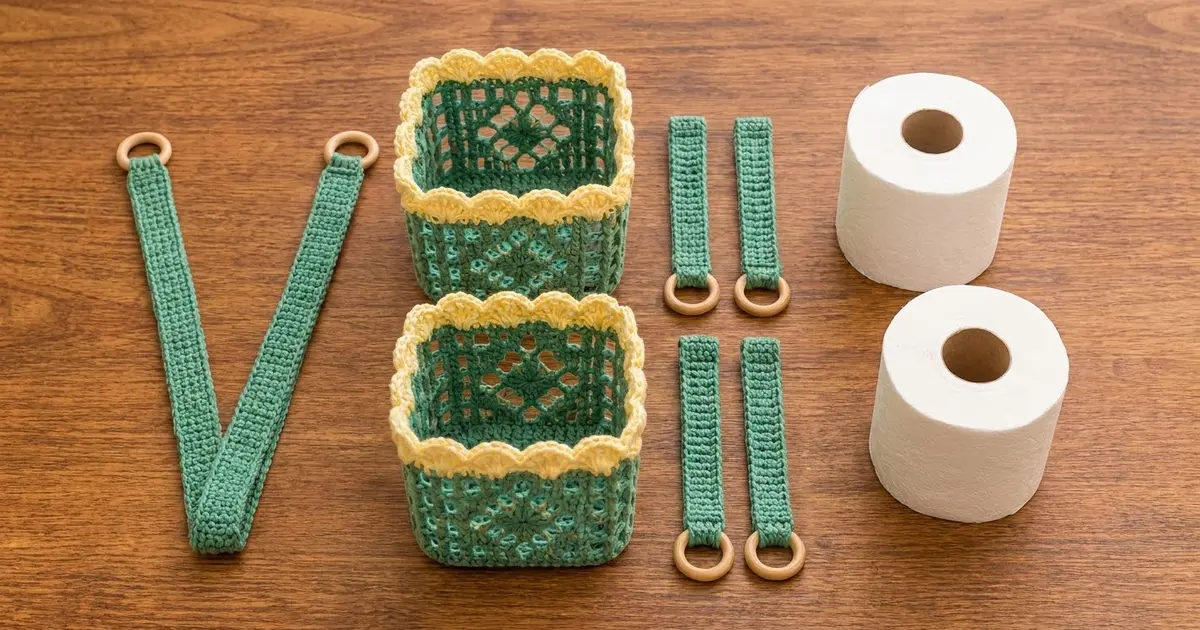
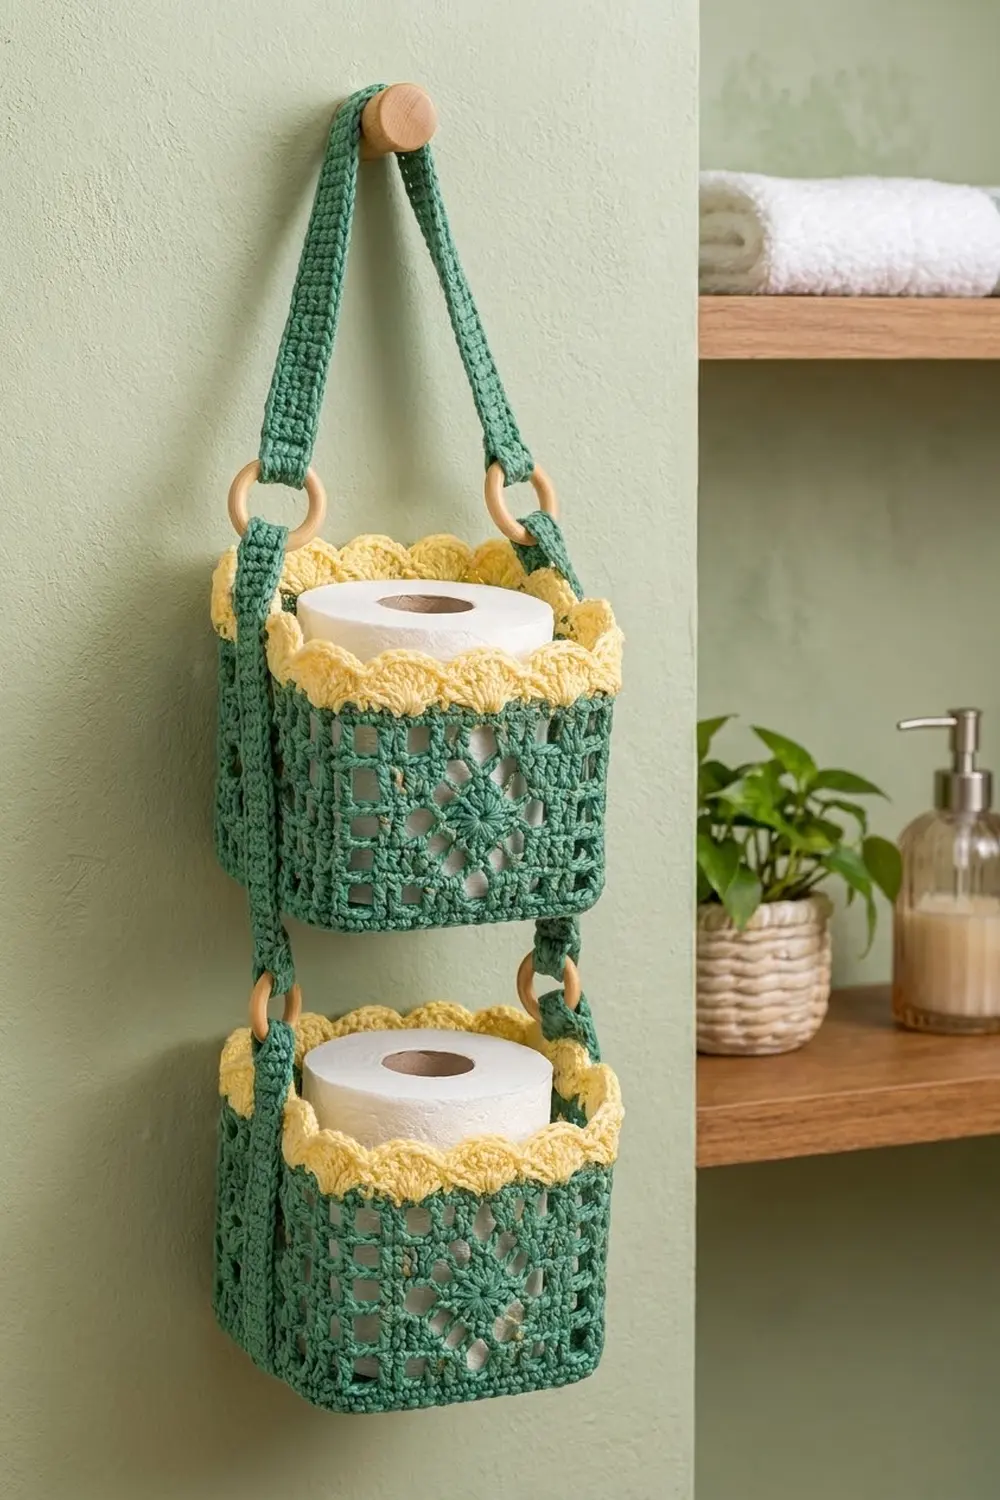
The Seaglass Tier is a two-basket hanging holder that keeps spare toilet rolls off the floor and in reach. Each basket has a sturdy solid base, airy filet-mesh walls with a diamond motif, and a soft butter-yellow scalloped collar that brightens a sea-green bathroom palette.
The design uses two colors: a muted sea green for the baskets and straps, and a pale butter yellow for the double-scallop collars. Natural wooden rings link everything together, and the whole holder hangs from a single wall peg or hook.
This pattern uses US crochet terms. Each basket measures about 6 in (15.2 cm) square and 5.5 in (14.0 cm) tall, and holds one standard roll. Hanging from the peg, the whole holder is about 23.5 in (59.7 cm) long.
For each basket, you crochet a square base in rounds, then work the walls straight up in the round and finish with a two-tier yellow collar. Next, you crochet five flat straps, sew four of them to the baskets through wooden rings, and loop the long hanging strap through the top rings.
Finished Size and Construction
- Finished basket size: 6 in (15.2 cm) square × 5.5 in (14.0 cm) tall
- Total hanging length: about 23.5 in (59.7 cm)
- Skill level: Intermediate (filet mesh in the round, front/back loop work, sewing)
- Terminology: US
- Yarn weight: Worsted (#4) cotton
- Hook: 4.0 mm (G-6)
- Number of pieces: 2 baskets, 4 side straps, 1 hanging strap, plus 4 wooden rings
- Layout: 2 baskets stacked vertically, 1 column
- Base size: 5.5 in (14.0 cm) before the edging round, 6 in (15.2 cm) after it
- Wall height before collar: 4.75 in (12.1 cm)
- Collar (border) depth: 0.75 in (1.9 cm) above the rim, with the lower scallop tier hanging down 0.5 in (1.3 cm)
Materials
Use a smooth, firm worsted-weight cotton or cotton blend. Cotton holds its shape in a damp bathroom, and its clean stitch definition shows off the filet diamonds. Avoid soft acrylics, because the baskets will sag.
- Sea green (Color A): 200 g / about 340 m
- Butter yellow (Color B): 50 g / about 85 m
- 4.0 mm (G-6) crochet hook
- 4 wooden rings, 1.5 in (3.8 cm) outer diameter
- Tapestry needle
- 4 locking stitch markers
- Measuring tape
- Spray bottle and pins for blocking
- A box or stack of books about 6 in (15.2 cm) square to use as a blocking form
These quantities include a margin of roughly 25% for gauge swatches and differences in tension.
Abbreviations (US Terms)
- ch – chain
- sl st – slip stitch
- sc – single crochet
- dc – double crochet
- sk – skip
- sp – space
- st(s) – stitch(es)
- BLO / FLO – back loop only / front loop only
- OS – open square
- SS – solid square
Special stitches:
- Open square (OS): dc in next st, ch 1, sk next st. One OS uses 2 stitches.
- Solid square (SS): dc in each of next 2 sts. When working over a ch-1 sp, dc into the space. One SS uses 2 stitches.
- Shell: 5 dc in the same stitch.
Gauge and Checkpoints
- Double crochet: 16 dc × 8 rounds = 4 in (10.2 cm)
- Single crochet: 16 sc × 18 rows = 4 in (10.2 cm)
Before you commit to the full project, make one base (Rounds 1–6) as your test piece. Use these checkpoints across the square, measured flat from edge to edge:
- After Round 1: 1.5 in (3.8 cm)
- After Round 3: 3.5 in (8.9 cm)
- After Round 5: 5.5 in (14.0 cm)
- After Round 6: 6 in (15.2 cm)
If your base is too big, go down to a 3.75 mm hook. If it is too small, go up to a 4.5 mm hook. Keep checking the walls as well: the wall should be 2.5 in (6.4 cm) tall after Wall Round 5, and 4.75 in (12.1 cm) after Wall Round 10. A basket smaller than 5.75 in (14.6 cm) square can grip the roll too tightly.
Basket (Make 2)
Base
Work in Color A. Join each round with a sl st to the top of the beginning ch. Do not turn.
Round 1: In a magic ring, ch 3 (counts as dc), 2 dc, ch 2, 3 dc, ch 2; rep from * 2 more times. Join. (12 dc, 4 ch-2 corner sps; 3 dc per side)*
Round 2: Ch 3 (counts as dc), dc in next 2 dc, (2 dc, ch 2, 2 dc) in corner sp, dc in next 3 dc, (2 dc, ch 2, 2 dc) in corner sp; rep from * 2 more times. Join. (28 dc; 7 dc per side)*
Round 3: Ch 3, dc in each dc to the next corner sp, (2 dc, ch 2, 2 dc) in corner sp; rep around, then dc in each remaining dc. Join. (44 dc; 11 dc per side)
Round 4: Rep Round 3. (60 dc; 15 dc per side)
Round 5: Rep Round 3. (76 dc; 19 dc per side)
The base should now measure 5.5 in (14.0 cm).
Round 6 (edging round): Ch 1, sc in each dc around, working 3 sc in each ch-2 corner sp. Join. (76 sc + 12 corner sc = 88 sc)
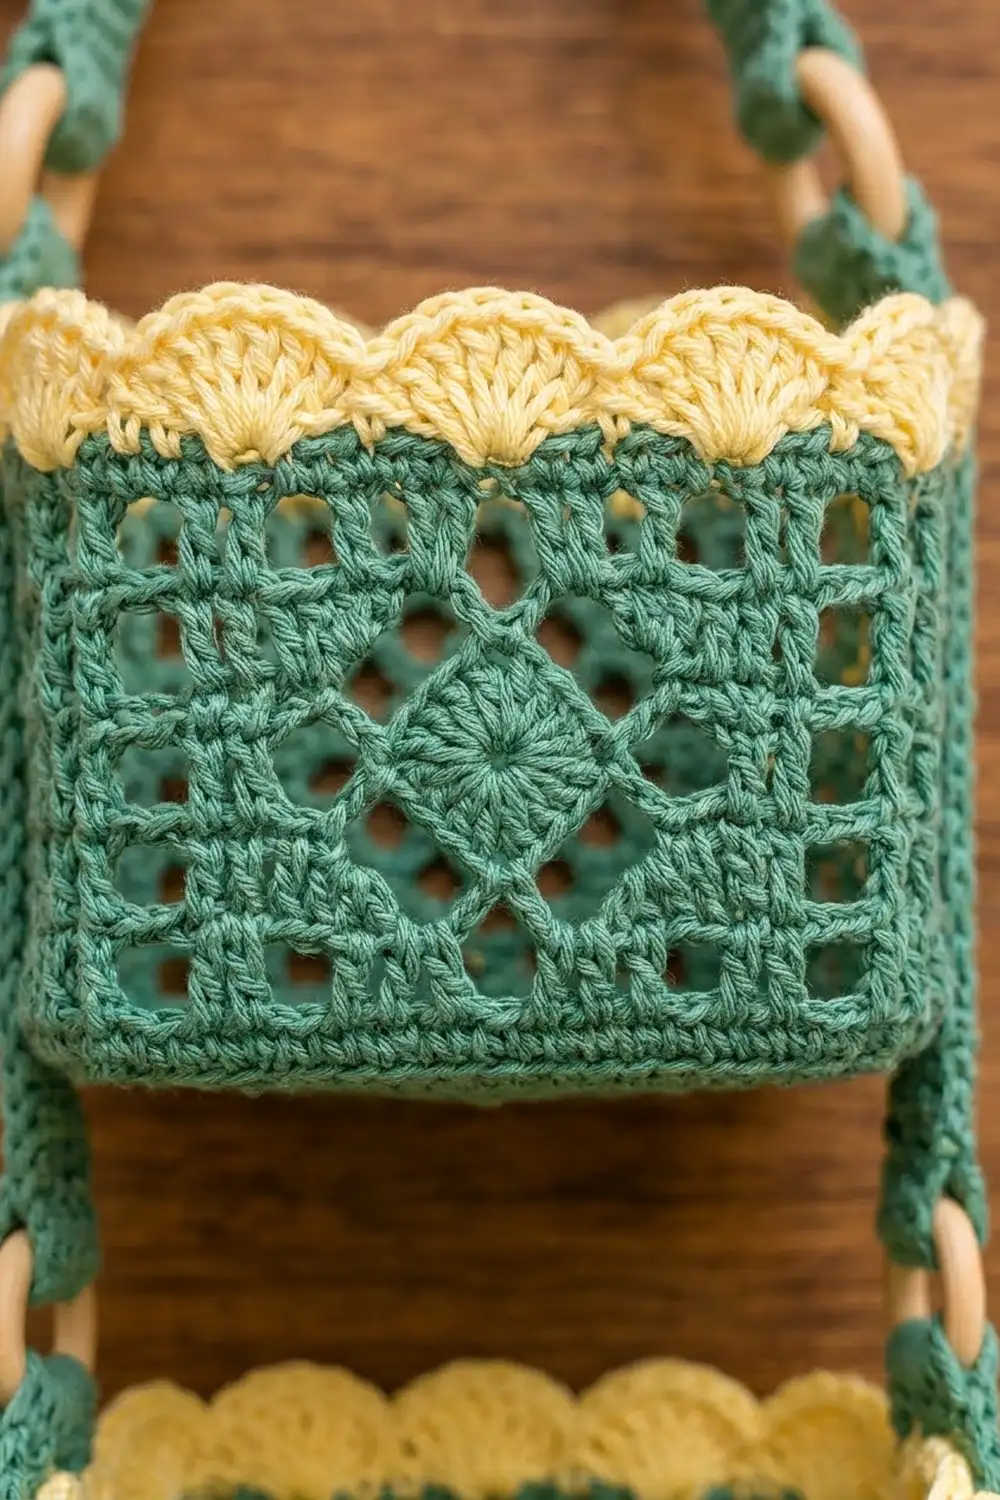
Defining a side: From here on, each side is 22 sts: the 19 sts along that edge plus the 3 corner sc that follow it. Place a marker in the first st of each side, and call the sides A, B, C and D. Sides A and C are the front and back, and they carry the diamond. Sides B and D are the sides, which carry a solid center column for the straps.
Walls
Each side has 11 squares (22 sts ÷ 2), numbered 1–11 from the side’s marker. Every wall round has 88 sts in total.
Wall Round 1: Ch 1, sc in BLO of each st around. Join. (88 sc) Working in the back loops makes a crisp fold, so the wall stands up from the base.
Wall Round 2: Ch 3 (counts as dc), dc in each st around. Join. (88 dc)
To begin Wall Rounds 3–9, ch 4 (counts as dc + ch 1), then sk next st. This completes the first OS of side A. Join each round to the 3rd ch of the ch-4.
Wall Round 3:
– Sides A and C: 11 OS.
– Sides B and D: 5 OS, 1 SS, 5 OS.
(46 dc + 42 ch-1 sps = 88 sts)
Wall Round 4:
– Sides A and C: 5 OS, 1 SS, 5 OS.
– Sides B and D: same as Wall Round 3.
(48 dc + 40 ch-1 sps = 88 sts)
Wall Round 5:
– Sides A and C: 4 OS, 1 SS, 1 OS, 1 SS, 4 OS.
– Sides B and D: same as Wall Round 3.
(50 dc + 38 ch-1 sps = 88 sts)
Wall Round 6:
– Sides A and C: 3 OS, 1 SS, 1 OS, 1 SS, 1 OS, 1 SS, 3 OS. The middle SS is the center block of the diamond.
– Sides B and D: same as Wall Round 3.
(52 dc + 36 ch-1 sps = 88 sts)
Wall Round 7: Rep Wall Round 5. (50 dc + 38 ch-1 sps)
Wall Round 8: Rep Wall Round 4. (48 dc + 40 ch-1 sps)
Wall Round 9: Rep Wall Round 3. (46 dc + 42 ch-1 sps)
Wall Round 10: Ch 3, dc in each dc and in each ch-1 sp around. Join. (88 dc) Fasten off Color A.
The wall height is now 0.25 in (0.6 cm) for the sc round plus 4.5 in (11.4 cm) for the nine dc rounds, which makes 4.75 in (12.1 cm).
Straps (Make 5)
Work in Color A, in rows.
Foundation: Ch 5. Sc in 2nd ch from hook and in each ch across. (4 sc)
Every following row: Ch 1, turn, sc in each sc across. (4 sc)
Each strap is 4 sc wide, which is 1 in (2.5 cm). Make these lengths, counting the foundation as Row 1:
- Lower-basket straps (make 2): 34 rows = 7.6 in (19.3 cm)
- Upper-basket straps (make 2): 45 rows = 10.0 in (25.4 cm)
- Hanging strap (make 1): 81 rows = 18.0 in (45.7 cm)
Leave a 12 in (30.5 cm) tail on each strap for sewing.
Make All Pieces
Totals:
- Color A: 2 bases with walls, 4 side straps, 1 hanging strap
- Color B: 2 collars, worked directly on the baskets
- Hardware: 4 wooden rings
Layout (front view, top to bottom):
        [ peg ]
        /     \
   hanging strap (V)
     O         O      <- rings 1–2
 [ UPPER BASKET ]
     |         |      <- upper strap tails
     O         O      <- rings 3–4
 [ LOWER BASKET ]
Joining
Do all of the joining after the collars are finished and blocked (see the Border and Final Blocking sections below).
Method: Whipstitch each strap onto the outside of the basket with matching Color A tails.
Stitch-to-stitch logic: Center each strap over the solid column (square 6) on sides B and D. The strap is 1 in (2.5 cm) wide and covers that column plus half of each neighboring open square. Sew each long edge of the strap into the dc posts on either side of the solid column, one whipstitch per dc round. That works out to 9 stitches per edge up the dc wall, plus 1 into Wall Round 1.
Lower basket:
- Line up the bottom end of a lower strap with the base fold.
- Sew the strap up the wall and across the collar, which takes 5.5 in (14.0 cm) of strap.
- Let 1 in (2.5 cm) of strap stand above the rim.
- Pass the strap end through a ring, fold it back 1 in (2.5 cm), and sew it down.
- Repeat on the opposite side.
Upper basket:
- Position each upper strap so that 1 in (2.5 cm) plus a 1 in (2.5 cm) fold sits above the rim through a ring. Sew it to the basket exactly like the lower straps.
- The remaining 2.5 in (6.4 cm) of strap hangs below the base. Pass this tail through a lower-basket ring, fold it up 1 in (2.5 cm), and sew it down. This leaves 1.5 in (3.8 cm) of tail visible between the baskets.
Hanging strap: Pass each end through one of the upper-basket rings, fold it back 1 in (2.5 cm), and sew it down. This leaves 16 in (40.6 cm) of loop for the peg.
Tension: Make the whipstitches snug but not tight. If you pull them tight, the filet mesh puckers.
Size checkpoint: Each pair of rings must sit level, 1 in (2.5 cm) above its basket rim. Hang the holder and check that both baskets hang straight before you weave in the ends.
Border: Two-Tier Scalloped Collar
Border gauge: 4 sc = 1 in (2.5 cm). One scallop uses 4 sts, so one scallop is 1 in (2.5 cm) wide.
Work each collar in Color B, directly onto Wall Round 10 of each basket.
Collar Round 1: Join Color B in the first st of side A. Ch 1, then sc in each st, working 3 sc in the 21st st of each side (the middle of the old corner group). Join. (88 sc + 8 extra sts = 96 sc; 24 per side)
Collar Round 2 (upper tier, BLO): Ch 1, sc in BLO of next st, sk 1, shell in BLO of next st, sk 1; rep from * around. Join. (24 shells; 6 per side)* Fasten off.
Collar Round 3 (lower tier, FLO): Join Color B in the front loop of the first st of Collar Round 1. Work the same repeat as Collar Round 2 into the front loops of Collar Round 1, letting the shells fold down over Wall Round 10. Join. (24 shells; 6 per side) Fasten off.
Why the math works: Each side starts with 22 sts. Adding 2 sts at the corner makes 24 sts, and 24 ÷ 4 = 6 scallops per side, so the repeat ends cleanly at every corner. The front and back loops of Collar Round 1 both hold 96 sts, so the two tiers line up shell for shell. Six 1 in (2.5 cm) scallops plus the curve of the corner fill the 6 in (15.2 cm) side.
Final Blocking
- Weave in all ends, except the strap tails you need for sewing.
- Lightly mist each basket until it is damp, not soaked.
- Slide the basket over a box about 6 in (15.2 cm) square, upside down.
- Square the corners and straighten the filet columns with your fingers.
- Turn the basket upright and pin the lower scallops so they sit flat against the wall. Shape the upper scallops so they stand straight up.
- Pin the straps flat at 1 in (2.5 cm) wide.
- Let everything dry completely before you sew.
Final Quality-Control Checklist
- Each base measures 6 in (15.2 cm) across.
- Every wall round has 88 sts.
- Each diamond is centered on sides A and C.
- The solid center column runs straight up sides B and D.
- Each wall is 4.75 in (12.1 cm) tall before the collar.
- Each collar has 24 shells per tier, 6 per side.
- The straps are 1 in (2.5 cm) wide and the correct row counts.
- The rings sit level, 1 in (2.5 cm) above each rim.
- A standard roll drops in easily and lifts out easily.
Troubleshooting
- The base is cupping. Your tension is too tight. Try a larger hook, or loosen up on the corner stitches.
- The base is ruffling. Check that you worked exactly 2 dc on each side of every corner.
- The diamond leans. You probably lost a st at the join. Recount to 22 per side.
- The walls flare outward. Go down half a hook size for the wall rounds.
- The scallops don’t fit the corners. Check that Collar Round 1 has 96 sts.
- The basket tilts when hanging. Re-sew the straps so both rings sit at the same height.
Care
Hand wash in cool water, press out excess water in a towel, and reshape the basket over its blocking box to dry. Avoid tumble drying, which can shrink cotton unevenly.
Final Notes
Here is the measurement chain:
- Each base grows to 5.5 in (14.0 cm), then 6 in (15.2 cm) with the sc edging round, which sets 88 sts, or 22 per side.
- The walls keep 88 sts all the way up to 4.75 in (12.1 cm).
- Adding 2 sts per corner makes 24 sts per side, which divides into 6 one-inch scallops in each tier.
- The straps measure 7.6 in (19.3 cm), 10.0 in (25.4 cm) and 18.0 in (45.7 cm), and they link both 5.5 in (14.0 cm) baskets into a 23.5 in (59.7 cm) hanging holder.
If you check each measurement as you reach it, the next stage will fit.
Happy crocheting!