

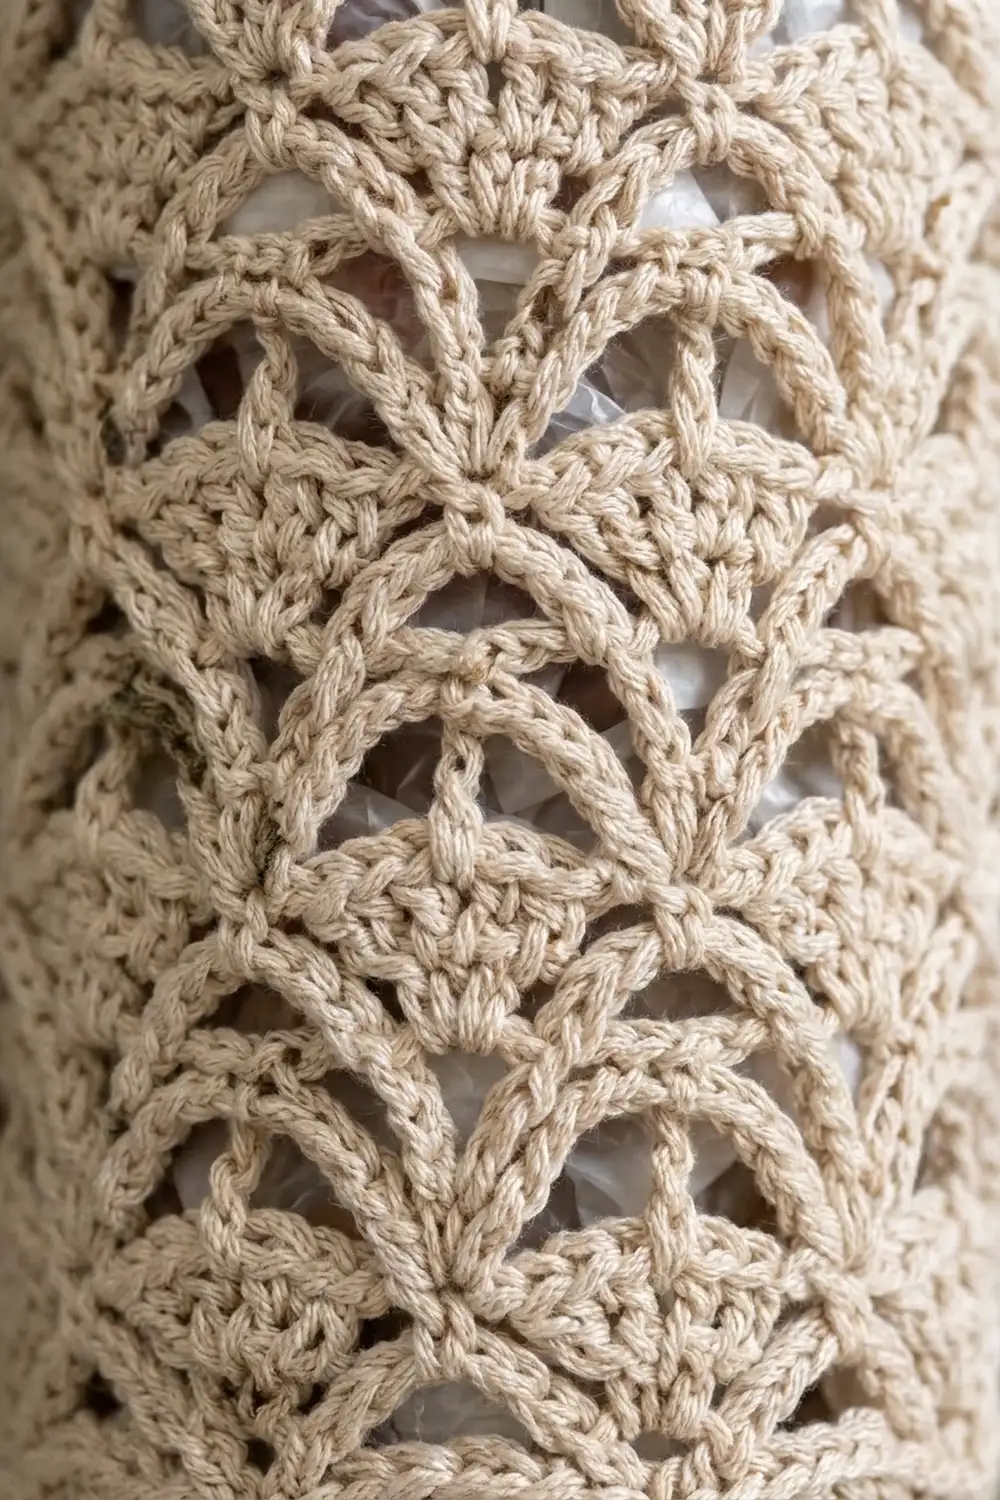
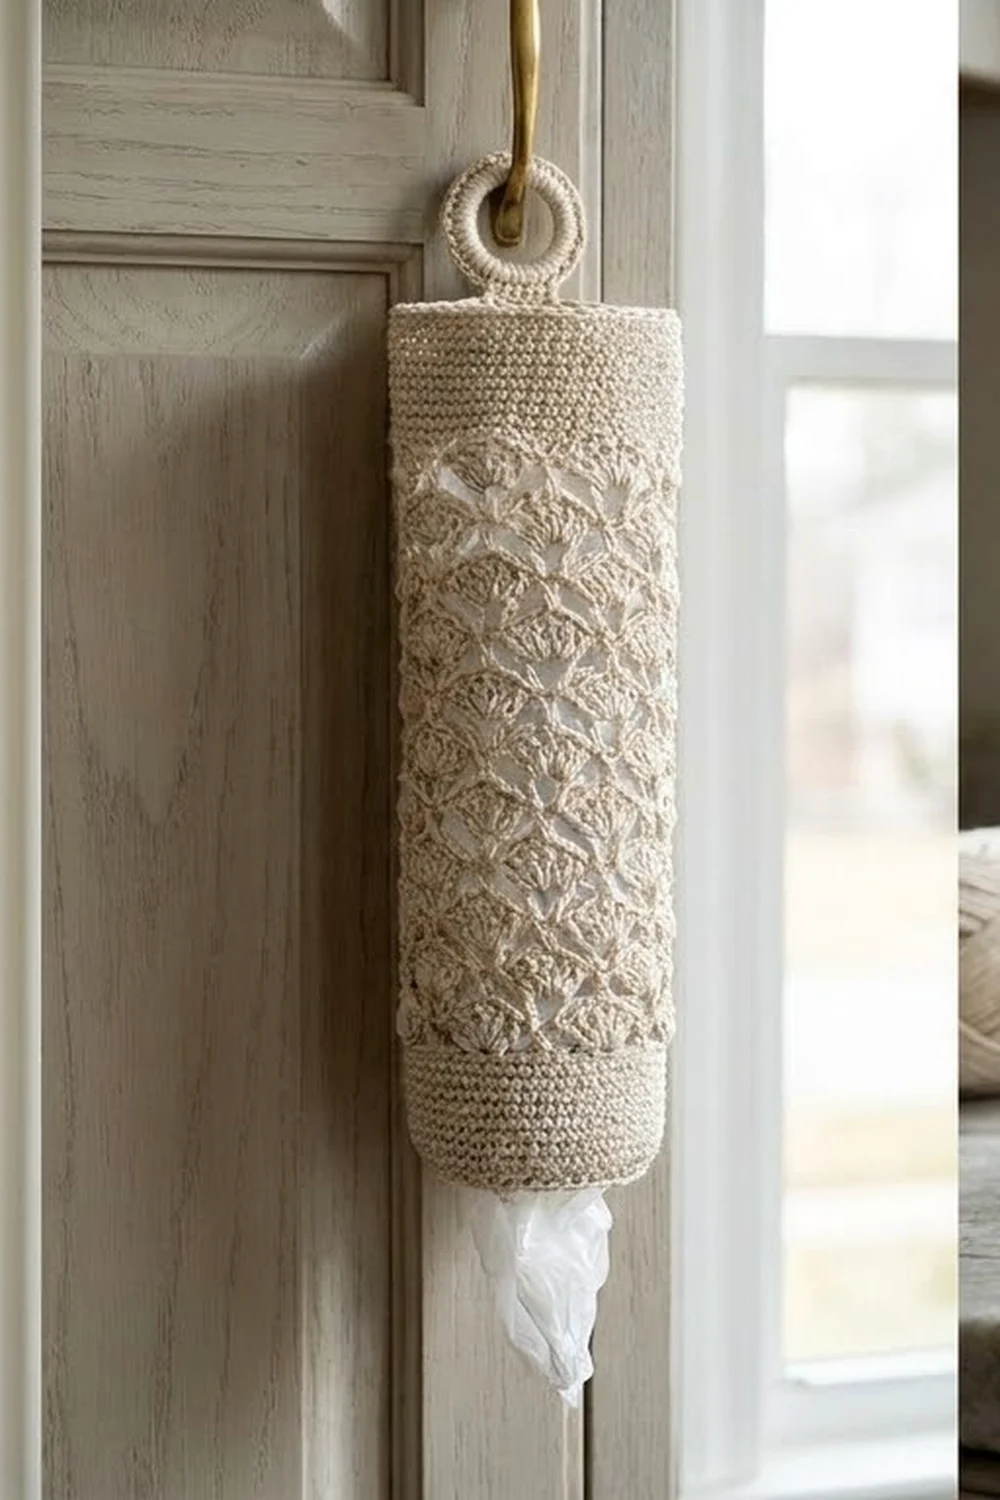
This plastic bag holder is a tall, slim tube of staggered seashell fans, crocheted in one calm cream cotton. Open arches sit between the rounds of fans, so the lace looks light and scalloped, and the bags inside show through like a soft lining. A solid band at the top keeps the opening firm, a narrower band at the bottom lets you pull out one bag at a time, and a covered ring lets it hang neatly from a hook or knob.
The style is farmhouse-simple: one color, cotton yarn, and a stitch pattern that looks detailed but runs on a short four-round repeat. It suits a pantry door, the end of a kitchen cabinet, or a laundry nook.
This pattern uses US crochet terms. Lying flat, the finished holder is 8 in (20.3 cm) wide and 17.5 in (44.5 cm) long, not counting the hanger. The ring adds about 2.75 in (7.0 cm) above the top edge.
You work the tube top-down, in joined rounds, without turning. First comes a solid single crochet top band, then the fan-and-arch lace body, then a bottom band that decreases to a smaller opening. Last, you cover a ring with single crochet, add a small tab, and sew the tab inside the back of the top band.
Finished Size and Construction
- Finished size (flat): 8 in (20.3 cm) wide × 17.5 in (44.5 cm) long
- Circumference: 16 in (40.6 cm), about 5 in (12.7 cm) across when filled
- Bottom opening: 10 in (25.4 cm) around, about 3.2 in (8.1 cm) across
- Skill level: Intermediate (an advanced beginner can manage it if comfortable with joined rounds)
- Terminology: US
- Yarn weight: Worsted (#4), cotton
- Hook: 5.0 mm (H-8)
- Number of pieces: 1 tube body + 1 covered ring hanger
- Layout: A single tube with 8 fan repeats around; no joining of motifs
- Size before border (top band + lace body): 8 in (20.3 cm) wide × 16 in (40.6 cm) long
- Border depth (bottom band): 1.5 in (3.8 cm)
Materials
Yarn: Use a smooth, mercerized or combed cotton in worsted weight. Cotton holds the shell shapes crisply, doesn’t stretch out of shape under the weight of the bags, and can be machine washed. Avoid fuzzy or very loosely plied yarns, because they blur the arches.
- Cream / oatmeal: 150 g, about 245 m (268 yd)
Tools:
- 5.0 mm (H-8) crochet hook
- One 2 in (5.1 cm) inside-diameter ring (plastic or metal)
- Stitch marker
- Tapestry needle
- Scissors
- Measuring tape
- Blocking pins and a towel or blocking mat
- Optional: a rolled towel or paper-towel tube for shaping while the piece dries
The yarn amount includes a margin of roughly 15% for your gauge swatch and small tension differences.
Abbreviations (US Terms)
- ch – chain
- sl st – slip stitch
- sc – single crochet
- dc – double crochet
- sc2tog – single crochet 2 together
- sk – skip
- sp – space
- st(s) – stitch(es)
- rnd(s) – round(s)
Special stitch:
Fan: (dc, ch 1) 4 times in the stitch shown, then 1 more dc in that same stitch. That gives 5 dc with 4 ch-1 spaces between them. The center of a fan is its 3rd dc.
Beginning fan: Ch 4 (counts as dc + ch 1), (dc, ch 1) 3 times in the same stitch, then dc in that same stitch.
Gauge and Checkpoints
- Single crochet gauge: 16 sc × 16 rnds = 4 in (10.2 cm)
- Lace gauge: 1 fan repeat (8 sts wide) = 2 in (5.1 cm); 4 pattern rnds = 2 in (5.1 cm) tall
Test first: Chain 32, join into a ring, and work Rnds 1–9 as written below, using 4 fan repeats instead of 8. Lay the little tube flat. It should be 4 in (10.2 cm) wide and 3.5 in (8.9 cm) tall. This swatch tests the exact stitches you’ll use.
Checkpoints on the real piece (measured flat):
- After Rnd 4: 8 in (20.3 cm) wide, 1 in (2.5 cm) tall
- After Rnd 9: 3.5 in (8.9 cm) tall
- After Rnd 33: 15.5 in (39.4 cm) tall
- After Rnd 34: 16 in (40.6 cm) tall
- After Rnd 40: 17.5 in (44.5 cm) tall
If your piece is too big: Switch to a hook 0.5 mm smaller and work the swatch again.
If your piece is too small: Switch to a hook 0.5 mm larger.
If only the height is off: If the width is right but each repeat is short or tall, adjust the total length by adding or leaving out one 4-round repeat. Each repeat changes the length by 2 in (5.1 cm).
Pattern: Tube Body
Top Band
Foundation: Ch 64. Join with a sl st to the first ch to form a ring, taking care not to twist the chain.
Rnd 1: Ch 1, sc in each ch around, sl st to first sc. (64 sts)
Rnds 2–4: Ch 1, sc in each st around, sl st to first sc. (64 sts)
The band now measures 8 in (20.3 cm) flat by 1 in (2.5 cm) tall. Place a marker in the joining stitch. This line is the center back, where the hanger will go.
Lace Body
Rnd 5 (set-up fan round): Ch 1, sc in first st, sk 3 sts, fan in next st, sk 3 sts, sc in next st. Repeat from * 6 more times, then sk 3 sts, fan in next st, sk 3 sts, sl st to first sc. (8 fans, 8 sc)
Each repeat uses exactly 8 stitches of Rnd 4: 1 sc + 3 skipped + 1 fan stitch + 3 skipped. Eight repeats × 8 sts = 64 sts.
Rnd 6 (arch round): Ch 6 (counts as dc + ch 3), sc in center dc of next fan, ch 3, dc in next sc, ch 3. Repeat from * 6 more times, then sc in center dc of last fan, ch 3, sl st to 3rd ch of beginning ch-6. (8 dc, 8 sc, 16 ch-3 sps)
This round puts a sc on top of every fan and a dc over every sc between the fans. The ch-3 strands form the arches.
Rnd 7 (offset fan round): Beginning fan in the same st as the join, sk ch-3 sp, sc in next sc, sk ch-3 sp, fan in next dc. Repeat from * 6 more times, then sk ch-3 sp, sc in last sc, sk ch-3 sp, sl st to 3rd ch of beginning ch-4. (8 fans, 8 sc)
These fans sit over the gaps between the Rnd 5 fans. That half-repeat shift is what gives the stacked, scalloped look.
Rnd 8 (arch round): Sl st in next ch-1 sp, sl st in next dc, sl st in next ch-1 sp, sl st in next dc. You are now at the center of the beginning fan. Ch 1, sc in same st, ch 3, dc in next sc, ch 3, sc in center dc of next fan. Repeat from * 6 more times, then ch 3, dc in last sc, ch 3, sl st to first sc. (8 sc, 8 dc, 16 ch-3 sps)
Rnd 9 (aligned fan round): Ch 1, sc in first sc, sk ch-3 sp, fan in next dc, sk ch-3 sp, sc in next sc. Repeat from * 6 more times, then sk ch-3 sp, fan in last dc, sk ch-3 sp, sl st to first sc. (8 fans, 8 sc)
The Rnd 9 fans line up directly above the Rnd 5 fans.
Checkpoint: The piece is 3.5 in (8.9 cm) tall and still 8 in (20.3 cm) wide when flat.
Rnds 10–33: Repeat Rnds 6–9 six more times. That makes 7 full repeats of Rnds 6–9, ending with an aligned fan round. (8 fans, 8 sc)
Rnd 34 (final arch round): Work as Rnd 6. (8 dc, 8 sc, 16 ch-3 sps)
Checkpoint: The body now measures 16 in (40.6 cm) long and 8 in (20.3 cm) wide when flat.
Do not fasten off. Continue straight into the bottom band.
Border: Bottom Band
Border gauge: 16 sc × 16 rnds = 4 in (10.2 cm). Every sc round adds 0.25 of an inch, so 4 rnds make 1 in (2.5 cm).
Because this is a tube, “per side” means each flat side when the tube is folded flat along the center-back marker and the center front.
Rnd 35 (conversion round): Ch 1, sc in same st as join (the beginning dc). 3 sc in next ch-3 sp, sc in next sc, 3 sc in next ch-3 sp, sc in next dc. Repeat from * around, ending with 3 sc in the last ch-3 sp. Sl st to first sc.
Count: 16 sts worked one in each existing st (8 dc + 8 sc), plus 48 sts added in the spaces (16 spaces × 3) = 64 sts. That is 32 per flat side.
Rnd 36 (decrease): Ch 1, sc in next 2 sts, sc2tog. Repeat from * 15 more times, sl st to first sc. (48 sts; 24 per flat side)
Rnd 37: Ch 1, sc in each st around, sl st to first sc. (48 sts)
Rnd 38 (decrease): Ch 1, sc in next 4 sts, sc2tog. Repeat from * 7 more times, sl st to first sc. (40 sts; 20 per flat side)
Rnds 39–40: Ch 1, sc in each st around, sl st to first sc. (40 sts)
Fasten off and weave in the end.
Why the math works:
- The lace is built on 8 repeats of 8 sts, which is 64 sts.
- The final arch round has 16 real stitches and 16 three-chain spaces. Working 1 sc in each stitch and 3 sc in each space gives 16 + 48 = 64, exactly the top band count. So the bottom starts at the same width as the top and the tube hangs straight.
- Rnd 36 takes out 1 stitch in every 4 (64 − 16 = 48).
- Rnd 38 takes out 1 stitch in every 6 (48 − 8 = 40).
- At 4 sts per inch, 40 sts makes a 10 in (25.4 cm) opening. That is snug enough to hold the bags in but loose enough to pull one out.
- The 6 band rounds (Rnds 35–40) at 4 rnds per inch give the 1.5 in (3.8 cm) border depth, which brings the length to 17.5 in (44.5 cm).
Top Edge Finish
Join yarn at the center-back marker on the foundation-chain edge. Sl st loosely in each foundation ch around. (64 sl sts; 32 per flat side)
Sl st to the first sl st and fasten off. This round firms up the chain edge so it matches the bottom band.
Ring Hanger
Ring cover: Make a slip knot on your hook. Holding the ring, work sc over the ring (inserting the hook through the center of the ring) until it is fully covered. That should be about 40 sc for a 2 in (5.1 cm) ring. Push the stitches together as you go so no plastic or metal shows. Sl st to first sc. (40 sc)
The covered ring measures about 2.75 in (7.0 cm) across the outside.
Tab:
- Row 1: Do not fasten off. Ch 1, sc in the same st and in the next 5 sts. (6 sc)
- Rows 2–4: Ch 1, turn, sc in each st across. (6 sc)
The tab is 1.5 in (3.8 cm) wide and 1 in (2.5 cm) tall. Fasten off, leaving a 12 in (30.5 cm) tail.
Attach: Center the tab on the inside of the top band at the center-back marker. The ring should rise above the top edge. Whipstitch all four edges of the tab to Rnds 1–4 of the band, catching only the back loops on the inside so no stitches show on the front.
Final Blocking
- Weave in all ends securely, running each one through solid sc stitches rather than the lace.
- Soak the holder in cool water for 10 minutes, then gently squeeze out the water. Do not wring it.
- Roll it in a towel to remove extra water.
- Slide a rolled towel or a cardboard tube about 5 in (12.7 cm) across inside the tube to open it into a round shape.
- Lay it flat, or stand it on the tube. Measure the width (8 in / 20.3 cm flat) and the length (17.5 in / 44.5 cm).
- Open up each fan with your fingers so the 5 dc spread evenly. Straighten the arches so they curve smoothly.
- Pin the top and bottom bands straight if they ripple.
- Let it dry completely, then remove the form.
Final Quality-Control Checklist
- 64 sts in the top band and in Rnd 35; 40 sts in the bottom opening
- 8 fans in every fan round, with the fans offsetting by half a repeat each time
- Rnd 34 is an arch round, so no fan round sits right against the bottom band
- Flat width is 8 in (20.3 cm) at both the top and the start of the bottom band
- Total length is 17.5 in (44.5 cm), plus the ring
- Joining seams line up in a straight column at the center back
- The ring is fully covered and the tab is sewn on all four sides
- No ends show on the outside
Troubleshooting
The joins drift around the tube. Make sure you start each round exactly as written, including the slip stitches at the start of Rnd 8. If the joins wander, it usually means one round started a stitch early.
The fans look crowded or cupped. Your dc are too tight. Loosen up slightly, or go up 0.5 mm for the lace rounds only.
The arches sag. Your chains are loose. Tighten the ch-3s, or try a ch-2 + sl st rhythm, but keep the stitch placement the same.
The bottom band flares. Go down 0.5 mm for Rnds 35–40.
The bags slip out on their own. Add one more round: sc in next 3 sts, sc2tog around, for 32 sts.
The tube twisted. If the foundation chain was twisted when you joined it, the twist can’t be fixed afterward. Restart and check the chain before joining.
Care
Machine wash cold in a mesh bag on a gentle cycle, or hand wash. Reshape it while damp and lay it flat to dry. Do not put it in the dryer, because the cotton can shrink in length.
Final Notes
The whole holder rests on one measurement chain. A 4-per-inch sc gauge gives 64 sts and a 16 in (40.6 cm) circumference. Eight 2 in (5.1 cm) fan repeats fill exactly that circle. Seven 4-round repeats, plus the set-up and final arch rounds, build a 16 in (40.6 cm) body. The conversion round brings you back to exactly 64 sts, and two decrease rounds close the bottom to 40 sts across a 1.5 in (3.8 cm) band, for a finished length of 17.5 in (44.5 cm). Check your gauge, count your fans, and the holder will hang straight and full.
Happy crocheting!