

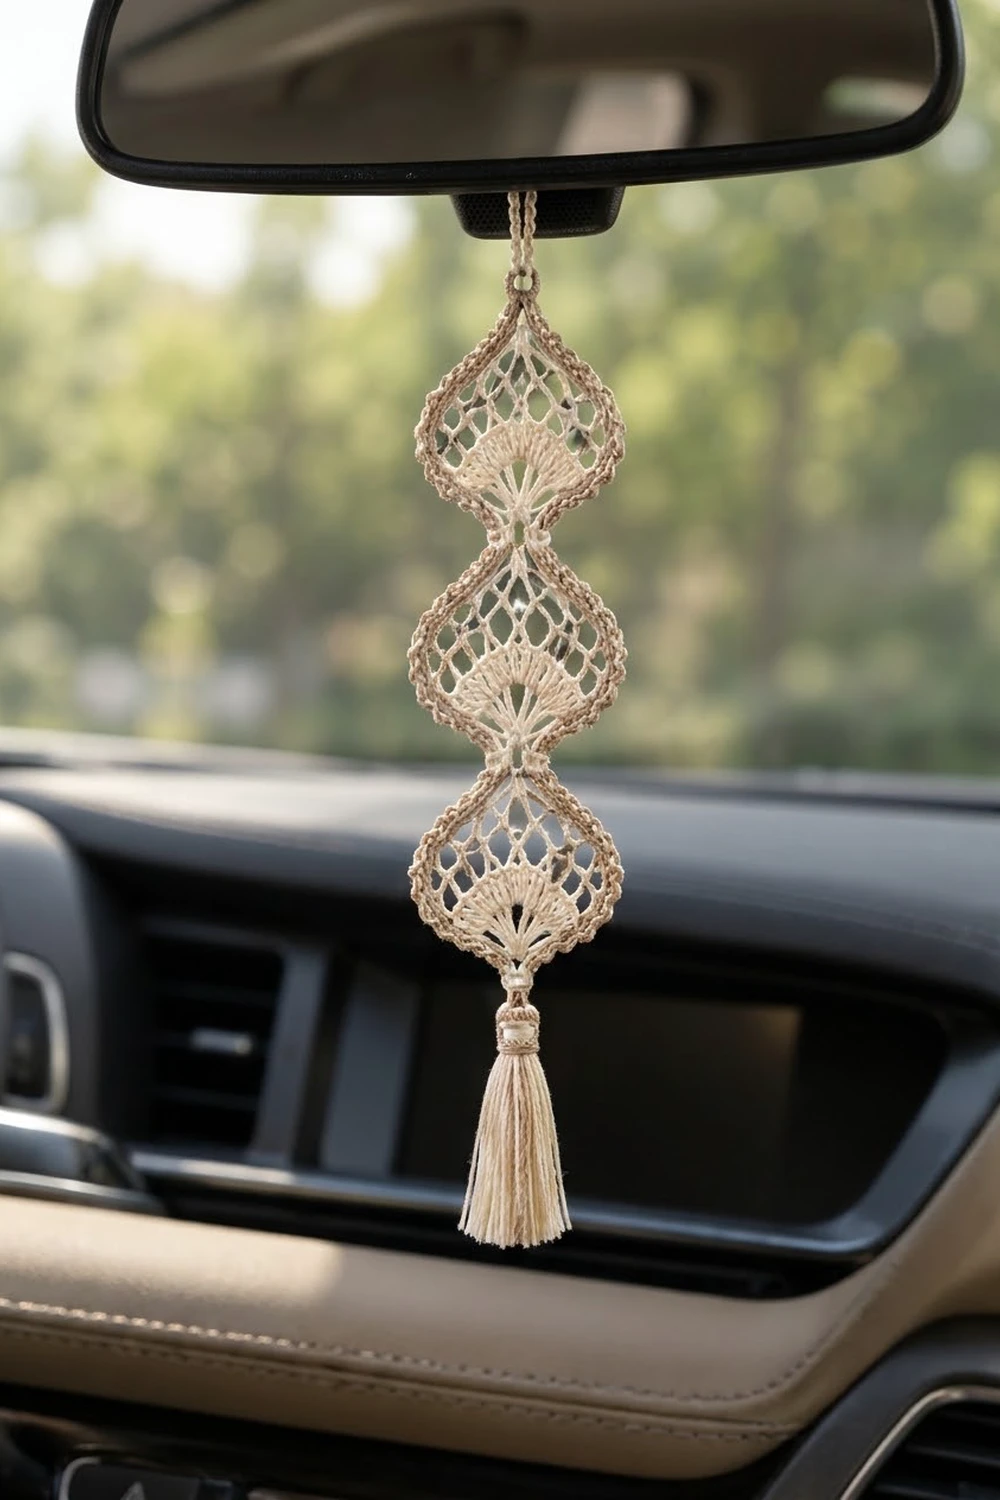
This hanger is a light, airy piece made to sway from a rear-view mirror. Three teardrop lace motifs are joined tip to tip. Each motif has a ribbed fan at the bottom and an open diamond net above it. The whole strip is framed by a raised outline that looks like twisted rope.
There are only two colors. The lace body and the tassel are soft cream. The outline, the hanging loop, and the tassel wrap are warm taupe. Together they look natural and a little boho, so the hanger suits a car, a window latch, a doorknob, or a gift bag.
The pattern uses US crochet terms. The finished strip measures 2.5 in (6.4 cm) wide and 10 in (25.4 cm) long. With the loop and tassel added, the hanger is about 15.5 in (39.4 cm) from the top of the loop to the tip of the tassel.
Here is the construction. You work each motif in rows, starting at the bottom point: first the fan, then a net that gets wider and then narrower up to the top point. Next you work one cream edge round around each motif. Then you join the three motifs point to point and work two taupe border rounds around the whole strip. Last, you add the hanging loop and the tassel.
Finished Size and Construction
- Finished size: 2.5 in × 10 in (6.4 cm × 25.4 cm) strip; about 15.5 in (39.4 cm) including loop and tassel
- Skill level: Intermediate (thread work, lace rows, crab stitch)
- Terminology: US crochet terms
- Yarn weight: Size 3 cotton crochet thread
- Hook: 1.75 mm steel hook
- Number of pieces: 3 identical motifs, plus a tassel
- Layout: 1 column × 3 rows, joined point to point
- Piece size (after edge round): 2.25 in × 3.25 in (5.7 cm × 8.3 cm)
- Size before border: 2.25 in × 9.75 in (5.7 cm × 24.8 cm)
- Border depth: 0.125 in (0.3 cm) on every side
Materials
Use mercerized cotton thread. It holds the net open, keeps the stitches crisp, and survives sun and heat in a car better than acrylic. Choose a tightly twisted thread so the crab-stitch outline looks like rope.
- Cream (main color): 20 g, about 60 m. Used for the motifs, the edge rounds, the joins, and the tassel.
- Taupe (contrast color): 8 g, about 24 m. Used for the border, the hanging loop, and the tassel wrap.
Tools:
- 1.75 mm steel crochet hook
- Tapestry needle with a small eye
- Scissors
- Rust-proof pins and a foam blocking board
- Spray starch or a fabric stiffener (optional, but recommended)
- A 3 in (7.6 cm) piece of cardboard for the tassel
- 2 stitch markers
These quantities include a margin of about 25% for your gauge swatch and any ripping back.
Abbreviations (US Terms)
- ch – chain
- sl st – slip stitch
- sc – single crochet
- dc – double crochet
- sk – skip
- sp – space
- st(s) – stitch(es)
- rev sc – reverse single crochet (crab stitch)
- RS – right side
Special stitch – reverse single crochet (rev sc): Work from left to right (right to left if you crochet left-handed). Insert the hook into the next stitch to the right, yarn over, pull up a loop, then yarn over and pull through both loops on the hook. This makes a twisted, corded edge.
Turning chain: In Row 2, the beginning ch 4 counts as 1 dc plus 1 ch-1 sp. In Row 1, the beginning ch 3 counts as 1 dc. In sc rows, the ch 1 never counts as a stitch.
Gauge and Checkpoints
Make one complete motif before you make the others. Lace gauge is easier to judge on a finished piece than on a square swatch.
- Border gauge: 10 sc = 1 in (2.5 cm) along the edge round
- After Row 2: the fan measures 1.25 in (3.2 cm) across the top and 0.75 in (1.9 cm) from the ring to the top of the dc.
- After Row 6 (widest row): the net measures 2 in (5.1 cm) across with the loops gently stretched.
- After Row 12: the motif measures 3 in (7.6 cm) from bottom point to top point.
- After the edge round: the motif measures 2.25 in × 3.25 in (5.7 cm × 8.3 cm) when pinned.
If your motif is too big: go down to a 1.5 mm hook, or make the ch-5 loops as ch-4 loops in Rows 4–12.
If your motif is too small: go up to a 2 mm hook. Do not add stitches, because the loop counts control the shape.
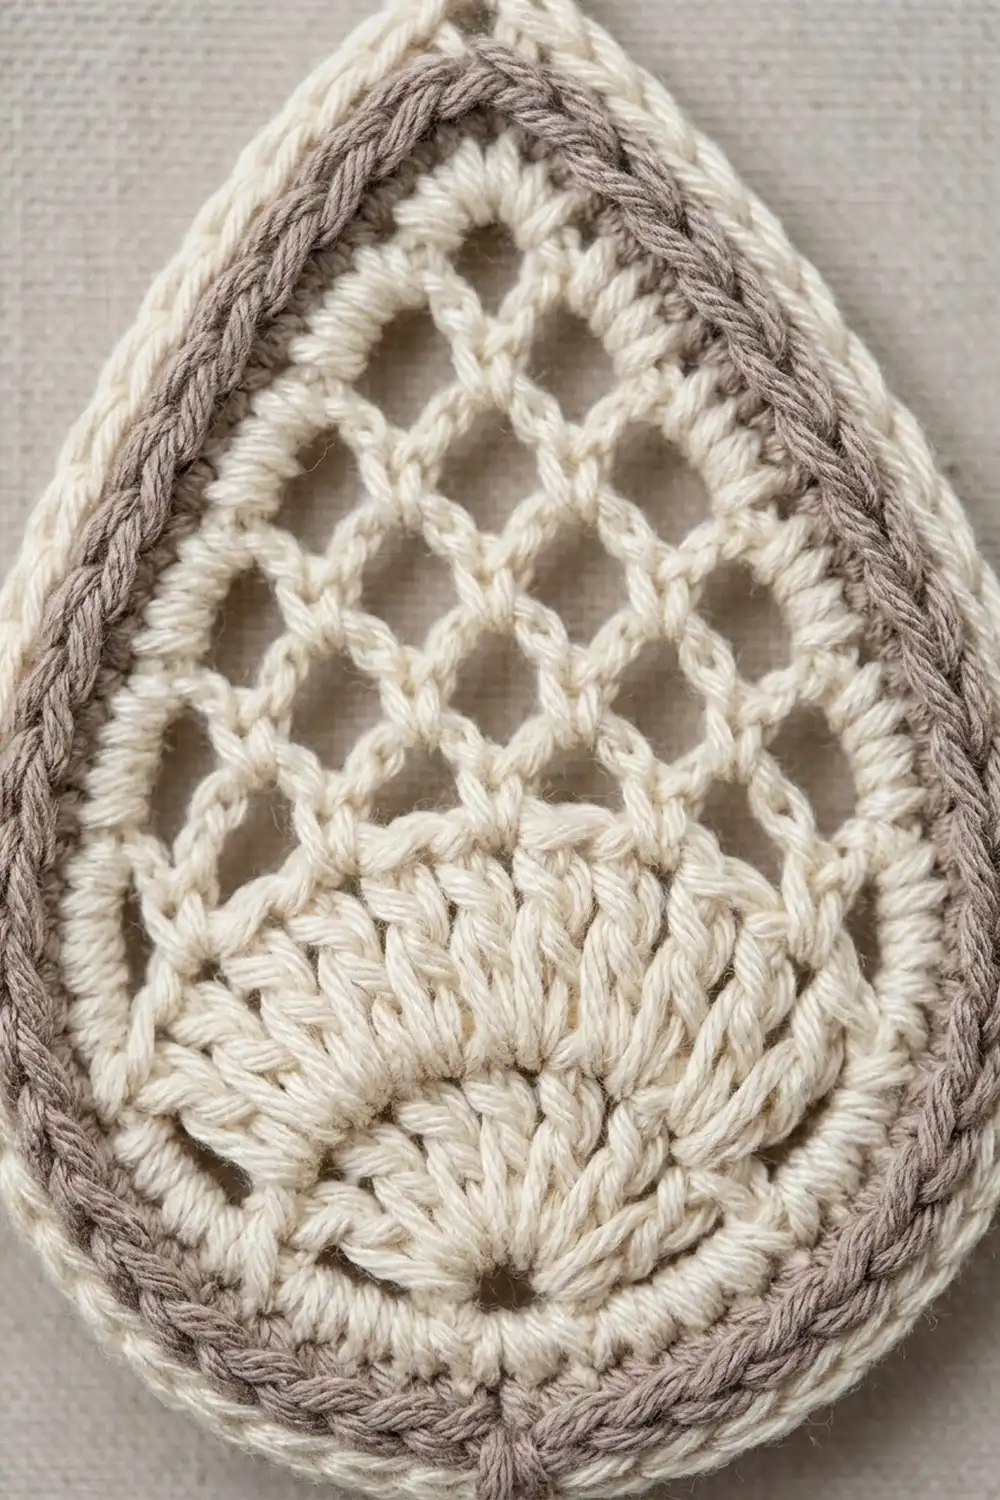
Motif (Make 3)
Use cream throughout.
Foundation: Ch 4 and sl st in the first ch to form a ring. This ring becomes the bottom point.
Row 1 (fan base): Ch 3 (counts as dc), work 8 dc in the ring. Turn. (9 dc)
The dc fill only half of the ring, so they spread into a semicircle that opens upward.
Row 2 (fan ribs): Ch 4 (counts as dc + ch 1). [Dc in next dc, ch 1] 7 times, then dc in the top of the turning ch. Turn. (9 dc, 8 ch-1 sps)
These spaced dc make the ribs of the fan.
Row 3 (start of net): Ch 1, sc in the first dc. [Ch 4, sk next dc, sc in next dc] 4 times. You place sc in dc 1, 3, 5, 7, and 9. Turn. (5 sc, 4 ch-4 loops)
Row 4 (increase): Ch 1, sc in the first sc, ch 5, sc in the first loop. [Ch 5, sc in next loop] 3 times. Ch 5, sc in the last sc. Turn. (5 ch-5 loops)
The extra loop at each end of the row makes the net wider.
Row 5 (increase): Ch 1, sc in the first sc, ch 5, sc in the first loop. [Ch 5, sc in next loop] 4 times. Ch 5, sc in the last sc. Turn. (6 ch-5 loops)
Row 6 (increase): Ch 1, sc in the first sc, ch 5, sc in the first loop. [Ch 5, sc in next loop] 5 times. Ch 5, sc in the last sc. Turn. (7 ch-5 loops)
This is the widest row and forms the rounded bulb of the teardrop.
Row 7 (decrease): Sl st in each of the first 3 ch of the first loop, sc in the same loop. [Ch 5, sc in next loop] 6 times. Turn. (6 ch-5 loops)
Starting in the middle of the first loop and ending in the last loop takes one loop off the row.
Row 8 (decrease): Work as Row 7, repeating the bracket 5 times. (5 ch-5 loops)
Row 9 (decrease): Work as Row 7, repeating the bracket 4 times. (4 ch-5 loops)
Row 10 (decrease): Work as Row 7, repeating the bracket 3 times. (3 ch-5 loops)
Row 11 (decrease): Work as Row 7, repeating the bracket 2 times. (2 ch-5 loops)
Row 12 (top point): Work as Row 7, repeating the bracket once. (1 ch-5 loop)
The net now tapers over six rows to a single loop. Because it widens over only three rows and narrows over six, the bulb sits low and the top comes to a long point. Do not turn and do not fasten off.
Edge Round (cream): Ch 1. Work 5 sc in the top loop from Row 12, and place a marker in the 3rd sc. This is the top point stitch.
Work down the first side:
- 3 sc around each row end of Rows 11 through 3 (27 sc)
- 3 sc around each dc row end of Rows 2 and 1 (6 sc)
Work 3 sc in the foundation ring, and place a marker in the middle sc. This is the bottom point stitch.
Work up the second side:
- 3 sc around each row end of Rows 1 and 2 (6 sc)
- 3 sc around each row end of Rows 3 through 11 (27 sc)
Sl st in the first sc to join. (74 sc)
Stitch count check: Each side has 36 sc between the two point stitches. Side one is the 2 sc after the top point, plus 33 row-end sc, plus 1 ring sc, which makes 36. Side two works the same way. So 36 + 36 + 2 point stitches = 74.
In this pattern, the per-side count of 36 excludes the point stitches. The points are counted separately because they become the joins.
Fasten off with a 6 in (15.2 cm) tail on Motif 2 and Motif 3. Weave in all the other ends.
Make All Pieces
- Cream: 3 motifs, each with the edge round
- Taupe: none at this stage
Layout grid, top to bottom, all motifs right side facing and top point up:
   [ Motif 1 ]   <- hanging loop attaches at top point
        |
   [ Motif 2 ]
        |
   [ Motif 3 ]   <- tassel attaches at bottom point
Joining
Method: sl st join at one stitch only, point to point.
- Lay Motif 1 above Motif 2, both RS up. The bottom point stitch of Motif 1 should touch the top point stitch of Motif 2.
- Using the cream tail of Motif 2, insert the hook through the bottom point stitch of Motif 1 and then through the top point stitch of Motif 2. Sl st through both.
- Ch 1, then sl st through the same pair again to lock the join. Fasten off and weave in the end.
- Repeat to join the bottom point of Motif 2 to the top point of Motif 3.
Stitch-to-stitch logic: Each join uses only the two point stitches. The 36 side stitches on each motif stay free for the border. The joined points sit inside the waist and are not worked again.
Tension: Keep the join snug but not puckered. The two motifs should meet with no gap and should not overlap. If you can see more than a hair of thread between the tips, the join is too loose.
Size checkpoint: The joined strip measures 2.25 in × 9.75 in (5.7 cm × 24.8 cm), which is 3 × 3.25 in (8.3 cm) tall.
Border
Border gauge: 10 sts = 1 in (2.5 cm). The border is 2 rounds deep and adds 0.125 in (0.3 cm) on every side.
Round 1 (taupe, sc): With RS facing, join taupe with a sc in the top point stitch of Motif 1. Work 2 more sc in the same stitch, so the strip’s top point has 3 sc in total.
Work down the left long side:
- Motif 1: sc in each of its 36 side stitches.
- At the waist, skip both joined point stitches.
- Motif 2: sc in each of its 36 side stitches.
- Skip the next joined points.
- Motif 3: sc in each of its 36 side stitches.
That gives 108 sc on the left long side.
At the bottom point stitch of Motif 3, work 3 sc.
Work up the right long side the same way: 36 sc on each motif and the joined points skipped, for 108 sc.
Sl st in the first sc to join. (222 sc)
Round 1 count by section:
- Top point: 3
- Left side: 108
- Bottom point: 3
- Right side: 108
- Total: 222
Round 2 (taupe, rev sc): Ch 1. Work rev sc in each sc around, 1 rev sc in each st. Sl st in the first st to join. (222 rev sc)
This round twists into the raised, rope-like outline. Do not fasten off yet.
Why the math works: Each long side runs past 3 motifs, and each motif gives 36 stitches to that side. That makes 3 × 36 = 108, with nothing added at the seams. The only extra stitches are at the strip’s two outer points: 3 sc in one stitch, so each point turns sharply without cupping.
At the waists, skipping the joined points pulls Round 1 inward. That creates the hourglass pinch between motifs. Round 2 is worked 1 stitch per stitch, so it stays at 222 and lies flat.
Hanging loop: With taupe still on the hook at the top point, ch 60. Sl st into the top point to form a loop. Sl st in each of the 60 ch to firm the cord, then fasten off.
The loop hangs about 3 in (7.6 cm) above the strip.
Tassel: Wrap cream 40 times around the 3 in (7.6 cm) card. Slide a 6 in (15.2 cm) strand of cream under the wraps at one edge and tie it tightly. This tie becomes the top of the tassel. Cut the loops at the opposite edge.
With taupe, wrap the neck 0.25 in (0.6 cm) below the tie, making a band about 0.25 in (0.6 cm) deep. Knot it, and bury the ends inside the tassel.
Trim the tassel to 2.5 in (6.4 cm). Use the cream tie ends to sew the tassel to the bottom point of Motif 3.
Final Blocking
- Soak the strip, without the tassel if you can, in cool water for 10 minutes. Press out the water in a towel.
- Pin the strip to a board, right side up. Check that it measures 2.5 in × 10 in (6.4 cm × 25.4 cm).
- Pin each top and bottom point sharply, then pin the widest part of each bulb to 2.5 in (6.4 cm).
- Open the diamond net by pinning a few ch-5 loops, so they lie in even, open diamonds.
- Spread the fan ribs into an even semicircle.
- Spray lightly with starch, or brush on diluted stiffener. Let it dry completely, which takes 6–12 hours.
- Unpin. Steam the tassel and comb it straight, then trim it level.
Final Quality-Control Checklist
- Each motif has 9 fan dc, 7 loops at Row 6, and 1 loop at Row 12.
- Each edge round has 74 sc: 36 per side plus 2 point stitches.
- The three joins sit exactly point to point, with no twisting.
- Border Rounds 1 and 2 each have 222 sts, with 108 per long side.
- The strip measures 2.5 in × 10 in (6.4 cm × 25.4 cm).
- The loop hangs about 3 in (7.6 cm), and the tassel is 2.5 in (6.4 cm).
- All ends are woven in through solid stitches, not through the net.
Troubleshooting
The net is lopsided. One end of a row was probably skipped. Count the loops after each row against the stated totals.
The fan cups instead of lying flat. Your Row 1 dc are too tight around the ring. Loosen the ring slightly before working Row 1, or go up a hook size for Rows 1–2 only.
The edge round ruffles. Work 2 sc instead of 3 around the mesh row ends, and keep the per-side counts equal on both sides. Note that this changes the totals, so adjust the border counts to match.
The waists look gappy. Tighten the point-to-point join, or add a second locking sl st.
The crab stitch looks flat. Use a slightly looser tension, and twist the hook fully as you work each rev sc.
The strip curls in the car heat. Block it again with a firmer stiffener.
Care
Hand wash in cool water with mild soap, press out the water in a towel, and pin it flat to dry. Starch it again after washing so the lace keeps its shape.
Final Notes
The measurement chain here is short and dependable:
- Fan of 1.25 in (3.2 cm)
- Widest row of 2 in (5.1 cm)
- Motif of 2.25 in × 3.25 in (5.7 cm × 8.3 cm)
- Joined strip of 2.25 in × 9.75 in (5.7 cm × 24.8 cm)
- Bordered strip of 2.5 in × 10 in (6.4 cm × 25.4 cm)
The stitch counts follow the same steps: 36 per motif side becomes 108 per long side, then 222 around. Check each step before moving on, and the hanger will hang straight.
Happy crocheting!