
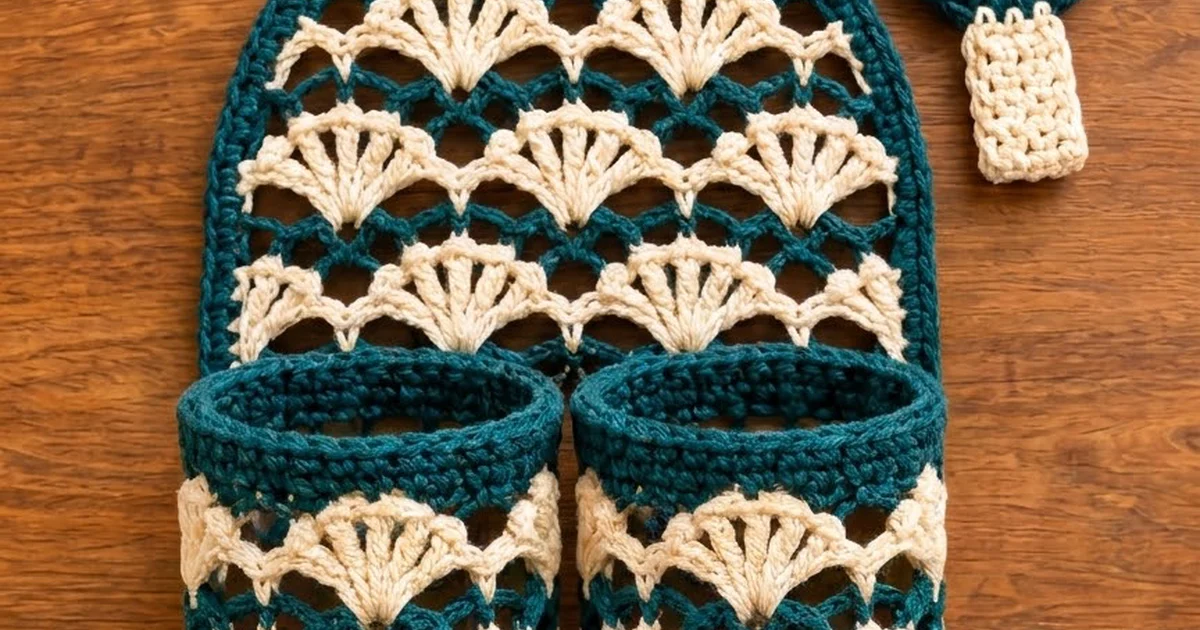
This hanging holder keeps two rolls of toilet paper off the floor and in easy reach. It has an arched back panel, two deep pots side by side, and a small ring that hangs from a wall hook or towel hook.
The main texture is a seashell lattice. Cream 7-double-crochet shells sit in staggered rows, and teal V-stitch rows frame them like a net. Solid teal is used for the bases, the rims, the border and the ring, so the piece looks clean and graphic.
The pattern uses US crochet terms throughout. The finished holder measures 10.25 in (26.0 cm) wide and 10 in (25.4 cm) tall, not counting the hanging ring. Each pot is 4.75 in (12.1 cm) across and 5.5 in (14.0 cm) tall.
You make four pieces: two pots worked in the round from the base up, one back panel worked flat in rows with a stepped arch that the border rounds off, and one hanging ring with a tab. You add a border to the panel, then sew the pots and the hanger in place.
Finished Size and Construction
- Finished size: 10.25 in (26.0 cm) wide x 10 in (25.4 cm) tall, plus about 2.25 in (5.7 cm) of hanging ring
- Skill level: Intermediate
- Terminology: US
- Yarn weight: Worsted (#4) cotton
- Hook: 5.0 mm (H-8)
- Number of pieces: 4 (back panel, 2 pots, 1 hanger)
- Layout: 2 pots side by side across the lower panel, hanger at the top center
- Pot size: 4.75 in (12.1 cm) across x 5.5 in (14.0 cm) tall
- Panel size before border: 9.25 in (23.5 cm) wide x 9 in (22.9 cm) tall
- Border depth: 0.5 in (1.3 cm), 2 rounds
Materials
Use a firm, smooth worsted-weight cotton or cotton blend. Cotton holds the pot shape and handles bathroom humidity well. Avoid fuzzy or very stretchy yarns, because the pots will sag.
- Teal: 160 g, about 290 m (317 yd)
- Cream: 110 g, about 200 m (219 yd)
The quantities include a margin of roughly 15% for swatching and the color changes.
Tools:
– 5.0 mm (H-8) crochet hook
– Plastic or wooden ring, 1.5 in (3.8 cm) across
– Tapestry needle
– Stitch markers
– Locking pins or clips
– Measuring tape
– Blocking mat and rust-proof pins
– Spray bottle
Abbreviations (US Terms)
- ch: chain
- sl st: slip stitch
- sc: single crochet
- hdc: half double crochet
- dc: double crochet
- BLO: back loop only
- sp: space
- st(s): stitch(es)
- rep: repeat
Special stitches:
– Shell: 7 dc worked into the same stitch or space.
– V-st: (dc, ch 1, dc) worked into the same stitch.
– Half shell: 4 dc in the same space at a row edge (the turning chain counts as 1 dc when stated).
Gauge and Checkpoints
Gauge: 16 sc and 18 rows = 4 in (10.2 cm). In the shell pattern, one 6-stitch repeat measures 1.5 in (3.8 cm), and one shell row plus one lattice row measures about 1.1 in (2.8 cm).
Make one pot first and use it as your test piece. Check these measurements:
- Base, after Rnd 5: 4.75 in (12.1 cm) across.
- Pot, after Rnd 7: the wall stands straight and the circumference is about 15 in (38.1 cm).
- Pot, finished: 5.5 in (14.0 cm) tall.
- Panel, after Row 11: 9.25 in (23.5 cm) wide x 5.5 in (14.0 cm) tall.
- Panel, after Row 18: 9 in (22.9 cm) tall.
If the piece is too big, go down 0.5 mm in hook size. If it is too small, go up 0.5 mm. Measure the base again before you work the wall, because every later count depends on the 60 stitches around the base.

Pots (Make 2)
Base
Use teal.
Rnd 1: Make a magic ring. Ch 3 (counts as dc), then work 11 dc into the ring. Join with a sl st to the top of the ch-3. (12 dc)
Rnd 2: Ch 3, dc in the same st, then 2 dc in each st around. Join. (24 dc)
Rnd 3: Ch 3, dc in the same st, dc in the next st, 2 dc in the next st, dc in the next st; rep from * around. Join. (36 dc)
Rnd 4: Ch 3, dc in the same st, dc in the next 2 sts, 2 dc in the next st, dc in the next 2 sts; rep around. Join. (48 dc)
Rnd 5: Ch 3, dc in the same st, dc in the next 3 sts, 2 dc in the next st, dc in the next 3 sts; rep around. Join. (60 dc)
Checkpoint: the base is 4.75 in (12.1 cm) across and lies flat.
Wall
Rnd 6 (teal): Ch 1, sc BLO in each st around. Join. (60 sc) Working in the back loop makes the crisp fold where the wall turns upward.
Rnd 7 (teal): Ch 1, sc in each st around. Join. (60 sc) Drop teal and carry it up the inside.
Rnd 8 (cream): Join cream in any st. Ch 1, sc in the same st, skip 2 sts, shell in the next st, skip 2 sts, sc in the next st; rep around, leaving out the final sc. Join to the first sc. (10 shells + 10 sc) Each repeat uses 6 stitches, and 60 ÷ 6 = 10 repeats.
Rnd 9 (teal): Pick up teal and sl st into the center (4th) dc of any shell. Ch 1, sc in the same dc, ch 3, V-st in the next sc, ch 3, sc in the center dc of the next shell; rep around, leaving out the final sc. Join. (10 sc + 10 V-sts)
Rnd 10 (cream): Join cream in any sc. Ch 1, sc in the same st, shell in the ch-1 sp of the next V-st, sc in the next sc; rep around, leaving out the final sc. Join. (10 shells + 10 sc) These shells sit halfway between the shells of Rnd 8, which creates the staggered look.
Rnds 11, 13: Work as Rnd 9. (10 sc + 10 V-sts)
Rnds 12, 14: Work as Rnd 10. (10 shells + 10 sc)
You now have four cream shell rounds. Fasten off cream.
Rnd 15 (teal, leveling round): Sl st into the center dc of any shell. Ch 1, then work each repeat as follows: sc in the 4th dc, sc in the 5th dc, hdc in the 7th dc, dc in the next sc, hdc in the 1st dc of the next shell, sc in the 3rd dc of that shell. Rep around 10 times. The next repeat always starts in the 4th dc of the shell you just left. Join. (10 dc into sc + 50 sts into shell dc = 60 sts)
The taller stitches fill the dips between shells, so the top edge becomes level again.
Rnds 16–18 (teal): Ch 1, sc in each st around. Join. (60 sc) Fasten off and weave in the ends.
Checkpoint: the pot is 5.5 in (14.0 cm) tall and 4.75 in (12.1 cm) across.
Back Panel
The panel is worked flat in rows. Turn at the end of every row. Carry the unused color loosely up the side edge, where the border will cover it.
Lower Rectangle
Row 1 (teal): Ch 38. Sc in the 2nd ch from the hook and in each ch across. (37 sc)
Row 2 (teal): Ch 1, sc in each st across. (37 sc)
Row 3 (cream): Ch 1, sc in the first st, skip 2, shell in the next st, skip 2, sc in the next st; rep 6 times. (6 shells + 7 sc)
Row 4 (teal): Ch 4 (counts as dc and ch 1), dc in the first sc. Then ch 3, sc in the center dc of the next shell, ch 3, V-st in the next sc; rep 6 times. (7 V-sts + 6 sc)
Row 5 (cream): Ch 3 (counts as dc), 3 dc in the ch-1 sp of the first V-st. Then sc in the next sc, shell in the next V-st sp; rep 5 times. Finish with sc in the next sc and 4 dc in the sp made by the turning ch-4. (5 shells + 2 half shells + 6 sc)
Row 6 (teal): Ch 1, sc in the first dc. Then ch 3, V-st in the next sc, ch 3, sc in the center dc of the next shell (or in the top of the turning ch-3 at the end); rep 6 times. (6 V-sts + 7 sc)
Row 7 (cream): Ch 1, sc in the first sc, shell in the next V-st sp, sc in the next sc; rep 6 times. (6 shells + 7 sc)
Rows 8–11: Rep Rows 4–7 once. (Row 11: 6 shells + 7 sc)
Checkpoint: the panel is 9.25 in (23.5 cm) wide and 5.5 in (14.0 cm) tall.
Arched Top
Each pair of rows moves in by half a repeat on each side, which is 3 sts or 0.75 in (1.9 cm). This creates the arch.
Row 12 (teal): Sl st in the first 4 sts (the sc and 3 dc). Ch 1, sc in the center dc of the first shell. Then ch 3, V-st in the next sc, ch 3, sc in the center dc of the next shell; rep 5 times. Leave the rest unworked. (5 V-sts + 6 sc)
Row 13 (cream): Ch 1, sc in the first sc, shell in the next V-st sp, sc in the next sc; rep 5 times. (5 shells + 6 sc; 7.75 in / 19.7 cm wide)
Row 14 (teal): Work as Row 12, but rep 4 times. (4 V-sts + 5 sc)
Row 15 (cream): Work as Row 13, but rep 4 times. (4 shells + 5 sc; 6.25 in / 15.9 cm wide)
Row 16 (teal): Work as Row 12, but rep 3 times. (3 V-sts + 4 sc)
Row 17 (cream): Work as Row 13, but rep 3 times. (3 shells + 4 sc; 4.75 in / 12.1 cm wide)
Row 18 (teal): Sl st in the first 4 sts. Ch 1, sc in the center dc of the first shell, ch 3, sc in the next sc, ch 3, sc in the center dc of the next shell; rep 2 times. (5 sc + 4 ch-3 sps; 3.25 in / 8.3 cm wide) Do not fasten off. Fasten off cream.
Checkpoint: the panel is 9 in (22.9 cm) tall at its center.
Border
Work the border with teal. Border gauge: 4 sc per 1 in (2.5 cm), the same as the main gauge, so the edges stay flat.
Rnd 1: Ch 1. Work across the top of Row 18 by placing 1 sc in each sc and 2 sc in each ch-3 sp (13 sc).
Work down the first curved side with 21 sc. Use about 3 sc per shell row end and 2 sc per lattice row end, and work over the stepped ledges instead of into every notch, so the curve stays smooth.
Work down the first straight side with 22 sc, evenly spaced along Rows 11–1.
Along the bottom, work 3 sc in the first foundation ch, 1 sc in each of the next 35 ch, and 3 sc in the last ch (37 worked 1-per-ch + 4 extra = 41 sc).
Work up the second straight side with 22 sc and up the second curved side with 21 sc. Join to the first sc.
Total: 13 + 21 + 22 + 41 + 22 + 21 = 140 sc (the arch is 21 + 13 + 21 = 55 sc).
Rnd 2: Ch 1, sc in each st around. Work 3 sc in the center sc of each bottom corner group. Around the arch, work 2 sc in the 11th, 22nd, 34th and 45th arch sts. Join and fasten off.
Counts: bottom 45, each straight side 22, arch 59. Total: 140 + 4 + 4 = 148 sc.
Why the math works: 22 sc over 5.5 in (14.0 cm) and 37 sc over 9.25 in (23.5 cm) both equal 4 sc per inch, so the straight edges neither ruffle nor pull. The arch gets 4 extra stitches in Rnd 2 because its outer edge is about 0.8 in (2.0 cm) longer than the inner one. Two rounds add 0.5 in (1.3 cm) all around, so the panel finishes at 10.25 in (26.0 cm) x 10 in (25.4 cm).
Hanger
Ring (teal): Join teal to the 1.5 in (3.8 cm) ring. Work 28 sc around the ring, packed tightly enough to cover it. Join and fasten off.
Tab (cream): Ch 6. Sc in the 2nd ch from the hook and across (5 sc). Work Rows 2–10: ch 1, sc across (5 sc). The tab measures 1.25 in (3.2 cm) x 2.25 in (5.7 cm).
Loop the tab around the bottom of the ring and sew its two short ends together. This makes a doubled tab about 1.1 in (2.8 cm) long.
Make All Pieces
- Pots: 2 (teal bases, rims and lattice; cream shells)
- Back panel: 1 (teal edge rows, lattice and border; cream shells)
- Hanger: 1 (teal ring, cream tab)
Layout, front view:
          [ ring ]
          [ tab  ]
   /‾‾‾‾‾‾‾‾‾‾‾‾‾‾‾‾‾‾‾\
  |  arched back panel  |
  | [ pot 1 ] [ pot 2 ] |
  |_[_______]_[_______]_|
Joining
Method: Whipstitch with teal and a tapestry needle.
- Lay the panel right side up. Place both pots on it so their bases line up with the bottom edge of the border.
- Center the pair. The two pots together measure 9.5 in (24.1 cm), which leaves about 0.375 in (1.0 cm) of border showing on each side.
- On each pot, mark a 6-stitch strip at the back center, 1.5 in (3.8 cm) wide. Pin this strip to the panel from Rnd 6 to Rnd 18.
- Sew stitch to stitch. In the solid teal rounds (Rnds 6–7 and 15–18), catch 1 pot stitch for each panel stitch. In the shell and lattice rounds, catch the sc and the V-st posts so the cream shells stay visible.
- Sew the two pots to each other where they touch, using 4 stitches per round along the same rounds.
- Sew the hanger tab to the wrong side of the panel at the top center, overlapping the border by 0.75 in (1.9 cm).
Tension: Pull each stitch snug, but do not pucker it. The pots should stay round instead of flattening against the panel.
Size checkpoint: The assembled holder is 10.25 in (26.0 cm) wide and about 12.25 in (31.1 cm) tall including the ring.
Final Blocking
- Before sewing, mist the panel until it is damp.
- Pin it to 10.25 in (26.0 cm) x 10 in (25.4 cm), easing the arch into a smooth curve.
- Open each shell into a neat fan with your fingers.
- Stuff each pot with a towel or a roll wrapped in plastic so it holds a round shape 4.75 in (12.1 cm) across, then mist it.
- Let everything dry completely.
- Sew the pieces together, then lightly mist the seams and let them dry.
Final Quality-Control Checklist
- Each base has 60 sts and measures 4.75 in (12.1 cm) across.
- Each pot has 10 shells in every shell round, and the shells are staggered.
- Each pot rim is level and 5.5 in (14.0 cm) tall.
- The panel rectangle measures 9.25 in (23.5 cm) x 5.5 in (14.0 cm).
- The arch steps go 6, 5, 4, 3 shells.
- Border Rnd 1 has 140 sts and Rnd 2 has 148 sts.
- The pots are centered and their bases are flush with the bottom edge.
- The hanger is centered and secure.
- All ends are woven in on the wrong side.
Troubleshooting
- The base cups or ruffles. Check that each round increases by 12 sts. If it still cups, go up a hook size.
- The shells crowd each other. You may have missed the “skip 2” before or after a shell. Recount by 6-stitch repeats.
- The pot rim dips. Use hdc and dc in the leveling round exactly as written.
- The arch looks blocky. Work over the ledges during border Rnd 1, then block firmly into a curve.
- The border ripples. Remove the extra stitches. Keep to 4 sc per inch.
- The pots sag. Use a firmer cotton or go down a hook size.
Care
Hand wash in cool water and lay flat to dry, reshaping the pots around a towel. Keep it away from direct shower spray so it dries quickly.

Final Notes
The measurement chain is simple. The 60-stitch base sets a 4.75 in (12.1 cm) pot. Two pots fit a 9.25 in (23.5 cm) panel. A 0.5 in (1.3 cm) border brings the panel to 10.25 in (26.0 cm) x 10 in (25.4 cm). If each checkpoint matches, the finished holder will hang straight and hold its rolls neatly.
Happy crocheting!