

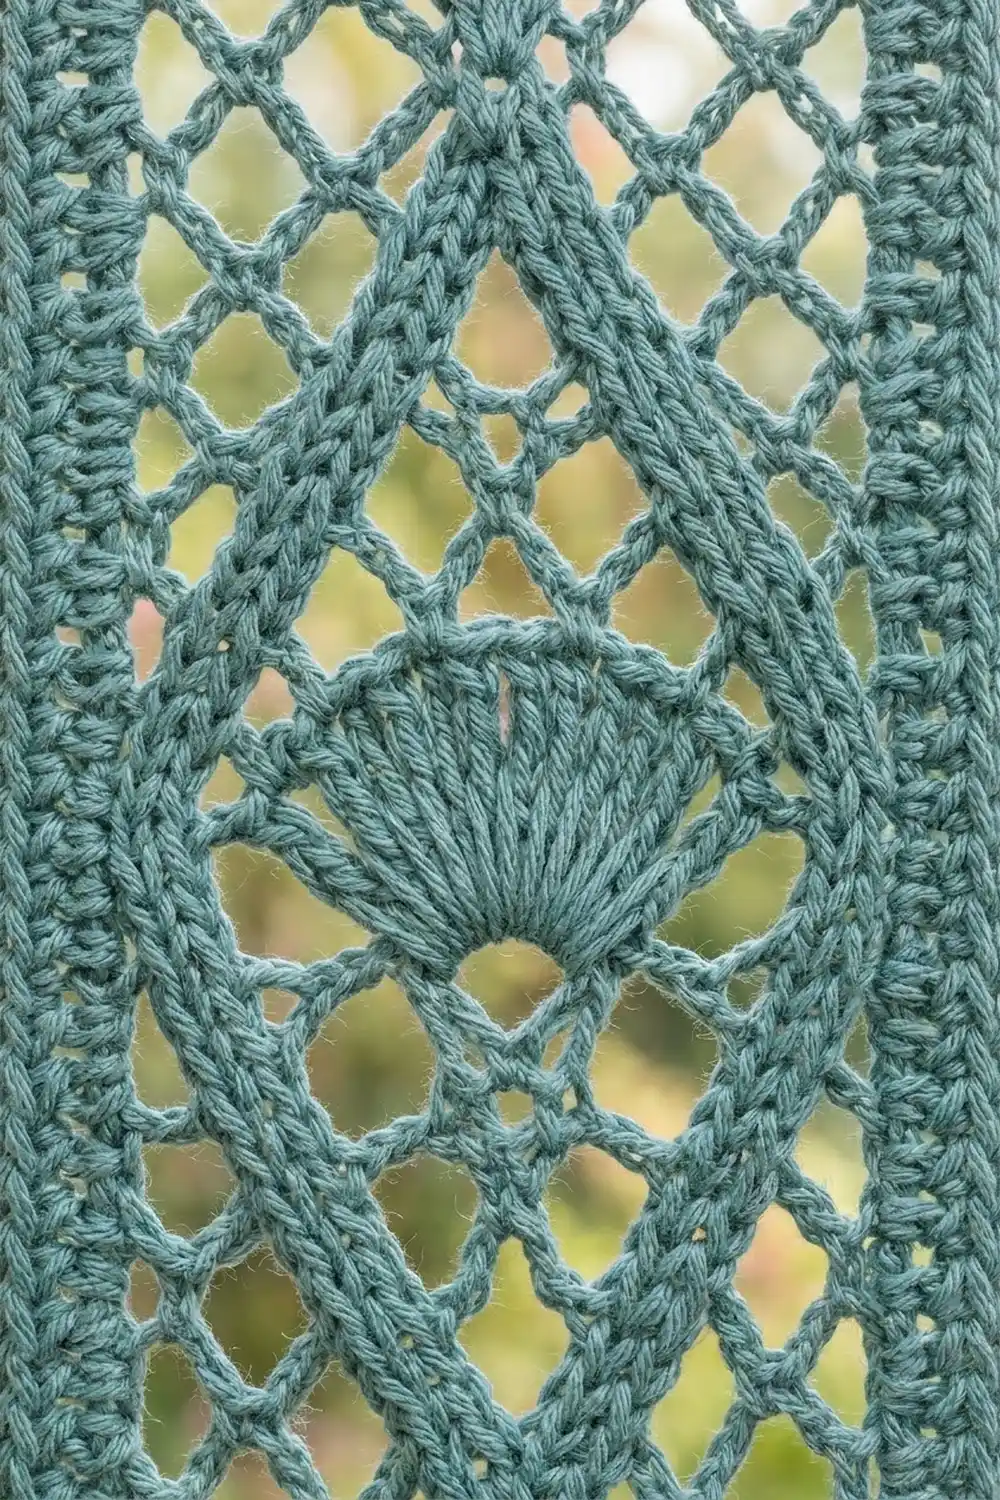
These crochet vertical blind slats turn a plain window into a soft wall of lace. Each slat is a long, narrow strip with a chain of tall diamonds down the center and a ribbed seashell fan inside every diamond. Solid bands at the top and bottom let the strip hang neatly from a standard blind carrier clip.
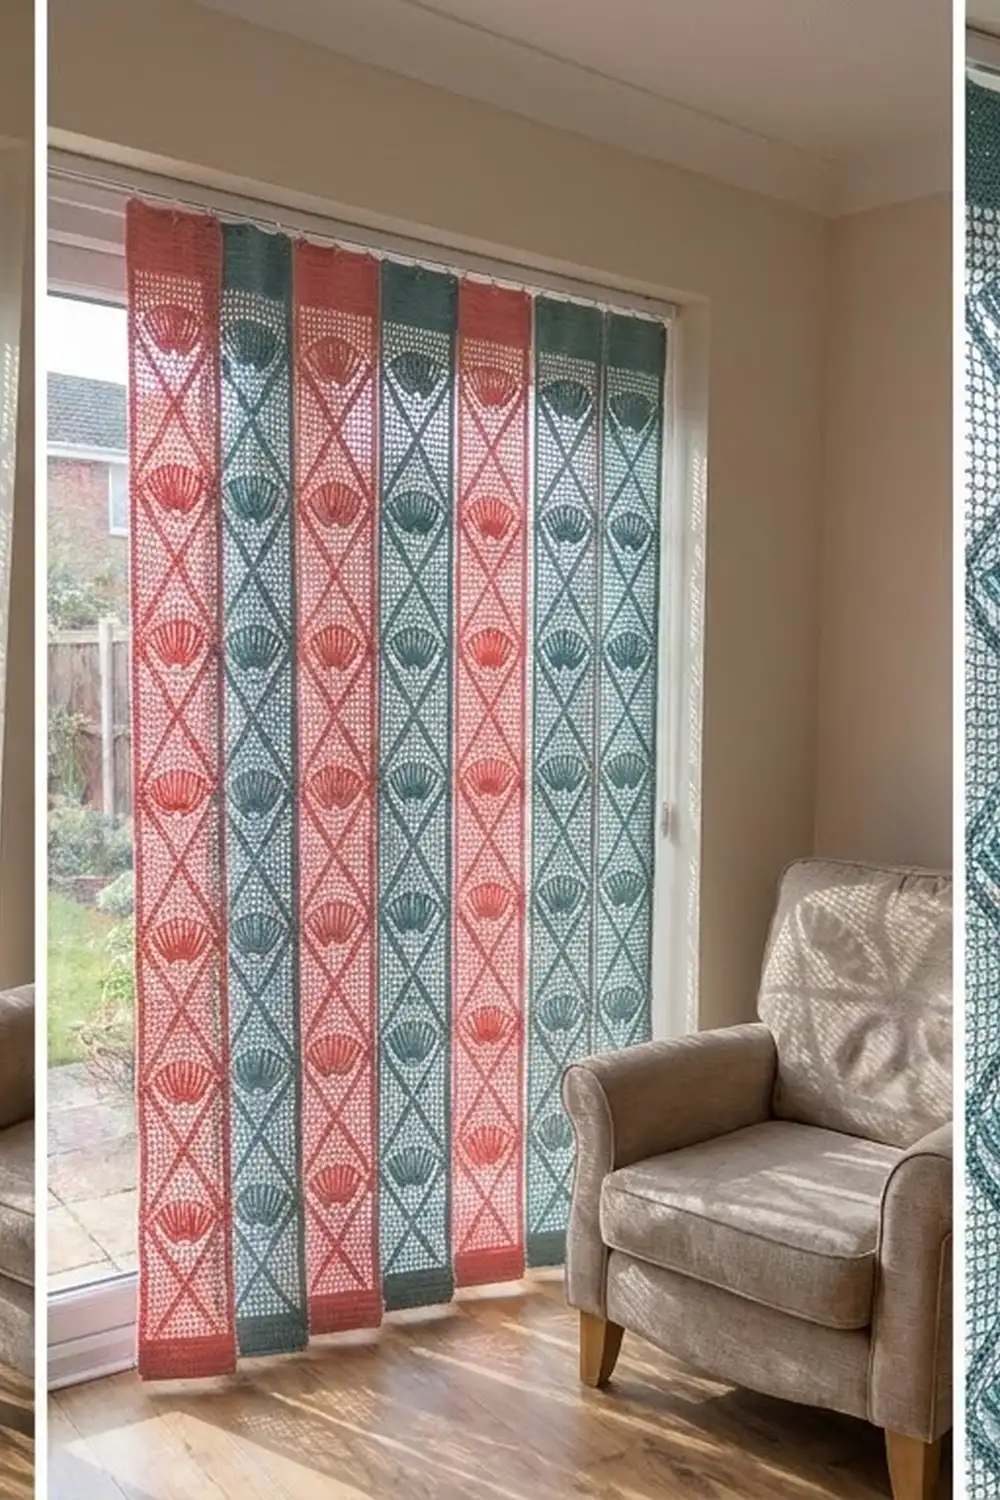
The set shown uses ten strips in two colors, dusty teal and coral pink, hung in alternating order. The filet mesh, diagonal lines, and shells look vintage, and the bold colors keep it fresh. Light passes through the open mesh, so the room stays bright.
This pattern uses US crochet terms. Each finished strip measures 4.0 in (10.2 cm) wide by 74.6 in (189.5 cm) long after blocking.
Each strip is worked flat in rows from the bottom up as a single piece. You work a solid bottom band, fifteen 12-row diamond repeats, one closing row, and a solid header with a hanging slot. One round of single crochet frames the edges. The strips are not joined; each one hangs on its own clip.
Finished Size and Construction
- Finished strip size: 4.0 in x 74.6 in (10.2 cm x 189.5 cm)
- Skill level: Intermediate
- Terminology: US crochet terms
- Yarn weight: Sport weight (2) cotton
- Hook: 3.5 mm (E-4)
- Number of pieces: 10 separate strips (5 teal, 5 coral)
- Layout: One row of 10 strips in alternating colors, hung from a blind track
- Strip size before border: 3.8 in x 74.4 in (9.7 cm x 189.0 cm), 19 stitches wide and 186 rows long
- Border depth: 0.1 in (0.3 cm) per side, one round of single crochet
Materials
Choose a smooth mercerized or combed cotton in sport weight. Cotton holds the lace shape, stretches less than acrylic, and handles sunlight well. Avoid fuzzy or very stretchy yarn, because long strips will sag under their own weight.
- Teal: 300 g, about 930 m (six 50 g / 155 m balls), for 5 strips
- Coral: 300 g, about 930 m (six 50 g / 155 m balls), for 5 strips
Each strip uses about 50 g (155 m). The amounts above allow 60 g (186 m) per strip, which leaves a margin for your test strip and for tension differences.
Tools:
- 3.5 mm (E-4) crochet hook
- Tapestry needle
- Scissors
- Locking stitch markers
- Row counter
- Tape measure
- Rustproof pins, blocking mats or a long towel, and a spray bottle
Abbreviations (US Terms)
- ch – chain
- sl st – slip stitch
- sc – single crochet
- dc – double crochet
- sk – skip
- st(s) – stitch(es)
- sp – space
- RS – right side
Special stitches:
- Block (B): Dc in each of next 2 sts. A ch-1 sp counts as a stitch.
- Space (S): Ch 1, sk next st, dc in next st.
- Beginning ch 3: Counts as the first dc of every row.
Every pattern row has the same frame: ch 3 (stitch 1), then 9 squares of 2 stitches each, for 19 stitches. Squares 1 and 9 are always Blocks, which makes the solid side columns. Squares 2–8 carry the diamond pattern.
Gauge and Checkpoints
Gauge: 20 dc and 10 rows = 4 in (10.2 cm) in filet mesh. That means 5 sts = 1 in (2.5 cm), and each row is 0.4 in (1.0 cm) tall.
Make one complete strip before you start the others. Long pieces magnify small gauge errors: if each row is 0.05 in too tall, the strip ends up more than 9 in longer.
Checkpoints:
- Row 1: 3.8 in (9.7 cm) wide.
- Row 14 (bottom band plus 1 repeat): 5.6 in (14.2 cm) long.
- Row 98 (bottom band plus 8 repeats): 39.2 in (99.6 cm) long.
- Row 186 (body complete): 74.4 in (189.0 cm) long.
- After border: 4.0 in x 74.6 in (10.2 cm x 189.5 cm).
If the strip is too big, go down one hook size to 3.25 mm (D-3). If it is too small, go up to 3.75 mm (F-5). Measure on a flat surface, never while the strip hangs, because cotton lace stretches when suspended.
Strip Pattern
Make 5 strips in teal and 5 in coral. Each row below lists Squares 1–9 in order.
Foundation: Ch 21.
Row 1 (RS): Dc in 4th ch from hook (the skipped 3 ch count as a dc), dc in each ch across. Turn. (19 sts)
Row 2: Ch 3, dc in each st across, working the last dc in the top of the turning ch. Turn. (19 sts)
Rows 1–2 form the solid bottom band, 0.8 in (2.0 cm) tall.
Diamond Repeat (12 rows)
Each row starts with ch 3 and ends with the last dc in the top of the turning ch. Turn at the end of every row. Every row has 19 sts.
Repeat Row 1: Ch 3, B, S, S, S, B, S, S, S, B.
Repeat Row 2: Work as Repeat Row 1.
Repeat Row 3: Ch 3, B, S, S, B, S, B, S, S, B.
Repeat Row 4: Work as Repeat Row 3.
Repeat Row 5: Ch 3, B, S, B, S, S, S, B, S, B.
Repeat Row 6 (Fan Row 1): Ch 3, B, S, B, sk next 2 sts, 5 dc in next st, sk next 2 sts, dc in next st, B, S, B. (19 sts: 1 + 2 + 2 + 2 + 5 + 1 + 2 + 2 + 2)
The 5-dc group goes into stitch 10, the exact center of the strip, and forms the narrow base of the shell.
Repeat Row 7 (Fan Row 2): Ch 3, B, B, sk next 2 sts, (dc in next dc of fan, ch 1) 4 times, dc in 5th dc of fan, sk next 2 sts, dc in next st, B, B. (19 sts: 1 + 2 + 2 + 9 + 1 + 2 + 2)
The 5 fan stitches now spread across 9 stitches, 1.8 in (4.6 cm). The ch-1 gaps between them make the ribbed lines of the shell.
Repeat Row 8: Ch 3, B, B, S, S, S, S, S, B, B.
Over the fan, work each Space’s dc into the ch-1 sps as they fall. This caps the shell with a light scalloped edge.
Repeat Rows 9–10: Work as Repeat Row 5.
Repeat Rows 11–12: Work as Repeat Row 3.
Each repeat is 12 rows, or 4.8 in (12.2 cm). The diagonal lines move out one square every 2 rows, reach the edge columns at Rows 7–8, then step back in. The next Repeat Row 1 brings both lines back to the center square, so they cross in an X and start the next diamond.
Rows 3–182: Work Repeat Rows 1–12 a total of 15 times. Place a marker at the end of each finished repeat to make counting easier.
Row 183: Work as Repeat Row 1. This closes the top point of the last diamond. (19 sts)
Header Band
Row 184: Ch 3, dc in each st across. Turn. (19 sts)
Row 185 (slot row): Ch 3, dc in next 7 sts, ch 3, sk next 3 sts, dc in last 8 sts. Turn. (19 sts: 1 + 7 + 3 + 8)
The ch-3 slot sits over stitches 9–11, centered in the header, and is about 0.6 in (1.5 cm) wide. It fits hook-style vane carriers. Clip-style carriers simply grip the solid band.
Row 186: Ch 3, dc in next 7 sts, 3 dc in ch-3 sp, dc in last 8 sts. (19 sts) Do not fasten off.
The header is 1.2 in (3.0 cm) tall. The strip now measures 3.8 in x 74.4 in (9.7 cm x 189.0 cm).
Make All Pieces
Make 10 strips in total:
- Teal: 5 strips
- Coral: 5 strips
Layout grid, left to right as hung:
| T | C | T | C | T | C | T | C | T | C |
T = teal, C = coral. Keep your first finished strip as a reference, and compare each new strip to it before adding the border.
Joining
The strips are not joined. Each strip hangs from its own carrier like a standard blind vane, so the blind can still rotate and stack open.
Instead of seaming, check that the set is consistent. Lay all 10 strips side by side before blocking. Every strip should have 15 diamonds, the fans should line up across the set, and lengths should match within 0.4 in (1.0 cm), which is one row. If one strip is longer, check its row count before changing your tension.
Border
Border gauge: 5 sc = 1 in (2.5 cm), the same as the body. On the long sides, work 2 sc in each dc row-end: each row is 0.4 in (1.0 cm) tall, and 2 sc fill that height.
Each corner is 3 sc worked in one stitch, and the middle sc of the 3 is the corner stitch. The per-side counts below include both corner stitches of that side.
Round 1 (RS): Ch 1 and turn the strip so the top edge of Row 186 faces you. 3 sc in first st (corner), sc in next 17 sts, 3 sc in last st (corner). Working down the long side, 2 sc in each row-end of Rows 186 to 1 (372 sc). Working along the foundation chain, 3 sc in base of first st (corner), sc in base of next 17 sts, 3 sc in base of last st (corner). Working up the other long side, 2 sc in each row-end of Rows 1 to 186 (372 sc). Join with sl st to first sc. Fasten off.
Counts per side:
- Top and bottom: 21 sc each = 2 corner sts + 19 between (1 corner-group sc + 17 + 1 corner-group sc)
- Long sides: 376 sc each = 2 corner sts + 374 between (1 corner-group sc + 372 row-end sc + 1 corner-group sc)
- Round total: 790 sc (21 + 21 + 376 + 376 = 794, minus the 4 corners counted twice)
Why the math works: The top edge has 19 stitches, and the border puts exactly 19 sc between its corners, one per stitch, so the short ends stay flat. On the long sides, 186 rows x 2 sc = 372 sc, and 372 sc at 5 sc per inch equals 74.4 in, exactly the body length. The edge neither ruffles nor pulls. The border adds 0.1 in (0.3 cm) on each side, taking the strip from 3.8 in to 4.0 in (9.7 cm to 10.2 cm) wide and from 74.4 in to 74.6 in (189.0 cm to 189.5 cm) long.
Weave in all ends along the solid side columns, not through the mesh, where they would show against the light.
Final Blocking
- Soak the strip in cool water, then press out the excess in a towel. Do not wring.
- Lay it on blocking mats or a long folded towel. If your surface is shorter than 75 in (190.5 cm), block in sections.
- Pin both long edges straight, 4.0 in (10.2 cm) apart, with a pin every 4 in (10.2 cm).
- Ease the length to 74.6 in (189.5 cm). Do not stretch it longer, because it will settle a little when hung.
- Spread each fan with your fingertips so the ribs open evenly, and nudge the diagonal lines straight.
- Square the top and bottom corners with a pin at each corner stitch.
- Let the strip dry completely flat before unpinning. Repeat for every strip.
Final Quality-Control Checklist
- Every row has 19 stitches.
- Squares 1 and 9 are solid Blocks on every row.
- Each strip has 15 complete diamonds, each with one fan.
- The diagonal lines cross in a clean X at the center square between diamonds.
- The hanging slot is centered in the header.
- The border has 21 sc on each short side and 376 sc on each long side, for 790 sc.
- Each strip measures 4.0 in x 74.6 in (10.2 cm x 189.5 cm).
- All 10 strips match in length within 0.4 in (1.0 cm).
- Colors alternate teal and coral across the track.
Troubleshooting
The strip is getting narrower. You are probably missing the last dc in the turning chain. Count to 19 sts every few rows.
The diamonds look lopsided. Check that each Space ends with a dc and that each row has exactly 9 squares. Compare squares, not stitches, against the row instructions.
The fan cups or puckers. Work the 5-dc group in Repeat Row 6 loosely. If it still cups, work Repeat Rows 6–7 with a 3.75 mm (F-5) hook. The stitch counts stay the same.
The long edges ripple after the border. Your rows are probably shorter than 0.4 in (1.0 cm). Redo the border with a 3.25 mm (D-3) hook, keeping 2 sc per row-end.
The strip grows when hung. Cotton lace relaxes over time. Wet and block it again, and don’t add heavy weights at the bottom.
The strips don’t match. Check row counts first, then gauge. Usually one strip has an extra or missing repeat row.
Care
Hand wash, or machine wash on a gentle cool cycle in a mesh bag, then reshape and dry flat. Don’t hang the strips while wet, because the weight of the water will stretch them.
Final Notes
The whole set follows one measurement chain. The gauge gives 5 sts and 2.5 rows per inch. Nineteen stitches make 3.8 in (9.7 cm) of width. Two band rows, fifteen 12-row repeats, one closing row, and three header rows make 186 rows, or 74.4 in (189.0 cm). One sc round adds 0.1 in (0.3 cm) per side, for a finished strip of 4.0 in x 74.6 in (10.2 cm x 189.5 cm). Make one strip, check every checkpoint, and the other nine will follow the same numbers.
To fit a different window, add or remove whole repeats. Each repeat is 4.8 in (12.2 cm) and changes each long side of the border by 24 sc.
Happy crocheting!