

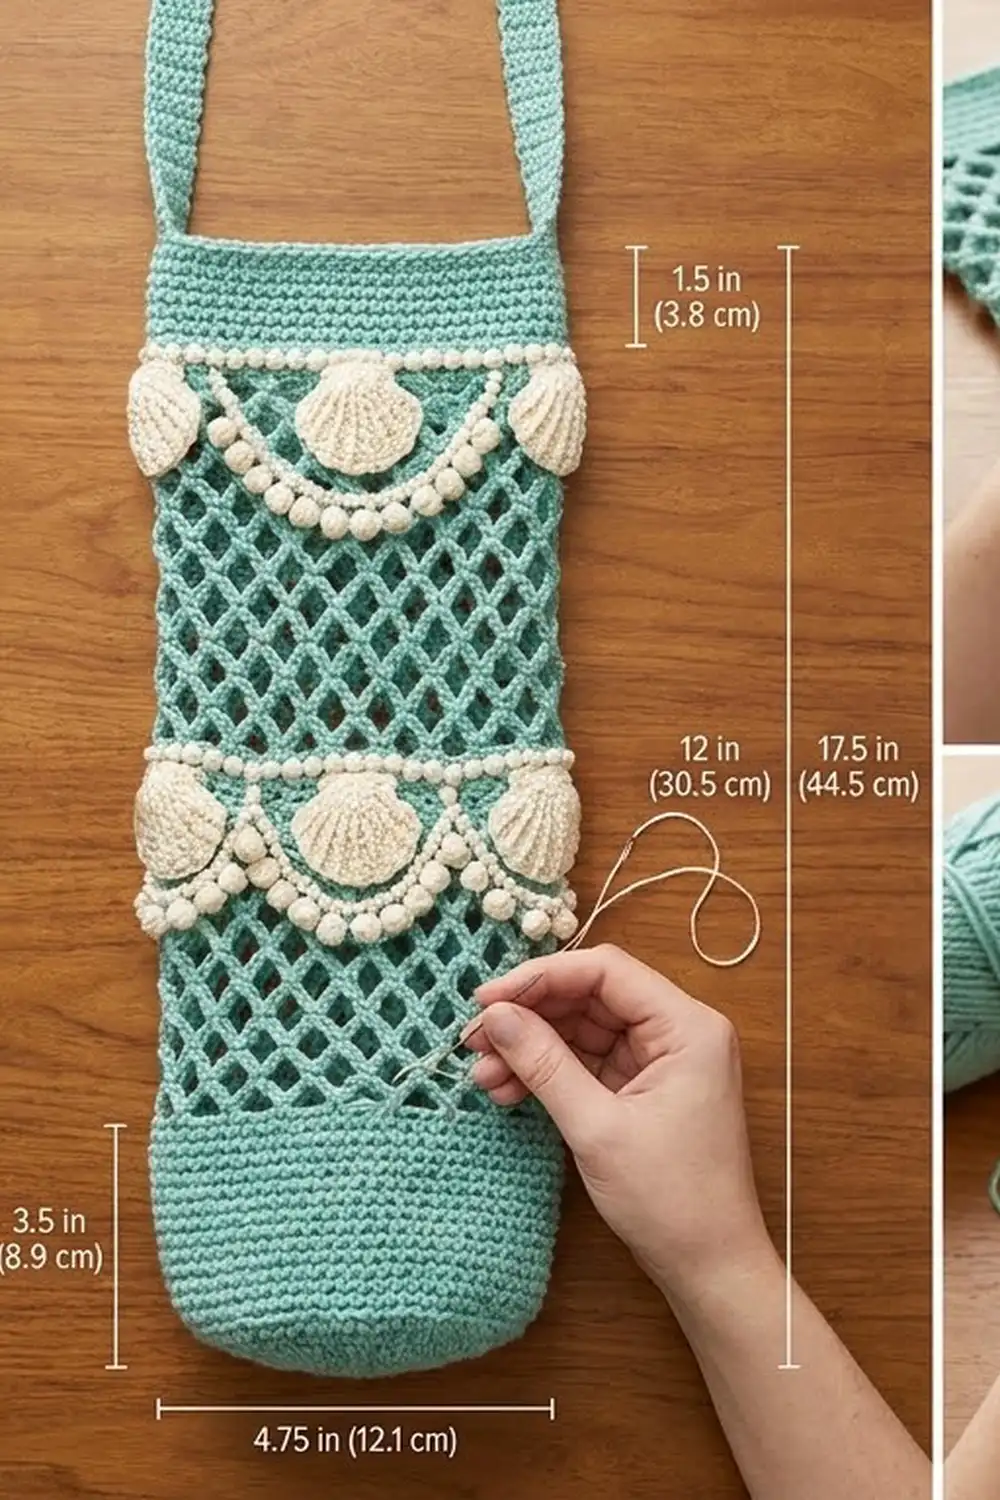
The Seaside Pearl Plastic Bag Holder is a tall crochet tube that keeps plastic grocery bags tidy. You push the bags in at the top and pull them out one at a time through a round hole near the bottom. The body is soft seafoam green. The lower band is solid, the middle is an airy diamond net, and the top band is firm with a hanging strap.
The trim is cream. Two tiers of ribbed scallop shells sit over strands of bobble “pearls,” which drape in gentle swags around the tube. The style is cottage-coastal: calm colors, a clear net texture, and just enough trim to make it look special.
This pattern uses US crochet terms. The finished holder is 4.75 in (12.1 cm) across and 17.5 in (44.5 cm) tall, not counting the strap. The strap rises about 3 in (7.6 cm) above the rim, so the total hanging length is about 20.5 in (52.1 cm).
You work the body in one piece from the bottom up:
1. A flat circular base.
2. A solid band with a dispensing hole.
3. The diamond net.
4. A solid top band.
5. The strap and top edging.
Then you make the shells and pearl strands separately and sew them on.
Finished Size and Construction
- Finished size: 4.75 in (12.1 cm) diameter × 17.5 in (44.5 cm) tall; about 20.5 in (52.1 cm) including the strap
- Skill level: Intermediate
- Terminology: US crochet terms
- Yarn weight: Worsted (#4), cotton
- Hooks: 5.0 mm (H-8) for the body; 4.0 mm (G-6) for the appliqués
- Number of pieces: 1 main body, plus 10 shell appliqués and 2 pearl strands sewn on
- Layout: Vertical tube, worked in joined rounds
- Body circumference: 60 sts = 15 in (38.1 cm)
- Size before border: 17 in (43.2 cm) tall after Rnd 49
- Border depth: 0.5 in (1.3 cm) of top edging, plus the strap
Materials
Use a smooth worsted-weight cotton or cotton blend, about 1.5 m per gram (roughly 170 m per 100 g). Cotton holds its shape when the holder is full of bags and doesn’t fuzz on the net.
- Seafoam green: 85 g / 130 m
- Cream: 35 g / 55 m
Both amounts include a margin of about 25% for your gauge swatch and sewing tails.
Tools:
– 5.0 mm (H-8) hook
– 4.0 mm (G-6) hook
– Tapestry needle
– 4 stitch markers
– Scissors
– Measuring tape
– Rust-proof pins
– A spray bottle
– A rolled towel or a 4.75 in (12.1 cm) cylinder for blocking
Abbreviations (US Terms)
- ch – chain
- sl st – slip stitch
- sc – single crochet
- hdc – half double crochet
- dc – double crochet
- FPdc – front post double crochet
- BLO – back loop only
- sk – skip
- sp – space
- st(s) – stitch(es)
- rnd(s) – round(s)
- RS/WS – right side / wrong side
- rev sc – reverse single crochet (crab stitch)
Pearl (pb): Ch 3. Yo, insert hook in 3rd ch from hook, yo, pull up a loop, yo, pull through 2 loops. Repeat from * to * 3 more times (5 loops on hook). Yo and pull through all 5 loops, then ch 1 to lock the pearl.
Gauge and Checkpoints
Gauge: 16 sc × 18 rnds = 4 in (10.2 cm) with the 5.0 mm hook. In the net, each round adds about 0.75 in (1.9 cm).
Work the base and Rnds 11–14 first and measure them as your test piece.
Checkpoints:
– Base after Rnd 10: 4.75 in (12.1 cm) across, give or take 0.25 in (0.6 cm).
– After Rnd 26: the solid band is 3.5 in (8.9 cm) tall, measured up from the base ridge.
– After Rnd 34: the net is 6 in (15.2 cm) tall.
– After Rnd 42: the body is 15.5 in (39.4 cm) tall.
– After Rnd 49: the body is 17 in (43.2 cm) tall.
If your base is too big, go down one hook size. If it’s too small, go up one. If the net grows faster than 0.75 in (1.9 cm) per round, chain more tightly or switch to ch 4 loops everywhere. If you do that, keep all 15 loops per round.

Body
Base
With seafoam and the 5.0 mm hook. Join each round with a sl st to the first sc. The ch 1 at the start of a round never counts as a stitch.
- Rnd 1: 6 sc in a magic ring. (6)
- Rnd 2: 2 sc in each st. (12)
- Rnd 3: Sc 1, 2 sc in next around. (18)
- Rnd 4: Sc 2, 2 sc in next around. (24)
- Rnd 5: Sc 3, 2 sc in next around. (30)
- Rnd 6: Sc 4, 2 sc in next around. (36)
- Rnd 7: Sc 5, 2 sc in next around. (42)
- Rnd 8: Sc 6, 2 sc in next around. (48)
- Rnd 9: Sc 7, 2 sc in next around. (54)
- Rnd 10: Sc 8, 2 sc in next around. (60)
The base should lie flat and measure 4.75 in (12.1 cm) across.
Solid Lower Band and Dispensing Hole
- Rnd 11: Sc in BLO of each st. (60) This makes the turning ridge where the sides start.
- Rnds 12–14: Sc in each st. (60)
Now work Rows 15–20 back and forth. This leaves an 8-st gap that becomes the hole.
- Row 15 (RS): Ch 1, sc in the same st as the join and in the next 51 sts. Leave the last 8 sts unworked and turn. (52)
- Rows 16–20: Ch 1, sc in each st, turn. (52) Row 20 is a WS row.
- Rnd 21 (RS): Ch 1, turn, sc in each of the 52 sts, ch 8, sl st to the first sc. (52 sc + 8 ch = 60)
- Rnds 22–26: Sc in each sc and in each ch. (60)
Checkpoint: the solid band is 3.5 in (8.9 cm) tall. The opening is about 2 in (5.1 cm) wide and 1.33 in (3.4 cm) tall.
Hole rim:
– Rnd 1: With RS facing, join seafoam at the lower right corner of the opening. Work sc in this order, then sl st to the first sc. (28)
– 8 sc in the skipped sts of Rnd 14
– 6 sc up the row ends of Rows 15–20
– 8 sc in the free loops of the ch-8
– 6 sc down the other side
– Rnd 2: Loosely sl st in each st. (28) Fasten off.
The slip-stitch round rolls into a firm, rounded rim. The finished opening is about 1.75 in (4.4 cm) across.
Diamond Net
- Rnd 27: Ch 1, sc in the first st. Ch 5, sk 3, sc in next st. Repeat from * 13 more times. Ch 5, sk 3, sl st to the first sc. (15 ch-5 sps)
- Rnds 28–42: Sl st in the next 3 ch to reach the center of the first loop. Ch 1, sc in the same ch-5 sp. Ch 5, sc in next ch-5 sp 14 times. Ch 5, sl st to the first sc. (15 ch-5 sps)
Each round offsets by half a loop, which forms the diamonds.
Checkpoint: 6 in (15.2 cm) of net after Rnd 34, and 12 in (30.5 cm) after Rnd 42.
Solid Top Band
- Rnd 43 (conversion): Ch 1. Sc in the sc, 3 sc in the next ch-5 sp around. (15 sc worked 1 per sc + 45 sc worked 3 per space = 60)
- Rnds 44–49: Sc in each st. (60)
Checkpoint: the top band is 1.5 in (3.8 cm) deep, and the body is 17 in (43.2 cm) tall.
Shell Appliqués (Make 10)
With cream and the 4.0 mm hook:
- Row 1 (RS): Ch 2 in a magic ring (counts as hdc), then 5 hdc in the ring. Pull the ring closed and turn. (6)
- Row 2 (WS): Ch 2 (counts as hdc), hdc in the same st, 2 hdc in each remaining st, turn. (12)
- Row 3 (RS): Ch 1, sc in the first st. FPdc around the next st, 2 sc in the next st 5 times. Sc in the last st and turn. (1 + 15 + 1 = 17)
- Row 4 (WS): Ch 1, sc in each st. (17)
The five FPdc posts stand up on the RS as the shell’s ribs.
Hinge: With RS facing, join at the base near the ring. Ch 4, sl st in the 2nd ch from hook, sc in the next 2 ch, sl st into the base. Fasten off and leave a 12 in (30.5 cm) tail.
Each shell is 2 in (5.1 cm) wide and 1.5 in (3.8 cm) tall.
Pearl Strands (Make 2)
With cream and the 4.0 mm hook: Ch 2. Pb, ch 2 35 times. Fasten off and leave a long tail.
Each pearl plus its gap measures 0.5 in (1.3 cm), so each strand is 17.5 in (44.5 cm) long. That gives 7 pearls per swag across 5 swags.
Appliqué Placement and Sewing
- Lay the tube flat with the hole centered toward you.
- Mark 5 points evenly around the tube, every 3 net loops (3 in / 7.6 cm). Put the first point directly above the hole.
Lower tier:
1. Tack one pearl strand at the 5 points along Rnd 28.
2. Between tack points, let each 7-pearl swag dip about 0.5 in (1.3 cm) so it rests on the top of the solid band.
3. Overlap the strand ends at the front point.
4. Sew one shell above each tack point, hinge down, so it covers the tack and fills Rnds 28–30.
Upper tier:
1. Tack the second strand at the same 5 positions along Rnd 35. The swags dip toward Rnd 34.
2. Sew the shells above it over Rnds 36–38.
Sew through the back loops of the appliqué edges and wrap around the net strands, not through them. Keep each stitch snug but not puckering.
Border
Border gauge: the top edging uses the body gauge, 4 sc per inch (2.5 cm).
Before you start: Flatten the tube with the hole at the front. Place a marker in the Rnd 49 stitch at the center back, directly opposite the hole. Flattened, each half is 30 sts.
- Rnd 50 (strap): Ch 1, sc in each st until 5 sts before the back marker. Ch 30, sk 10 sts (5 on each side of the marker), sc in each remaining st, sl st to join. (50 sc + 30 ch = 80)
- Front half: 30 sc
- Back half: 10 sc + 30 ch + 10 sc
- Rnd 51: Ch 1, sc in each sc and in each ch. (80)
- Front half: 30
- Back half: 10 + 30 + 10
- Rnd 52: Ch 1, rev sc in each st. (80) Fasten off.
- Strap inner edge: Join at one end of the strap opening. Work 30 sc in the free loops of the ch-30 and 10 sc in the 10 skipped sts, then sl st to join. (40) Fasten off.
The strap is 3 rows deep, about 0.75 in (1.9 cm) wide and 7.5 in (19.1 cm) long. It arches about 3 in (7.6 cm) above the rim.
Why the math works: Rnd 50 uses 50 of the 60 stitches and bridges the other 10 with chains. The inner-edge round then works into those 10 skipped stitches. So the opening keeps all 60 stitches and stays at 15 in (38.1 cm), while the strap adds 30 stitches only on the outer edge. Rnds 51 and 52 are worked 1 per stitch, so the count stays at 80 and nothing ruffles.
Final Blocking
- Weave in all the ends before you block.
- Spray the holder until it is evenly damp, not soaked.
- Slide a rolled towel or a 4.75 in (12.1 cm) cylinder inside the tube.
- Gently pull the net lengthwise until it measures 12 in (30.5 cm). Then even out the diamonds so each column lines up.
- Pin the shells flat and press the ribs upright with your fingers.
- Shape the hole rim into a circle about 1.75 in (4.4 cm) across.
- Let it dry completely, upright, before you remove the form.
Final Quality-Control Checklist
- The base is flat, 4.75 in (12.1 cm) across, with a clean turning ridge.
- The solid band is 3.5 in (8.9 cm) tall and the hole rim is smooth.
- The net has 15 loops in every round and is 12 in (30.5 cm) tall.
- The top band is 1.5 in (3.8 cm) deep with 60 sts.
- The strap sits directly opposite the hole.
- Each tier has 5 shells, evenly spaced, with the pearl swags matching.
- The total height is 17.5 in (44.5 cm), not counting the strap.
Troubleshooting
- The base cups: Your tension is too tight. Go up one hook size for the base only.
- The base ruffles: Go down one hook size, or check that each increase round adds exactly 6 sts.
- The hole is lopsided: Check that every one of Rows 15–20 has 52 sts. If needed, redo Rnd 2 of the rim more firmly.
- The net twists into a spiral: Always slip stitch to the center of the first loop. Don’t skip the half-loop shift.
- The net is too long: Leave out Rnd 41 and Rnd 42. That takes 1.5 in (3.8 cm) off the height.
- The shells curl: Block them pinned flat, and check that Row 4 has 17 sts.
- The strap stretches: Add a second rev sc round to the inner edge only.
Care
Hand wash in cool water and lay flat or hang to dry. Reshape the net while it is damp.
Final Notes
Here is the measurement chain:
– A 60-st body at 4 sts per inch gives 15 in (38.1 cm) around and 4.75 in (12.1 cm) across.
– The body is built from 3.5 in (8.9 cm) of solid band, 12 in (30.5 cm) of net, and 1.5 in (3.8 cm) of top band, for 17 in (43.2 cm).
– The edging adds 0.5 in (1.3 cm), for a total of 17.5 in (44.5 cm).
Hit each checkpoint and the shells and pearls will fall into place.
Happy crocheting!