

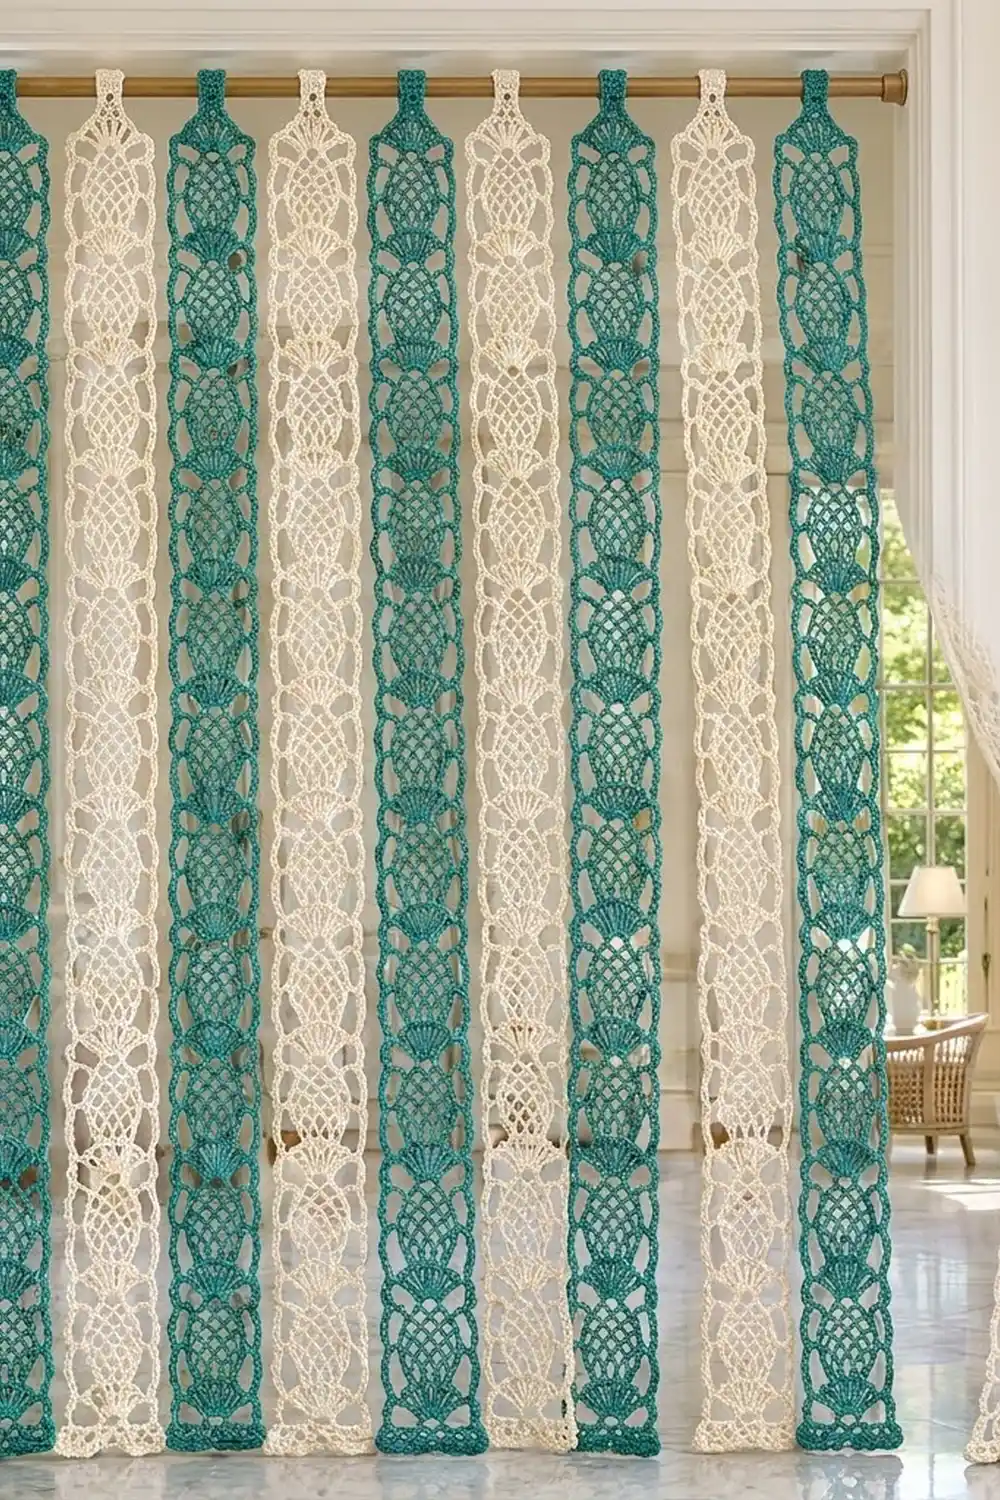
This door curtain is made of seven long lace strips, each one a column of classic pineapple motifs. Every pineapple sits on a fan of treble stitches. A chain-loop mesh narrows to a point above the fan, and long chain arches frame each pineapple on both sides. The strips hang side by side from a rod and are not joined to each other, so the curtain parts easily when you walk through.
The colors alternate deep teal and soft cream: teal, cream, teal, cream, teal, cream, teal. The style is airy and coastal, and light passes easily through the open mesh. Each strip has a small chain ring at both top corners and a solid tab that wraps over the rod.
This pattern uses US crochet terms. Each finished strip measures 4 1/2 in (11.4 cm) wide and 77 1/2 in (196.9 cm) long, not counting the tab. With the tab folded over the rod, a strip hangs about 79 in (200.7 cm) from the top of the rod. Spaced on the rod, the seven strips cover about 39 in (99.1 cm).
Construction is simple. Each strip is worked in turned rows from the bottom up: a foundation row of single crochet, then 19 pineapple repeats, a final fan, a top row of single crochet, and a solid rod tab. A two-row edging goes down one long side, across the bottom, and up the other side. Then you fold the tab over and sew it down.
Finished Size and Construction
- Finished strip size: 4 1/2 in x 77 1/2 in (11.4 cm x 196.9 cm), not counting the tab
- Hanging length: about 79 in (200.7 cm) from the top of the rod
- Skill level: Intermediate
- Terminology: US
- Yarn weight: Sport (CYC 2), mercerized cotton
- Hook: 3.25 mm (US D-3)
- Number of pieces: 7 separate strips (4 teal, 3 cream)
- Layout: 7 strips side by side on one rod, 1 1/4 in (3.2 cm) apart
- Strip size before border: 4 in x 77 1/4 in (10.2 cm x 196.2 cm)
- Border depth: about 1/4 in (0.6 cm) per edge
- Rod tab: 3 3/8 in (8.6 cm) long before folding; fits a rod up to 1 in (2.5 cm) across
Materials
Use a smooth mercerized cotton for this curtain. It shows stitch detail clearly, holds its shape when blocked, and doesn’t stretch much under its own weight. Avoid acrylic and loosely plied yarns, because a long lace strip will stretch over time.
- Teal (Color A): 300 g, about 900 m, for 4 strips
- Cream (Color B): 250 g, about 750 m, for 3 strips
One strip uses about 70 g (about 210 m). These quantities include a margin for your gauge swatch and weaving in ends.
Tools:
- 3.25 mm (US D-3) crochet hook
- Tapestry needle
- Scissors
- Stitch markers
- Measuring tape
- Rust-proof pins and a long blocking surface
- Spray bottle
- Curtain rod up to 1 in (2.5 cm) across
Abbreviations (US Terms)
- ch – chain
- sl st – slip stitch
- sc – single crochet
- dc – double crochet
- tr – treble crochet
- sp(s) – space(s)
- st(s) – stitch(es)
- rep – repeat
Special stitch:
- Fan – 9 tr worked into the same stitch or space.
Post stitches in this pattern: Every lace row has 4 “posts.” These are the edge stitch at each end (the turning chain counts as one) and the inner stitch on each side. The posts frame the side spaces and keep the strip straight.
Gauge and Checkpoints
- Gauge: 25 sc = 4 in (10.2 cm); 7 sc rows = 1 in (2.5 cm)
- One pineapple repeat (9 rows): 4 in wide x 4 in tall (10.2 cm x 10.2 cm), after blocking
Before you start the full curtain, make a test piece. Work Rows 1–11, then fasten off, pin the piece flat, and mist it.
Checkpoints:
- After Row 1: 4 in (10.2 cm) wide.
- After Row 3: about 1 1/8 in (2.9 cm) tall.
- After Row 10: about 4 1/8 in (10.5 cm) tall from the bottom edge.
If your piece is too big, go down 0.25 mm in hook size. If it’s too small, go up 0.25 mm. A small error adds up fast here: being 1/8 in (0.3 cm) off on each repeat adds almost 2 1/2 in (6.4 cm) to the strip length.
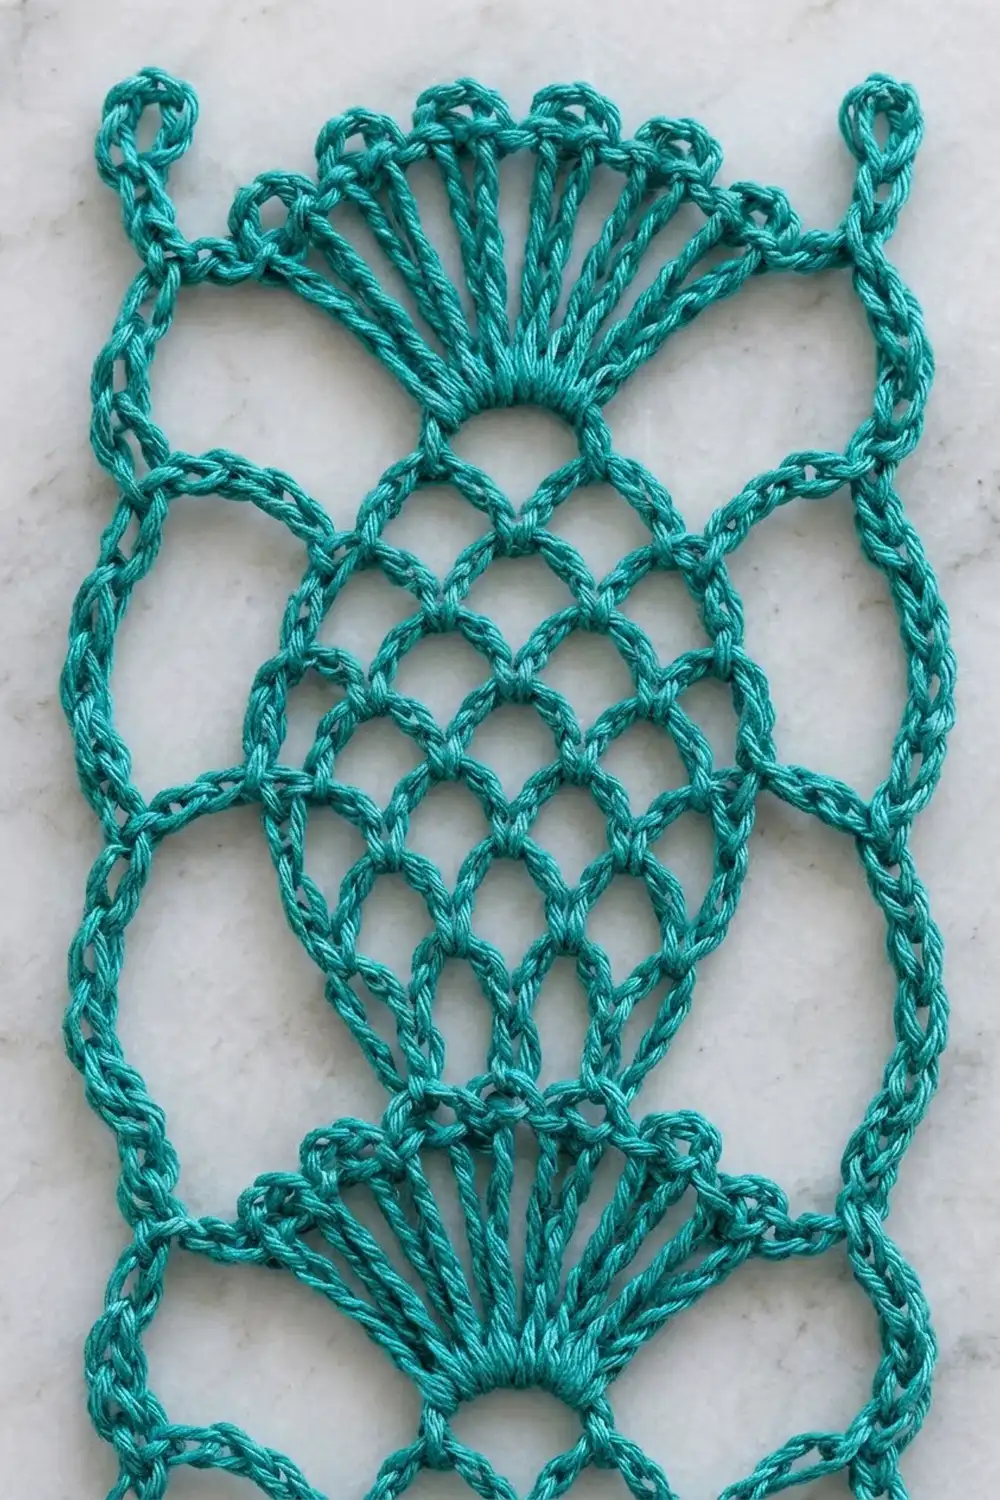
Strip Pattern (Make 7)
Foundation: Ch 26.
Row 1: Sc in the 2nd ch from the hook and in each ch across. Turn. (25 sc)
Count across the row: st 1 is the right edge, st 7 is the inner post, st 13 is the center, st 19 is the other inner post, and st 25 is the left edge.
Row 2 (Fan A): Ch 4 (counts as tr), ch 4, skip 5 sc, tr in st 7, ch 4, skip 5 sc, Fan in st 13, ch 4, skip 5 sc, tr in st 19, ch 4, skip 5 sc, tr in st 25. Turn. (13 tr: 4 posts + 9 fan tr; 2 side ch-4 sps, 2 connecting ch-4 sps)
Row 3 (Fan B): Ch 4 (counts as tr), ch 4, tr in the inner tr, ch 4, [tr in the next fan tr, ch 1] 8 times, tr in the last fan tr, ch 4, tr in the inner tr, ch 4, tr in the top of the turning ch. Turn. (13 tr, 8 ch-1 sps in the fan)
Row 4 (Mesh 7): Ch 3 (counts as dc), ch 4, dc in the inner tr, ch 4, sc in the first ch-1 sp, [ch 4, sc in the next ch-1 sp] 7 times, ch 4, dc in the inner tr, ch 4, dc in the top of the turning ch. Turn. (4 dc posts, 8 sc, 7 mesh loops)
From here, each mesh row has one loop fewer than the row before. The connecting chains get longer so the edges stay straight.
Row 5 (Mesh 6): Ch 3 (counts as dc), ch 4, dc in the inner dc, ch 5, sc in the first mesh loop, [ch 4, sc in the next loop] 6 times, ch 5, dc in the inner dc, ch 4, dc in the top of the turning ch. Turn. (4 posts, 7 sc, 6 loops)
Rows 6–10: Work the same way as Row 5. Change only the connecting chain length (the chain before the first sc and after the last sc) and the bracket repeat:
| Row | Connecting ch | Bracket repeats | Mesh sc | Mesh loops |
|---|---|---|---|---|
| 6 (Mesh 5) | ch 5 | 5 | 6 | 5 |
| 7 (Mesh 4) | ch 6 | 4 | 5 | 4 |
| 8 (Mesh 3) | ch 6 | 3 | 4 | 3 |
| 9 (Mesh 2) | ch 7 | 2 | 3 | 2 |
| 10 (Mesh 1) | ch 7 | 1 | 2 | 1 |
Every row has 4 posts. After Row 10 the pineapple ends in a single point loop. The long ch-6 and ch-7 connecting chains now form the arches on either side of the pineapple.
Row 11 (Fan A, next repeat): Ch 4 (counts as tr), ch 4, tr in the inner dc, ch 4, Fan in the single mesh loop, ch 4, tr in the inner dc, ch 4, tr in the top of the turning ch. Turn. (13 tr)
Row 11 is worked the same way as Row 2, so the pineapple repeat is Rows 2–10. Starting from Row 11, work Rows 3–10 and then the Fan A row again until you have 19 complete repeats (Rows 2–172).
Row 173 (Fan A): Work as Row 11.
Row 174 (Fan B): Work as Row 3.
Row 175 (Top row): Ch 1, sc in the first tr, 3 sc in the side ch-4 sp, sc in the inner tr, 3 sc in the connecting ch-4 sp, sc in each of the 9 fan tr (skip the ch-1 sps), 3 sc in the connecting ch-4 sp, sc in the inner tr, 3 sc in the side ch-4 sp, sc in the top of the turning ch. Turn. (1 + 3 + 1 + 3 + 9 + 3 + 1 + 3 + 1 = 25 sc)
Checkpoint: The strip should now measure 4 in x 77 1/4 in (10.2 cm x 196.2 cm), lightly stretched.
Rows 176–199 (Rod tab): Ch 1, sc in each sc across. Turn. (25 sc per row, 24 rows)
The tab measures about 3 3/8 in (8.6 cm). Fasten off, leaving a 20 in (50.8 cm) tail for sewing the tab later.
Make All Pieces
Make 4 strips in Teal (A) and 3 strips in Cream (B). Before adding the border, check that every strip has exactly 19 repeats. Strips with different repeat counts will hang at uneven lengths.
Layout on the rod (left to right):
| A | B | A | B | A | B | A |
  1   2   3   4   5   6   7
A teal strip goes on each end, so the curtain looks balanced.
Joining
The strips are not joined to each other. Each strip is joined to itself to form the rod loop, and this is the only joining step.
Method: Fold the tab (Rows 176–199) to the back of the strip so that Row 199 lies against the back of Row 175. Thread the long tail onto a tapestry needle and whipstitch the two rows together, stitch to stitch. Each of the 25 sts of Row 199 matches 1 of the 25 sts of Row 175, so the loop closes flat with no puckers.
Tension: Keep the whipstitches snug but not tight. If you pull too hard, the top fan gathers in and the strip gets narrower at the rod.
Size checkpoint: The tab loop should slide over your rod with a little room to spare. It fits a rod up to 1 in (2.5 cm) across. For a thicker rod, add 3 tab rows for every extra 1/8 in (0.3 cm) of rod diameter.
Do the joining after the border is finished and blocked (see Final Blocking).
Border
Work the border on each strip before sewing the tab. It goes down one long side, across the bottom, and up the other side. The tab is not edged.
Border gauge: About 5 sc per inch (2.5 cm) along the row ends. This is a little looser than the body gauge on purpose, so the lace edge lies flat and doesn’t ruffle.
Border Row 1: Hold the strip with the right side facing you. Join yarn in the last sc of Row 175, at the top right corner of the lace. Ch 1. Work down the side, putting the sc around the edge posts:
- Row 175 end: 1 sc
- Rows 174 and 173 (tr posts): 3 sc each = 6 sc
- In each of the 19 repeats: 3 sc in each of the 2 fan-row posts + 2 sc in each of the 7 mesh-row posts = 20 sc per repeat, 380 sc total
- Row 1 end: 1 sc
That is 388 sc down the side (1 + 6 + 380 + 1). Ch 2 for the corner. Then sc in each of the 25 foundation ch loops (25 sc), ch 2 for the corner, and work up the other side in reverse order (388 sc). Don’t turn.
The ch-2 corners are spaces, not stitches. They are not part of any side count.
Border Row 2 (Arches): Ch 1, turn. Sc in the first sc, ch 6, sl st in the same sc to make the top corner ring.
- First side: [Ch 3, skip 2 sc, sc in the next sc] 129 times. (129 arches; the last sc is in st 388)
- Corner: (Sc, ch 3, sc) in the ch-2 corner sp.
- Bottom: Sc in the first sc, [ch 3, skip 2 sc, sc in the next sc] 8 times. (8 arches)
- Corner: (Sc, ch 3, sc) in the ch-2 corner sp.
- Second side: Sc in the first sc, [ch 3, skip 2 sc, sc in the next sc] 129 times. Ch 6, sl st in the last sc to make the second ring.
Fasten off.
Why the math works: Each arch uses 3 sts. A side has 388 sts: 1 starting sc + (129 x 3) = 388. The bottom has 25 sts: 1 starting sc + (8 x 3) = 25. Both counts come out exactly, so there are no leftover stitches and no fudged arches. The border adds about 1/4 in (0.6 cm) to each edge, so the strip goes from 4 in (10.2 cm) to 4 1/2 in (11.4 cm) wide, and from 77 1/4 in (196.2 cm) to 77 1/2 in (196.9 cm) long.
Final Blocking
- Weave in all ends along the posts, not through the mesh, so they stay hidden.
- Soak the strip in cool water for 10 minutes, then press the water out gently. Don’t wring it.
- Lay the strip on towels on a long, flat surface, or block it in sections.
- Pin the long sides straight at 4 1/2 in (11.4 cm) wide, placing a pin at every 4th arch.
- Stretch the length to 77 1/2 in (196.9 cm). Measure from the bottom arches to the corner rings.
- Open each fan and pin the tip of each pineapple point so it lines up with the center.
- Let the strip dry completely.
- Fold and sew the tab (see Joining), then hang the strip.
Final Quality-Control Checklist
- 7 strips in total: 4 teal and 3 cream
- Every strip has 19 repeats and ends with a fan
- Each Row 175 has exactly 25 sc
- 388 sc on each side and 25 sc across the bottom in Border Row 1
- 129 arches per side and 8 across the bottom
- A corner ring at both top corners
- Each strip measures 4 1/2 in x 77 1/2 in (11.4 cm x 196.9 cm)
- Tab loops slide easily over the rod
- Strips are spaced 1 1/4 in (3.2 cm) apart and hang level
Troubleshooting
The strip gets narrower toward the top. Your connecting chains are too tight. Chain more loosely, or go up one hook size for the chains only.
The fan looks crowded. Check that the ch-1 spaces in Fan B are really there, and work each Fan tr fully, all the way up.
The mesh row count is wrong. Remember that the first sc goes into the first loop before you start the bracket. Each mesh row has one more sc than it has loops.
The edges ripple after the border. You worked too many sc. Count again: 20 sc per repeat.
The strips are different lengths. Count the repeats on each strip, then block them all to the same 77 1/2 in (196.9 cm).
The strip stretches as it hangs. Block it again while slightly compressed, or take out one repeat.
Care
Hand wash in cool water with mild soap and lay flat to dry, reshaping to the blocked size. Don’t hang the strips to dry, because the wet weight will stretch them.
Final Notes
Everything in this pattern follows one measurement chain. With a gauge of 25 sc = 4 in (10.2 cm), the strip is 4 in (10.2 cm) wide. One 9-row repeat is 4 in (10.2 cm) tall, so 19 repeats plus the end rows make 77 1/4 in (196.2 cm). Border Row 1 puts 388 sc on each side, which divides exactly into 129 arches. The border brings each strip to 4 1/2 in x 77 1/2 in (11.4 cm x 196.9 cm). The tab adds the last bit of drop, for a hanging length of 79 in (200.7 cm). Check your swatch, count each repeat, and the seven strips will hang evenly.
Happy crocheting!