

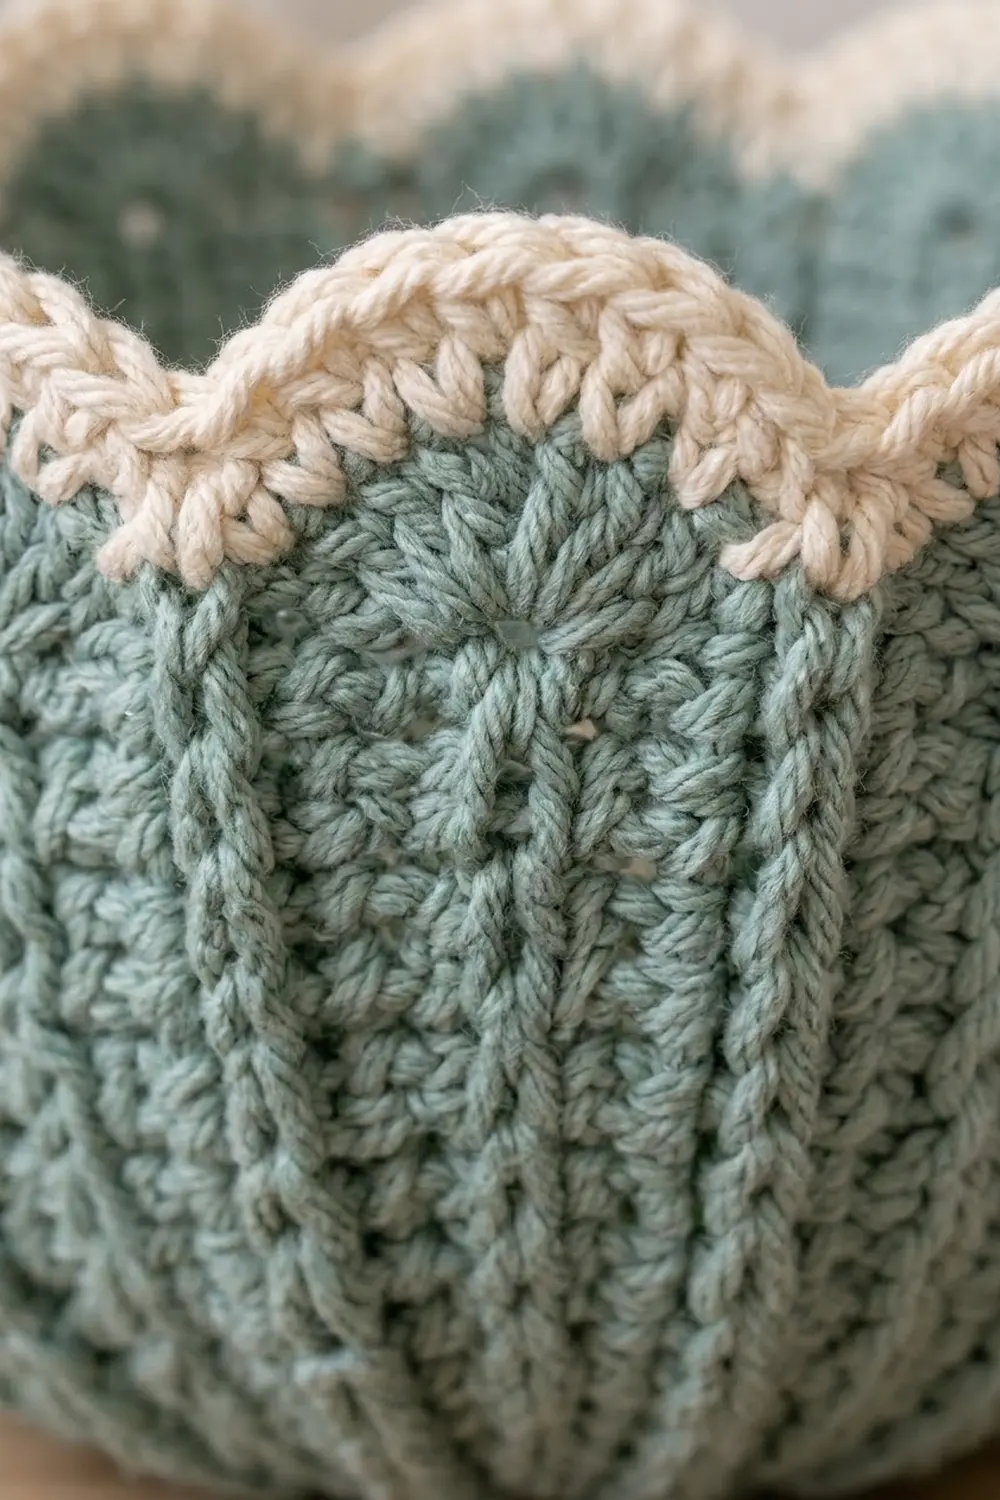
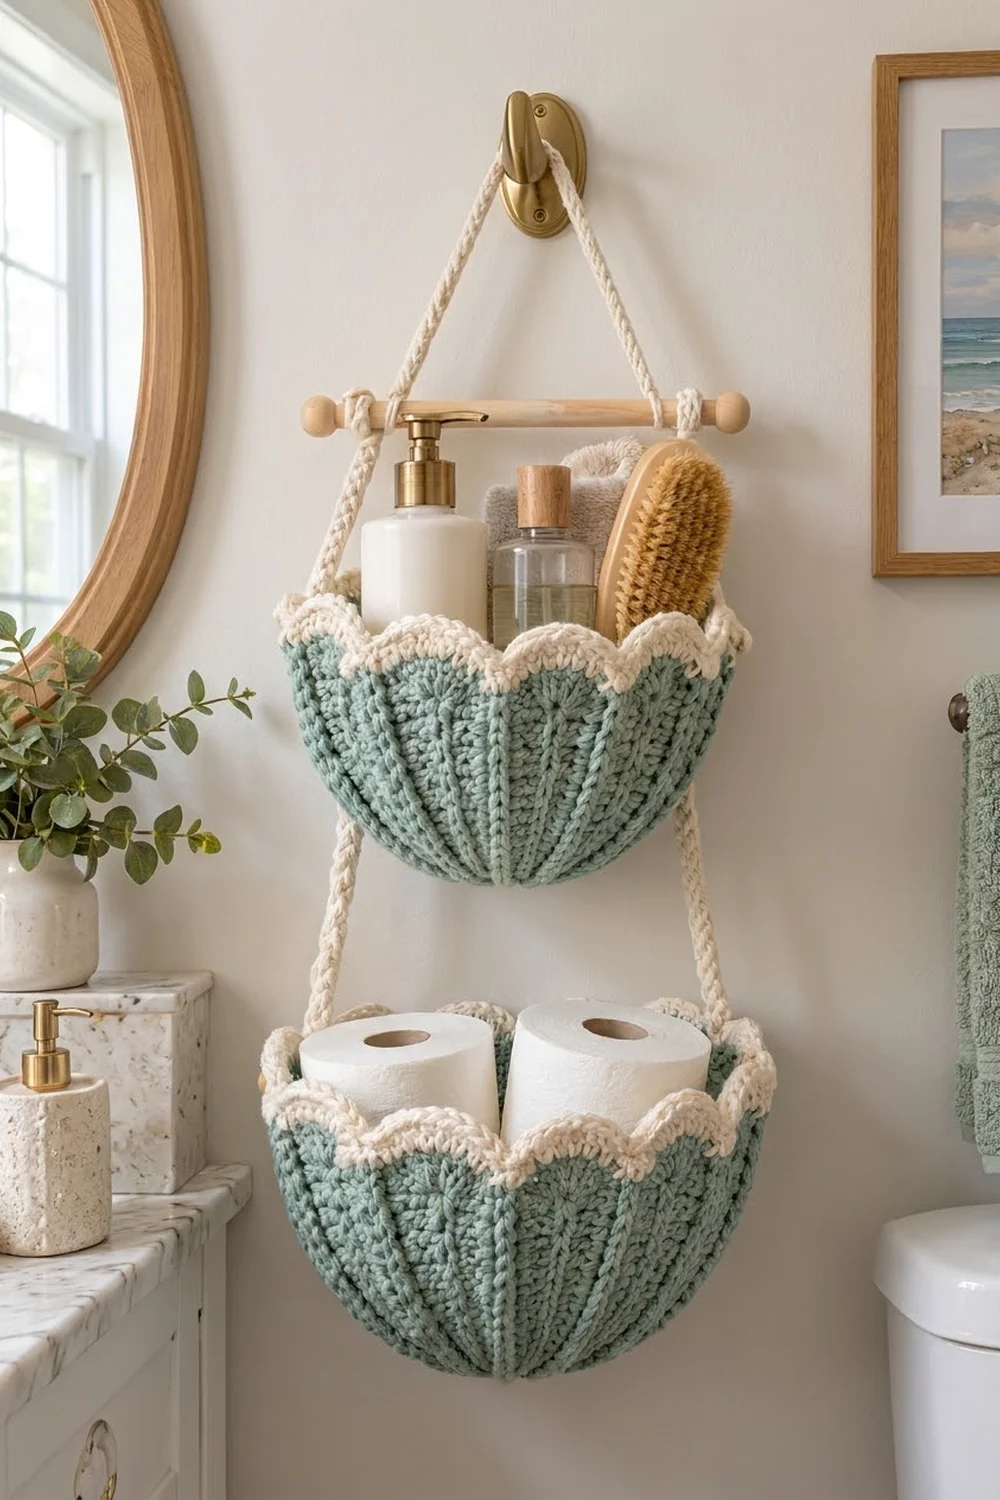
This two-tier hanging basket is made of two soft, shell-shaped bowls stacked one above the other on cream cords and a wooden dowel. Sage green post-stitch ribs fan out from the center of each base like the ridges on a scallop shell, and a cream scalloped rim finishes each bowl.
The colors keep things calm and coastal: sage green for the bodies and cream for the rims and cords. The organizer works well in a bathroom for soaps, brushes, and spare toilet rolls, or in a nursery or craft corner.
The pattern uses US crochet terms. The small top basket is about 12 in (30.5 cm) across the scallops and 6.25 in (15.9 cm) tall. The large lower basket is about 13.5 in (34.3 cm) across and 7.75 in (19.7 cm) tall. Fully assembled, it measures about 18 in (45.7 cm) from the dowel to the bottom of the lower basket, and the hanging V adds about 10 in (25.4 cm) above the dowel.
Each basket starts as a flat ribbed circle, then the sides rise with fewer increases so the circle curves into a bowl. A cream rim is worked straight onto the last round. Three slip-stitch cords and a dowel join everything into one hanging piece.
Finished Size and Construction
- Finished size: Small basket 12 in (30.5 cm) across scallops, 6.25 in (15.9 cm) tall. Large basket 13.5 in (34.3 cm) across scallops, 7.75 in (19.7 cm) tall.
- Skill level: Intermediate
- Terminology: US
- Yarn weight: Bulky (#5)
- Hook: 6 mm (US J-10)
- Number of pieces: 5 crocheted pieces (2 baskets, 1 hanging V cord, 2 side cords) plus 1 dowel
- Layout: Vertical stack: V cord, dowel, small basket, large basket
- Size before border: Small opening 11 in (27.9 cm) across. Large opening 12.5 in (31.8 cm) across.
- Body depth before border: Small 5 in (12.7 cm). Large 6.5 in (16.5 cm).
- Border depth: 1.25 in (3.2 cm)
Materials
Pick a firm bulky yarn. A cotton or cotton-acrylic blend holds the bowl shape best. Very soft, lofty acrylic will sag under the weight of the toilet rolls.
- Sage green (Color A): 250 g, about 275 m
- Cream (Color B): 150 g, about 165 m
Both amounts include a margin of about 25% for gauge differences and swatching.
Tools:
– 6 mm (US J-10) crochet hook
– Wooden dowel, 14 in (35.6 cm) long and 0.75 in (1.9 cm) thick, with knob or bead ends
– Tapestry needle
– 2 stitch markers
– Measuring tape
– A bowl about 11 in (27.9 cm) across for blocking (optional)
– Fabric stiffener or spray starch (optional)
– Wall hook rated for at least 5 lb (2.3 kg)
Abbreviations (US Terms)
- ch – chain
- sl st – slip stitch
- sc – single crochet
- dc – double crochet
- fpdc – front post double crochet
- sk – skip
- st(s) – stitch(es)
- rep – repeat
Special stitch – front post double crochet (fpdc): Yarn over and insert the hook from front to back to front around the post of the stitch shown. Yarn over, pull up a loop, then (yarn over, pull through 2) twice. The fpdc sits on the right side and makes the raised rib.
Round notes: Work every round with the right side facing and don’t turn. The beginning ch 2 does not count as a stitch. Work the first stitch into the same stitch as the join, and join each round with a sl st to the first stitch.
Gauge and Checkpoints
Gauge: 11 dc and 6 rounds = 4 in (10.2 cm) in Color A.
Make the small basket first. It works as your gauge test, and you can check it against the larger one later.
Checkpoints:
– After Round 5 (60 sts): the base lies flat and is 7 in (17.8 cm) across.
– After Round 6 (72 sts): the base is 8 in (20.3 cm) across.
– After Round 10 (96 sts): the opening circumference is about 35 in (88.9 cm).
– Small basket after Round 13: 11 in (27.9 cm) across the opening, 5 in (12.7 cm) deep.
– Large basket after Round 16: about 39.25 in (99.7 cm) around and 12.5 in (31.8 cm) across.
If your base is too big: change to a 5.5 mm hook. If it is too small or stiff: change to a 6.5 mm hook. If the base ruffles before Round 6, you are working too loosely. If it cups early, you are working too tightly.
Basket Base (Both Baskets)
Use Color A. Rounds 1–10 are the same for both baskets.
Round 1: Make a magic ring. Ch 2, 12 dc in ring. Pull the ring snug but leave a small center hole. Join. (12 sts)
Round 2: Ch 2, fpdc around next dc, dc in top of same dc; rep from * 12 times. Join. (24 sts: 12 fpdc, 12 dc)
Round 3: Ch 2, fpdc around next fpdc, 2 dc in next dc; rep from * 12 times. Join. (36 sts)
Round 4: Ch 2, fpdc around next fpdc, dc in next dc, 2 dc in next dc; rep from * 12 times. Join. (48 sts)
Round 5: Ch 2, fpdc around next fpdc, dc in next 2 dc, 2 dc in next dc; rep from * 12 times. Join. (60 sts)
The 12 fpdc columns are the main ribs. Put a marker in the first main rib.
Round 6 (adds secondary ribs): Ch 2, fpdc around next fpdc, 2 dc in next dc, fpdc around next dc, dc in next 2 dc; rep from * 12 times. Join. (72 sts: 24 fpdc, 48 dc)
Now there are 24 ribs with 2 dc between each pair. The new ribs sit halfway between the main ribs, so the shell ridges split as they spread outward.
Round 7 (sides begin): Ch 2, fpdc around next fpdc, dc in next 2 dc; rep from * 24 times. Join. (72 sts)
This round has no increases, so the edge starts to curve upward.
Round 8: Ch 2, fpdc around next fpdc, dc in next 2 dc, fpdc around next fpdc, dc in next dc, 2 dc in next dc; rep from * 12 times. Join. (84 sts)
Round 9: Ch 2, fpdc around next fpdc, dc in next 2 dc, fpdc around next fpdc, dc in next 3 dc; rep from * 12 times. Join. (84 sts)
Round 10: Ch 2, fpdc around next fpdc, dc in next dc, 2 dc in next dc, fpdc around next fpdc, dc in next 3 dc; rep from * 12 times. Join. (96 sts: 24 fpdc, 72 dc)
All 24 rib sections now have 3 dc each. Check the 35 in (88.9 cm) circumference here.
Small Basket Sides
Rounds 11–13: Ch 2, fpdc around next fpdc, dc in next 3 dc; rep from * 24 times. Join. (96 sts each round)
Fasten off Color A. The body should be 11 in (27.9 cm) across and 5 in (12.7 cm) deep.
Large Basket Sides
Round 11: Work as for the small basket. (96 sts)
Round 12: Ch 2, fpdc around next fpdc, dc in next 3 dc, fpdc around next fpdc, dc in next 2 dc, 2 dc in next dc; rep from * 12 times. Join. (108 sts)
After this round, the sections after the main ribs have 3 dc and the sections after the secondary ribs have 4 dc.
Rounds 13–16: Ch 2, fpdc around next fpdc, dc in next 3 dc, fpdc around next fpdc, dc in next 4 dc; rep from * 12 times. Join. (108 sts each round)
Fasten off Color A. The body should be 12.5 in (31.8 cm) across and 6.5 in (16.5 cm) deep.
Cords
Hold 2 strands of Color B together and use the 6 mm hook.
Cord gauge: 5 ch = 2 in (5.1 cm).
Method: Ch the stated number, then sl st into the back bump of the 2nd ch from the hook and of every ch after it. Fasten off, leaving 8 in (20.3 cm) tails at both ends.
- Hanging V cord: Ch 75. Finished length 30 in (76.2 cm).
- Side cords (make 2): Ch 40 each. Finished length 16 in (40.6 cm).
Make All Pieces
| Piece | Qty | Color A | Color B |
|---|---|---|---|
| Small basket (body Rounds 1–13) | 1 | about 85 m | rim about 25 m |
| Large basket (body Rounds 1–16) | 1 | about 115 m | rim about 35 m |
| Hanging V cord | 1 | — | about 12 m (doubled) |
| Side cords | 2 | — | about 7 m each (doubled) |
Layout grid:
             [ wall hook ]
               /       \
         V cord         V cord
  (O)=========== DOWEL 14 in ===========(O)
   |                                      |
 side      [ SMALL BASKET, 12 in ]      side
 cord            6.25 in tall           cord
   |              3 in gap                |
   |      [ LARGE BASKET, 13.5 in ]       |
   |            7.75 in tall              |
Before you assemble, add the rims to both baskets (see Border below).
Joining
Method: Wrap and knot the cords to the dowel, then sew the cords flat to the rims with the cord tails and a tapestry needle.
Attachment points: On each basket, the attachment points are the two main ribs exactly opposite each other. Count 6 main ribs from your marked rib to find the second point. The rim’s sc dips sit on these main ribs, which gives you a firm, centered spot to sew into.
- V cord: Wrap each end of the V cord twice around the dowel, just inside the knobs, and tie the tail tightly. Weave in. About 13 in (33.0 cm) of cord stays free on each side of the hook.
- Side cords to dowel: Wrap the top 2 in (5.1 cm) of each side cord around the dowel next to the V cord wraps. Tie and weave in.
- Small basket: Hold the small basket so its rim sits 1 in (2.5 cm) below the dowel. Sew each side cord to one attachment point, through all 3 rim rounds, over about 1 in (2.5 cm) of rim.
- Large basket: Let each cord run down the outside of the small basket. Its rim should hang 3 in (7.6 cm) below the bottom of the small basket, which is 10.25 in (26.0 cm) below the dowel. Sew the remaining cord end to the attachment points through all 3 rim rounds.
Tension: Sew with small, firm stitches without pulling the rim inward. Before you sew the large basket, check that both side cords are exactly the same length. If one side is even 0.25 in (0.6 cm) shorter, the basket will tilt.
Size checkpoint: When hung empty, the organizer measures 18 in (45.7 cm) from the dowel to the bottom of the large basket, and the dowel hangs level.
Border (Scalloped Rim)
Each rim is worked on its own basket in Color B. Its starting count is that basket’s final body round: 96 for the small basket and 108 for the large. No stitches are added at the attachment points.
Border gauge: 11 sc = 4 in (10.2 cm), the same as the body. This keeps the rim from pulling in or flaring too much.
Small Basket Rim
Join Color B in the marked main rib.
Rim Round 1: Ch 1, sc in each st around. Join. (96 + 0 = 96 sts)
Rim Round 2: Sc in next st, sk 3 sts, 7 dc in next st, sk 3 sts; rep from * 12 times. Join. (12 scallops: 12 × 8 = 96 sts)
Each sc lands above a main rib and each 7-dc shell above a secondary rib, so the scallop dips line up with the main ribs below.
Rim Round 3: Ch 1, sc in each st, working 2 sc in the center (4th) dc of each shell. Join. (96 + 12 = 108 sts)
Large Basket Rim
Join Color B in the marked main rib.
Rim Round 1: Ch 1, sc in next 3 sts, 2 sc in next st, sc in next 5 sts; rep from * 12 times. Join. (108 + 12 = 120 sts)
The added stitch moves each secondary rib to position 6 of a 10-st repeat, so the scallops stay centered.
Rim Round 2: Sc in next st, sk 4 sts, 9 dc in next st, sk 4 sts; rep from * 12 times. Join. (12 scallops: 12 × 10 = 120 sts)
Rim Round 3: Ch 1, sc in each st, working 2 sc in the center (5th) dc of each shell. Join. (120 + 12 = 132 sts)
Fasten off and weave in.
Why the math works: Each rim has 12 scallops. The small basket’s 96 sts make twelve 8-st repeats (1 sc + 3 skipped + 1 shell + 3 skipped). The large basket’s 120 sts make twelve 10-st repeats (1 sc + 4 skipped + 1 shell + 4 skipped). Both repeats are symmetrical. The extra 12 sts in Rim Round 3 round out the shell tips so they lie open rather than cupping. Each rim adds 1.25 in (3.2 cm) of height.
Final Blocking
- Lightly mist or soak each basket in cool water and squeeze out the excess in a towel.
- Optional: spray with fabric stiffener or starch, especially on the large basket.
- Turn a bowl upside down and pull the basket over it. Shape the base flat and the sides into an even curve.
- Straighten the ribs so they run in clean lines from the center.
- Pin each scallop open. Shells should measure 12 in (30.5 cm) across on the small basket and 13.5 in (34.3 cm) on the large.
- Let the baskets dry completely, usually 24 hours, before assembling or loading them.
Final Quality-Control Checklist
- Small basket: 96 sts in Rounds 10–13. Large basket: 108 sts in Rounds 12–16.
- 24 ribs per basket, running straight and evenly spaced.
- 12 scallops per rim, with every dip over a main rib.
- Attachment points exactly opposite each other on both baskets.
- Side cords match in length, and the dowel hangs level.
- Small basket rim 1 in (2.5 cm) below the dowel, with a 3 in (7.6 cm) gap between the baskets.
- All tails woven in through the post ribs, where they won’t show.
Troubleshooting
- The base ruffles: You are working too loosely or have added extra increases. Recount Rounds 3–6 and go down a hook size.
- The basket is a cylinder, not a bowl: Rounds 8 and 10 (and Round 12 on the large basket) were worked without their increases. Work them as written.
- The ribs lean sideways: Make sure you work each fpdc around the fpdc directly below it, not the dc next to it.
- The scallops are off-center: Rim Round 1 didn’t start in a main rib. Rip back and rejoin at the marker.
- The basket tilts: The side cords are uneven, or the attachment points aren’t opposite each other. Re-sew one side.
- The large basket sags when filled: Stiffen it, or switch to a firmer cotton yarn.
Care
Hand wash in cool water, press out the water in a towel, and reshape over a bowl to dry flat. If you used stiffener, reapply it after washing.
Final Notes
Here is the full measurement chain. With a gauge of 11 dc and 6 rounds = 4 in (10.2 cm), Round 6 makes an 8 in (20.3 cm) base. Round 10 reaches 96 sts, about 35 in (88.9 cm) around.
The small basket finishes 11 in (27.9 cm) across and 5 in (12.7 cm) deep. The large basket reaches 108 sts and finishes 12.5 in (31.8 cm) across and 6.5 in (16.5 cm) deep.
The 1.25 in (3.2 cm) rims bring the baskets to 12 in (30.5 cm) and 13.5 in (34.3 cm) across the scallops. With 16 in (40.6 cm) side cords on a 14 in (35.6 cm) dowel, the organizer hangs 18 in (45.7 cm) from the dowel to the bottom of the lower basket.
Happy crocheting!