

This hanging toilet paper holder keeps three spare rolls tidy on a towel bar, a hook, or the back of a door. A long solid panel hangs from two split straps, and three lacy pockets are sewn down its front, one above the other.
The sample uses one warm taupe cotton that suits stone, wood, and brass. The panel is plain and firm so it hangs straight. The pockets carry the decoration: a solid base band, two tiers of offset fan shells with diamond openings, and a scalloped top.
The pattern uses US crochet terms. The finished panel measures 5.5 in (14.0 cm) wide and 28.5 in (72.4 cm) long laid flat, including straps and border. Each pocket stands 3.25 in (8.3 cm) tall and holds a standard roll about 4.5 in (11.4 cm) across.
The construction is simple. Crochet the panel in rows and split the top into two straps. Make three pockets in the round, each starting from an oval base. Sew the pockets onto the panel, work a two-round border around the panel, and fold the straps into hanging loops.
Finished Size and Construction
- Finished panel size: 5.5 in x 28.5 in (14.0 cm x 72.4 cm) flat, with border
- Approximate hanging length: 25 in (63.5 cm) from bar to bottom edge
- Skill level: Easy to intermediate
- Terminology: US crochet terms
- Yarn weight: Worsted / aran (#4), cotton or cotton blend
- Hook: 5.0 mm (H-8)
- Number of pieces: 4 (1 back panel, 3 pockets)
- Layout: 1 column, 3 pockets stacked vertically on the panel
- Pocket size: base about 5.5 in x 4 in (14.0 cm x 10.2 cm); side height 3.25 in (8.3 cm); opening circumference 15 in (38.1 cm)
- Panel size before border: 5 in x 28 in (12.7 cm x 71.1 cm)
- Border depth: 0.25 in (0.6 cm) on each edge
Materials
Choose a smooth, firm cotton or cotton blend. Cotton holds its shape under the weight of the rolls and keeps the shell openings crisp. Avoid very soft acrylics, because the panel will stretch over time.
- Taupe (only color): 150 g, about 270 m (295 yd), based on yarn at about 180 m per 100 g
- Back panel and border: about 55 g (99 m)
- Each pocket: about 22 g (40 m)
These quantities include a margin of roughly 20–25% for swatching, sewing, and differences in tension.
Tools
- 5.0 mm (H-8) crochet hook
- Tapestry needle
- 4 stitch markers
- Scissors
- Measuring tape
- Rust-proof pins and a blocking mat
- One toilet roll for test fitting
Abbreviations (US Terms)
- ch – chain
- sl st – slip stitch
- sc – single crochet
- dc – double crochet
- BLO – back loop only
- st(s) – stitch(es)
- RS – right side
- rnd – round
- [ ] x N – repeat the steps in brackets N times
Special stitches
- Shell: 5 dc worked into the same stitch or space.
- Scallop: 7 dc worked into the same space.
Gauge and Checkpoints
Gauge: 16 sc and 16 rows = 4 in (10.2 cm) in sc worked flat. Work firmly. At this tension a row end is the same width as a stitch, which keeps the border math clean.
Test one piece first. Make one pocket before you start the panel. It uses little yarn and shows you right away whether a roll fits.
Checkpoints:
- Pocket after Rnd 8: oval base about 5.5 in x 4 in (14.0 cm x 10.2 cm), 60 sts.
- Pocket after Rnd 11: a roll slides in with a little room all around.
- Finished pocket: side height 3.25 in (8.3 cm).
- Panel after Row 1: 5 in (12.7 cm) wide.
- Panel after Row 40: 10 in (25.4 cm) long.
- Panel after Row 88: 22 in (55.9 cm) long.
- Panel after Row 112: 28 in (71.1 cm) long.
If your work is too big, go down a hook size, for example to 4.5 mm (7). If it is too small, go up to 5.5 mm (I-9). For the pocket, fit matters more than exact gauge. Troubleshooting explains how to enlarge a pocket.
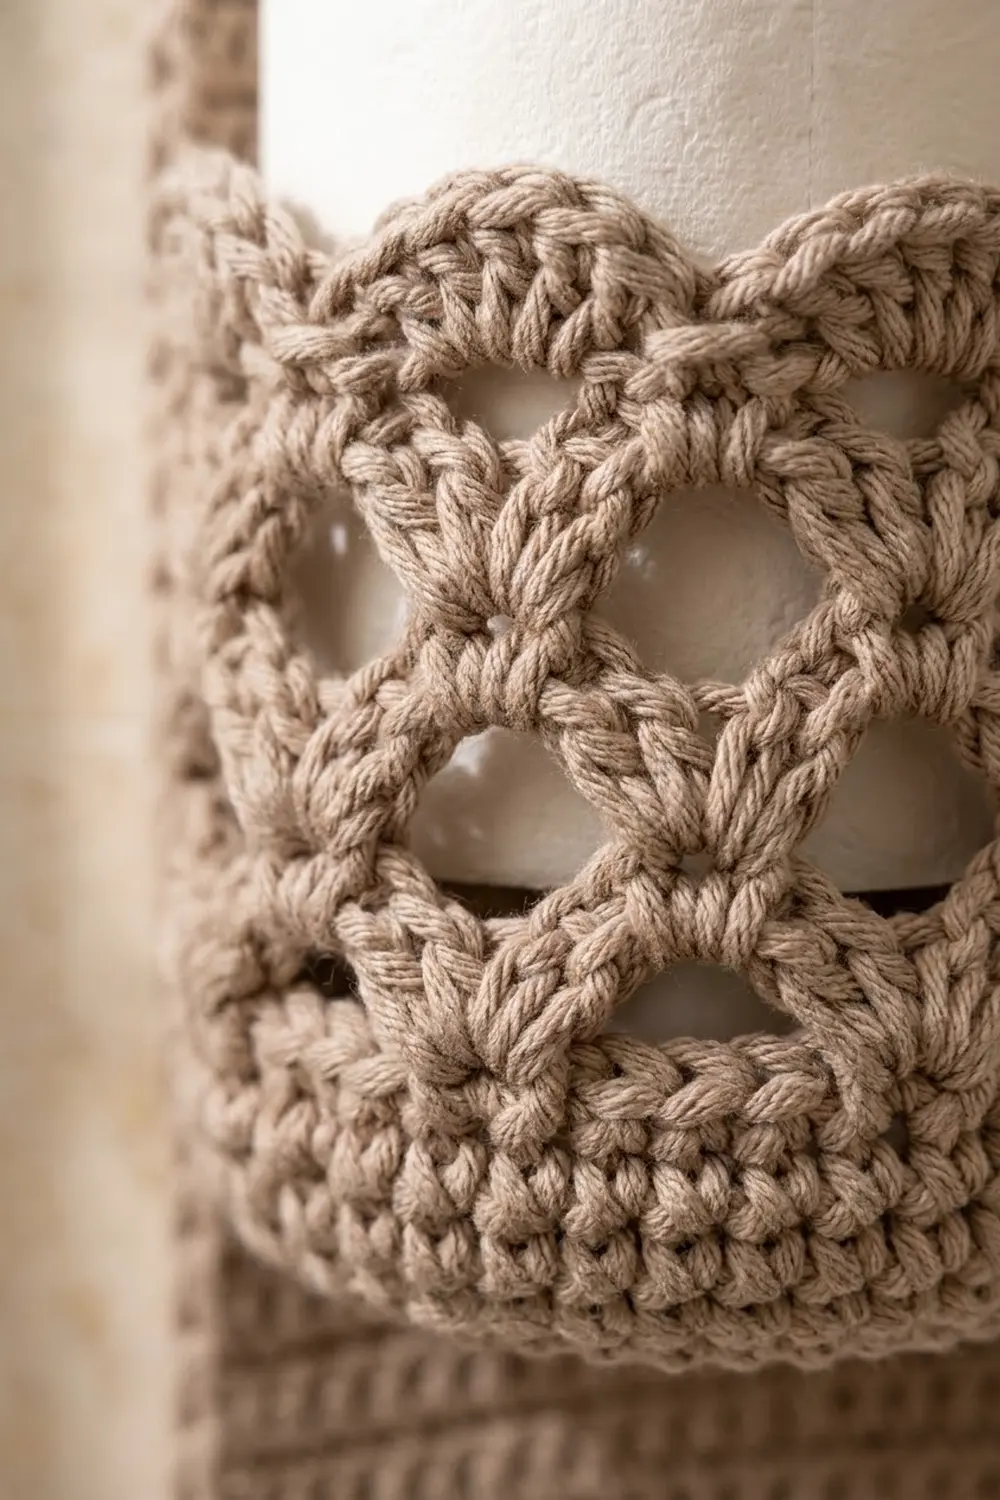
Pocket (Make 3)
Work the pocket in joined rounds with the RS facing. Do not turn.
Oval Base
Ch 9.
Rnd 1: 3 sc in 2nd ch from hook, sc in next 6 ch, 3 sc in last ch. Rotate and work along the other side of the chain: sc in next 6 ch. Join with sl st to first sc. (18 sts)
Rnd 2: Ch 1, [2 sc in next st] x 3, sc in next 6, [2 sc in next st] x 3, sc in next 6. Join. (24 sts)
Rnd 3: Ch 1, [sc in next st, 2 sc in next st] x 3, sc in next 6, [sc in next st, 2 sc in next st] x 3, sc in next 6. Join. (30 sts)
Rnd 4: Ch 1, [sc in next 2, 2 sc in next] x 3, sc in next 6, [sc in next 2, 2 sc in next] x 3, sc in next 6. Join. (36 sts)
Rnd 5: Ch 1, [sc in next 3, 2 sc in next] x 3, sc in next 6, [sc in next 3, 2 sc in next] x 3, sc in next 6. Join. (42 sts)
Rnd 6: Ch 1, [sc in next 4, 2 sc in next] x 3, sc in next 6, [sc in next 4, 2 sc in next] x 3, sc in next 6. Join. (48 sts)
Rnd 7: Ch 1, [sc in next 5, 2 sc in next] x 3, sc in next 6, [sc in next 5, 2 sc in next] x 3, sc in next 6. Join. (54 sts)
Rnd 8: Ch 1, [sc in next 6, 2 sc in next] x 3, sc in next 6, [sc in next 6, 2 sc in next] x 3, sc in next 6. Join. (60 sts)
Checkpoint: the base lies flat and measures about 5.5 in x 4 in (14.0 cm x 10.2 cm).
Solid Base Band
Rnd 9: Ch 1, sc in BLO of each st around. Join. (60 sts) The unused front loops form a neat ridge, and the edge turns upward.
Rnds 10–11: Ch 1, sc in each st around. Join. (60 sts)
This band is 0.75 in (1.9 cm) tall.
Fan Shell Sides
Rnd 12 (shell round): Ch 1, sc in first st, [skip 2 sts, shell in next st, skip 2 sts, sc in next st] x 9, skip 2 sts, shell in next st, skip 2 sts. Join to first sc. (10 shells and 10 sc = 60 sts)
Each repeat uses 6 sts, so 10 repeats use all 60.
Rnd 13 (net round): Sl st in next 3 dc to reach the center dc of the first shell. Ch 1, sc in same dc, ch 5, [sc in center dc of next shell, ch 5] x 9. Join to first sc. (10 sc and 10 ch-5 loops)
Each ch-5 loop arches over one sc of Rnd 12.
Rnd 14 (offset shell round): Ch 1, sc in first sc, shell in next ch-5 loop, [sc in next sc, shell in next ch-5 loop] x 9. Join. (10 shells and 10 sc = 60 sts)
The new shells sit above the old sc, and the new sc sit above the old shell centers. This offset creates the diamond-shaped holes.
Rnd 15 (net round): Work as Rnd 13. (10 sc and 10 ch-5 loops)
Scalloped Top
Rnd 16 (scallop round): Ch 1, sc in first sc, scallop in next ch-5 loop, [sc in next sc, scallop in next ch-5 loop] x 9. Join. (10 scallops and 10 sc = 80 sts)
This is a growth round. The 7-dc scallops flare the top slightly into the fuller fan edge. Fasten off, leaving a 24 in (61.0 cm) tail for sewing.
Pocket checkpoint: side height is 3.25 in (8.3 cm). Rnds 9–11 add 0.75 in (1.9 cm). Rnds 12–16 add about 0.5 in (1.3 cm) each, for 2.5 in (6.4 cm).
Back Panel
Work the panel flat in rows. The ch 1 at the start of each row does not count as a stitch.
Ch 21.
Row 1 (RS): Sc in 2nd ch from hook and in each ch across. Turn. (20 sts)
Rows 2–88: Ch 1, sc in each st across. Turn. (20 sts)
Checkpoints: Row 40 = 10 in (25.4 cm); Row 88 = 22 in (55.9 cm). Do not fasten off.
Strap A
Row 89: Ch 1, sc in first 5 sts. Turn, leaving the remaining 15 sts unworked. (5 sts)
Rows 90–112: Ch 1, sc in each st across. Turn. (5 sts)
Fasten off. Strap A has 24 rows and is 6 in (15.2 cm) long.
Strap B
With the same side facing as Row 89 of Strap A, skip the next 10 unworked sts of Row 88 and join yarn in the 16th st.
Row 89: Ch 1, sc in same st and in next 4 sts. Turn. (5 sts)
Rows 90–112: Ch 1, sc in each st across. Turn. (5 sts)
Fasten off. Check: 5 strap sts + 10 gap sts + 5 strap sts = 20 sts.
Panel before border: 5 in x 28 in (12.7 cm x 71.1 cm).
Make All Pieces
Every piece uses the taupe yarn.
- Back panel: 1 piece, about 55 g (99 m) including border
- Pockets: 3 pieces, about 22 g (40 m) each
Layout grid (panel rows counted from the bottom, RS facing):
Row 112  [Strap A]  [ gap ]  [Strap B]
Row 89   [Strap A]  [ gap ]  [Strap B]
Row 88   +-------- panel top --------+
Row 64   |  POCKET 3 base (top)      |
Row 34   |  POCKET 2 base (middle)   |
Row 4    |  POCKET 1 base (bottom)   |
Row 1    +------- panel bottom ------+
The pocket bases are 30 rows, or 7.5 in (19.1 cm), apart. That leaves about 3.5 in (8.9 cm) of space above each roll for lifting it out.
Joining
Sew the pockets on with whipstitch, using each pocket’s long tail.
1. Mark the pocket back. On Rnd 9, find one straight side of the oval. Mark its 6 straight sts plus 6 sts on each side, for 18 sts in total. This is the pocket back.
2. Mark the panel. On panel Row 4, place markers in st 2 and st 19. These 18 sts (sts 2–19) take the pocket. Sts 1 and 20 stay clear for the border.
3. Sew the base. Match the 18 pocket sts to the 18 panel sts, one to one. Whipstitch through the front loop of Rnd 9 on the pocket and the full panel stitch. No easing is needed because the counts match.
4. Tack the sides. From each end of the base seam, sew straight up the panel. Catch the end sts of Rnds 10–11 and the sc of Rnds 12 and 14 that fall on those lines. Tack the sc between the two back scallops of Rnd 16. Leave the front free.
5. Repeat for Pocket 2 on Row 34 and Pocket 3 on Row 64.
Tension advice: Pull each stitch snug, but not so tight that the panel puckers. The panel should lie flat behind the seam.
Size checkpoint: each base seam is 18 sts, or 4.5 in (11.4 cm), centered on the 5 in (12.7 cm) panel, with 0.25 in (0.6 cm) free at each edge. Test each pocket with a roll before you sew the next one.
Border
Border gauge matches the panel: 4 sts per inch (2.54 cm) and 1 sc per row end. On this panel, each corner is listed as its own group: 3 sc worked into one corner stitch.
Rnd 1: With RS facing, join yarn in the first st of Row 112 on Strap A. Ch 1 and work:
- Strap A top: 3 sc in first st, sc in next 3, 3 sc in last st. (9 sts)
- Outer side, Strap A and panel: 1 sc in each row end down to Row 1. (112 sts)
- Bottom edge (foundation ch side): 3 sc in first ch, sc in next 18 ch, 3 sc in last ch. (24 sts)
- Other outer side: 1 sc in each row end up to Row 112 of Strap B. (112 sts)
- Strap B top: 3 sc in first st, sc in next 3, 3 sc in last st. (9 sts)
- Inner edge of Strap B: 1 sc in each row end down. (24 sts)
- Gap (Row 88): sc in each of the 10 unworked sts. (10 sts)
- Inner edge of Strap A: 1 sc in each row end up. (24 sts)
Join to first sc. Total: 9 + 112 + 24 + 112 + 9 + 24 + 10 + 24 = 324 sts
Rnd 2: Ch 1, sl st loosely in each st around. Join and fasten off. (324 sts)
Why the math works: at 16 sts and 16 rows per 4 in (10.2 cm), one sc per row end equals one stitch-width of edge, so the long sides stay flat. The 3-sc corners turn each outside corner 90 degrees. The bottom works into all 20 foundation chains (18 + 2 corner chains) and adds only 4 corner sts. The two inside corners at the gap get plain sc, so they stay crisp.
The border adds 0.25 in (0.6 cm) on each edge. Width: 5 in + 0.5 in = 5.5 in (14.0 cm). Length: 28 in + 0.5 in = 28.5 in (72.4 cm).
Hanging Loops
Fold the top 1.5 in (3.8 cm) of each strap over the bar to the wrong side. Whipstitch the strap tip to the back of the same strap. If your bar cannot be removed, sew on two large snaps so the loops can open.
Final Blocking
- Lightly mist the holder with water.
- Lay the panel flat, RS up, on the blocking mat.
- Pin the panel to 5.5 in x 28.5 in (14.0 cm x 72.4 cm), keeping the long edges straight.
- Wrap a roll in a plastic bag and put it in each pocket so the pocket dries in shape.
- Open each shell and scallop with your fingers so the diamond holes are even.
- Let it dry completely, then remove the pins and the plastic.
Final Quality-Control Checklist
- Panel is 5.5 in (14.0 cm) wide along its whole length.
- Panel is 28.5 in (72.4 cm) long flat.
- Both straps are the same length and fold evenly.
- Border Rnd 1 has 324 sts, with no ruffling.
- Each pocket has 10 shells per tier and 10 scallops.
- Each pocket base is sewn across 18 centered sts and sits level.
- All three rolls slide in and out easily.
- All ends are woven in securely.
Troubleshooting
The panel gets narrower. You are missing the last st of a row. Count 20 sts every 10 rows.
The pocket base cups. Your tension is tight. Go up a hook size for the base only.
The pocket base ruffles. You may have added extra increases. Recount each round.
The roll will not fit. After Rnd 8, add a round of [sc in next 9, 2 sc in next] x 6 (66 sts). Work Rnds 9–11 on 66 sts, then work 11 shell repeats instead of 10.
The shells stack instead of offsetting. In Rnds 13 and 15, put each sc into the center dc of a shell, not into the sc between shells.
The panel sags with rolls inside. The fabric is too loose. Use a smaller hook or a firmer cotton.
Care
Hand wash in cool water with mild soap. Press out the water in a towel and dry flat, with rolls in the pockets to keep their shape.
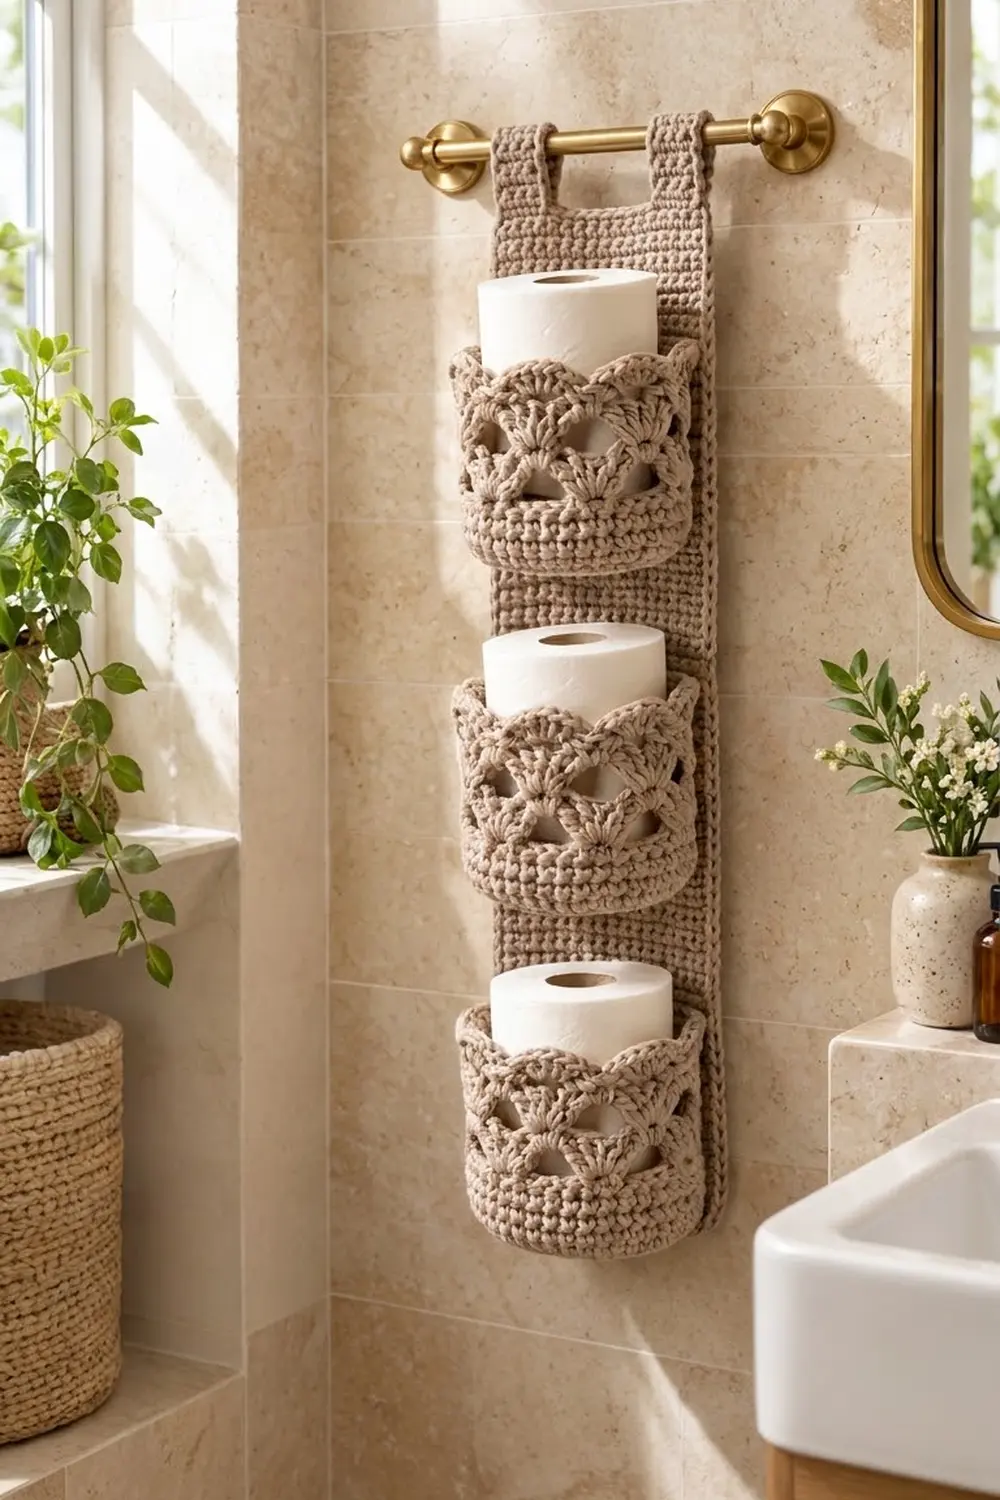
Final Notes
The measurement chain is short. A gauge of 16 sc and 16 rows to 4 in (10.2 cm) makes the 20-st panel 5 in (12.7 cm) wide. Its 112 rows reach 28 in (71.1 cm), and the 0.25 in (0.6 cm) border brings it to 5.5 in x 28.5 in (14.0 cm x 72.4 cm). Each pocket grows from 18 to 60 sts, holds 10 shell repeats of 6 sts each, and ends with 80 sts at a scalloped top 3.25 in (8.3 cm) high. Sewing 18 pocket sts to 18 panel sts keeps every pocket centered and flat.
Happy crocheting!