
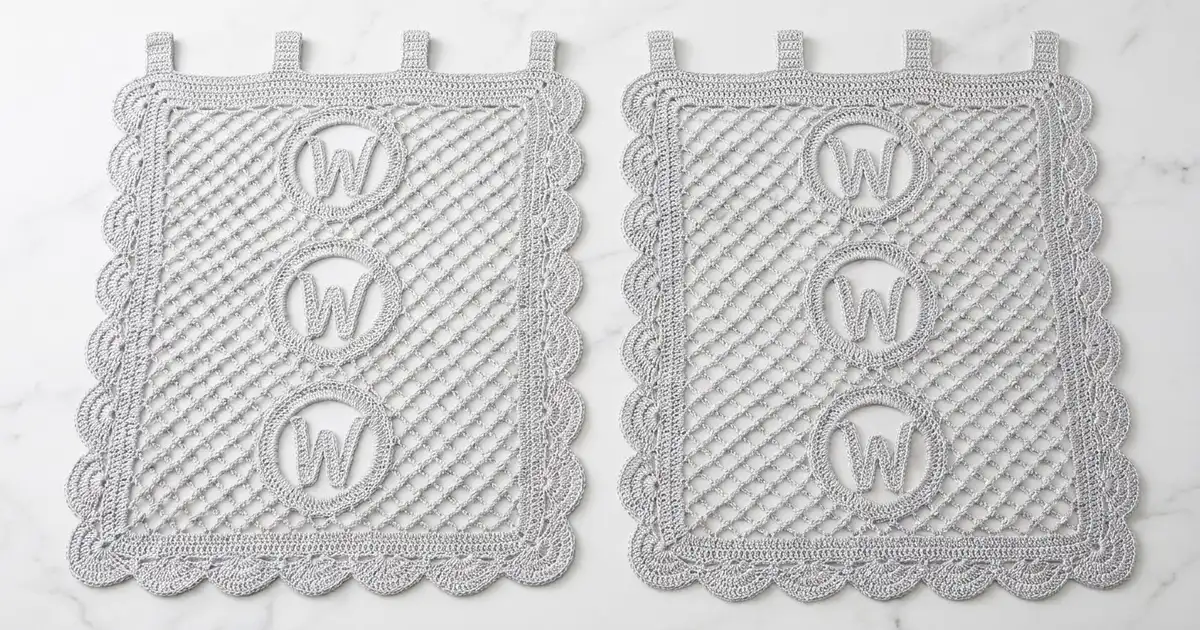
These airy lace curtain panels pair a soft diamond net with framed “W” monograms. Each panel is a long, narrow rectangle with a scalloped fan edge down both long sides and across the bottom. Four simple loop tabs at the top let it slide onto a curtain rod.
The pair shown is made in one color, a light silver gray mercerized cotton that catches the light without looking heavy. The mesh lets daylight through, while the solid W letters and fan rings give the eye something to rest on. The look is classic and a little formal, so it suits a French door, a narrow window, or a doorway. If your initial isn’t W, you can shape the same letter strip into another straight-stroked letter, such as M, V, N, or Z.
This pattern uses US crochet terms. Each finished panel measures 18 in (45.7 cm) wide and 56.75 in (144.1 cm) long to the top edge. With the tabs, it is 59.75 in (151.8 cm) long overall.
Construction is simple to follow. First, work the net mesh body in rows from the bottom up. Then add a two-round border all the way around and work four tabs into the top edge. Last, make four fan-ringed medallions and four W letters and appliqué them onto the mesh. Make two panels for a pair.
Finished Size and Construction
- Finished panel size: 18 in x 56.75 in (45.7 cm x 144.1 cm), plus 3 in (7.6 cm) tabs
- Skill level: Intermediate
- Terminology: US crochet terms
- Yarn weight: Super fine (#1, fingering) mercerized cotton
- Hook: 2.75 mm (US C-2)
- Number of pieces: 2 identical panels, hung separately and never joined to each other. Each panel has 1 mesh body (with the border and tabs worked onto it), 4 medallion rings and 4 W letters. That’s 9 pieces per panel and 18 pieces in total.
- Layout: 4 medallions stacked down the center of each panel
- Body size before border: 15 in x 54.5 in (38.1 cm x 138.4 cm)
- Medallion size: 7.25 in (18.4 cm) across, with a 4.75 in (12.1 cm) open center
- Border depth: 1.5 in (3.8 cm) on the sides and bottom, 0.75 in (1.9 cm) at the top
Materials
Yarn: Use a smooth mercerized cotton in fingering weight, about 170 m per 50 g. Mercerized cotton gives the puff knots crisp definition and blocks flat. Avoid fuzzy or very stretchy yarn, because the mesh will sag on the rod.
- Light silver gray: 450 g, about 1,530 m, for the pair (225 g, about 765 m, per panel)
These quantities include a margin of about 15% for your swatch, tension differences and the appliqué tails.
Tools:
- 2.75 mm (US C-2) crochet hook
- Tapestry needle
- Stitch markers (at least 10)
- Rust-proof pins and a blocking surface at least 20 in x 60 in (50.8 cm x 152.4 cm)
- Spray bottle
- Measuring tape
Abbreviations (US Terms)
- ch: chain
- sc: single crochet
- dc: double crochet
- sl st: slip stitch
- sk: skip
- sp: space
- st(s): stitch(es)
- RS / WS: right side / wrong side
Special stitches:
- Puff knot (pk): (Yarn over, insert hook in the indicated sp, yarn over and pull up a loop) 2 times. Yarn over and draw through all 5 loops on the hook, then ch 1 to lock. The ch 1 does not count as a separate stitch.
- Border fan: 7 dc in the same st or sp.
- Medallion fan: 9 dc in the same st.
Gauge and Checkpoints
Gauge: After blocking, 4 mesh loops = 4 in (10.2 cm) wide and 8 rows = 4 in (10.2 cm) tall. Border gauge is 4 dc = 1 in (2.5 cm), and one dc round is 0.5 in (1.3 cm) tall.
Test first: Ch 26 and work Rows 1–3 below, then repeat Rows 2–3 four more times (6 loops, 11 rows). Block the swatch and measure the center 4 loops and 8 rows. Then make one medallion ring and one W letter. You’ll make more of these than any other piece, so check their size before you go on.
Checkpoints:
- After 16 rows: 15 in (38.1 cm) wide and 8 in (20.3 cm) tall
- After Row 109: 15 in x 54.5 in (38.1 cm x 138.4 cm)
- After Border Rnd 1: 16 in x 55.5 in (40.6 cm x 141.0 cm)
- After Border Rnd 2: 18 in x 56.75 in (45.7 cm x 144.1 cm)
- Medallion Rnd 1: 4.75 in (12.1 cm) inner opening. Medallion Rnd 2: 7.25 in (18.4 cm) across.
If your swatch is too big, go down 0.25 mm in hook size. If it’s too small, go up 0.25 mm. Don’t change the loop length to fix gauge, because the border math depends on the stitch counts.
Mesh Body
Make 1 per panel.
Foundation: Ch 62.
Row 1 (RS): Sc in 2nd ch from hook, ch 5, sk 3 ch, sc in next ch; repeat from * 14 more times. Turn. (16 sc, 15 ch-5 loops)*
Row 2: Ch 5 (counts as dc + ch 2), pk in first ch-5 loop, ch 5, pk in next ch-5 loop; repeat from * 13 more times, ch 2, dc in last sc. Turn. (15 pk, 14 ch-5 loops, 2 ch-2 half loops, 2 dc)*
Row 3: Ch 1, sc in first dc, ch 5, pk in next ch-5 loop; repeat from * 13 more times, ch 5, sc in 3rd ch of turning ch. Turn. (15 ch-5 loops, 14 pk, 2 sc)*
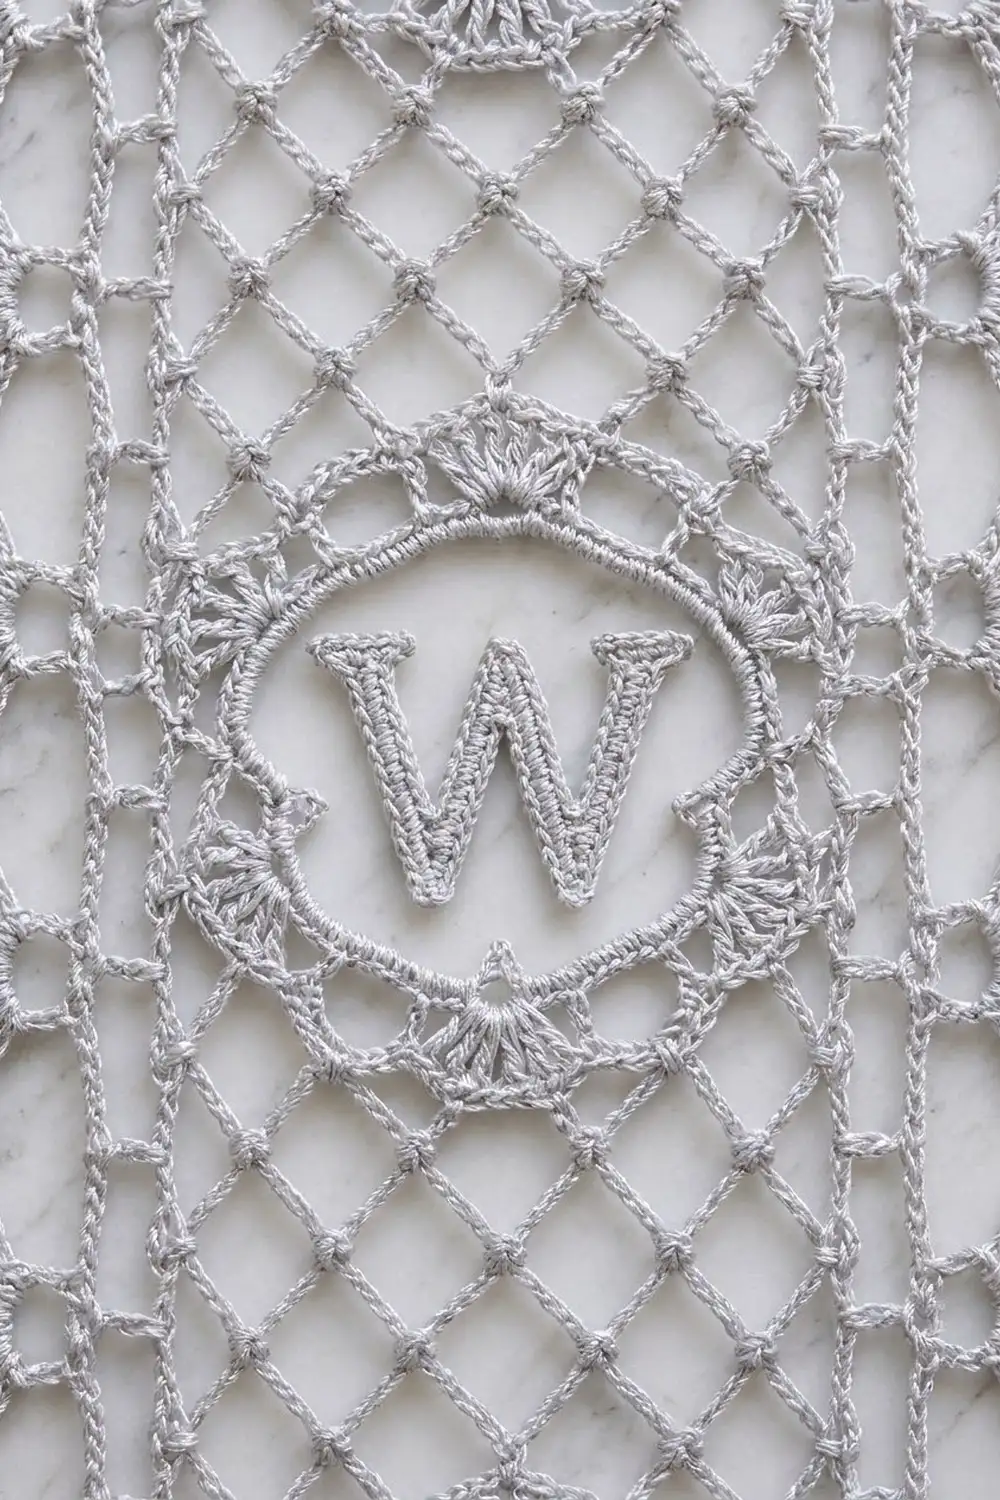
Each pk sits in the center of a loop from the row below. This forms the diamond net, with a small knot at every crossing.
Rows 4–109: Repeat Rows 2–3 fifty-three more times. Row 109 is worked like Row 3. Don’t fasten off.
Tip: Place a marker every 10 rows. This makes the medallion placement rows easy to find later and helps you match the second panel row for row.
Checkpoint: 109 rows and 15 loops across, measuring 15 in x 54.5 in (38.1 cm x 138.4 cm) when gently stretched flat.
Border
Work the border in rounds around the body. The corners on Rnd 1 are ch-3 sps and don’t count as stitches.
Rnd 1 (dc frame):
- Top: Ch 3 (counts as dc), then work 2 more dc in the first ch-5 loop of Row 109. Dc in next pk, 3 dc in next ch-5 loop; repeat from * 13 more times (14 times in all). Ch 3 for the corner. (59 dc: 15 loops x 3 dc + 14 dc in the inner pk)
- Side 1: Work 2 dc in each row-end down the side. Ch 3 for the corner. (109 x 2 = 218 dc)
- Bottom: Working into the foundation, work 3 dc in each ch-3 sp and 1 dc in each of the 14 inner chains that hold a Row 1 sc. Ch 3 for the corner. (45 + 14 = 59 dc)
- Side 2: Work 2 dc in each row-end up the side, ch 3, then sl st to the top of the beginning ch-3. (218 dc)
(554 dc: 59 + 218 + 59 + 218, plus 4 corner ch-3 sps)
This round forms the straight inner frame line around the mesh.
Rnd 2 (top edge and fans):
- Top: Ch 1, sc in the same st as the join and in each dc across. (59 sc)
- Side 1: Sc in corner sp. Sk 2 dc, border fan in next dc, sk 2 dc, sc in next dc; repeat from * 35 more times. Sk 2 dc, border fan in the corner sp. (36 side fans, 37 sc including the corner sc, 1 corner fan)
- Bottom: Sk 2 dc, sc in next dc, sk 2 dc, border fan in next dc; repeat from * 8 more times. Sk 2 dc, sc in next dc, sk 2 dc, border fan in the corner sp. (9 bottom fans, 10 sc, 1 corner fan)
- Side 2: Sk 2 dc, sc in next dc, sk 2 dc, border fan in next dc; repeat from * 35 more times. Sk 2 dc, sc in the last corner sp, then sl st to the first sc. (36 side fans, 37 sc including the corner sc)
(83 fans and 143 sc in total: 36 + 36 + 9 + 2 fans, and 59 + 37 + 10 + 37 sc)
Why the math works: Each side has 218 dc. Starting from the top corner, the 36 repeats use 36 x 6 = 216 dc, and the final sk 2 uses the last 2, for 218. Across the bottom, 9 repeats use 54 dc and the closing sk 2, sc, sk 2 uses 5 more, for 59. Fans land in both bottom corners. Plain sc sit in both top corners, so the top edge stays straight for hanging.
Tabs: With the RS facing, count the 59 top sc from the right. The tabs go on sc 3–7, 20–24, 36–40 and 53–57. That leaves gaps of 2, 12, 11, 12 and 2 sc.
For each tab, join yarn in the first sc of the tab. Row 1: Ch 1, sc in the same st and in the next 4 sts. Turn. (5 sc) Rows 2–24: Ch 1, sc in each sc across. Turn. (5 sc) The strip should be 6 in (15.2 cm) long. Fold it to the WS and whipstitch Row 24 to the base of Row 1 to make a 3 in (7.6 cm) loop. This loop fits a rod up to about 1.5 in (3.8 cm) in diameter.
Medallion Ring
Make 4 per panel.
Foundation: Ch 60 and sl st to the first ch to form a ring, making sure not to twist the chain.
Rnd 1: Ch 1, sc in each ch around. Sl st to first sc. (60 sc)
Rnd 2: Ch 1, sc in the same st. Sk 2 sts, medallion fan in next st, sk 2 sts, sc in next st; repeat from * 9 more times. On the last repeat, sl st to the first sc instead of working the final sc. (10 fans, 10 sc) Fasten off, leaving a 24 in (61.0 cm) tail.
Each repeat uses 6 sts, and 10 x 6 = 60. The 4.75 in (12.1 cm) center stays open so the mesh shows through.
W Letter
Make 4 per panel.
Foundation: Ch 33.
Row 1: Sc in 2nd ch from hook and in each ch across. Turn. (32 sc)
Row 2: Ch 1, sc in each sc across. (32 sc) Fasten off, leaving a 20 in (50.8 cm) tail.
The strip should be 8 in (20.3 cm) long. Place markers between sc 8 and 9, between sc 16 and 17, and between sc 24 and 25. At each marker, fold the strip back on itself at an angle to make a sharp point. The four 2 in (5.1 cm) strokes form the W. Secure each fold with two small stitches.
Make All Pieces
Per panel: 1 mesh body with border and tabs, 4 medallion rings, 4 W letters.
For the pair: 2 bodies, 8 rings and 8 W letters, all in light silver gray.
Layout (each panel, top to bottom):
[ Tab ]   [ Tab ]   [ Tab ]   [ Tab ]
|  Medallion 4 + W  - center at Row 95  |
|  Medallion 3 + W  - center at Row 68  |
|  Medallion 2 + W  - center at Row 41  |
|  Medallion 1 + W  - center at Row 14  |
\/\/\/\/\/\/ fan edge \/\/\/\/\/\/\/\/\/
The first medallion center sits 7 in (17.8 cm) above the bottom of the body. The centers are 13.5 in (34.3 cm) apart, and the last center sits 7 in (17.8 cm) below the top of the body. This leaves 6.25 in (15.9 cm) of open mesh between rings and 3.875 in (9.8 cm) of mesh on each side of each ring.
Joining (Appliqué)
Block the body, rings and letters before you attach anything (see Final Blocking).
- Lay the body flat, RS up. Mark the center row for each medallion and the center loop, which is loop 8 of 15.
- Pin a ring so its center sits on the marked point. Using the ring’s tail, whipstitch the back loop of every other Rnd 1 sc to the mesh, for 30 tacks.
- Tack the center dc of each fan to the mesh under it, for 10 more tacks.
- Center a W inside the ring with its points at the top and bottom. Tack each end, each fold and every 4th sc along the strokes.
Work one medallion at a time, starting with Medallion 1, and lay the panel flat again after each one.
Stitch logic: Always catch a mesh strand or a puff knot, never empty space. Make each tack straight down so it doesn’t pull the mesh sideways.
Tension: Keep the tacks snug but not tight. If the mesh puckers around a ring, snip that tack and redo it.
Size checkpoint: Once all four medallions are attached, the body should still measure 15 in (38.1 cm) wide at every medallion.
Final Blocking
- Soak the finished panel in cool water for 10 minutes. Press out the water without wringing.
- Roll the panel in a towel to remove excess moisture.
- Lay it RS up and pin the four corners to 18 in x 56.75 in (45.7 cm x 144.1 cm).
- Pin both long sides straight along the Rnd 1 frame line, then pin out each fan tip.
- Open the mesh evenly so every diamond is the same size, and smooth each medallion into a true circle.
- Let it dry completely, at least 24 hours, before unpinning.
Final Quality-Control Checklist
- Body has 109 rows and 15 loops across
- Rnd 1 has 59 / 218 / 59 / 218 dc
- 36 fans on each side, 9 across the bottom and 2 corner fans
- Top edge is straight, with 4 evenly spaced tabs
- 4 medallions centered at Rows 14, 41, 68 and 95
- Each W is upright, with sharp folds
- Panel blocks to 18 in x 56.75 in (45.7 cm x 144.1 cm)
- Both panels match within 0.5 in (1.3 cm)
Troubleshooting
- Mesh slants to one side: You probably missed the half loop at the end of a Row 2-type row. Check that every even row has 15 pk.
- Sides ripple: Too many dc per row-end. Work exactly 2 dc per row.
- Fans cup: Your tension is too tight. Go up 0.25 mm in hook size for Rnd 2 only.
- Puff knots look loose: Lock each one with the ch 1.
- W looks rounded: Fold each point more sharply and add a third tack at the fold.
- Medallion ruffles: Block it flat again. If it still ruffles, work the medallion fans with 8 dc instead of 9.
- Panels differ in length: Block the longer panel to the shorter one’s length, or rip back rows evenly.
Care
Hand wash in cool water with a mild detergent, and dry flat, pinned to size. Don’t hang the panels while wet, or the mesh will stretch.

Final Notes
The whole design depends on one chain of measurements. A gauge of 1 loop per 1 in (2.5 cm) and 2 rows per 1 in (2.5 cm) gives a 15 in x 54.5 in (38.1 cm x 138.4 cm) body. The border brings the panel to 18 in x 56.75 in (45.7 cm x 144.1 cm), and the tabs add 3 in (7.6 cm). Check your measurements at each stage, and your second panel will match the first.
Happy crocheting!