

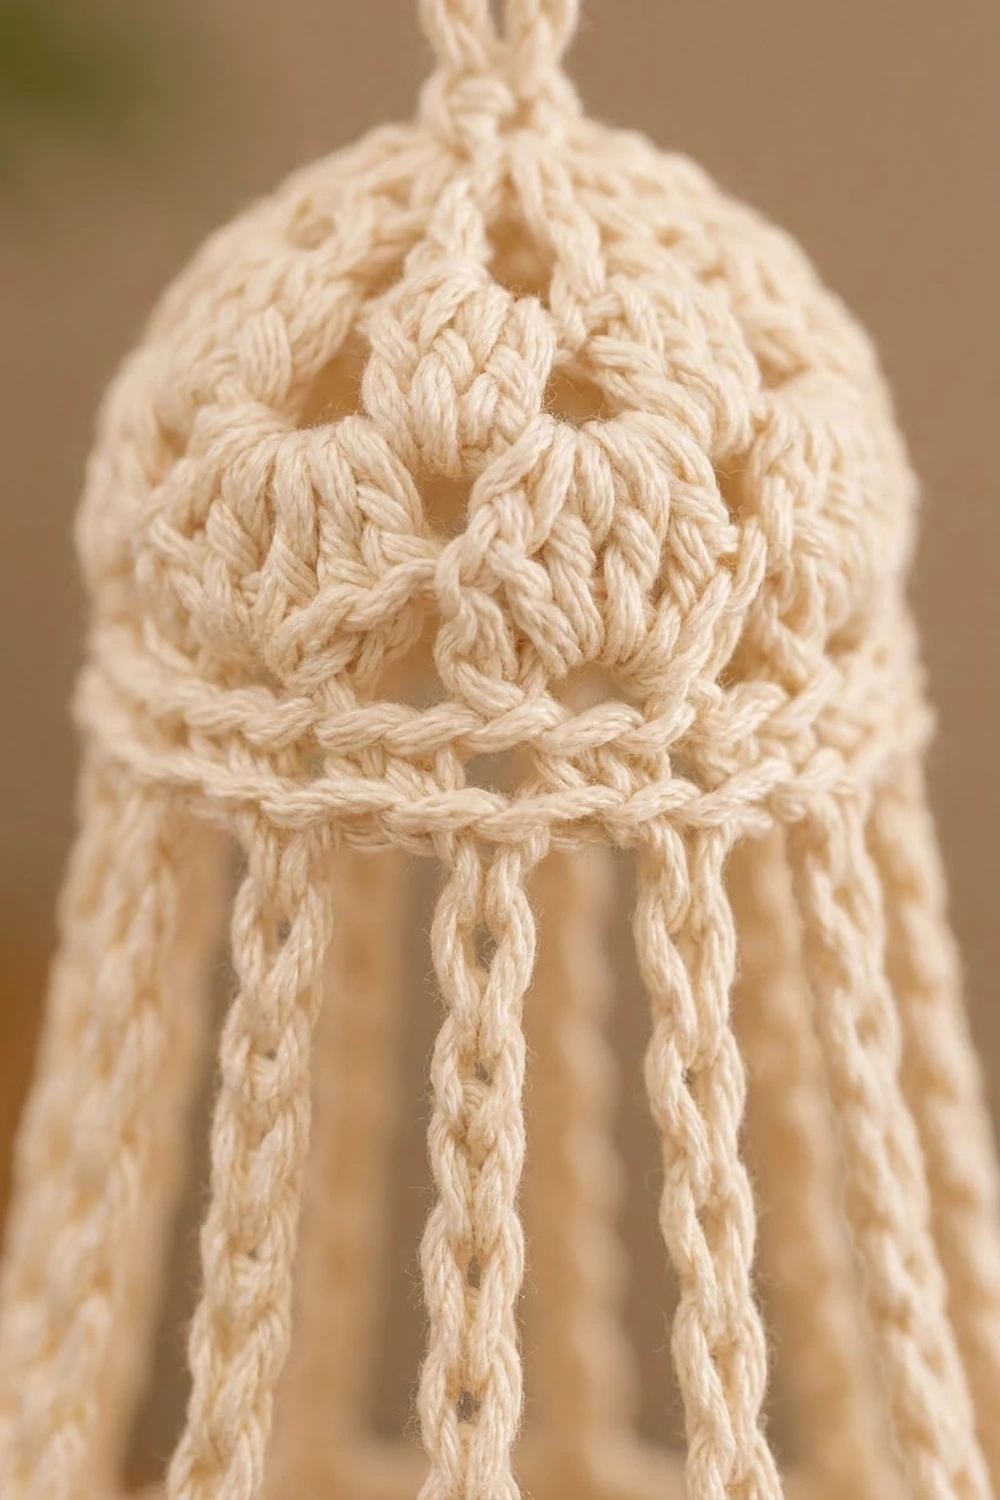
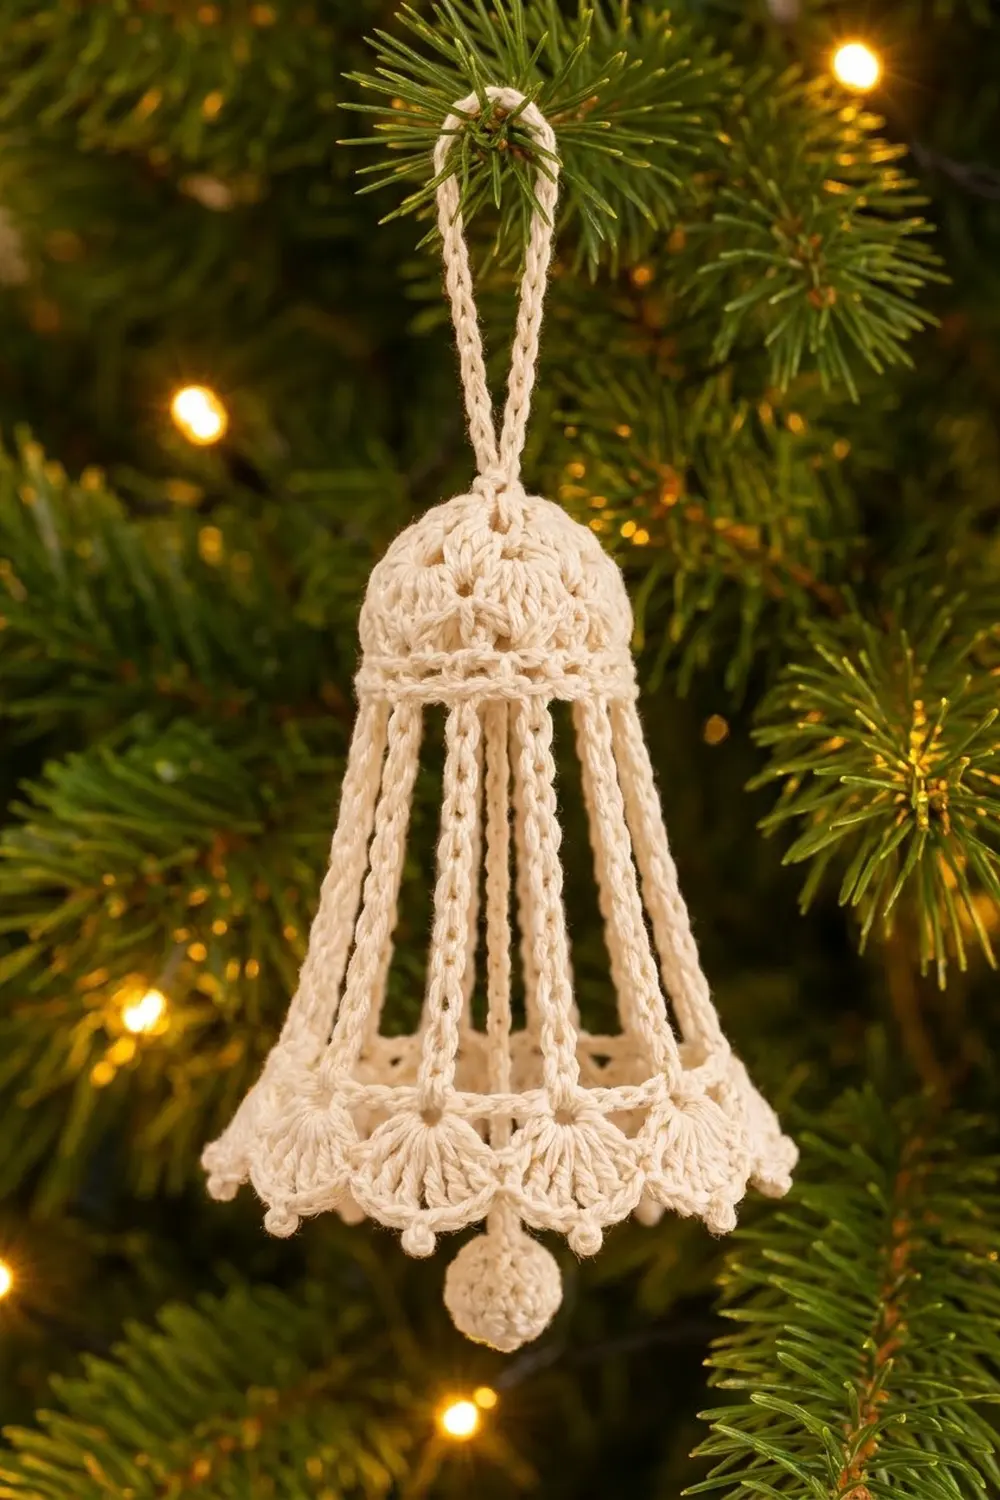
The Snow Lace Bell is a lacy, three-dimensional Christmas ornament with a vintage feel. A rounded puff-stitch crown sits on an open cage of slim vertical bars, and the bars flare out to a scalloped hem trimmed with tiny picots. A small round clapper hangs in the center, just peeking out below the scallops.
The sample is made in one cream cotton, which gives it a soft, snowy, heirloom look. It looks lovely on a tree, tied onto gifts, or hung in a window. You can make one, or make a whole set in the same color so they match.
The pattern uses US crochet terms. The finished bell is about 4.5 in (11.4 cm) tall and 3.5 in (8.9 cm) across the hem, with a 2 in (5.1 cm) hanging loop. The clapper is about 0.6 in (1.5 cm) across.
The construction is simple:
1. Crochet the crown from the top down in joined rounds.
2. Work 12 bars straight off the last crown round.
3. Join new yarn at the bar tips and work the hem and scalloped edge.
4. Make the clapper, attach it along with the hanging loop, and stiffen the bell over a form.
Finished Size and Construction
- Finished size: 4.5 in (11.4 cm) tall x 3.5 in (8.9 cm) wide at the hem, not counting the loop or clapper
- Skill level: Intermediate (simple stitches, but 3D shaping and stiffening)
- Terminology: US crochet terms
- Yarn weight: Sport weight (#2) mercerized cotton
- Hook: 2.75 mm (C-2)
- Number of pieces: 1 bell body + 1 small clapper ball
- Layout: Single standalone ornament (no motifs to join)
- Piece size: Crown 1.5 in (3.8 cm) across; bell 4.5 in (11.4 cm) tall
- Size before border: 3.5 in (8.9 cm) tall (crown plus bars)
- Border depth: 1 in (2.5 cm) (hem band plus scallops)
Materials
Choose a smooth, mercerized cotton in sport weight. Cotton holds stiffener well and shows the stitch texture crisply. Avoid fuzzy or very stretchy yarns, because the bars need to stay straight and firm.
- Cream (main color): 12 g, about 37 m (40 yd)
This amount includes a margin for your gauge swatch and the clapper stuffing.
Tools:
- 2.75 mm (C-2) crochet hook
- Tapestry needle
- Scissors
- 4 stitch markers
- Fabric stiffener (or a 1:1 mix of white craft glue and water)
- A bell-shaped form for blocking: a small plastic cup or paper cone about 3 in (7.6 cm) across the base, wrapped in plastic wrap
- Rustproof pins
- A small amount of scrap cream yarn to stuff the clapper
Abbreviations (US Terms)
- ch – chain
- sl st – slip stitch
- sc – single crochet
- dc – double crochet
- sc2tog – single crochet 2 together
- BLO – back loop only
- st(s) – stitch(es)
- sp – space
- MR – magic ring
Special stitches:
- Puff: (Yarn over, insert hook in the indicated st or sp, pull up a loop to the height of the round) 3 times, yarn over, pull through all 7 loops on hook.
- Bar: Ch 21, sl st in 2nd ch from hook and in each of next 19 ch (20 sl st). This makes one firm bar about 2.5 in (6.4 cm) long.
- Picot: Ch 3, sl st in top of the sc just made.
Gauge and Checkpoints
Gauge: 10 sc = 2 in (5.1 cm); 8 ch = 1 in (2.5 cm). Gauge matters here because the crown and hem must line up with the number of bars.
Test first: work Rounds 1–3 of the crown and measure. That small circle is your gauge swatch.
Checkpoints:
- After Round 3: a flat circle 1.5 in (3.8 cm) across.
- After Round 7: the crown is a cup 1.5 in (3.8 cm) across and about 1.25 in (3.2 cm) tall.
- Each bar: 2.5 in (6.4 cm) long, measured flat.
- After Round 10: the hem is 9.6 in (24.4 cm) around, or about 3 in (7.6 cm) across when shaped.
- Finished bell after blocking: 4.5 in (11.4 cm) tall and 3.5 in (8.9 cm) across the scallops.
If your circle is too big, go down a hook size (2.5 mm). If it is too small, go up to 3 mm. Check the bars separately. If they are longer than 2.5 in (6.4 cm), chain more tightly or drop a hook size for the bars only.
Pattern: Crown
Join each round with a sl st to the first st. The beginning ch 1 or ch 2 does not count as a stitch.
Round 1: MR, ch 1, 8 sc in ring, sl st to first sc. (8 sts)
Round 2: Ch 1, 2 sc in each st around, sl st to first sc. (16 sts)
Round 3: Ch 1, sc in next st, 2 sc in next st; repeat from * 7 more times, sl st to first sc. (24 sts)
Checkpoint: 1.5 in (3.8 cm) across. From here on, the crown is worked even (no increases), so it curves down into a dome.
Round 4: Ch 2, puff in first st, ch 1, skip next st, puff in next st, ch 1, skip next st; repeat from * 10 more times, sl st to top of first puff. (12 puffs + 12 ch-1 sps = 24 sts)
Round 5: Sl st into next ch-1 sp, ch 2, puff in same sp, ch 1, puff in next ch-1 sp, ch 1; repeat from * 10 more times, sl st to top of first puff. (12 puffs + 12 ch-1 sps = 24 sts)
The puffs of Round 5 sit between the puffs of Round 4. This gives the crown its offset cluster texture.
Round 6: Sl st into next ch-1 sp, ch 1, sc in same sp, sc in next puff, sc in next ch-1 sp, sc in next puff; repeat from * 10 more times, sl st to first sc. (24 sts)
Round 7: Ch 1, sc in BLO of each st around, sl st to first sc. (24 sts)
Working in the back loop leaves the front loops showing as a line. That line forms the raised ridge band at the base of the crown.
Checkpoint: the crown is a little cup 1.5 in (3.8 cm) across and about 1.25 in (3.2 cm) tall.
Pattern: Cage Bars
Round 8: Ch 1, sc in next st, Bar, sl st in the sc just made, sc in next st; repeat from * 11 more times, sl st to first sc. (24 sc + 12 bars)
Each bar hangs from the first sc of each pair, so the bars are evenly spaced every 2 sts. Fasten off and weave in the end.
Let the bars hang down. Check that all 12 have the slip-stitch side facing the same way and that none are twisted. Place markers on 4 bars, spaced 3 bars apart, so you can see the quarters.
Checkpoint: each bar is 2.5 in (6.4 cm) long. Once the hem pulls them outward, the bars slant, so the drop from crown to hem is about 2.25 in (5.7 cm). Crown plus bars = 1.25 in (3.2 cm) + 2.25 in (5.7 cm) = 3.5 in (8.9 cm). This is the size before the border.
Border: Hem and Scalloped Edge
Border gauge: 5 sc per 1 in (2.5 cm) and 8 ch per 1 in (2.5 cm), the same as the crown. The border is counted in 12 sections, one per bar.
Round 9 (hem ring): Join yarn with a sc into the tip (the turning ch) of any bar, ch 4, sc in tip of next bar, ch 4; repeat from * 10 more times, sl st to first sc. (12 sc + 12 ch-4 sps = 60 sts)
Per section: 1 sc + 4 ch = 5 sts. Work the bars in order, without skipping or crossing any. The ring is about 8.4 in (21.3 cm) around, so it already spreads the bars outward from the 4.8 in (12.2 cm) crown.
Round 10 (hem band): Ch 1, sc in next sc, 3 sc in next ch-4 sp; repeat from * 11 more times, sl st to first sc. (12 sc worked into the 12 sc + 36 sc worked into the 12 ch-4 sps = 48 sts)
Per section: 4 sc. The band is 9.6 in (24.4 cm) around. It is slightly wider than the ring above it, which starts the bell’s flare.
Round 11 (shells): Ch 1, sc in next st, skip next st, 5 dc in next st, skip next st; repeat from * 11 more times, sl st to first sc. (12 sc + 12 shells of 5 dc = 72 sts)
Per section: 1 sc + 5 dc = 6 sts. Each sc sits directly below a bar, and each shell fans out between two bars.
Round 12 (picot edge): Ch 1, sc in next sc, Picot, sc in each of next 5 dc; repeat from * 11 more times, sl st to first sc. (72 sc + 12 picots)
Per section: 6 sc + 1 picot. The picots land in the dips between the scallops and form the little bobbles along the edge. Fasten off and weave in the end.
Why the math works: The crown ends with 24 sts, and one bar sits every 2 sts, which gives exactly 12 bars. The hem ring takes 1 sc per bar tip, so it also has 12 sections. Every border round after that is a multiple of 12: 60 (5 per section), 48 (4 per section), and 72 (6 per section). Each shell repeat uses exactly 4 sts (sc, skip, shell, skip), which matches the 4 sc per section in Round 10. Nothing is left over, and no section needs fudging. Rounds 9–12 add about 1 in (2.5 cm), so the bell is 3.5 in (8.9 cm) + 1 in (2.5 cm) = 4.5 in (11.4 cm) tall.
Clapper and Hanging Loop
Clapper ball:
Round 1: MR, ch 1, 6 sc in ring, sl st to first sc. (6 sts)
Round 2: Ch 1, 2 sc in each st around, sl st to first sc. (12 sts)
Round 3: Ch 1, sc in each st around, sl st to first sc. (12 sts)
Round 4: Stuff firmly with scrap yarn. Ch 1, sc2tog 6 times, sl st to first st. (6 sts)
Do not fasten off. Cord: Ch 36 (about 4.5 in / 11.4 cm). Fasten off, leaving a 12 in (30.5 cm) tail.
Attach: Thread the tail onto the needle. Pass it up through the center of the crown’s magic ring, from the inside to the outside. Adjust the cord so about 0.5 in (1.3 cm) of the ball shows below the scallops. Knot the tail securely on top of the crown.
Hanging loop: With the remaining tail, ch 30, then sl st into the center of Round 1 on top of the crown. This makes a loop about 2 in (5.1 cm) tall. Weave the end down through the crown and knot it inside.
Final Blocking
- Mix the stiffener following the label, or mix 1 part glue with 1 part water.
- Soak the bell for 1 minute, keeping the clapper out of the mix. Squeeze gently, then blot with a towel until it stops dripping.
- Slide the bell over your wrapped form. The crown should cup the top, and the hem should sit at 3 in (7.6 cm) across.
- Space the 12 bars evenly. Use your 4 markers to check the quarters, then remove them.
- Make sure each bar runs straight from crown to hem without bending.
- Pin the shells outward until the scalloped edge measures 3.5 in (8.9 cm) across. Shape each picot into a small round bobble.
- Shape the crown into a smooth dome with your fingers.
- Let it dry completely, at least 12 hours. Remove the form and let the clapper hang freely.
Final Quality-Control Checklist
- The crown is 1.5 in (3.8 cm) across with even, offset puffs.
- The ridge band at the base of the crown is level all around.
- There are exactly 12 bars, evenly spaced, none twisted.
- All bars are the same length and run straight.
- The hem band is 9.6 in (24.4 cm) around.
- There are 12 shells and 12 picots, with each picot lined up below a bar.
- The bell is 4.5 in (11.4 cm) tall and 3.5 in (8.9 cm) across.
- The clapper hangs centered, about 0.5 in (1.3 cm) below the hem.
- The hanging loop is 2 in (5.1 cm) tall and firmly secured.
- All ends are woven in and hidden.
Troubleshooting
The crown is flat instead of domed. Round 3 may be loose. Go down a hook size, or block the crown firmly over the curved top of the form.
The crown ruffles. The puffs are too tall. Pull each loop up only to the height of a dc.
The bars are different lengths. Count all 21 chains and 20 sl sts on every bar. Keep the same chain tension for all 12.
The bars curl or twist. Work the sl sts into the back bump of the chain for a flatter bar, and pin each bar straight when blocking.
The hem puckers. Make sure there are exactly 4 chains between bar tips in Round 9. If it is still tight, go up one hook size for Rounds 9–12 only.
The scallops flop after blocking. Use more stiffener or a stronger mix, and let the bell dry fully on the form.
The clapper hangs off center. Re-thread the cord exactly through the center of the magic ring and knot it again.
Care
Dust gently with a soft brush, and store the bell in a box with tissue paper so it keeps its shape. If it goes soft, spot clean it, then stiffen and block it over the form again.
Final Notes
The measurements build on each other in a short chain. The crown ends at 24 sts and 1.5 in (3.8 cm) across. Twelve bars of 2.5 in (6.4 cm) bring the body to 3.5 in (8.9 cm) tall. The hem is worked in 12 even sections, going from 60 to 48 to 72 sts. It adds 1 in (2.5 cm), for a finished bell 4.5 in (11.4 cm) tall and 3.5 in (8.9 cm) across. Check your gauge on the crown, count every bar, and stiffen the bell over a form, and it will come out crisp and even.
Happy crocheting!