

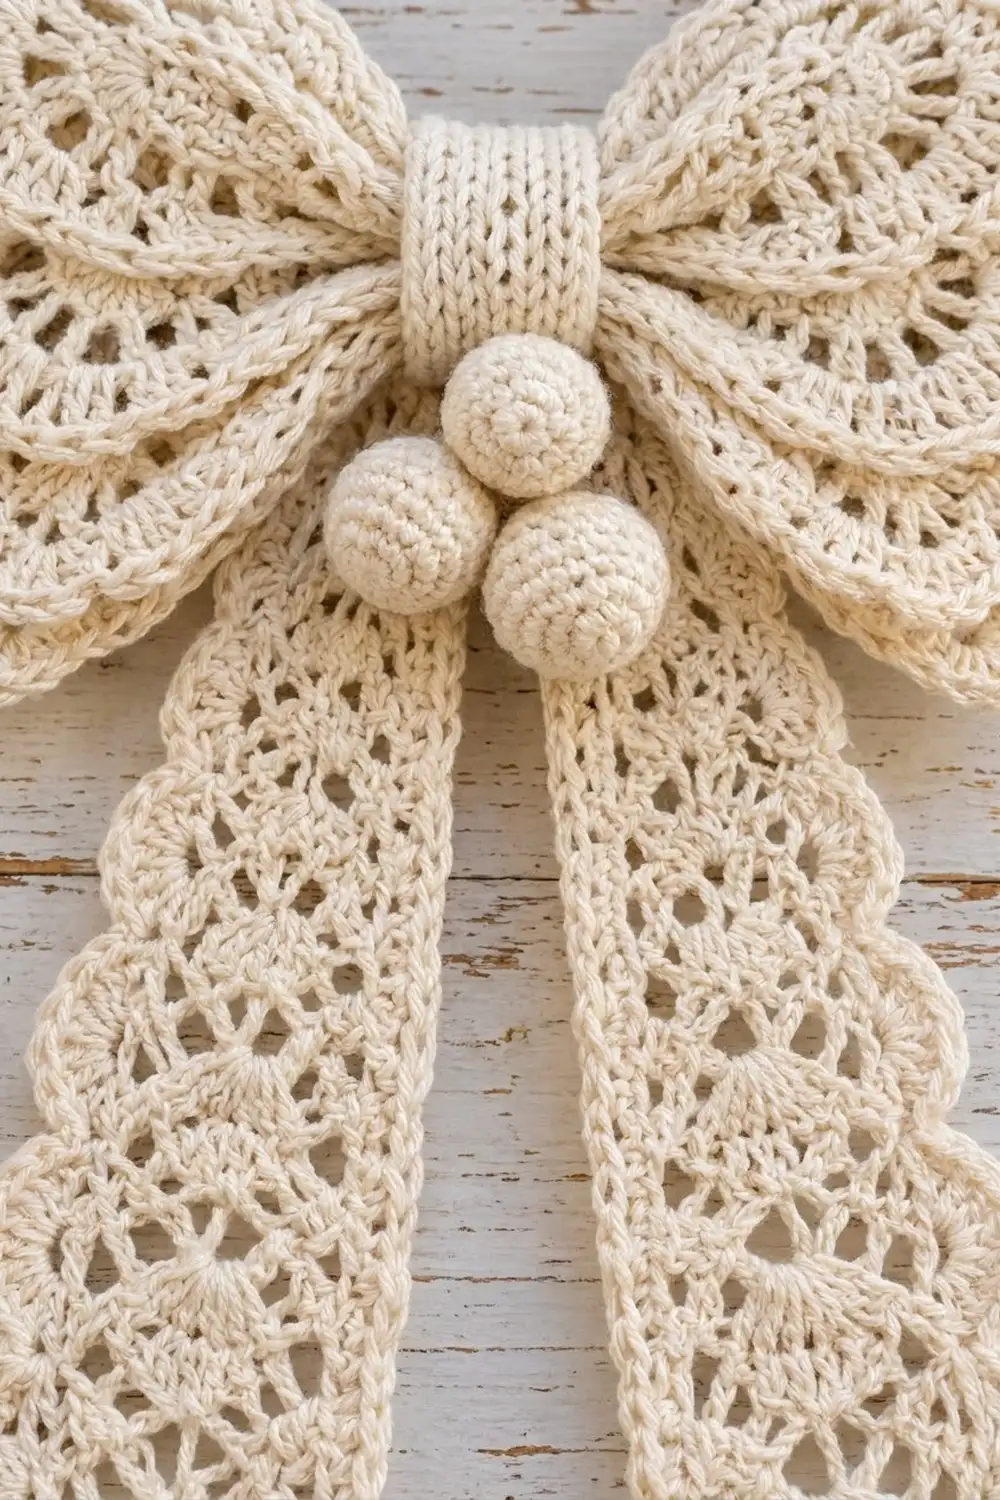
The Snowdrift Lace Door Bow is a large, soft bow for front doors, wreaths, and mantels. Each side has two fan-shaped wings stacked on top of each other. Two long lace tails hang below, and a ribbed band wraps the center. Three round bobbles sit on the front of the band.
The whole bow uses one color, a warm cream or ivory. The look comes from the texture: radial eyelet lace, a scalloped shell edge on every outer edge, and vertical ribs on the band.
This pattern uses US crochet terms. The finished bow measures about 11.5 in (29.2 cm) wide and 19 in (48.3 cm) tall, not counting the hanging loop.
Each wing is a wedge worked in turned rows from a magic ring. Each tail is worked from the top down, widening first and then shaping a point. You edge the wings and tails with scallops, make the small parts, and sew everything together.
Finished Size and Construction
- Finished size: about 11.5 in (29.2 cm) wide x 19 in (48.3 cm) tall, plus loop
- Skill level: Intermediate
- Terminology: US crochet terms
- Yarn weight: #4 worsted, cotton or cotton blend
- Hook: 5.0 mm (H-8)
- Number of pieces: 11 (2 large wings, 2 small wings, 2 tails, 1 band, 3 bobbles, 1 cord), assembled into one bow
- Layout: each side has a small wing on top of a large wing; the tails hang in a V below the band
- Piece sizes: large wing radius 5.5 in (14.0 cm); small wing radius 4.5 in (11.4 cm); tail 14.5 in (36.8 cm) long
- Size before border: large wing radius 5 in (12.7 cm); small wing radius 4 in (10.2 cm); tail 14 in (35.6 cm) long and 4.25 in (10.8 cm) wide at its widest
- Border depth: 0.5 in (1.3 cm) scallop
Materials
Use a smooth worsted-weight cotton or cotton blend. Cotton shows the stitches clearly and helps the wings hold their shape. Acrylic also works, but it needs firmer blocking.
- Cream: about 100 g / 170 m (186 yd)
The quantity includes a margin of roughly 25% for swatching and differences in tension.
Tools:
- 5.0 mm (H-8) crochet hook
- Tapestry needle
- Small amount of polyester fiberfill
- Stitch markers
- Rustproof pins and a blocking mat
- Spray bottle; fabric stiffener (optional)
- Scissors and measuring tape
Abbreviations (US Terms)
- ch – chain
- sl st – slip stitch
- sc – single crochet
- dc – double crochet
- dc2tog – double crochet 2 together
- BLO – back loop only
- MR – magic ring
- sk – skip
- sp – space
- st(s) – stitch(es)
- inc – 2 sc in the same st
- dec – sc2tog (an invisible decrease is best)
Special stitch: Shell – 5 dc in the same stitch.
Counting rule: every dc and every ch-1 space counts as 1 stitch. A beginning ch-3 counts as a dc. A beginning ch-4 counts as a dc plus a ch-1 space.
Gauge and Checkpoints
Gauge: 16 dc and 8 rows = 4 in (10.2 cm) in solid dc.
That makes 1 dc 0.25 in (0.6 cm) wide and 1 dc row 0.5 in (1.3 cm) tall. The wing shaping, tail length, and scallop spacing all depend on this gauge.
Test one piece first. Make one small wing (Rows 1–8) as your swatch. If it matches gauge, you can use it in the bow.
Wing checkpoints (radius from the ring to the outer edge):
- After Row 4: 2 in (5.1 cm)
- After Row 6: 3 in (7.6 cm)
- After Row 8: 4 in (10.2 cm)
- After Row 10: 5 in (12.7 cm)
Tail checkpoints:
- Row 1: 2.25 in (5.7 cm) wide
- After Row 20: 10 in (25.4 cm) long, 4.25 in (10.8 cm) wide
- After Row 28: 14 in (35.6 cm) long
If your piece is too big, switch to a 4.5 mm hook. If it is too small, switch to a 5.5 mm hook.
Large Wing (make 2)
The wing is a 120-degree wedge divided into 4 sections. Each section gains 1 st per row, so each row has 4 more sts than the last. Odd rows open a ch-1 eyelet in the middle of each section. Even rows fill each eyelet with 2 dc. The result is four radial lines of eyelets.
Row 1 (RS): MR, ch 3 (counts as dc), 3 dc in ring. Pull the ring closed. Turn. (4 sts)
Row 2: Ch 3, dc in same st, 2 dc in each st across, ending with 2 dc in the top of the beginning ch-3. Turn. (8 sts)
Row 3 (eyelet): Ch 3, ch 1, dc in next st, [dc in next st, ch 1, dc in next st] 3 times. Turn. (12 sts: 8 dc, 4 ch-1 sps)
Row 4 (solid): Ch 3, 2 dc in ch-1 sp, dc in next dc, [dc in next dc, 2 dc in ch-1 sp, dc in next dc] 3 times. Work the last dc in the 3rd ch of the turning ch. Turn. (16 sts)
Row 5 (eyelet): Ch 3, dc in next st, ch 1, dc in next 2 sts, [dc in next 2 sts, ch 1, dc in next 2 sts] 3 times. Turn. (20 sts: 16 dc, 4 ch-1 sps)
Row 6 (solid): Ch 3, dc in next dc, 2 dc in ch-1 sp, dc in next 2 dc, [dc in next 2 dc, 2 dc in ch-1 sp, dc in next 2 dc] 3 times. Turn. (24 sts)
Row 7 (eyelet): Ch 3, dc in next 2 sts, ch 1, dc in next 3 sts, [dc in next 3 sts, ch 1, dc in next 3 sts] 3 times. Turn. (28 sts: 24 dc, 4 ch-1 sps)
Row 8 (solid): Ch 3, dc in next 2 dc, 2 dc in ch-1 sp, dc in next 3 dc, [dc in next 3 dc, 2 dc in ch-1 sp, dc in next 3 dc] 3 times. Turn. (32 sts)
Row 9 (eyelet): Ch 3, dc in next 3 sts, ch 1, dc in next 4 sts, [dc in next 4 sts, ch 1, dc in next 4 sts] 3 times. Turn. (36 sts: 32 dc, 4 ch-1 sps)
Row 10 (solid): Ch 3, dc in next 3 dc, 2 dc in ch-1 sp, dc in next 4 dc, [dc in next 4 dc, 2 dc in ch-1 sp, dc in next 4 dc] 3 times. Turn. (40 sts)
Do not fasten off. Continue with the Wing Edging in the Border section.
Small Wing (make 2)
Work Rows 1–8 of the Large Wing. (32 sts) Do not fasten off. Continue with the Wing Edging.
Tail (make 2)
The tail is worked from the top down. Solid dc rows alternate with eyelet rows. The tail widens by 1 st at each edge every 4 rows, then narrows to a point.
Row 1 (solid): Ch 11, dc in 4th ch from hook (the skipped ch count as a dc) and in each ch across. Turn. (9 sts)
Row 2 (eyelet): Ch 4 (counts as dc + ch 1), sk next st, dc in next st, [ch 1, sk next st, dc in next st] across. Turn. (9 sts: 5 dc, 4 ch-1 sps)
Row 3 (solid): Ch 3, dc in each ch-1 sp and dc across, with the last dc in the 3rd ch of the turning ch-4. Turn. (9 sts)
Row 4: Repeat Row 2. (9 sts)
Row 5 (increase): Ch 3, dc in first st, dc in each st across to the last st, 2 dc in last st. Turn. (11 sts)
Rows 6–20: Work eyelet rows on even rows and solid rows on odd rows. Repeat the Row 5 increase on Rows 9, 13, and 17.
- Rows 6–8: 11 sts
- Rows 9–12: 13 sts
- Rows 13–16: 15 sts
- Rows 17–20: 17 sts
Row 21: Ch 2, dc in next sp (counts as dc2tog), dc in each st and sp across to the last 2 sts, dc2tog. Turn. (15 sts)
Rows 22–27: Ch 2, dc in next st (counts as dc2tog), dc in each st across to the last 2 sts, dc2tog. Turn. (13, 11, 9, 7, 5, 3 sts)
Row 28: Ch 2 (does not count), dc2tog. (1 st, the tip)
Fasten off. The top (foundation) edge stays plain because it is gathered behind the band.
Center Band (make 1)
Row 1: Ch 9, sc in 2nd ch from hook and in each ch across. Turn. (8 sc)
Rows 2–18: Ch 1, sc BLO across. Turn. (8 sc)
The band measures 2 in (5.1 cm) x 4.5 in (11.4 cm). The BLO ridges run across the 2 in (5.1 cm) width, so they show as vertical ribs when the band is wrapped around the center. Fasten off, leaving a 12 in (30.5 cm) tail.
Bobbles (make 3)
Work in a continuous spiral.
- Rnd 1: MR, 6 sc. (6)
- Rnd 2: Inc in each st. (12)
- Rnd 3: [Sc, inc] 6 times. (18)
- Rnds 4–6: Sc in each st. (18)
- Rnd 7: [Sc, dec] 6 times. (12) Stuff firmly.
- Rnd 8: Dec 6 times. (6)
Close the opening and leave an 8 in (20.3 cm) tail for sewing. Each bobble measures about 1.5 in (3.8 cm) across.
Hanging Cord (make 1)
Ch 50, sl st in the back bump of the 2nd ch from hook and of each ch across. (49 sl st)
The cord measures about 12 in (30.5 cm). Folded in half, it makes a loop about 6 in (15.2 cm) long.
Make All Pieces
In cream, 11 pieces total: 2 large wings, 2 small wings, 2 tails, 1 band, 3 bobbles, and 1 cord.
                 [ cord loop ]
[ L wing ][ S wing ][ BAND ][ S wing ][ L wing ]
                  [ 3 bobbles ]
             [ tail ]      [ tail ]
Each small wing sits on top of a large wing. The tails come out from behind the band.
Joining (Assembly)
Edge and block all wings and tails (see the Border and Final Blocking sections) before you sew anything.
- Stack the wings. Place a small wing on a large wing, RS up, with the rings lined up and the small wing centered between the large wing’s straight edges. Sew through both layers across Rows 1–2. Repeat for the other side.
- Gather the center. Place the two stacks ring to ring. Weave yarn through the inner 1 in (2.5 cm) of both stacks, pull it in to 1.5 in (3.8 cm), and knot.
- Add the tails. Gather the 9-st foundation edge of each tail to 1 in (2.5 cm). Sew the tails behind the gathered center, angled outward into a V.
- Wrap the band. Wrap the band around the center with the ribs vertical. Whipstitch Row 1 to Row 18 at the back, matching st to st (8 to 8). Tack the band to the wings at its top and bottom.
- Add the bobbles. Sew one bobble to the lower middle of the band and two just below it, forming a triangle.
- Attach the cord. Fold the cord in half and sew both ends to the back of the band.
Tension: pull firmly enough that the center stays gathered, but not so tight that the wings buckle.
Size checkpoint: about 11.5 in (29.2 cm) x 19 in (48.3 cm).
Border
Border gauge: each scallop uses 4 sts (sc, skip, shell, skip), which equals 1 in (2.5 cm) of edge. The scallops add 0.5 in (1.3 cm) of depth.
Wing Edging (curved edge only)
Large wing, 40 sts (RS): Ch 1, sc in first st, [sk 1, shell in next st, sk 1, sc in next st] 9 times, sk 1, shell in next st, sc in last st. (10 shells, 11 sc)
Check: 1 + (9 x 4) + 3 = 40.
Small wing, 32 sts (RS): Work as for the large wing, but repeat the bracketed part 7 times. (8 shells, 9 sc)
Check: 1 + (7 x 4) + 3 = 32.
Tail Edging
Prep row: Join yarn at the top corner of one long side. Ch 1. Work 2 sc in each row-end down that side, Rows 1–28 (56 sc). Work 5 sc in the top of the tip st. Work 2 sc in each row-end up the other side, Rows 28–1 (56 sc). Turn. (117 sc)
Scallop row: Ch 1, sc in first sc, [sk 1, shell in next sc, sk 1, sc in next sc] 29 times. (29 shells, 30 sc)
Why the math works: each side has 56 sc, which makes 14 scallops of 4 sts. The tip sc are sts 57–61, so the shell in st 59 lands exactly on the point. The row totals 1 + (29 x 4) = 117. Two sc per dc row-end matches the gauge: each row is 0.5 in (1.3 cm) tall and each sc is 0.25 in (0.6 cm) wide.
Final Blocking
- Weave in all ends except the sewing tails.
- Soak the wings and tails in cool water, then press the water out gently. Don’t wring them.
- Pin each wing as a 120-degree fan: large wings to a 5.5 in (14.0 cm) radius, small wings to a 4.5 in (11.4 cm) radius. Use one pin per shell.
- Pin each tail to 14.5 in (36.8 cm) with the point centered, and open the eyelets.
- Spray with stiffener if you want a crisper finish. Let everything dry completely.
- After assembly, lightly steam the wings and shape them with your fingers.
Final Quality-Control Checklist
- Large wings: 40 sts, 10 shells. Small wings: 32 sts, 8 shells.
- Four straight lines of eyelets on each wing
- Tails are 14.5 in (36.8 cm) long and match, with 29 shells each and a shell at the tip
- Band ribs are vertical and the seam is hidden at the back
- Bobbles are firm and securely sewn
- Bow measures about 11.5 in (29.2 cm) x 19 in (48.3 cm)
Troubleshooting
- Wing cups: your stitches are too tight. Go up a hook size.
- Wing ruffles: recount. Each row must have exactly 4 more sts than the row before.
- Tail edge waves: block firmly, or work the prep row with a smaller hook.
- Tail edge pulls in: work the prep row with a larger hook.
- Point leans to one side: check that you decreased at both edges on Rows 21–28.
- Bow tips forward: sew the cord higher on the band.
Care
Hand wash in cool water with mild soap and dry flat, reshaping the wings. If you used stiffener, apply it again after washing.

Final Notes
Every measurement in this bow comes from one gauge: 16 dc and 8 rows = 4 in (10.2 cm). Each wing row adds 0.5 in (1.3 cm) of radius. The large wings reach 5 in (12.7 cm) and the small wings 4 in (10.2 cm), and each gains 0.5 in (1.3 cm) from the scallops. The tails reach 4.25 in (10.8 cm) wide by Row 20 and 14 in (35.6 cm) long by Row 28. Every scallop uses 4 sts, so the edges fit evenly, and the assembled bow comes to about 11.5 in (29.2 cm) x 19 in (48.3 cm). Check your gauge on the first small wing before making the rest.
Happy crocheting!