

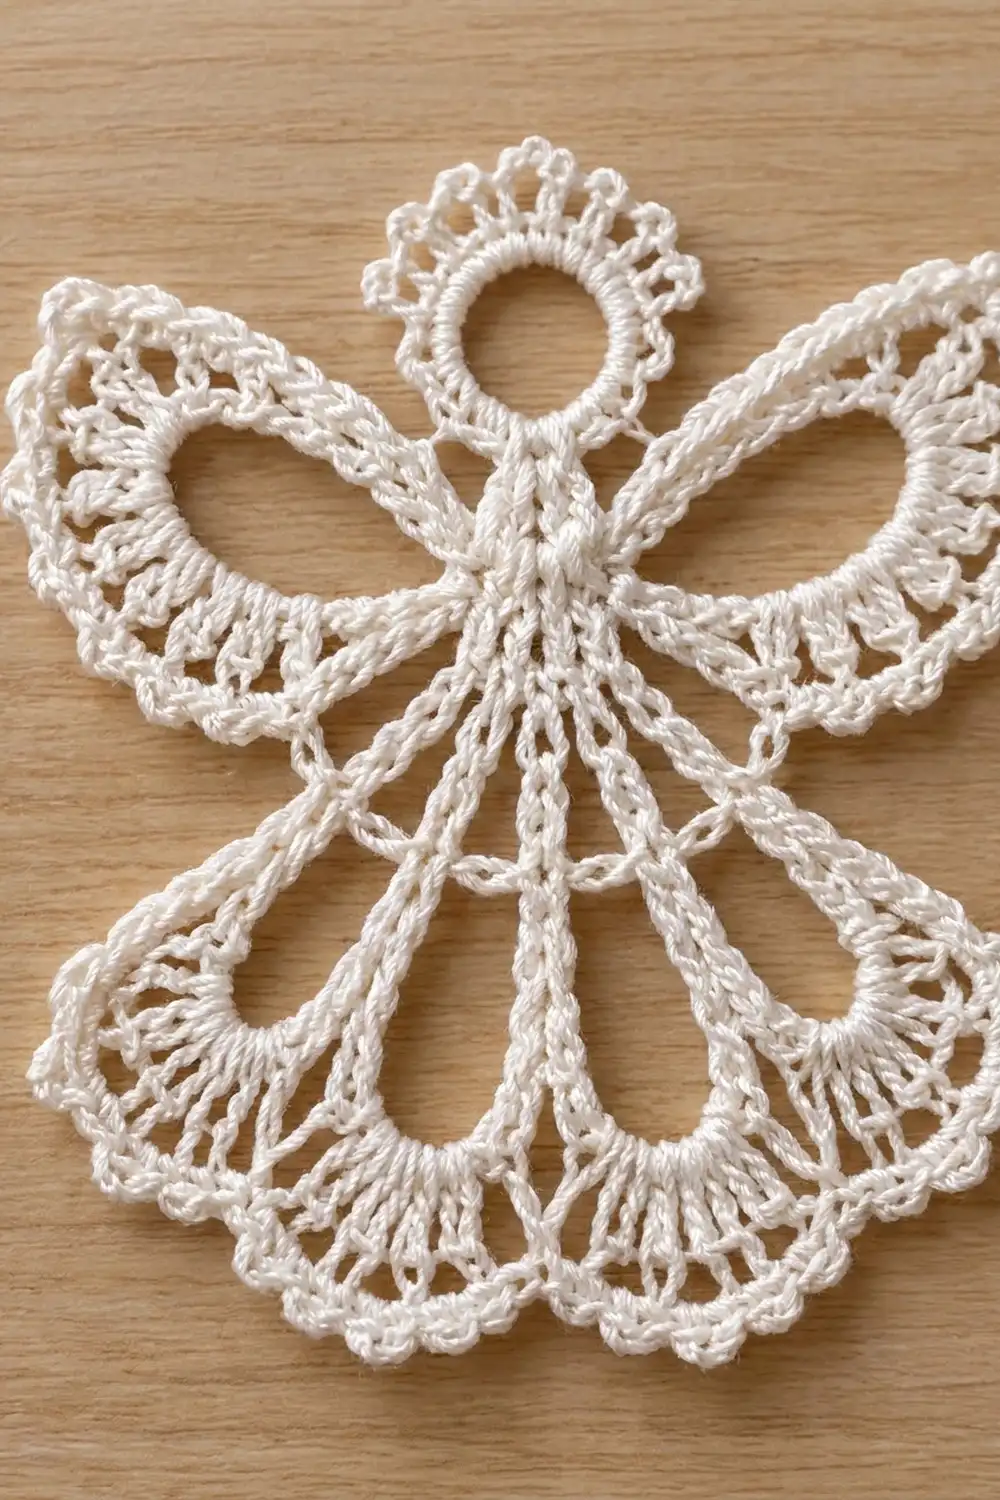
This little lace angel is a classic holiday motif with a clean, airy look. An open ring forms the head, a tiny picot crown sits on top as a halo, and a bell-shaped skirt opens into four teardrop windows above a scalloped hem. Two rounded wings with picot edges frame the body.
The sample uses a single color: white mercerized cotton thread with a soft sheen. It looks like traditional thread lace, but the construction is simple and the stitch counts are short, so it works well as a first thread project or a quick gift.
This pattern uses US crochet terms. The finished angel measures about 4.5 in (11.4 cm) wide across the wings and 4.75 in (12.1 cm) tall, including the halo and hem scallops.
The angel is made in one piece without fastening off between sections. First you make the head ring and work the halo across the top of it. Then you slip stitch down to the neck and work the body in turned rows down to the hem. Last, you add a wing at each shoulder. A light starch gives a crisp, flat finish for hanging.
Finished Size and Construction
- Finished size: 4.5 in (11.4 cm) wide across the wings x 4.75 in (12.1 cm) tall
- Skill level: Easy-intermediate (thread crochet, basic stitches)
- Terminology: US crochet terms
- Yarn weight: Size 3 crochet cotton thread (light fingering)
- Hook: 2.0 mm steel hook
- Number of pieces: 1 (worked continuously)
- Layout: Single standalone motif
- Piece size: 4.5 x 4.75 in (11.4 x 12.1 cm)
- Size before edging: skirt 3.5 in (8.9 cm) wide, angel 4.25 in (10.8 cm) tall
- Edging depth: about 0.25 in (0.6 cm) at the hem
Materials
Choose a firmly twisted, mercerized cotton thread in size 3. Mercerized cotton holds starch well, shows stitch definition clearly, and keeps a gentle sheen. Avoid fuzzy or very soft yarn, because the windows and picots will blur.
- White (main and only color): about 10 g, approx. 27 m (30 yd)
These quantities include a margin of roughly 30 percent for a test head ring, the hanging loop, and weaving in.
Tools:
– 2.0 mm steel crochet hook
– Fine tapestry needle
– Small sharp scissors
– 1 stitch marker
– Fabric stiffener or spray starch
– Foam blocking board and rustproof pins
– Ruler or tape measure
Tension tip: Thread has no stretch to hide uneven stitches. Hold the working thread with steady, light tension and pull every loop all the way up to the shank of the hook. If you don’t, picots and chains come out uneven.
Abbreviations (US Terms)
- ch – chain
- sl st – slip stitch
- sc – single crochet
- dc – double crochet
- sp – space
- st(s) – stitch(es)
- RS – right side
Special stitches:
- Picot: ch 3, sl st in 3rd ch from hook.
- Mini shell: (dc, picot, dc) in the same st. Used on the halo.
- Picot shell: (2 dc, picot, 2 dc) in the same st. Used on the hem and wings.
Gauge and Checkpoints
In thread lace, gauge is mostly about proportion. Even so, make the head first as a test. It takes two minutes and shows whether your hook and thread match the sample.
Gauge: 8 sc = 1 in (2.5 cm) with size 3 thread and a 2.0 mm hook.
Checkpoints:
- Head ring after Rnd 1: 0.75 in (1.9 cm) outer diameter.
- Head with halo: 1.25 in (3.2 cm) tall.
- Waist after Row 3: 2.25 in (5.7 cm) wide.
- Skirt after Row 5: 3.5 in (8.9 cm) wide at the lower edge.
- After hem edging (Row 6): 4 in (10.2 cm) wide.
- Finished with wings: 4.5 in (11.4 cm) wide, 4.75 in (12.1 cm) tall.
If your head ring is too big: go down to a 1.75 mm hook, or work more tightly around the starting chain. If it is too small: go up to a 2.25 mm hook. Being off by 0.125 in (0.3 cm) at the head turns into about 0.5 in (1.3 cm) at the hem, so fix it early.
Head
Rnd 1: Ch 15, sl st in first ch to form a ring. Ch 1, work 24 sc into the ring (over the chain), sl st in first sc. (24 sc)
Place a marker in the first sc. This is st 1, the bottom center of the head where the neck will attach. Counting around, st 13 is the top center.
Checkpoint: the ring lies flat with an open center and measures 0.75 in (1.9 cm) across.
Halo
The halo is one short row across the top of the head, from st 6 to st 20.
Halo row: Sl st in next 5 sts (you are now in st 6). Ch 1, sc in same st (st 6), mini shell in next st, sc in next st; repeat from * 6 more times, ending with sc in st 20. (8 sc, 7 mini shells)
The center mini shell lands in st 13, so the halo sits centered on top.
Do not fasten off. Sl st in each of sts 21–24. You are now at the side of the neck, ready for the body.
Checkpoint: head plus halo is 1.25 in (3.2 cm) tall.
Body and Skirt
The body is worked in turned rows that hang down from sts 24, 1 and 2 of the head ring.
Row 1 (neck): Ch 1, sc in st 24, sc in st 1, sc in st 2. (3 sc)
Row 2 (bodice spokes): Ch 5 (counts as dc + ch 2), turn, dc in same sc, ch 2, dc in next sc, ch 2, (dc, ch 2, dc) in last sc. (5 dc, 4 ch-2 sps)
These five dc are the ribs that fan out from the neck. The two end dc are the shoulders, where the wings will go.
Row 3 (waist arc): Ch 1, turn, sc in first dc, ch 5, sc in next dc; repeat from * 3 more times, working the last sc in 3rd ch of turning ch. (5 sc, 4 ch-5 loops)
Checkpoint: the waist measures 2.25 in (5.7 cm) across when gently laid flat.
Row 4 (window loops): Ch 1, turn, sc in first sc, ch 13, sc in next sc; repeat from * 3 more times. (5 sc, 4 ch-13 loops)
Each ch-13 loop spans the same two sc as one ch-5 loop above it. Together, the short loop above and the long loop below enclose a teardrop-shaped opening. These are the four skirt windows.
Row 5 (skirt fill): Ch 3 (counts as dc), turn, 15 dc in next ch-13 loop, dc in next sc; repeat from * 3 more times. (65 dc)
Count check: 1 turning ch + 4 x (15 + 1) = 65 dc. Work the dc around the ch-13 chain only, never into the ch-5 loops, so each window stays open.
Checkpoint: the skirt is 3.5 in (8.9 cm) wide at the lower edge, and the angel is 4.25 in (10.8 cm) tall from halo to skirt edge. This is your size before edging.
Wings
Make two wings, one at each shoulder (the end dc of Row 2). Hold the angel with RS facing.
Wing frame: Join thread with a sl st at the top of the end dc of Row 2. Ch 18, sl st in same st to form a loop.
Wing outline: Ch 1, work 25 sc into the ch-18 loop (over the chain), sl st in the shoulder st. (25 sc)
Number the outline sts 1–25 starting at the shoulder. St 13 is the outer tip of the wing.
Wing edging: Work it now, as described in the Picot Edging section below. Then repeat the frame, outline and edging on the opposite shoulder.
Checkpoint: each wing frame is about 1.75 in (4.4 cm) long from shoulder to tip before edging.
Picot Edging
The picot edging works as the angel’s border. It appears on three edges: the halo (already done above), the skirt hem, and the outer curve of each wing. Every edging uses the same structure: sc, skip, shell, skip, sc.
Edging gauge: on the hem, one picot shell plus its anchoring sc covers about 0.5 in (1.3 cm).
Hem (Row 6)
Continue from Row 5 without fastening off.
Row 6: Ch 1, turn, sc in first dc, skip 3 dc, picot shell in next dc, skip 3 dc, sc in next dc; repeat from * 7 more times, working the last sc in 3rd ch of turning ch. (9 sc, 8 picot shells)
Fasten off and weave in.
Why the math works: each repeat uses 8 sts (3 skipped + 1 shell + 3 skipped + 1 sc), and 1 + 8 x 8 = 65, which matches Row 5 exactly. Every between-window dc from Row 5 (sts 17, 33 and 49) lands on an anchoring sc, so each window has two scallops centered under it. Eight shells at 0.5 in (1.3 cm) each give the 4 in (10.2 cm) hem.
Checkpoint: the hem is 4 in (10.2 cm) wide, with an edging depth of about 0.25 in (0.6 cm).
Wing Edge
Work this on each wing right after its outline, without fastening off.
Wing edging row: Sl st in sts 1–4 of the outline. Sc in st 5, skip 1 st, picot shell in next st, skip 1 st, sc in next st; repeat from * 3 more times, ending with sc in st 21. (5 sc, 4 picot shells)
Sl st in sts 22–25 and in the shoulder st. Fasten off and weave in.
Why the math works: each repeat uses 4 sts, so 1 + 4 x 4 = 17 sts, which is sts 5 through 21. That leaves four plain sts on each side of the shoulder (sts 1–4 and 22–25), so the wing base stays slim and the shells sit only on the outer curve. Shells land in sts 7, 11, 15 and 19, which frames the sc at the tip (st 13) symmetrically.
Halo Recap
The halo row covers sts 6–20. That is 15 sts: 8 sc + 7 mini shells, each worked into 1 st. Sts 21–24 and 1–5 stay plain around the neck, so the head ring stays visible.
Hanging Loop (Optional)
Join thread in the picot of the center mini shell (st 13). Ch 30, sl st in same picot, then fasten off. The loop is about 3 in (7.6 cm) long. You can also tie on a ribbon or metallic thread instead.
Final Blocking
- Weave in all ends before blocking. Hide them in the solid dc of the skirt or the sc of the wing outlines.
- Wet the angel in cool water and press out the excess in a towel. Do not wring.
- Apply stiffener by soaking the angel in fabric stiffener or misting it well with spray starch.
- Pin the center line first: top of halo, neck, and center of hem, in a straight vertical line.
- Pin the skirt to 3.5 in (8.9 cm) across the Row 5 edge. Then pin each scallop picot outward until the hem measures 4 in (10.2 cm).
- Open the windows by pinning inside each teardrop, top and bottom, so all four match in shape.
- Pin the wings to a total span of 4.5 in (11.4 cm), with a pin at each wing tip and each picot.
- Open the head ring and halo with a pin in the ring center and one in each halo picot.
- Let it dry completely, about 12–24 hours, before unpinning.
Final Quality-Control Checklist
- Head ring has exactly 24 sc and lies flat.
- Halo has 7 mini shells centered on st 13.
- Row 2 has 5 dc ribs and 4 ch-2 sps.
- Row 3 has 4 ch-5 loops; Row 4 has 4 ch-13 loops.
- Row 5 has 65 dc.
- Hem has 8 picot shells and 9 sc.
- Each wing has 25 sc and 4 picot shells.
- All four skirt windows are open and similar in shape.
- Finished size is 4.5 in (11.4 cm) wide and 4.75 in (12.1 cm) tall.
- All ends are woven in and invisible from the front.
Troubleshooting
Head ring cups or ruffles: the 24 sc must fit the ring evenly. If it cups, loosen your sc. If it ruffles, tighten them or start with a ch-14 ring.
Skirt windows are closed or lopsided: Row 5 dc go into the ch-13 loop only. If you caught the ch-5 loop, the window collapses, so rip back to Row 4.
Hem flares or waves: your Row 5 dc are probably too tall. Rework Rows 4–6 with a 1.75 mm hook. The stitch counts stay the same.
Hem pulls in: loosen the chains in Row 4, or go up to a 2.25 mm hook for Rows 4–6 only.
Picots look flat or uneven: pull each picot chain fully up to the hook shank before the sl st, and pin each picot to a point while blocking.
Wings droop after starching: add more stiffener and re-pin with the tips slightly higher than the shoulders.
Wings are different sizes: count the ch-18 frame on both sides. A single missing chain changes the wing by about 0.125 in (0.3 cm).
Care
Hand wash in cool water with mild soap, re-starch, and pin to shape while damp. Store flat or hanging, away from direct sunlight, to keep the white bright.

Final Notes
The measurement chain is short and reliable. A 0.75 in (1.9 cm) head ring leads to a 2.25 in (5.7 cm) waist, a 3.5 in (8.9 cm) skirt before edging, and a 4 in (10.2 cm) hem after the picot shells. With the wings added, the angel finishes at 4.5 in (11.4 cm) wide and 4.75 in (12.1 cm) tall. If your head ring matches the checkpoint, the rest of the piece will follow.
Make one for the tree, a gift tag, or a card. Happy crocheting!