

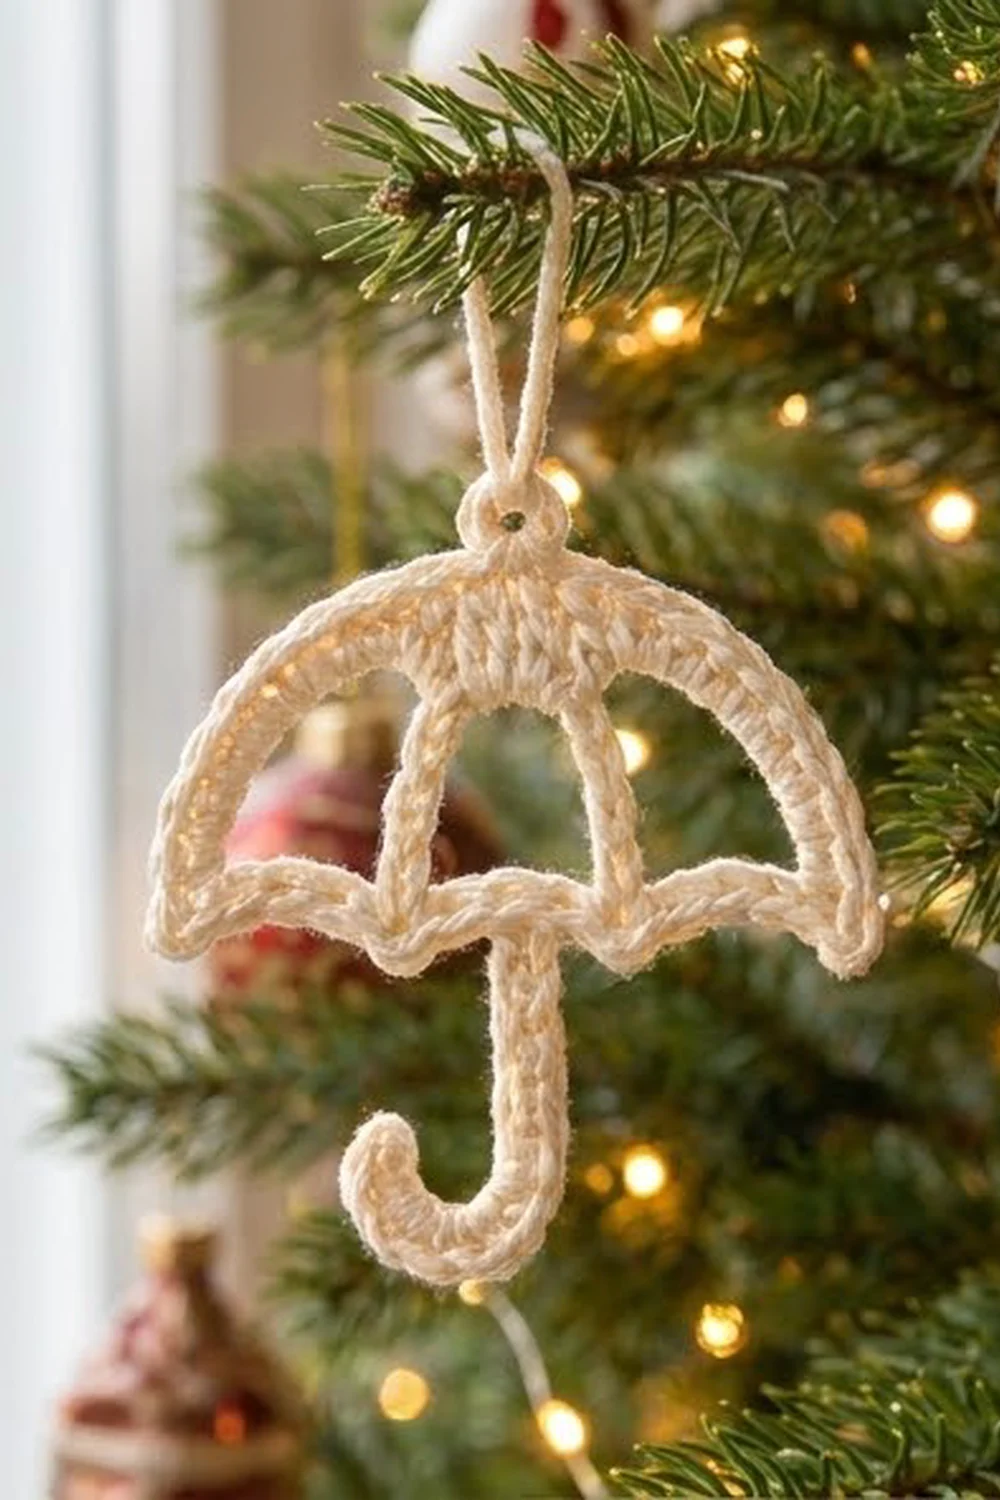
This little umbrella is all outline and air. It has a solid fan-shaped cap, a rounded canopy made of smooth cord, two curved inner ribs, a gently scalloped lower edge and a classic J-hook handle. In cream cotton it looks like lace against the green of a tree, and it holds its shape well after a light starch.
The ornament uses one color only, so it’s easy to make in quantity. Cream gives a vintage, snowy look. White, gold or soft red also work well. The pattern uses US crochet terms throughout.
The finished ornament measures 3.5 in (8.9 cm) wide across the canopy and 4.25 in (10.8 cm) tall from the top of the cap to the bottom of the handle. The hanging loop adds 0.75 in (1.9 cm), for a total height of 5 in (12.7 cm).
You’ll work it in three stages. First you make a small fan-shaped cap. Next you build the whole outline in one continuous chain “skeleton”: the arches, the lower edge, the two ribs and the handle. Ribs and handle get their own single crochet as you go. Finally one edging round covers the arches with cord, turns the lower edge into scallops and adds the hanging loop.
Finished Size and Construction
- Finished size: 3.5 in (8.9 cm) wide × 4.25 in (10.8 cm) tall, plus a 0.75 in (1.9 cm) loop
- Skill level: Easy–Intermediate (simple stitches, careful counting)
- Terminology: US crochet terms
- Yarn weight: Super fine (#1) fingering-weight cotton
- Hook: 2.25 mm (B-1)
- Number of pieces: 1, worked continuously
- Layout: single motif, no joining
- Piece size: 3.5 in × 4.25 in (8.9 cm × 10.8 cm)
- Size before border: about 3.25 in (8.3 cm) wide, tip to tip
- Border depth: about 0.125 in (0.3 cm) on the arches and 0.25 in (0.6 cm) at the deepest point of each scallop
Materials
Yarn: Use a smooth, tightly plied mercerized cotton in fingering weight. Cotton shows stitch definition clearly, takes starch well and doesn’t sag on a branch. Avoid fuzzy or very soft yarns, because the cords will lose their crisp outline.
- Cream: 4 g, about 15 m (16 yd) per ornament
That amount includes a margin for your gauge swatch and weaving in. One 50 g ball makes about 12 ornaments.
Tools:
- 2.25 mm (B-1) crochet hook
- Tapestry needle
- Scissors
- Stitch marker
- Blocking board or foam mat, plus rust-proof pins
- Fabric stiffener or spray starch (optional, but recommended)
Abbreviations (US Terms)
- ch – chain
- sl st – slip stitch
- sc – single crochet
- hdc – half double crochet
- dc – double crochet
- st(s) – stitch(es)
- RS – right side
Special stitch – Scallop (worked over 7 ch): sc in next ch, hdc in next ch, dc in each of next 3 ch, hdc in next ch, sc in next ch. That makes 7 sts over 7 ch, rising to a small rounded bump in the middle.
Gauge and Checkpoints
Gauge: 8 ch = 1 in (2.5 cm), and 8 sc worked into a chain = 1 in (2.5 cm).
This is a small piece, so the ornament is your swatch. Make one, measure it at each checkpoint below, and adjust before you make a batch.
- Checkpoint 1 (after the cap): Row 2 measures 1.25 in (3.2 cm) across.
- Checkpoint 2 (after the skeleton): about 3.25 in (8.3 cm) from tip to tip, with the handle chain hanging about 2.5 in (6.4 cm).
- Checkpoint 3 (after the edging): 3.5 in (8.9 cm) wide and 4.25 in (10.8 cm) tall, not counting the loop.
If your piece is too big: Go down to a 2 mm hook, or chain more firmly. Loose chains are the most common cause.
If your piece is too small: Go up to a 2.5 mm hook. The cords should look round and firm, not stiff and cramped.
Don’t change the chain counts to fix size. The ribs and arches are balanced against each other, so the shape only works when you change size through the hook.

Part 1: The Cap
The cap is worked in 2 rows from a small ring at the top. It fans downward, so the ring sits at the top of the umbrella.
Foundation: Ch 4, sl st in first ch to form a ring.
Row 1: Ch 3 (counts as dc), 8 dc in ring. Turn. (9 dc)
The stitches spread into a half-circle with the ring at the top. These upright posts give the cap its ribbed look.
Row 2: Ch 1, 2 sc in first dc, sc in each of next 7 dc, 2 sc in top of ch-3. Do not turn. (11 sc)
Number the Row 2 stitches from the corner where your hook is now: that corner is st 1 and the far corner is st 11. Call your current side the right. Place a marker in st 4 and keep track of st 8; the two ribs will attach there.
Checkpoint 1: Row 2 should measure 1.25 in (3.2 cm) across.
Part 2: The Skeleton
The whole outline is now made in one continuous chain. Don’t fasten off at any point. Keep the cap RS facing and work clockwise when viewed from the front, starting at the right corner.
Right arch: Ch 18. This chain becomes the right outer arch and ends at the right tip.
Lower edge, segment A: Ch 7.
Right rib: Ch 13, sl st in st 4 of Row 2 (the marked st). Turn the chain so you’re working back down it: sc in each of the 13 rib ch. Sl st in the last ch of segment A. (13 sc on the rib)
The rib is now a solid sc cord that runs from the cap to the lower edge.
Lower edge, segment B: Ch 7.
Handle: Ch 21. Sc in 2nd ch from hook, 2 sc in each of next 6 ch, sc in each of remaining 13 ch. Sl st in the last ch of segment B. (26 sc on the handle: 1 + 12 + 13)
The 6 increases at the end make the bottom of the handle longer on one edge than the other, so it curls naturally into the J-hook. Turn the curl outward toward the side you prefer. Blocking will set it.
Lower edge, segment C: Ch 7.
Left rib: Ch 13, sl st in st 8 of Row 2. Sc in each of the 13 rib ch going back down. Sl st in the last ch of segment C. (13 sc on the rib)
Lower edge, segment D: Ch 7.
Left arch: Ch 18, sl st in st 11 of Row 2 (the left corner of the cap).
Skeleton totals:
- 2 arches × 18 ch = 36 ch
- 4 lower segments × 7 ch = 28 ch
- 2 ribs × 13 ch, each covered with 13 sc
- 1 handle of 21 ch, covered with 26 sc
Lay the piece flat. Ribs attached at sts 4 and 8 leave 3 sts (sts 5–7) open at the top of the center window, and 3 sts outside each rib (sts 1–3 and 9–11) at the tops of the side windows. That’s why the three windows look balanced.
Checkpoint 2: The outline should measure about 3.25 in (8.3 cm) from tip to tip, with the handle about 2.5 in (6.4 cm) long before it curls.
Part 3: Border (Edging Round)
One edging round turns the bare chain arches into cord and the lower edge into scallops. It also adds the hanging loop. Work along the outer side of each chain, keeping the bare inner side toward the windows.
Border gauge: 1 st per ch throughout, at 8 sts = 1 in (2.5 cm).
Edging Round: You start at the left corner of the cap, where the left arch was joined.
- Left arch: Sc in each of the 18 arch ch, working down toward the tip. (18 sc)
- Left tip: Ch 1.
- Segment D: Scallop over the 7 ch. Sl st into the base of the left rib. (7 sts + 1 sl st)
- Segment C: Scallop over the 7 ch. Sl st into the base of the handle. (7 sts + 1 sl st)
- Segment B: Scallop over the 7 ch. Sl st into the base of the right rib. (7 sts + 1 sl st)
- Segment A: Scallop over the 7 ch. (7 sts)
- Right tip: Ch 1.
- Right arch: Sc in each of the 18 arch ch, working up toward the cap. (18 sc)
- Right side of cap: Work 3 sc evenly along the cap edge (over the end of Row 2 and the post of the ch-3). (3 sc)
- Top and loop: Sc in ring, ch 10, sc in ring. (2 sc + 10-ch loop)
- Left side of cap: Work 3 sc evenly along the cap edge, over the end of Row 2 and the post of the last dc. (3 sc)
- Sl st in first sc of the round. Fasten off.
Per-side counts:
- Left arch: 18 sc
- Right arch: 18 sc
- Lower edge: 4 scallops × 7 sts = 28 sts, plus 3 joining sl sts
- Tips: 1 ch each
- Cap sides: 3 sc each
- Top: 2 sc plus a 10-ch loop
Edging total: 18 + 18 + 3 + 3 + 2 = 44 sc, plus 28 scallop sts, 3 sl sts, 2 tip ch and the 10-ch loop.
Why the math works: Each arch and lower segment gets exactly 1 st per ch. The edging is therefore the same length as the skeleton, so it can’t ruffle or pull in. The scallops stay the same length as their 7-ch segment, but the taller dc in the middle push the edge down into a bump. The single ch at each tip keeps the points sharp without adding bulk. Ribs and handle were already covered in Part 2, so they get only a sl st here. That anchors them without thickening the joins.
Checkpoint 3: 3.5 in (8.9 cm) wide and 4.25 in (10.8 cm) tall, plus a 0.75 in (1.9 cm) loop.
Final Blocking
- Weave in both tails along the back of the cord, not across the open windows. Don’t trim them yet.
- Wet the ornament, or soak it in diluted fabric stiffener, then press out the excess in a towel.
- Lay it face up on your board. Pin the cap center and both tips first so the canopy is exactly 3.5 in (8.9 cm) wide.
- Shape both arches into smooth, even curves, then pin each rib so it curves gently outward.
- Pin the deepest point of each scallop so the lower edge has four equal bumps.
- Set the handle straight down from the center, then curl the J around a pencil or pin it in a tight curve about 0.5 in (1.3 cm) across.
- Pin the loop straight up.
- Let it dry completely. That usually takes 6–8 hours, or overnight if you used stiffener.
- Unpin it, then trim the tails close.
Final Quality-Control Checklist
- Cap Row 1 has 9 dc and Row 2 has 11 sc.
- Ribs are attached at sts 4 and 8, so the three windows look balanced.
- Each rib has 13 sc and the handle has 26 sc.
- Each arch has 18 sc, and both arches look the same length.
- There are four scallops of 7 sts each, all the same size.
- Both tips come to a clear point.
- The loop is centered above the ring.
- Width is 3.5 in (8.9 cm) and height is 4.25 in (10.8 cm) without the loop.
- No tails show through the windows.
Troubleshooting
Canopy is lopsided: One arch probably has an extra or missing ch. Count both: each should have 18 sc. If they match, re-block and pin both tips at the same height.
Ribs bow or twist: The chain twisted before you made the sl st into the cap. Before joining, make sure the front of the chain faces you all the way along.
Handle won’t curl: Check that you made 6 pairs of increases (2 sc in each of 6 ch). Stiffener, then dry the curl around a pencil.
Handle curls the wrong way: Turn it over before blocking. The curl will set in whichever direction you pin it.
Scallops look flat: Make sure the middle 3 sts in each scallop are dc, not hdc, and keep the sl st joins snug.
Edging ruffles: You’ve worked more than 1 st per ch somewhere. Count each section against the per-side counts above.
Arches look thin: Your chain is too loose. Go down half a hook size for the skeleton only.
Care
Hand wash in cool water and dry flat, re-shaping it as it dries. Starch again if it softens. Store flat or hanging, never crushed in a box.
Final Notes
Everything in this ornament follows one measurement chain. Gauge is 8 sts = 1 in (2.5 cm). The cap is 1.25 in (3.2 cm) wide, and the skeleton reaches about 3.25 in (8.3 cm) from tip to tip. The edging brings the canopy to 3.5 in (8.9 cm) wide and the total height to 4.25 in (10.8 cm), plus a 0.75 in (1.9 cm) loop. If each checkpoint matches, the next stage will fit without forcing. Make one, block it, then make a whole row of them for the tree.
Happy crocheting!