

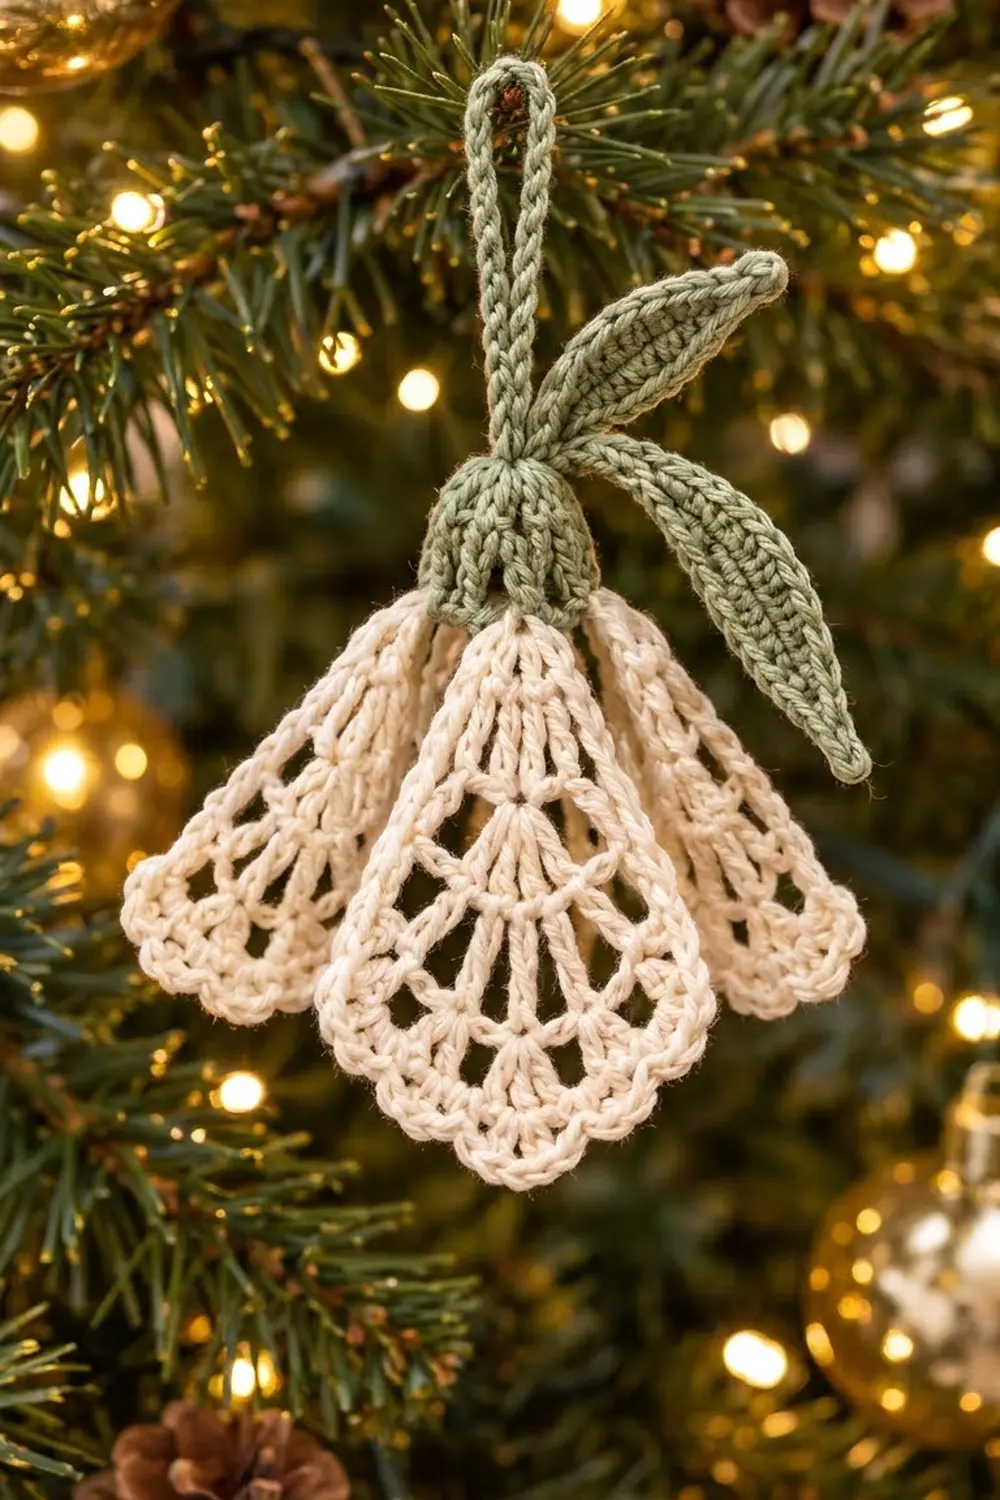
This little ornament looks like a snowdrop just starting to open. Three lacy cream petals fan out from a ribbed sage-green cap. Two slim leaves and a twisted hanging loop come out of the top. It looks soft and vintage on a lit tree.
The palette is just two colors: warm cream for the petals and muted sage for the cap, leaves and loop. Cotton yarn shows off the open fan ribs and keeps the scallops crisp.
The pattern uses US crochet terms. The finished ornament is about 4 in (10.2 cm) wide and 3 in (7.6 cm) tall, not counting the loop. Each bordered petal is 2.75 in (7.0 cm) wide.
You’ll crochet three petals in rows from a small ring, then add a single crochet and scallop border to each one. Next you make a ribbed cap in the round, two leaves worked around a chain, and a slip-stitch cord. Finally you sew everything together.
Finished Size and Construction
- Finished ornament: 4 in (10.2 cm) wide x 3 in (7.6 cm) tall, plus a 3 in (7.6 cm) loop
- Skill level: Easy-intermediate
- Terminology: US
- Yarn weight: Sport (2), cotton
- Hook: 2.5 mm (US B/1 or C/2)
- Number of pieces: 7 (3 petals, 1 cap, 2 leaves, 1 cord)
- Layout: center petal in front, two side petals angled behind, tips gathered into the cap
- Petal size, bordered: 2.75 in (7.0 cm) wide x 2.4 in (6.1 cm) tall
- Petal size before border: 2.5 in (6.4 cm) wide x 2 in (5.1 cm) tall
- Border depth: 0.4 in (1.0 cm) at the bottom edge
Materials
Use a smooth mercerized or combed cotton sport yarn. Smooth cotton gives the ribs good definition and blocks very well. Acrylic will work too, but the lace may look a bit fuzzier.
- Cream (petals): 12 g / 37 m (about 40 yd)
- Sage green (cap, leaves, cord): 8 g / 25 m (about 27 yd)
These amounts are based on a 50 g / 155 m ball and include a safety margin of roughly 25%.
Tools
– 2.5 mm crochet hook
– Tapestry needle
– Scissors
– Stitch marker
– Blocking mat and rust-proof pins
– Spray bottle with water
– Optional: liquid fabric stiffener
Abbreviations (US Terms)
- ch – chain
- sl st – slip stitch
- sc – single crochet
- hdc – half double crochet
- dc – double crochet
- sp – space
- sk – skip
- st(s) – stitch(es)
- tch – turning chain
- RS / WS – right side / wrong side
- FPdc – front post double crochet: yo, insert hook from front to back to front around the post of the stitch, then complete a dc.
- BPdc – back post double crochet: yo, insert hook from back to front to back around the post, then complete a dc.
- Shell – 5 dc worked into the same stitch.
Gauge and Checkpoints
Gauge: 24 dc and 10 dc rows = 4 in (10.2 cm). That works out to 6 dc per 1 in (2.5 cm), and each dc row is 0.4 in (1.0 cm) tall.
Make one petal before you do anything else, because the petal sets the size of the whole ornament. Measure the width straight across the widest part, and measure the height from the top of the ring to the lowest edge.
Petal checkpoints:
– After Row 1: 0.9 in (2.3 cm) wide
– After Row 2: 1.4 in (3.6 cm) wide
– After Row 3: 2 in (5.1 cm) wide
– After Row 4: 2.5 in (6.4 cm) wide x 2 in (5.1 cm) tall
– After border: 2.75 in (7.0 cm) wide x 2.4 in (6.1 cm) tall
Cap checkpoint: after Round 3 the flat circle should measure 1 in (2.5 cm) across.
If the petal after Row 4 is more than 0.25 in (0.6 cm) too big, go down half a millimeter in hook size. If it’s too small, go up half a millimeter. Small differences are fine, as long as all three petals match each other.

Petal (make 3, cream)
Each petal is worked in turned rows, fanning out from a small ring. Each row adds width only through its chain spaces and new ribs, so the petal stays a neat triangle.
Ring: Ch 5, sl st in first ch to form a ring.
Row 1 (RS): Ch 3 (counts as dc), 4 dc in ring. Turn.
(5 dc)
Row 2 (WS): Ch 4 (counts as dc + ch 1), [dc in next dc, ch 1] 3 times, dc in top of tch. Turn.
(5 dc, 4 ch-1 sps)
Row 3 (RS): Ch 5 (counts as dc + ch 2), [dc in next dc, ch 2] 3 times, dc in 3rd ch of tch. Turn.
(5 dc, 4 ch-2 sps)
The five dc ribs now radiate from the ring like the spokes of a fan.
Row 4 (WS): Ch 3 (counts as dc), [ch 1, dc in next ch-2 sp, ch 1, dc in next dc] 4 times, working the last dc into the 3rd ch of the tch. Do not turn yet. Go to the Border section and continue straight into it.
(9 dc: 5 original ribs plus 4 new ribs; 8 ch-1 sps)
The four new ribs fill in between the original spokes and give the lower part of the petal its lacy look. Check that the piece measures 2.5 in (6.4 cm) wide x 2 in (5.1 cm) tall.
Cap (make 1, sage)
Round 1: Make a magic ring, ch 1, work 6 sc in the ring. Sl st to first sc. (6 sc)
Round 2: Ch 1, 2 sc in each st around. Sl st to first sc. (12 sc)
Round 3: Ch 1, [sc in next st, 2 sc in next st] 6 times. Sl st to first sc. (18 sc)
Check that the circle measures 1 in (2.5 cm) across.
Round 4: Ch 2 (does not count as a st), [FPdc around next st, BPdc around next st] 9 times. Sl st to the first FPdc. (18 sts)
Round 5: Ch 2, [FPdc around the FPdc, BPdc around the BPdc] 9 times. Sl st to the first FPdc. (18 sts)
Because there are no increases, the sides of the cap curve down into a small bell. Fasten off, leaving a 10 in (25.4 cm) tail for sewing. The cap should be about 1 in (2.5 cm) wide and 1 in (2.5 cm) tall.
Leaf (make 2, sage)
Leave a 6 in (15.2 cm) starting tail.
Round 1: Ch 13. Work sc in 2nd ch from hook, hdc in next ch, dc in each of next 7 ch, hdc in next ch, sc in next ch, 3 sc in last ch (this is the tip). Rotate and work along the other side of the chain: sc in next ch, hdc in next ch, dc in each of next 7 ch, hdc in next ch, sc in last ch. Sl st to first sc.
(25 sts: 11 + 3 + 11)
Vein: With the RS facing, work surface sl sts up the center of the leaf along the foundation chain, from the base to the tip. Fasten off.
Each leaf measures 2 in (5.1 cm) long x 0.6 in (1.5 cm) wide.
Hanging Cord (make 1, sage)
Ch 37. Sl st in the back bump of the 2nd ch from hook and in the back bump of each remaining ch. (36 sl sts)
Fasten off. The cord measures 6 in (15.2 cm). Twist it gently before you fold it, so it looks like the twisted cord in the photo.
Make All Pieces
Before assembly, finish each petal with the Border described below.
Cream: 3 bordered petals
Sage: 1 cap, 2 leaves, 1 cord
Layout (front view):
            [ cord loop ]
     [leaf]   [ CAP ]   [leaf]
   [petal L] [PETAL C] [petal R]
   (behind)  (front)   (behind)
Assembly
1. Stack the petals. Lay the left and right petals so the inner side edges overlap by about 0.5 in (1.3 cm), then place the center petal on top. Line up all three ring tips.
2. Tack the tips. Using a cream tail, sew through all three ring tips with 3 or 4 small stitches, sewing only the top 0.3 in (0.8 cm) of each petal. The lower parts should hang free so they can fan out.
3. Add the cord. Fold the cord in half to make a 3 in (7.6 cm) loop. Thread both ends down through the center of cap Round 1 from the outside.
4. Seat the cap. Slide the cap over the gathered tips so that Round 5 covers the top 0.5 in (1.3 cm) of the petals. Knot the cord ends to the petal tips inside the cap.
5. Sew the cap rim. Using the cap tail, sew from each FPdc of Round 5 into the petal directly below it, so the 9 FPdc ribs are stitched down evenly around the rim. Keep your tension firm but not tight, so the ribbing doesn’t pucker.
6. Attach the leaves. Sew the base of each leaf to the top of the cap, one on each side of the loop, angling them outward.
Size checkpoint: the assembled ornament should measure 4 in (10.2 cm) across the fanned petals and 3 in (7.6 cm) from the top of the cap to the lowest scallop.
Border (Each Petal)
The border is worked right after Row 4 of every petal. It is made of one single crochet round and one scallop round.
Border gauge: Each dc row end is 0.4 in (1.0 cm) tall, so 2 sc per row end (0.2 in / 0.5 cm each) keeps the sides flat. Along the bottom edge, work 1 sc into every dc and every ch-1 sp.
Border Round 1 (RS): Turn. Ch 1.
- Bottom edge: 3 sc in first dc (corner), [sc in next ch-1 sp, sc in next dc] 7 times, sc in next ch-1 sp, 3 sc in last dc (corner). (21 sc, including both 3-sc corner groups)
- First side: 2 sc in each of the 4 row ends. (8 sc)
- Top: 1 sc in the ring. (1 sc)
- Second side: 2 sc in each of the 4 row ends. (8 sc)
Sl st to first sc.
(38 sc total: 21 + 8 + 1 + 8)
Border Round 2: Ch 1.
- Bottom edge: sc in first sc, [sk 1 sc, shell in next sc, sk 1 sc, sc in next sc] 5 times. (5 shells; 21 sts = 6 sc + 25 dc counted as 5 shell bases… see note)
- Sides and top: sc in each of next 8 sc, sc in top sc, sc in each of next 8 sc. (17 sc)
Sl st to first sc and fasten off.
Stitch count note: The bottom edge of Round 2 is built on all 21 sc from Round 1. It holds 6 sc and 5 shells (25 dc).
Why the math works: Row 4 has 9 dc and 8 ch-1 sps. Worked 1 sc per existing stitch or space, that gives 9 + 8 = 17 sc. The two corner dc each take 3 sc instead of 1, which adds 2 + 2 = 4 more, for 17 + 4 = 21 along the bottom. Each scallop repeat uses 4 sc, so 5 repeats use 20. Add the opening sc and you get exactly 21, which puts a sc right at each end of the bottom edge. The sides and top keep their 17 sts from Round 1, so the petal outline stays flat.
Final Blocking
- Weave in all ends before blocking, except the ones you need for sewing.
- Spray each petal until it is damp, but not dripping.
- Pin each petal to 2.75 in (7.0 cm) wide x 2.4 in (6.1 cm) tall. Put one pin in the center of each shell.
- Use a pin to open each chain space so the ribs radiate evenly.
- Pin the leaves flat and pointed, at 2 in (5.1 cm) long.
- Stuff the cap with a bit of plastic wrap to hold its rounded shape.
- Let everything dry completely. Brush on diluted stiffener if you want a firmer ornament.
- Assemble only after all the pieces are fully dry.
Final Quality-Control Checklist
- All three petals measure 2.75 in (7.0 cm) wide and match each other.
- Each petal has 5 even shells along the bottom.
- All 9 ribs radiate in straight lines from the ring.
- The cap ribbing alternates evenly around all 18 sts.
- Both leaves are the same length and have a visible center vein.
- The loop is 3 in (7.6 cm) long and centered between the leaves.
- The ornament hangs straight, with the center petal facing forward.
- No ends are showing.
Troubleshooting
The petal cups instead of lying flat: your chains are too tight. Loosen the ch-1 and ch-2 sps, or go up a hook size.
The petal ruffles: your chains are too loose, or you added extra sts. Recount Row 4 (9 dc, 8 ch-1 sps).
The scallops don’t fit evenly: Border Round 1 is off. Count exactly 21 sc along the bottom edge before you start the shells.
The sides of the petal wave: use 2 sc per row end, not 3.
The cap is too loose on the petals: add a second stitch at each FPdc, or skip Round 5.
The leaves are curling: block them while damp and pin the tip.
Care
Hand wash in cool water with mild soap, then press out the water in a towel. Reshape and dry flat. If you used stiffener, just spot clean.
Final Notes
The size of this ornament depends on a short measurement chain. With a gauge of 6 dc per 1 in (2.5 cm), Row 4 should measure 2.5 in (6.4 cm). The border brings each petal to 2.75 in (7.0 cm) x 2.4 in (6.1 cm). A 1 in (2.5 cm) cap gathers the three overlapping petals into a 4 in (10.2 cm) x 3 in (7.6 cm) snowdrop. Check each link in that chain and every ornament will come out the same size. Make a whole set for the tree, or tie one to a gift.
Happy crocheting!