

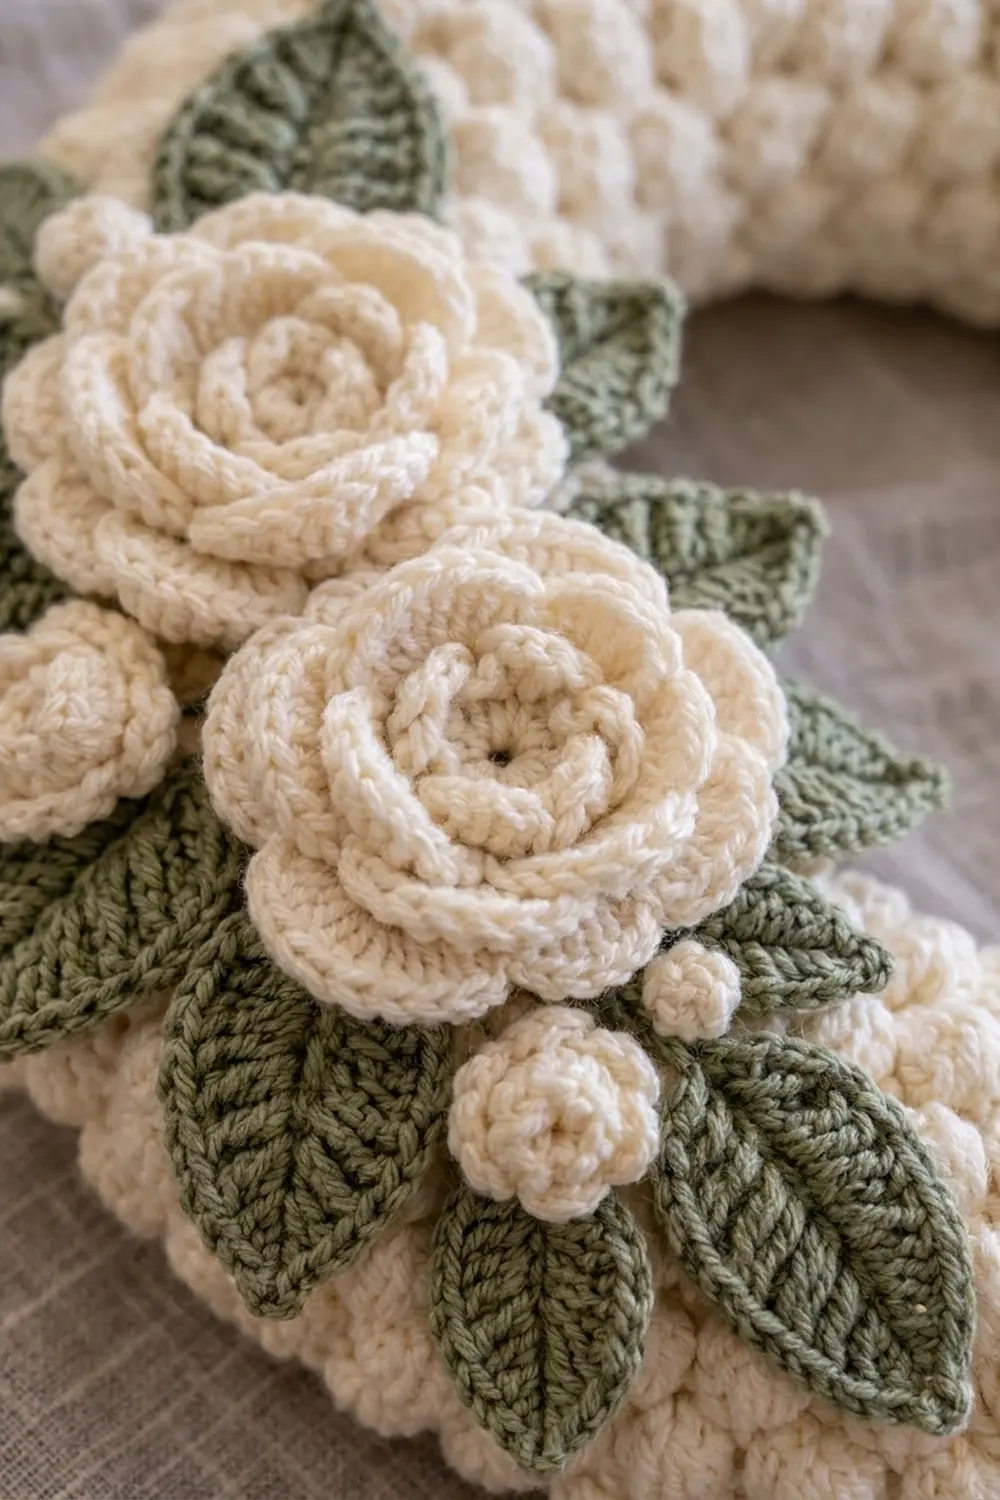
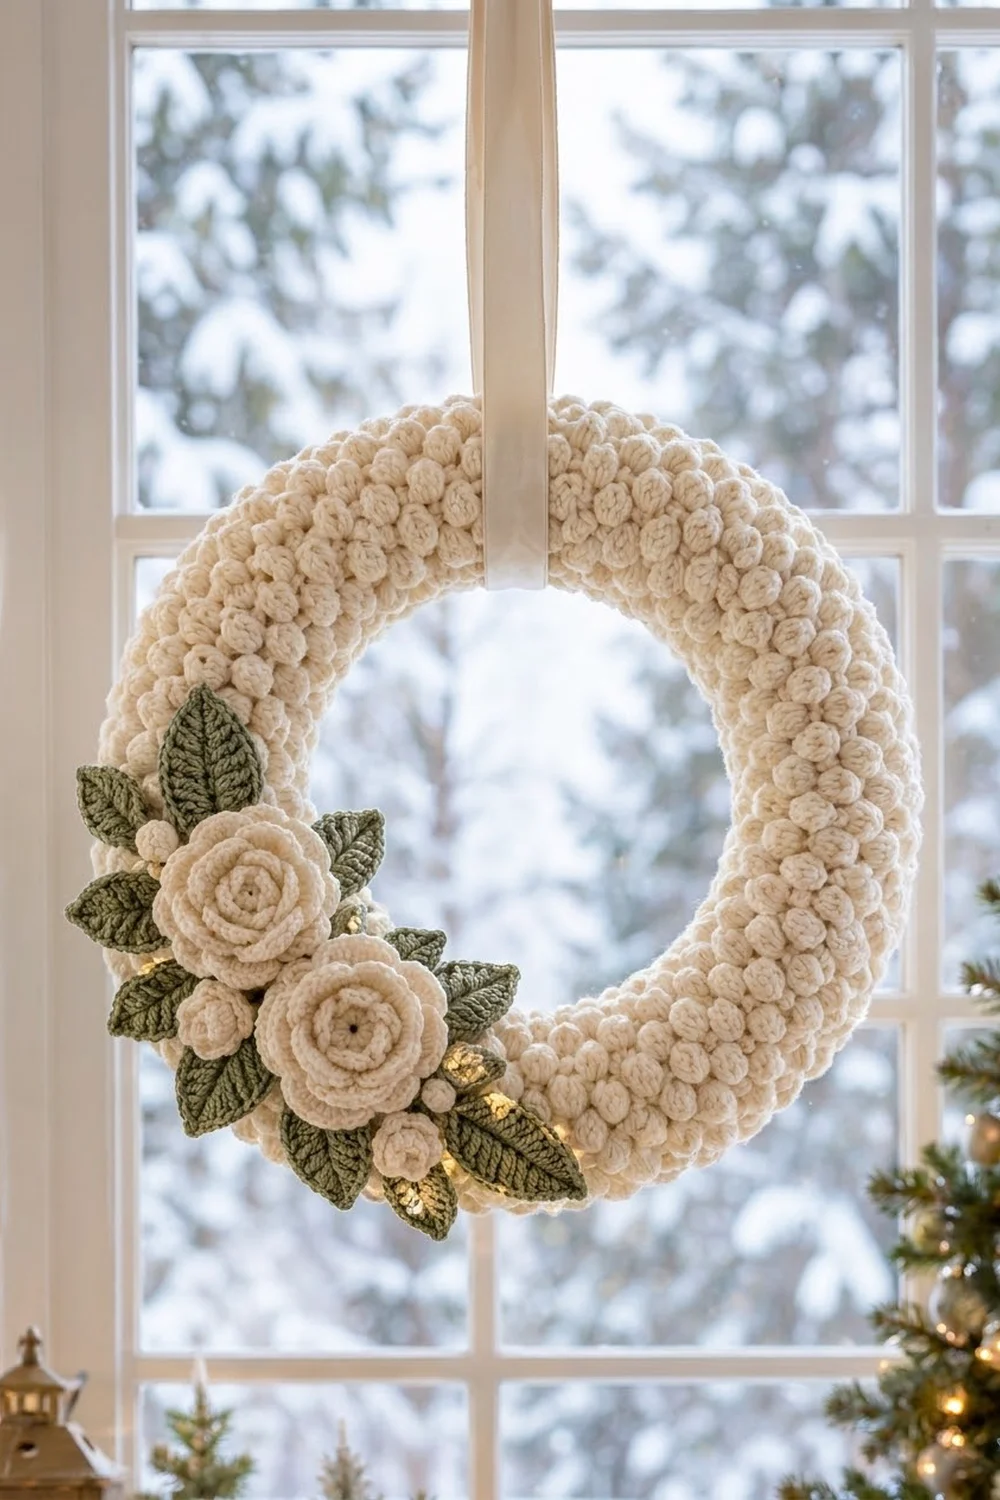
This wreath has a soft, snowy feel. A plump cream ring is covered in staggered bobbles, and a cluster of layered roses, small rosebuds and sage-green leaves is sewn on at the lower left. It looks quiet and wintry, and it suits a front door or a frosty window equally well.
Only two colors are used. Cream is for the bobble cover, the roses and the berries, and sage green is for the leaves. Because the palette is so limited, the texture does most of the work.
This pattern uses US crochet terms. The finished wreath measures about 12.5 in (31.8 cm) across, with a tube about 2.25 in (5.7 cm) thick.
You will make the cover as one long, flat strip of bobbles, add a single-crochet edging round, then wrap the strip around a foam ring and sew it closed at the back. Next you crochet the appliqués: roses with stacked petal layers, berries and ridged leaves. Finally, you sew them on in a cluster.
Finished Size and Construction
- Finished size: 12.5 in (31.8 cm) across; tube about 2.25 in (5.7 cm) thick
- Skill level: Intermediate
- Terminology: US
- Yarn weight: Worsted (#4)
- Hooks: 5.0 mm (H-8) for the cover; 4.0 mm (G-6) for the appliqués
- Number of pieces: 20 (1 cover, 2 large roses, 3 small roses, 4 berries, 10 leaves)
- Layout: One cover around a foam ring, with one appliqué cluster at the lower left
- Cover strip size before edging: 6.25 in × 32.25 in (15.9 cm × 81.9 cm)
- Cover strip size after edging: 6.75 in × 32.75 in (17.1 cm × 83.2 cm)
- Edging depth: 0.25 in (0.6 cm) on each side
Materials
Choose a smooth worsted-weight yarn at about 170 m per 100 g. Cotton or a cotton blend shows the bobbles crisply. Soft acrylic also works and weighs less on the door.
- Cream: 260 g (442 m) for the cover, roses and berries
- Sage green: 40 g (68 m) for the leaves
These quantities include a margin of roughly 10 percent for your gauge swatch and sewing tails.
Tools:
- 5.0 mm (H-8) and 4.0 mm (G-6) crochet hooks
- Foam wreath ring, 12 in (30.5 cm) outer diameter with a 2 in (5.1 cm) round tube
- Tapestry needle
- Stitch markers
- Rustproof pins
- Scissors
- A small amount of fiberfill, or yarn scraps, for stuffing the berries
- Cream satin ribbon, 1.5 in (3.8 cm) wide and 24 in (61.0 cm) long
Abbreviations (US Terms)
- ch – chain
- sl st – slip stitch
- sc – single crochet
- hdc – half double crochet
- dc – double crochet
- tr – treble crochet
- sc2tog – single crochet 2 together
- BPsc – back post single crochet
- BLO – back loop only
- MR – magic ring
- sp – space
- st(s) – stitch(es)
- RS / WS – right side / wrong side
Bobble (bob): Work the following 5 times in the same stitch: yarn over, insert the hook, pull up a loop, yarn over and draw through 2 loops. You now have 6 loops on the hook. Yarn over and draw through all 6. Each bobble counts as 1 stitch. Bobbles are worked on WS rows so that they push out to the RS.
Gauge and Checkpoints
Gauge: 16 sts and 16 rows = 4 in (10.2 cm) in bobble pattern with the 5.0 mm hook.
Test one piece first. Work Rows 1–17 of the cover, which gives 25 sts by 17 rows. It should measure 6.25 in (15.9 cm) wide and 4.25 in (10.8 cm) long. That 17-row section is the start of your actual cover, so if it measures correctly, keep going.
Checkpoints:
- After Row 17: 6.25 in × 4.25 in (15.9 cm × 10.8 cm)
- After Row 65: 16.25 in (41.3 cm) long
- After Row 129: 32.25 in (81.9 cm) long
- Large rose: 3.5 in (8.9 cm) across
- Small rose: 2 in (5.1 cm) across
- Leaf: 2.75 in × 1.5 in (7.0 cm × 3.8 cm)
If your piece is too big, go down one hook size. If it is too small, go up one hook size. Keep the stitch counts the same, because the edging math depends on them.
Bobble Cover
With the 5.0 mm hook and cream:
Row 1 (RS): Ch 26. Sc in the 2nd ch from the hook and in each ch across. Turn. [25 sc]
Row 2 (WS, Bobble Row A): Ch 1. Sc in the first st, then bob in the next st, sc in the next st. Repeat from * 11 more times. Turn. [12 bobbles + 13 sc = 25 sts]
Row 3 (RS): Ch 1. Sc in each st across. Turn. [25 sc]
Row 4 (WS, Bobble Row B): Ch 1. Sc in each of the first 2 sts, then bob in the next st, sc in the next st. Repeat from * 10 more times. Sc in the last st. Turn. [11 bobbles + 14 sc = 25 sts]
Row 5 (RS): Ch 1. Sc in each st across. Turn. [25 sc]
Rows 6–129: Repeat Rows 2–5 thirty-one more times, for 32 repeats in total. Row 129 is a RS sc row. Do not fasten off; continue straight into the edging round in the Border section.
Bobble Row B shifts each bobble half a repeat from Row A. This produces the staggered texture seen on the finished ring. Every 4-row repeat adds 1 in (2.5 cm), so 129 rows ÷ 4 rows per inch = 32.25 in (81.9 cm).
Roses, Berries and Leaves
Use the 4.0 mm hook for every appliqué.
Large Rose (make 2, cream)
Rnd 1: In a MR, ch 4 (counts as 1 dc + ch 1). Work (dc, ch 1) 5 times in the ring. Sl st to the 3rd ch of the beginning ch-4. Pull the ring snug but leave a small opening at the center. [6 dc, 6 ch-1 sps]
Rnd 2: In each ch-1 sp, work (sc, hdc, dc, hdc, sc). Sl st to the first sc. [6 petals, 30 sts]
Rnd 3: Fold the petals forward so you are working behind them. Ch 4, BPsc around the next dc post of Rnd 1. Repeat from * 5 more times; the 6th BPsc goes around the beginning ch-4. [6 ch-4 loops]
Rnd 4: In each ch-4 loop, work (sc, hdc, 3 dc, hdc, sc). Sl st to the first sc. [6 petals, 42 sts]
Rnd 5: Working behind Rnd 4, ch 5, sc around the next BPsc of Rnd 3. Repeat from * 5 more times. [6 ch-5 loops]
Rnd 6: In each ch-5 loop, work (sc, hdc, 5 dc, hdc, sc). Sl st to the first sc. [6 petals, 54 sts]
Rnd 7: Working behind Rnd 6, ch 6, sc around the next anchoring sc of Rnd 5. Repeat from * 5 more times. [6 ch-6 loops]
Rnd 8: In each ch-6 loop, work (sc, hdc, 7 dc, hdc, sc). Sl st to the first sc. [6 petals, 66 sts]
Fasten off, leaving a 12 in (30.5 cm) tail. Each petal layer grows by 2 dc and sits directly behind the layer before it. The inner layers are smaller, so they cup up naturally around the open center. The rose should measure 3.5 in (8.9 cm) across.
Small Rose (make 3, cream)
Work Rnds 1–4 of the Large Rose. [2 petal layers, 42 sts in the outer layer] Fasten off, leaving a 12 in (30.5 cm) tail. The small rose should measure 2 in (5.1 cm) across.
Berry (make 4, cream)
Rnd 1: 6 sc in a MR. [6 sts]
Rnd 2: 2 sc in each st. [12 sts]
Rnd 3: Sc in each st. [12 sts]
Rnd 4: Sc2tog 6 times. [6 sts]
Stuff the berry firmly. Fasten off, then weave the tail through the front loops of the last 6 sts and pull it closed. Each berry should be 0.75 in (1.9 cm) across.
Leaf (make 10, sage green)
Rnd 1: Ch 11. The skipped first ch becomes the tip of the leaf.
- Side 1: Starting in the 2nd ch from the hook, work sc in the next ch, hdc in the next ch, dc in the next 2 chs, tr in the next 2 chs, dc in the next 2 chs, hdc in the next ch, and 3 sc in the last ch (this is the base).
- Side 2: Working along the unused loops of the chain, work hdc in the next ch, dc in the next 2 chs, tr in the next 2 chs, dc in the next 2 chs, hdc in the next ch, and sc in the next ch.
- Tip: Work (sc, ch 2, sc) in the skipped tip ch. Sl st to the first sc.
[12 sts on Side 1 + 9 sts on Side 2 + 2 sc at the tip = 23 sts and 1 ch-2 tip sp]
Rnd 2 (BLO): Work sc in each st around, but put 3 sc in the center sc of the base and (sc, ch 2, sc) in the tip sp. Sl st to the first sc.
[23 sts worked 1 per existing st, + 2 extra at the base, + 2 sc in the tip sp = 27 sts and 1 ch-2 tip sp]
Working in the back loops raises a ridge around the outline. For the center vein, surface sl st along the foundation chain from the base to the tip. Fasten off, leaving a 10 in (25.4 cm) tail. The leaf should measure 2.75 in × 1.5 in (7.0 cm × 3.8 cm).
Make All Pieces
Cream: 1 cover, 2 large roses, 3 small roses, 4 berries
Sage green: 10 leaves
Cluster layout as you face the wreath (R = large rose, S = small rose, B = berry, L = leaf):
(toward 10 o'clock)
  L    S    L    B
  L   [R1]  B    L
  L    B   [R2]  L
  S    L    B    L
  L    S    L
(toward 6 o'clock)
Check: 10 L, 3 S, 4 B, 2 R. The finished cluster spans about 9 in × 5 in (22.9 cm × 12.7 cm). It runs along the lower-left curve, roughly from 10 o’clock to 6 o’clock.
Joining
Work the edging round from the Border section on the cover before you seam it.
Seaming the cover:
- Lay the cover RS down and set the foam ring on top, centered lengthwise.
- Wrap both long edges up around the tube so they meet at the back, on the flat face that will rest against the door.
- Thread a long cream strand on the tapestry needle and whipstitch the two long edges together through the back loops of the edging sc. Join stitch to stitch: 129 edging sc on one side to 129 on the other, so the seam ends up 1:1.
- Work around the ring. The fabric stretches slightly on the outer curve and eases in on the inner curve, and the bobbles hide that easing.
- Seam the short ends together the same way, 25 sts to 25 sts.
The cover width after edging is 6.75 in (17.1 cm). The tube’s cross-section circumference is about 6.3 in (16.0 cm). That roughly 0.5 in (1.3 cm) of extra fabric fills out the seam and stops the foam from showing at the back.
Tension: Pull each stitch just snug enough that the two edges meet. If you pull hard, the back will pucker.
Size checkpoint: The covered wreath should measure 12.5 in (31.8 cm) across.
Attaching the appliqués:
- Pin all 19 appliqués in the layout grid shown above.
- Sew the leaves on first. Stitch through the base and halfway up the vein, and leave the tips free.
- Sew the roses on next. Stitch through the back of Rnd 1 and the base of the outer petals.
- Add the berries last.
Border
Border gauge: 16 sc = 4 in (10.2 cm), which is 4 sc per inch. This matches the cover’s row gauge of 4 rows per inch, so 1 sc per row end keeps the long edges flat.
Edging Round: Continuing from Row 129 with the 5.0 mm hook, work the round as follows.
- Top short edge: Ch 1 and sc in each of the 25 sts across. [25 sc]
- First corner: Ch 1.
- Long side: Sc in each row end, 1 per row. [129 sc]
- Second corner: Ch 1.
- Bottom short edge: Working into the unused loops of the foundation chain, sc in each of the 25 chs. [25 sc]
- Third corner: Ch 1.
- Other long side: Sc in each row end, 1 per row. [129 sc]
- Fourth corner: Ch 1, then sl st to the first sc.
Fasten off, leaving a 60 in (152.4 cm) tail for seaming.
Total: 25 + 129 + 25 + 129 = 308 sc, plus 4 corner ch-1 sps. In this pattern, the side counts do not include the corner chains.
Why the math works: The short edges have 25 sts at 4 sts per inch, which is 6.25 in (15.9 cm). The long edges have 129 rows at 4 rows per inch, which is 32.25 in (81.9 cm). One edging sc per stitch or row end matches the gauge exactly, so the strip cannot ruffle or cup. The edging adds 0.25 in (0.6 cm) to each side. That takes the strip to 6.75 in × 32.75 in (17.1 cm × 83.2 cm).
Final Blocking
- Pin each rose face up. Use your fingers to cup the petals forward.
- Pin each leaf flat, pulling the tip to a point.
- Hold a steam iron 1 in (2.5 cm) above the pieces and steam them. Do not press down.
- Leave them pinned until they are completely dry.
- Once the wreath is assembled, steam the cover lightly from a distance. Never press, or you will flatten the bobbles.
- Loop the ribbon over the top of the wreath and knot or sew the ends behind it.
Final Quality-Control Checklist
- Cover counts are 25 sts per row and 129 rows.
- Edging is 25 / 129 / 25 / 129 sc with 4 corner ch-1 sps.
- Bobbles are staggered and all pop to the RS.
- The seam sits flat at the back with no foam showing.
- Large roses are 3.5 in (8.9 cm), small roses 2 in (5.1 cm), berries 0.75 in (1.9 cm).
- There are 10 leaves, each with a raised vein and a pointed tip.
- The cluster sits at the lower left and spans about 9 in × 5 in (22.9 cm × 12.7 cm).
- All tails are woven in behind the appliqués.
Troubleshooting
- Bobbles are on the wrong side: You worked them on a RS row. Bobble rows must be WS rows (the even-numbered rows).
- Cover is too narrow for the ring: Go up one hook size and keep the 25-stitch width.
- Long edges ruffle: You worked more than 1 sc per row end. Rip back and work exactly 129 per side.
- Rose looks flat: Your Rnd 3, 5 or 7 loops were anchored in front of the petals. Rework them behind the petals.
- Leaf curls: Steam-block it and pin the tip until dry.
- Seam shows: Rotate the cover so the seam faces the wall.
Care
Spot clean with a damp cloth and mild soap, then reshape the wreath and let it air-dry. Do not soak the foam ring, and keep the wreath out of strong sun so the cream doesn’t yellow.
Final Notes
The measurement chain is:
- Gauge: 16 sts and 16 rows = 4 in (10.2 cm).
- Cover strip: 25 sts × 129 rows = 6.25 in × 32.25 in (15.9 cm × 81.9 cm).
- Edging: 308 sc brings the strip to 6.75 in × 32.75 in (17.1 cm × 83.2 cm).
- Covered ring: wrapped around a 12 in (30.5 cm) foam ring, the finished wreath measures 12.5 in (31.8 cm).
- Cluster: two 3.5 in (8.9 cm) roses, three 2 in (5.1 cm) roses, four berries and ten leaves at the lower left.
If you check each stage as you go, the wreath will come out at the size given here.
Happy crocheting!