

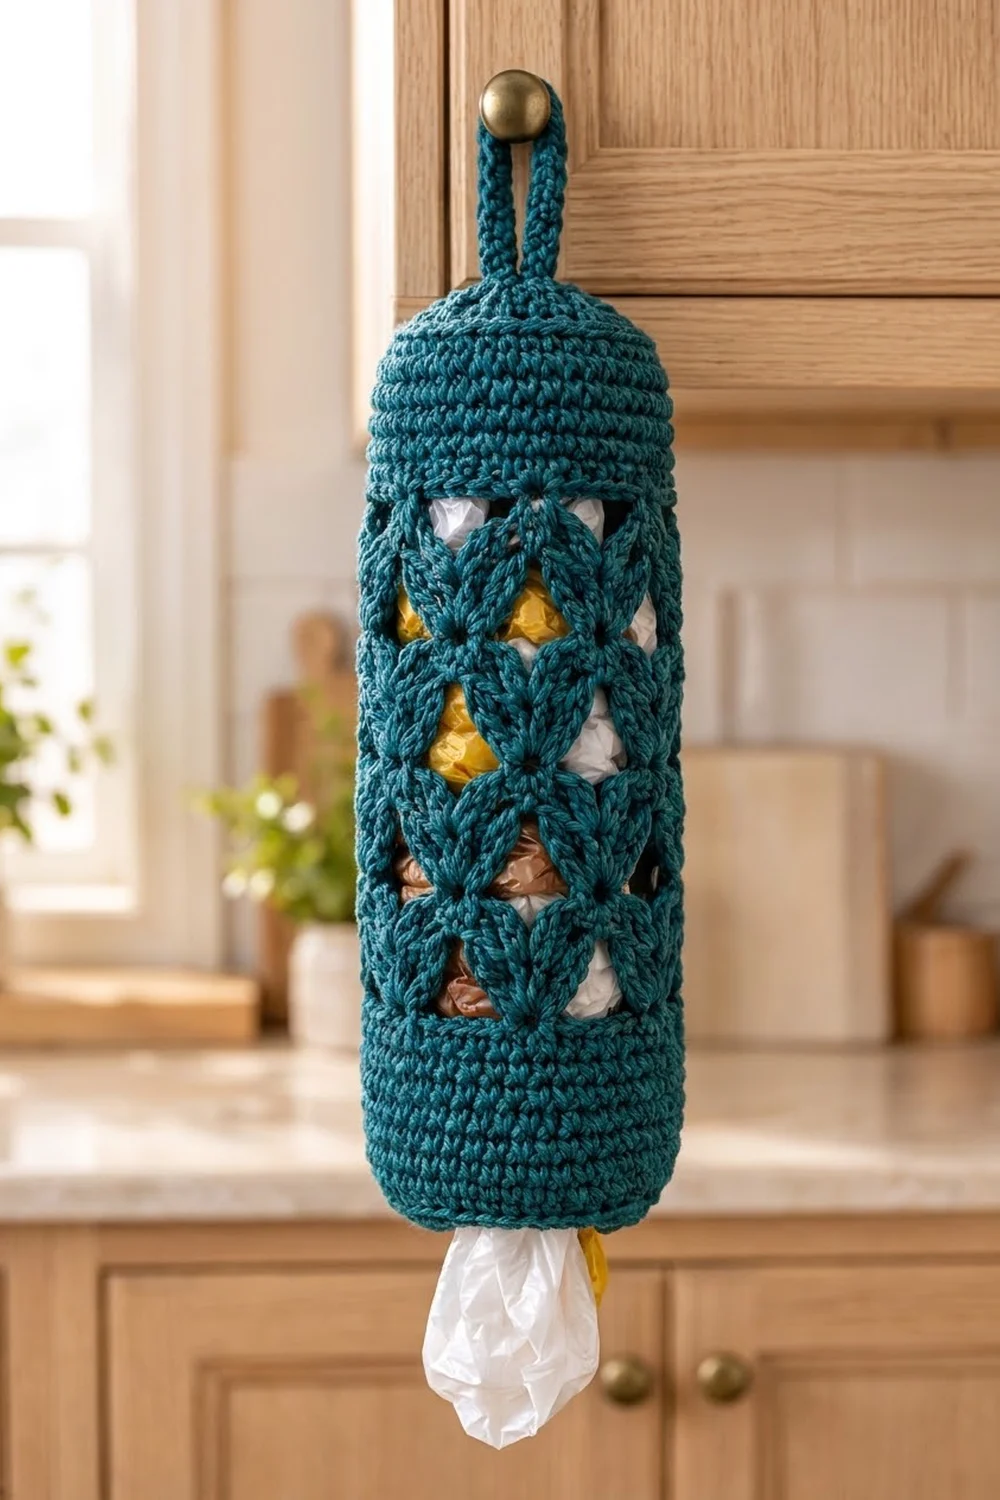
This grocery bag holder turns a kitchen chore into something nice to look at. A tall panel of starburst lace sits between two solid single crochet bands, so the colored bags inside show through the open diamonds. The top closes into a soft dome with a sturdy hanging loop, and the bottom stays open so you can pull one bag out at a time.
The sample is deep teal, which looks good against warm wood cabinets. Sage green works just as well, and so does any solid, smooth cotton that shows off the stitch pattern. Avoid heavy variegated yarn, because it hides the star shapes.
This pattern uses US crochet terms. The finished holder measures 6 in (15.2 cm) wide laid flat and 18.75 in (47.6 cm) tall without the loop, or about 21.75 in (55.2 cm) including the loop.
Construction is simple. You work the lace panel flat in rows and seam it into a tube. Then you work the top band in rounds off one edge and close it into a dome. Last, you add the hanging loop and work the bottom band, which acts as the border, in rounds off the foundation edge.
Finished Size and Construction
- Finished size: 6 in (15.2 cm) wide flat x 18.75 in (47.6 cm) tall; 21.75 in (55.2 cm) with loop
- Circumference: 12 in (30.5 cm)
- Skill level: Easy-Intermediate
- Terminology: US
- Yarn weight: #4 worsted, cotton or cotton blend
- Hook: 5.0 mm (H-8)
- Number of pieces: 1 (one lace panel seamed into a tube, with bands and loop worked directly onto it)
- Layout: vertical tube: top band and dome, lace middle, bottom band
- Lace panel size: 12.25 in (31.1 cm) wide flat x 11.75 in (29.8 cm) tall
- Size before border: 14.75 in (37.5 cm) tall (top band plus lace)
- Border (bottom band) depth: 4 in (10.2 cm)
Materials
Yarn: Choose a smooth worsted-weight cotton or cotton blend at about 85 m per 50 g. Cotton holds its shape when the holder is full, and it can be washed. Acrylic also works, but it stretches more under weight.
- Main color (deep teal): 130 g, about 220 m (241 yd)
- Optional variant (sage green): same amount, used instead of teal
These quantities include a margin of about 15% for your gauge swatch and small differences in tension.
Tools:
– 5.0 mm (H-8) crochet hook
– Tapestry needle
– Scissors
– 4 stitch markers
– Measuring tape
– Blocking mat and pins, or a clean towel
Abbreviations (US Terms)
- ch – chain
- sl st – slip stitch
- sc – single crochet
- dc – double crochet
- sc2tog – single crochet 2 together (decrease)
- st(s) – stitch(es)
- sp – space
- RS / WS – right side / wrong side
Special stitches:
- Shell: 5 dc in the same stitch.
- dc3tog (half cluster): Yarn over, insert hook in next st, yarn over, pull up a loop, yarn over, pull through 2 loops 3 times over the 3 stated sts (4 loops on hook). Yarn over, pull through all 4 loops.
- dc5tog (cluster): Work as dc3tog, but over 5 sts (6 loops on hook). Yarn over, pull through all 6 loops.
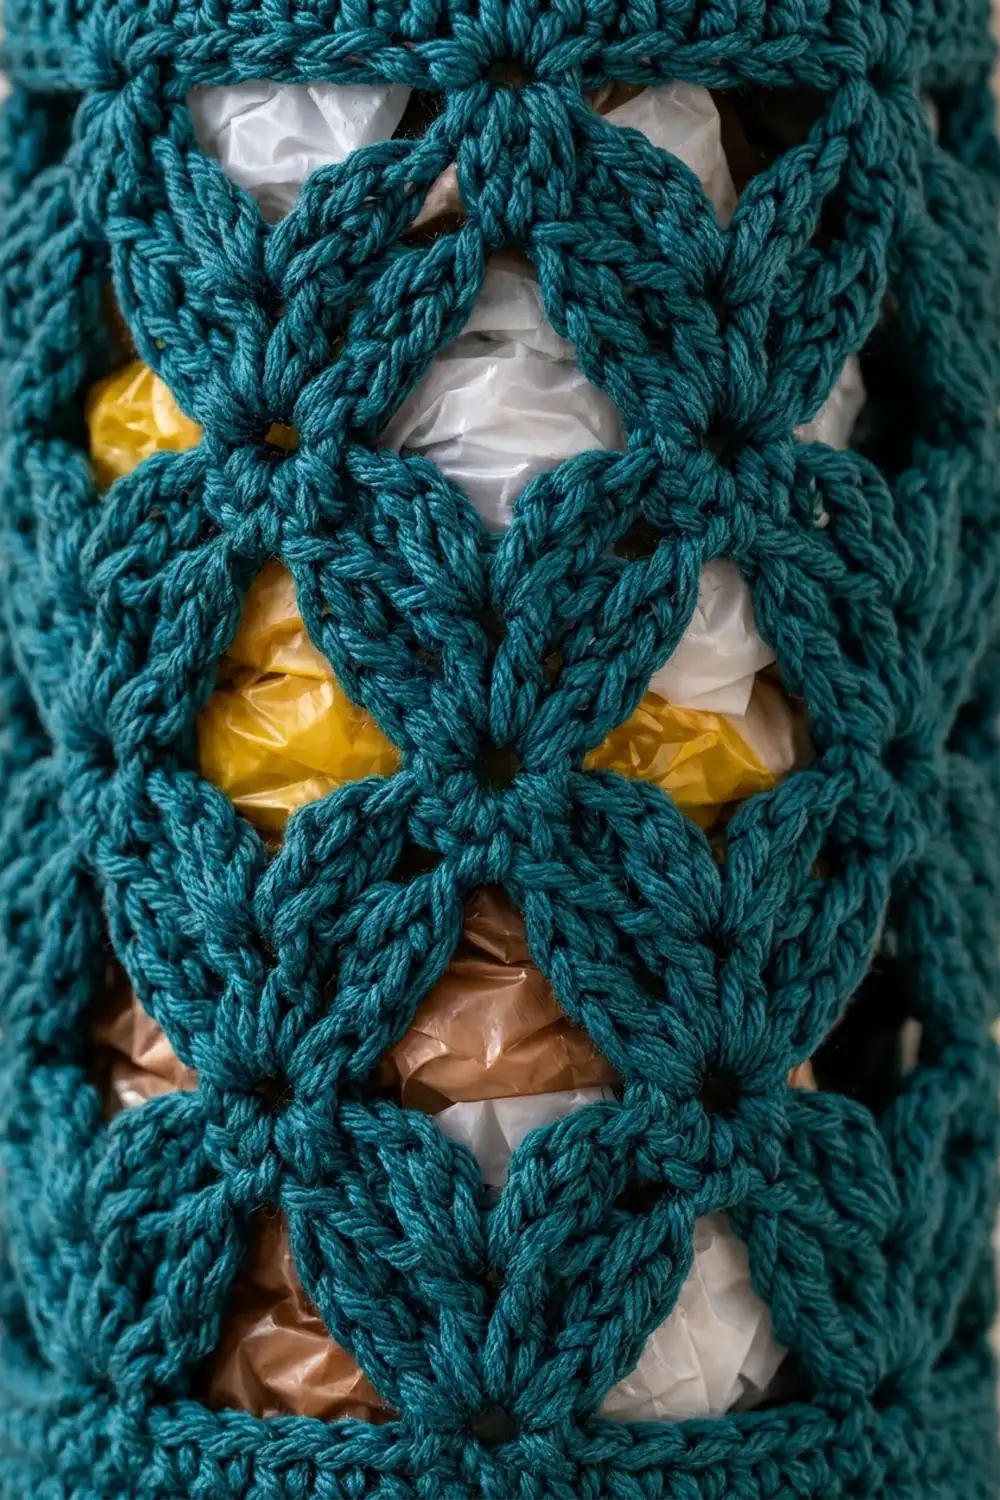
Each cluster gathers the ends of two neighboring shells into one point. The next row’s shell then opens out from that point, which makes the starburst.
Gauge and Checkpoints
- Single crochet gauge: 16 sc x 18 rows = 4 in (10.2 cm)
- Lace gauge: 2 shell repeats (12 sts) = 3 in (7.6 cm) wide; 8 pattern rows = 5 in (12.7 cm) tall
Work a 4 in (10.2 cm) square of sc first. The lace panel is the real test piece, so check it early.
Checkpoints:
1. After Row 2, the panel measures 12.25 in (31.1 cm) wide.
2. After Row 10, the panel measures about 6 in (15.2 cm) tall.
3. After Row 20, the panel measures 11.75 in (29.8 cm) tall.
4. After seaming and Top Band Rnd 1, the tube measures 6 in (15.2 cm) across when laid flat.
If the piece is too big: go down to a 4.5 mm hook. If it is too small: go up to a 5.5 mm hook. A difference of half an inch (1.3 cm) in width adds up to a full inch (2.5 cm) of circumference, so fix it before you continue.
Lace Panel
The panel uses a multiple of 6 + 1 sts, with 8 repeats across. The ch-2 spaces count as stitches in the row totals so that every row comes out to 49.
Foundation: Ch 50, leaving an 18 in (45.7 cm) tail for seaming.
Row 1 (RS): Sc in the 2nd ch from hook and in each ch across. Turn. (49 sc)
Row 2 (WS, shell row): Ch 1, sc in the first sc. Skip 2 sc, shell in next sc, skip 2 sc, sc in next sc. Repeat from * 7 more times. Turn. (8 shells + 9 sc = 49 sts)
Row 3 (RS, cluster row): Ch 2 (does not count as a st). Dc3tog over the first sc and the next 2 dc, ch 2, sc in the center dc of the shell, ch 2. Dc5tog over the next 2 dc, the next sc and the next 2 dc, ch 2, sc in the center dc of the next shell, ch 2. Repeat from * 6 more times. Dc3tog over the last 2 dc and the last sc. Turn.
(2 half clusters + 7 clusters + 8 sc + 16 ch-2 sps [32 ch] = 49 sts)
Row 4 (WS, shell row): Ch 3 (counts as dc), 2 dc in the top of the half cluster. Skip ch-2 sp, sc in next sc, skip ch-2 sp, shell in the top of the next cluster. Repeat from * 6 more times. Skip ch-2 sp, sc in next sc, skip ch-2 sp, 3 dc in the top of the last half cluster. Turn.
(3 dc + 7 shells [35 dc] + 8 sc + 3 dc = 49 sts)
Row 5 (RS, cluster row): Ch 1, sc in the first dc, ch 2. Dc5tog over the next 2 dc, the next sc and the next 2 dc, ch 2, sc in the center dc of the next shell, ch 2. Repeat from * 6 more times. Dc5tog over the next 2 dc, the next sc and the next 2 dc, ch 2, sc in the top of the turning ch. Turn.
(8 clusters + 9 sc + 16 ch-2 sps [32 ch] = 49 sts)
Row 6 (WS, shell row): Ch 1, sc in the first sc. Skip ch-2 sp, shell in the top of the next cluster, skip ch-2 sp, sc in next sc. Repeat from * 7 more times. Turn. (8 shells + 9 sc = 49 sts)
The skipped ch-2 spaces open into the diamond windows. Each place where a cluster top meets a shell base becomes one star.
Rows 7–18: Repeat Rows 3–6 three more times. Row 18 is a shell row, the same as Row 6. (49 sts)
Row 19 (RS): Repeat Row 3. (49 sts)
Row 20 (WS): Ch 1, sc in each st and in each ch across. Do not fasten off yet. (49 sc)
The panel now measures 12.25 in (31.1 cm) x 11.75 in (29.8 cm). Fasten off and leave an 8 in (20.3 cm) tail.
Seaming the Tube
Fold the panel lengthwise with the RS together so the two side edges line up row for row. Use the 18 in (45.7 cm) foundation tail and a tapestry needle to whipstitch the edges together. Place 1 stitch in each sc row end and 2 stitches in each dc or cluster row end.
Keep the tension even and relaxed. A tight seam puckers the lace, and a loose one gaps. Turn the tube RS out.
Checkpoint: Laid flat, the tube measures 6 in (15.2 cm) across. At the seam, the first and last sts of each row now sit side by side and act as one stitch, so each edge has 48 working sts all the way around.
Top Band and Dome
You work the top band in continuous rounds into Row 20. Mark the first st of each round.
Rnd 1: With RS facing, join yarn at the seam. Ch 1, sc2tog over the two seam-edge sts, then sc in each of the remaining 47 sts. Do not join; work in a spiral. (48 sc)
Rnds 2–9: Sc in each st around. (48 sc)
The band is now 2 in (5.1 cm) tall.
Rnd 10: Sc in next 6 sts, sc2tog. Repeat 6 times. (42 sc)
Rnd 11: Sc in next 5 sts, sc2tog. Repeat 6 times. (36 sc)
Rnd 12: Sc in next 4 sts, sc2tog. Repeat 6 times. (30 sc)
Rnd 13: Sc in next 3 sts, sc2tog. Repeat 6 times. (24 sc)
Rnd 14: Sc in next 2 sts, sc2tog. Repeat 6 times. (18 sc)
Rnd 15: Sc in next st, sc2tog. Repeat 6 times. (12 sc)
Rnd 16: Sc2tog 6 times. (6 sc)
Sl st in the next st and fasten off, leaving an 8 in (20.3 cm) tail. Weave the tail through the front loops of the last 6 sts and pull it closed. The dome adds about 1 in (2.5 cm), so the top band totals about 3 in (7.6 cm).
Hanging Loop
Join yarn at the center of the dome. Ch 24, skip 2 sts, and sl st into the next st to anchor the loop. Work 1 sc in each ch of the loop (24 sc), then sl st at the base. Turn and sl st in each sc back across (24 sl st) to firm up the loop. Fasten off.
The loop stands about 3 in (7.6 cm) tall.
Bottom Band (Border)
The bottom band is the border of this piece. It is worked in rounds into the free loops of the foundation chain and uses the same gauge as the top band: 16 sc = 4 in (10.2 cm).
Rnd 1: Turn the tube upside down. With RS facing, join yarn at the seam in a free loop of the foundation chain. Ch 1, sc2tog over the two seam-edge loops, then sc in each of the remaining 47 free loops. (48 sc)
Rnds 2–14: Sc in each st around. (48 sc)
Rnd 15: Sc in next 6 sts, sc2tog. Repeat 6 times. (42 sc)
Rnd 16: Sc in next 5 sts, sc2tog. Repeat 6 times. (36 sc)
Rnd 17: Sc in each st around. (36 sc)
Rnd 18: Sl st in each st around. (36 sl st)
Fasten off and weave in the end.
Why the math works: 48 sc at 4 sc per inch gives exactly 12 in (30.5 cm), which matches the lace panel’s 48 working sts after seaming. No stitches are added at the seam, because the sc2tog turns the two side-by-side edge sts into one.
Each decrease round removes 6 sts in 6 evenly spaced repeats, so the opening narrows smoothly without points. The final 36 sts give a 9 in (22.9 cm) opening, about 4.5 in (11.4 cm) across laid flat. That is snug enough to hold the bags in and wide enough to pull one out. The sl st round stops the edge from stretching.
Eighteen rounds at 18 rounds per 4 in give a border depth of 4 in (10.2 cm).
Final Blocking
- Weave in all remaining ends along the seam or inside the solid bands.
- Wet the holder in cool water and gently squeeze out the excess. Do not wring it.
- Roll it in a towel to remove more water.
- Lay it flat on a blocking mat with the seam centered on the back.
- Pin the width to 6 in (15.2 cm) across the full length.
- Ease the lace to 11.75 in (29.8 cm) tall and gently open each diamond with your fingers.
- Shape the dome by hand and leave the loop lying straight.
- Let it dry completely before you hang it.
Final Quality-Control Checklist
- Width laid flat: 6 in (15.2 cm) along the whole length
- Body height: 18.75 in (47.6 cm); with loop: 21.75 in (55.2 cm)
- Lace has 8 stars around and even diamonds
- Seam is flat, with no puckers or gaps
- Top band: 48 sc rounds, closed dome, no hole at the center
- Loop is firmly anchored and 3 in (7.6 cm) tall
- Bottom opening is 36 sts, 9 in (22.9 cm) around
- All ends are woven in securely
Troubleshooting
- The panel is narrower than 12.25 in (31.1 cm): Your dc may be tight. Go up a hook size for the lace only.
- The stars lean to one side: Check that every cluster uses exactly 2 dc, 1 sc and 2 dc.
- There are 48 or 50 sts in a row: Count the ch-2 spaces as 2 sts each. You most likely skipped a ch-2 or worked into one by mistake.
- The seam ripples: Remove it and re-sew with looser, evenly spaced stitches.
- The dome is pointed: Spread the decreases out more evenly, and stagger them by 1 st on alternate rounds.
- Bags fall out of the bottom: Add one more round of 4 sc, sc2tog to reduce to 30 sts.
Care
Hand wash or machine wash on a cool, gentle cycle and lay flat to dry. Reshape the width to 6 in (15.2 cm) while it is damp.
Final Notes
The measurements build on each other. A 4 in (10.2 cm) swatch with 16 sc produces a 49-st lace panel 12.25 in (31.1 cm) wide. Seaming gives a 48-st tube that is 12 in (30.5 cm) around and 6 in (15.2 cm) flat. The top band adds 3 in (7.6 cm), the lace 11.75 in (29.8 cm) and the bottom band 4 in (10.2 cm), for 18.75 in (47.6 cm) in total. If each checkpoint matches, the finished holder will too.
Happy crocheting!