

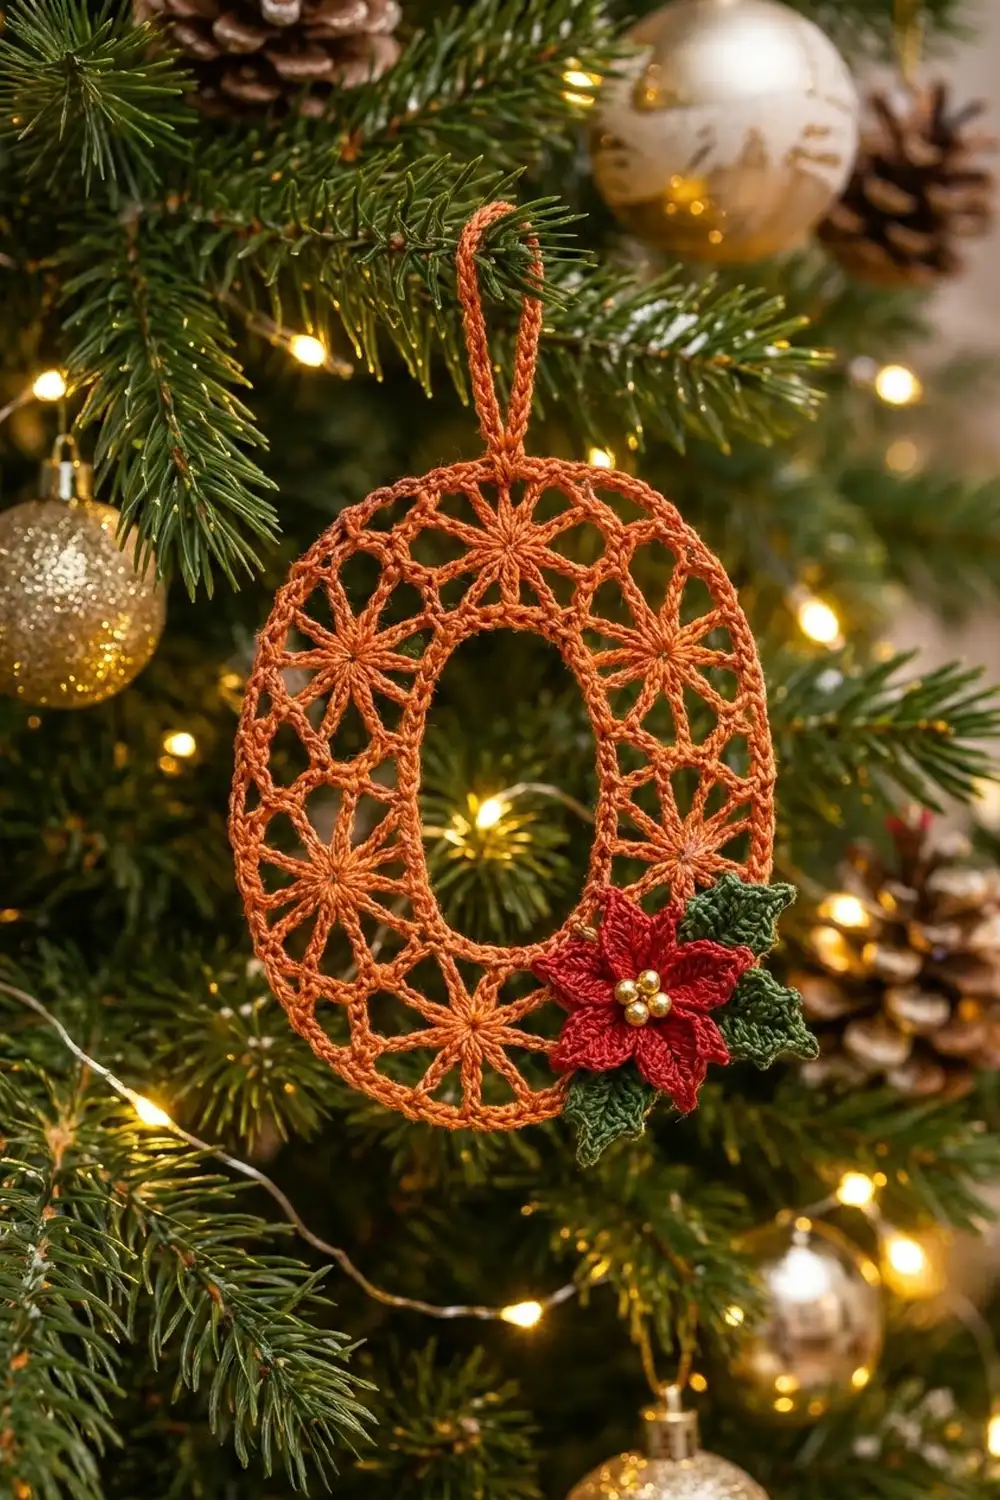
The Starlight Lace Letter O is a light, airy Christmas ornament shaped like a capital “O”. Ten small star motifs join into an oval ring. The open lace lets tree lights shine through, and a red poinsettia with gold-bead centers sits on the lower right curve.
The ring is worked in burnt orange, the poinsettia in deep red, and the holly leaves in dark green. Together they make a warm, vintage holiday look that suits a monogram tree, a gift topper, or a personalized name ornament.
This pattern uses US crochet terms. The finished ornament measures 4 in (10.2 cm) wide by 5.25 in (13.3 cm) tall. With the hanging loop, it is 6.25 in (15.9 cm) tall.
Construction is simple and modular. You crochet ten 3-round star motifs and join each one to the last on its final round, closing them into a ring. Next, you work a two-round border on the outer and inner edges. Then you add a hanging loop, make the poinsettia and three leaves, and sew them in place.
Finished Size and Construction
- Finished size: 4 in (10.2 cm) wide × 5.25 in (13.3 cm) tall; 6.25 in (15.9 cm) tall with the loop
- Inner opening: 1.5 in (3.8 cm) × 2.75 in (7.0 cm)
- Skill level: Intermediate
- Terminology: US
- Yarn weight: Size 3 cotton crochet thread (Fine / 1)
- Hook: 2.25 mm (B-1)
- Number of pieces: 10 star motifs, 1 poinsettia, 3 holly leaves (14 pieces)
- Layout: 10 motifs in an oval ring: 1 at the top, 4 down each side, 1 at the bottom
- Motif size: 1.25 in (3.2 cm) point to point
- Ring size before border: 3.75 in (9.5 cm) × 5 in (12.7 cm)
- Border depth: 0.125 in (0.3 cm) on the outer edge and on the inner edge
Materials
Choose a mercerized cotton thread in size 3. It gives crisp stitch definition and holds its shape well after blocking. Acrylic thread won’t block as sharply. These amounts assume thread of about 50 g = 160 m (175 yd).
- Orange (ring, border, loop): 12 g, about 38 m (42 yd)
- Red (poinsettia): 3 g, about 10 m (11 yd)
- Green (holly leaves): 3 g, about 10 m (11 yd)
All quantities include a margin of about 20% for gauge swatching and weaving in ends.
Tools:
– 2.25 mm (B-1) crochet hook
– Tapestry needle and a sharp sewing needle
– 5 gold seed beads, 4 mm
– Gold or red sewing thread for the beads
– Blocking mat, rust-proof pins, and spray bottle
– Optional: fabric stiffener or a starch solution
– Scissors and stitch markers
Abbreviations (US Terms)
- ch – chain
- sl st – slip stitch
- sc – single crochet
- hdc – half double crochet
- dc – double crochet
- tr – treble crochet
- sp – space
- st(s) – stitch(es)
- P1–P8 – points 1 to 8 of a motif’s final round
Special stitch:
– Picot: ch 3, sl st in the 3rd ch from the hook.
– Join-point: in place of the middle ch of a ch-3 point, work ch 1, sl st into the matching ch-3 point of the neighboring motif, ch 1.
Gauge and Checkpoints
Border gauge: 9 sc = 1 in (2.5 cm).
Test one motif first. Make a complete motif and pin it flat before you go on.
- After Rnd 1: 0.6 in (1.5 cm) across
- After Rnd 2: 0.9 in (2.3 cm) across
- After Rnd 3: 1.25 in (3.2 cm) point to point
If your motif is too big, go down to a 2 mm hook or tighten the chain loops. If it is too small, go up to a 2.5 mm hook. A difference of 0.1 in (0.3 cm) per motif adds up to about 1 in (2.5 cm) around the ring, so it’s worth adjusting now.
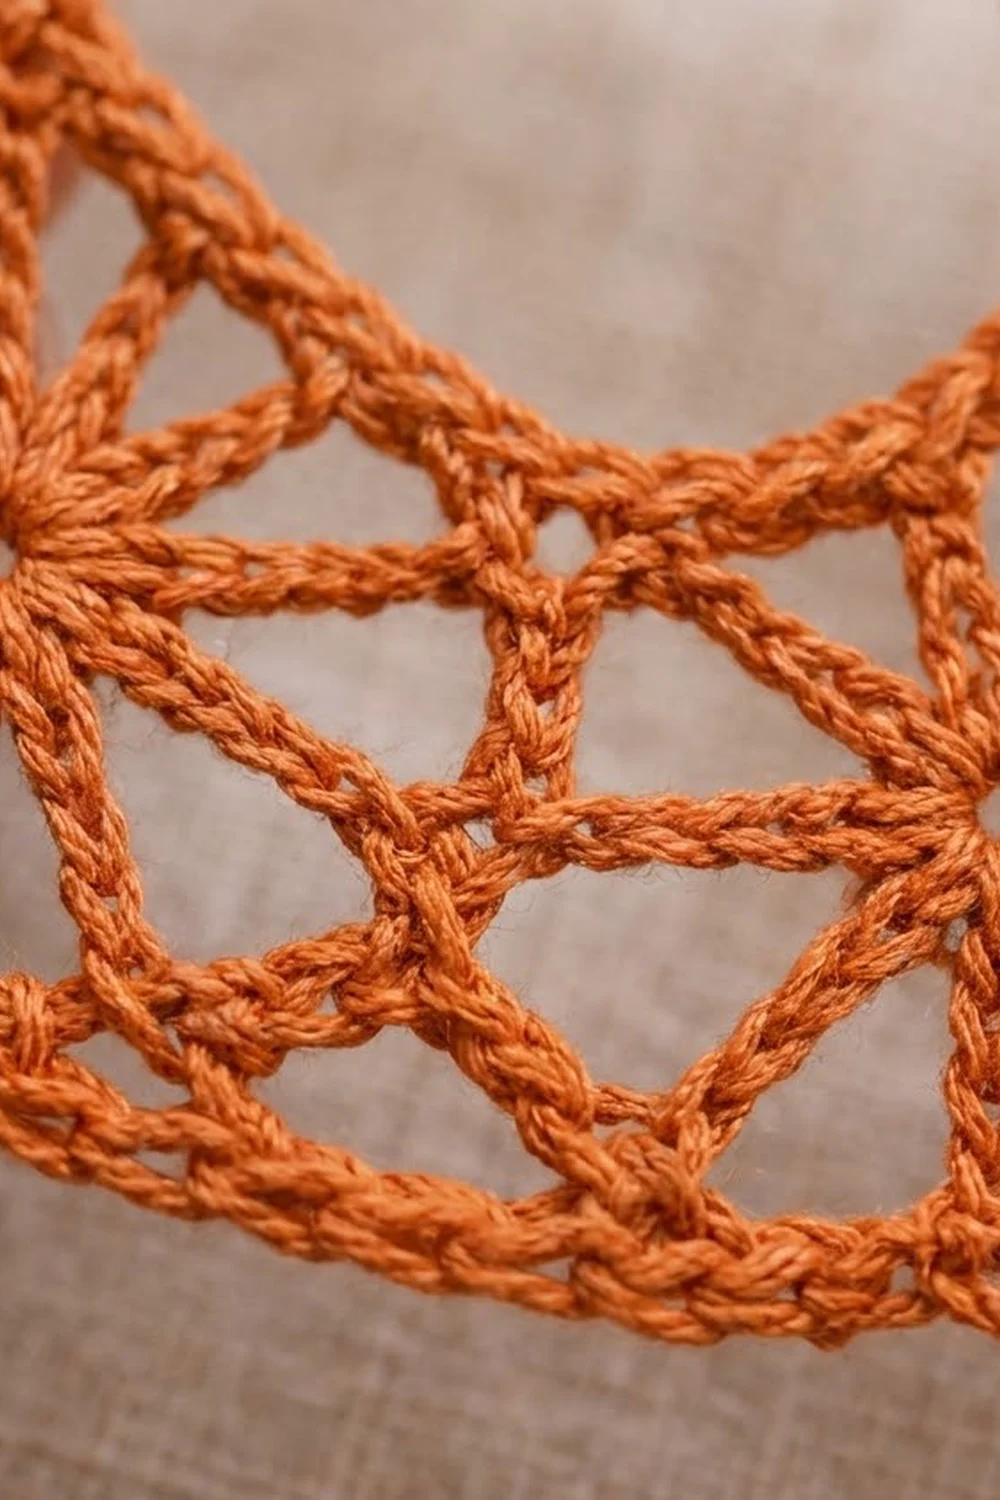
Star Motif (make 10 in orange)
Rnd 1: Make a magic ring. Ch 5 (counts as dc + ch 2). Work (dc, ch 2) into the ring 7 times. Join with a sl st to the 3rd ch of the beginning ch-5. Pull the ring closed, leaving a small center hole. (8 dc spokes, 8 ch-2 sps; 24 sts)
The eight dc spokes form the rays of the star.
Rnd 2: Ch 1. Sc in the same st. Ch 4, sc in the next dc. Repeat from * 6 more times. Ch 4, then join to the first sc. (8 sc, 8 ch-4 loops; 40 sts)
Each sc sits on top of a spoke, which carries the ray out to the frame.
Rnd 3 (first motif only): Sl st into the first ch-4 loop. Ch 1. In each ch-4 loop, work (2 sc, ch 3, 2 sc). Join to the first sc. Fasten off. (32 sc, 8 ch-3 points; 56 sts)
Number the ch-3 points P1 to P8 in the order you worked them. Mark P1.
Checkpoint: 1.25 in (3.2 cm) point to point.
Make All Pieces
- Orange: 10 star motifs. Work Motif 1 in full. Make Motifs 2–10 through Rnd 2, then join them on Rnd 3 (see Joining).
- Red: 1 poinsettia
- Green: 3 holly leaves
Layout grid (front view):
          [1]
    [10]        [2]
   [9]            [3]
   [8]            [4]
    [7]        [5]
          [6]
The poinsettia covers the outer edge of Motifs 4 and 5 on the lower right.
Joining (Join-As-You-Go)
Method: Each new motif joins on Rnd 3 at two adjacent points. Its P1 and P2 attach to P6 and P5 of the previous motif.
On Motifs 2–10, work Rnd 3 as written, with these changes:
- Loop 1: 2 sc, join-point to P6 of the previous motif, 2 sc.
- Loop 2: 2 sc, join-point to P5 of the previous motif, 2 sc.
- Loops 3–8: work as normal.
Motif 10 also joins to Motif 1 to close the ring. Work Loop 5 with a join-point to P2 of Motif 1, and Loop 6 with a join-point to P1 of Motif 1.
Stitch-to-stitch logic: Each motif joins at P1/P2 on one side and P5/P6 on the opposite side. That leaves 2 free points on each edge:
- Outer edge: P3 and P4
- Inner edge: P7 and P8
Junctions: The pair joining P5 to the next motif’s P2 is the outer junction. The pair joining P6 to the next motif’s P1 is the inner junction. Each motif therefore gives the border 2 free points plus 1 junction on each edge.
Tension advice: Keep the join ch-1s the same size as your other chains. Tight joins make the ring cup, and loose joins leave gaps. Before joining, lay each new motif next to the ring and check that every motif’s P3 and P4 face outward.
Size checkpoint: Lay the closed ring flat and coax it into an oval. It should measure about 3.75 in (9.5 cm) × 5 in (12.7 cm), with an opening of about 1.75 in (4.4 cm) × 3 in (7.6 cm).
Border
Border gauge: 9 sc = 1 in (2.5 cm).
Outer Edge
Outer Rnd 1: Join orange in P3 of Motif 1. Work the following for each motif, going around the ring:
- sc in P3
- ch 4
- sc in P4
- ch 3
- sc through both loops of the outer junction
- ch 3
Join to the first sc.
- Per motif: 3 sc + 10 ch = 13 sts
- Total: 10 motifs × 13 sts = 130 sts
Outer Rnd 2: Ch 1. Sc in each sc and in each ch around. Join. Do not fasten off yet. (130 sc; 13 per motif)
Hanging loop: Sl st along to the 7th sc of the Motif 1 section, which is the top center. Ch 22, then sl st in the same sc. Work 30 sc over the chain loop and sl st into the base. Fasten off.
The loop stands 1 in (2.5 cm) tall.
Inner Edge
Inner Rnd 1: Join orange in P7 of any motif. Work the following for each motif, going around the opening:
- sc in P7
- ch 1
- sc in P8
- ch 1
- sc through both loops of the next inner junction
- ch 1
Join to the first sc.
- Per motif: 3 sc + 3 ch = 6 sts
- Total: 10 motifs × 6 sts = 60 sts
Inner Rnd 2: Ch 1. Sc in each st around. Join and fasten off. (60 sc; 6 per motif)
Why the Math Works
Outer edge: At the finished size, the outer curve measures about 14.5 in (36.8 cm). At 9 sc per inch, that needs about 130 sts, which is 10 motifs × 13.
Inner edge: The inner curve measures about 6.75 in (17.1 cm), which needs about 60 sts, or 10 motifs × 6.
The longer outer edge and the shorter inner edge are what bend the straight chain of motifs into a flat oval. Each border adds 0.125 in (0.3 cm), which takes the ring from 3.75 × 5 in (9.5 × 12.7 cm) to 4 × 5.25 in (10.2 × 13.3 cm).
Poinsettia (make 1 in red)
Rnd 1: Make a magic ring. Ch 1, then work 12 sc into the ring. Join. (12 sc)
Rnd 2 (petals): Repeat the following 6 times:
- Ch 6.
- Working into the back bumps of the chains, sl st in the 2nd ch from the hook.
- Work sc, hdc, dc, and tr in the next 4 ch, one stitch in each.
- Skip 1 sc and sl st in the next sc.
Fasten off, leaving a 10 in (25.4 cm) tail. (6 pointed petals; 5 sts per petal)
Working into the back bumps gives each petal a raised center ridge.
Finished size: about 1.5 in (3.8 cm) across.
Beads: Sew the 5 gold beads in a tight cluster over the center ring.
Holly Leaf (make 3 in green)
- Foundation: Ch 9.
- Side 1: Starting in the 2nd ch from the hook, work the following, one stitch per chain:
- sc
- hdc
- dc, picot
- dc
- dc, picot
- hdc
- sc
- sl st in the last ch
(8 sts, 2 picots)
3. Stem: Ch 2, then sl st back into the same ch.
4. Side 2: Working into the free loops on the other side of the foundation chain, work the following:
– sl st
– sc
– hdc
– dc, picot
– dc
– dc, picot
– hdc
– sc
(8 sts, 2 picots)
5. Tip: Ch 3, then sl st in the first sc of Side 1 to form a pointed tip.
6. Fasten off, leaving a tail for sewing.
Leaf size: about 1.1 in (2.8 cm) long.
Assembly
Do this after blocking (see the next section).
- Place the leaves on the lower right outer edge, over Motifs 4 and 5. Fan them so the tips point up-right, right, and down. Let about 0.5 in (1.3 cm) of each leaf extend past the border.
- Center the poinsettia over the base of the leaves.
- Sew each leaf at its base. Then sew around the poinsettia’s center ring, stitching through all layers.
- Tack each petal tip lightly so it lies flat.
Final Blocking
- Weave in all ends on the ring before you block. Leave the appliqué ends for sewing.
- Wet the ring and roll it in a towel to remove excess water.
- Pin it to the mat in a 4 in (10.2 cm) × 5.25 in (13.3 cm) oval. Place one pin in each outer free point and one in each inner free point.
- Check that the opening is 1.5 in (3.8 cm) × 2.75 in (7.0 cm) and that it sits centered.
- Straighten each star’s spokes with a pin tip.
- Pin the hanging loop straight up.
- Mist with stiffener if you like, and let it dry completely.
- Block the poinsettia and leaves separately, pinning out each petal tip and leaf point.
- Assemble after everything is dry.
Final Quality-Control Checklist
- All 10 motifs measure 1.25 in (3.2 cm) point to point
- Every motif has 8 even spokes and a small round center hole
- No twisted joins; all P3 and P4 points face outward
- Outer border: 130 sc. Inner border: 60 sc
- Size: 4 × 5.25 in (10.2 × 13.3 cm); opening 1.5 × 2.75 in (3.8 × 7.0 cm)
- Loop is centered over Motif 1 and stands 1 in (2.5 cm) tall
- Poinsettia has 6 petals and 5 beads; 3 leaves, each with 4 side picots and a tip
- No tails visible from the front
Troubleshooting
- The ring cups or ruffles: The outer border is too tight or the inner border too loose. Recheck the ch counts (13 per motif outer, 6 per motif inner).
- The opening is too round: Pin harder top to bottom while blocking. Use stiffener to hold the shape.
- Gaps at the joins: Make the join ch-1s snugger, or sew small gaps closed from the back.
- The stars look muddy: Use mercerized cotton and block firmly.
- Petals curl: Re-wet them, pin each tip, and dry flat.
- The ornament leans when hung: The loop is off-center. Move it to the 7th sc of the Motif 1 section.
Care
Hand wash in cool water with mild soap, press out water in a towel, and dry flat, reshaping as needed. Store flat in tissue between seasons so the loop and petals keep their shape.
Final Notes
The measurement chain is short and easy to check at each step:
- Motifs measure 1.25 in (3.2 cm) at 3 rounds.
- Ten joined motifs make a 3.75 × 5 in (9.5 × 12.7 cm) ring.
- The 130-stitch outer border and 60-stitch inner border at 9 sc per inch shape it into a 4 × 5.25 in (10.2 × 13.3 cm) oval.
- The 1 in (2.5 cm) loop brings the total height to 6.25 in (15.9 cm).
If each stage matches its checkpoint, the finished ornament will too.
Happy crocheting!