
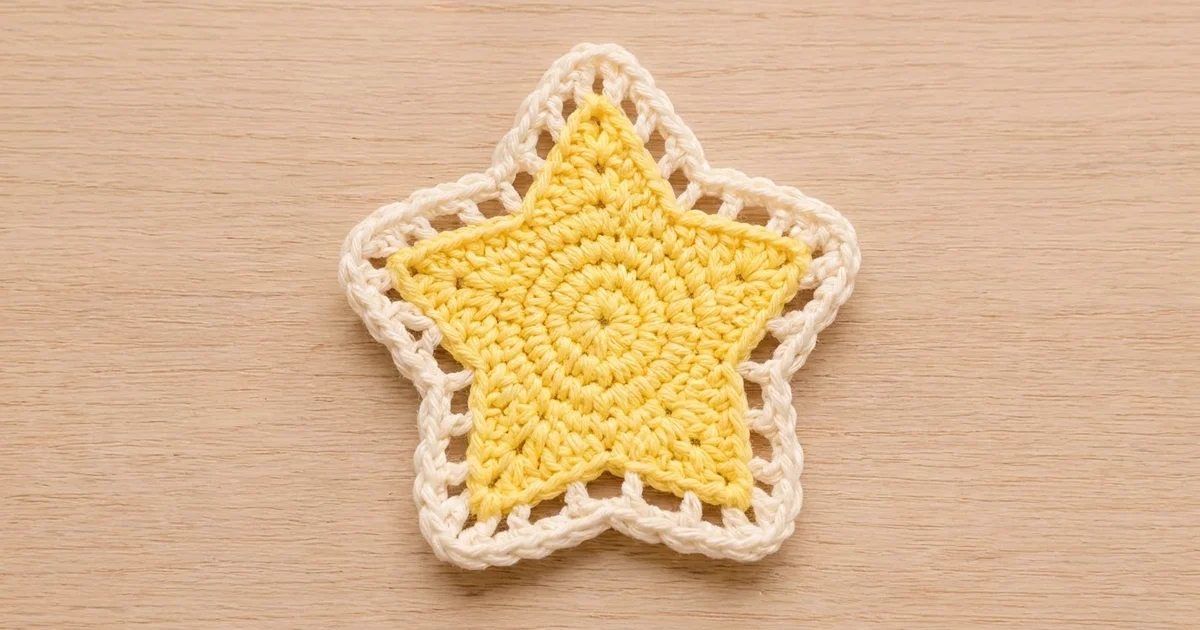
This star coaster has a soft butter-yellow center and a light cream lace frame. It looks like a cookie with icing piped around the edge. It’s quick to make, sits flat under a mug, and suits holiday tables, tree-trimming parties, or a little gift tucked into a card.
The star is made in two colors: pastel yellow for the solid center and cream for the openwork border. The yellow is worked in tight rounds of double crochet that spiral out from the middle. The cream border alternates double crochet posts with small chain spaces, then finishes with a single crochet rim that keeps every point crisp.
This pattern uses US crochet terms. The finished coaster is 6 in (15.2 cm) from point to point. The yellow star alone is 5 in (12.7 cm).
Construction is simple. You crochet one flat circle, shape five points in a single round, smooth the edge with single crochet, and then add a two-round lace border in a second color. It’s one piece, with no sewing or joining.
Finished Size and Construction
- Finished size: 6 in (15.2 cm) point to point after blocking
- Skill level: Easy / advanced beginner
- Terminology: US crochet terms
- Yarn weight: DK / light (#3), cotton or cotton blend
- Hook: 3.5 mm (E-4)
- Number of pieces: 1
- Layout: Single motif, no assembly
- Piece size before border: 5 in (12.7 cm) point to point
- Border depth: 0.5 in (1.3 cm) on every edge
Materials
Yarn: Use a smooth, mercerized or combed cotton in DK weight. Cotton soaks up drips, handles hot mugs well, and shows stitch definition. Acrylic works too, but it can curl at the points and may need firmer blocking.
- Color A, pastel yellow: 12 g, about 29 m (32 yd)
- Color B, cream / off-white: 6 g, about 14 m (15 yd)
These quantities include a margin of about 20% for your gauge swatch, tails, and tension differences.
Tools:
– 3.5 mm (E-4) crochet hook
– Tapestry needle
– Scissors
– Stitch markers (2–3)
– Ruler or tape measure
– Blocking mat and rust-proof pins
– Spray bottle with water
Abbreviations (US Terms)
- ch: chain
- sl st: slip stitch
- sc: single crochet
- hdc: half double crochet
- dc: double crochet
- tr: treble crochet (yo twice)
- dtr: double treble crochet (yo 3 times, insert hook, pull up loop, [yo, pull through 2] 4 times)
- sc2tog: single crochet 2 together
- sc3tog: single crochet 3 together
- sk: skip
- sp: space
- st(s): stitch(es)
- yo: yarn over
Special stitch: sc3tog over spaces. Insert the hook into the ch-1 sp, pull up a loop. Insert into the next dc, pull up a loop. Insert into the next ch-1 sp, pull up a loop. Yo and pull through all 4 loops on the hook. This pulls the border into each inner valley.
Gauge and Checkpoints
Since this is a single piece, the coaster itself is your test piece. Measure at each checkpoint below and adjust before you go further.
- After Round 1: about 1 in (2.5 cm) across
- After Round 2: about 1.75 in (4.4 cm) across
- After Round 3: 2.5 in (6.4 cm) across. This is your main gauge check.
- After Round 4: 3.25 in (8.3 cm) across. The edge may ripple very slightly. That’s expected.
- After Round 6: 5 in (12.7 cm) point to point
- After Round 8: 6 in (15.2 cm) point to point
If Round 3 is bigger than 2.5 in (6.4 cm): go down to a 3.25 mm hook, or tighten your loops.
If Round 3 is smaller than 2.5 in (6.4 cm): go up to a 3.75 mm or 4.0 mm hook.
A difference of 0.25 in (0.6 cm) at Round 3 grows to almost 0.5 in (1.3 cm) on the finished star. Fix it early.
Star Center (Color A, Yellow)
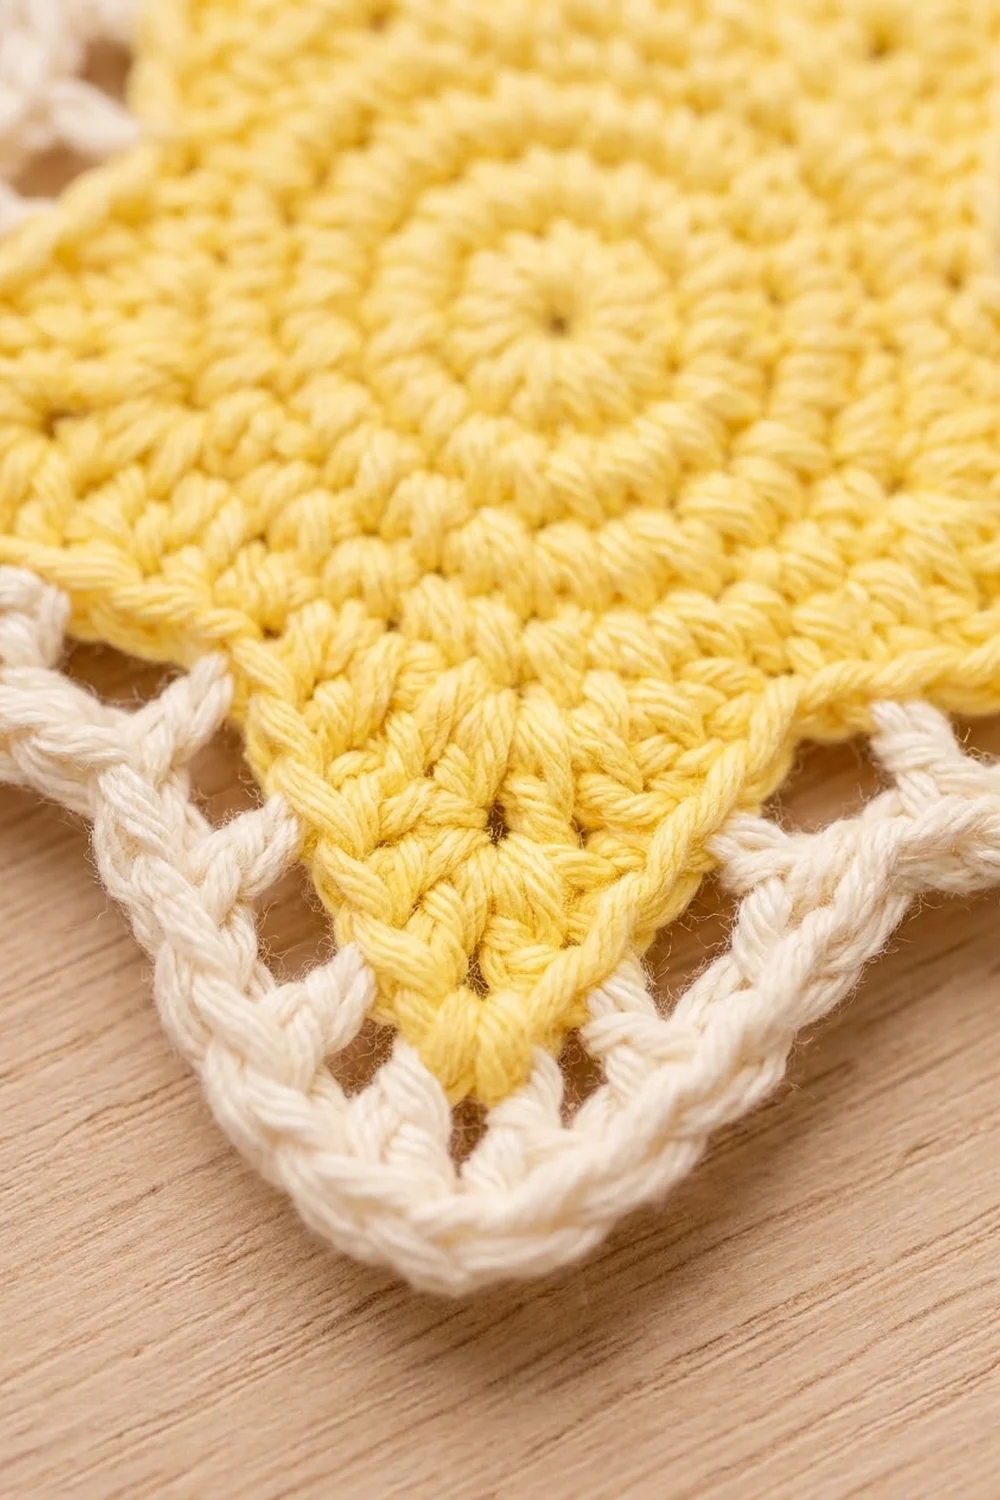
The ch 3 at the start of Rounds 1–4 counts as 1 dc. Join every round with a sl st to the top of the beginning ch 3 (or the first st), and don’t turn.
Round 1: Make a magic ring. Ch 3, then work 14 dc into the ring. Pull the ring closed and join. (15 dc)
Round 2: Ch 3, dc in the same st. Work 2 dc in each remaining st around. Join. (30 dc)
Round 3: Ch 3, 2 dc in the next st. Dc in the next st, 2 dc in the next st; repeat from * 13 more times. Join. (45 dc)*
Checkpoint: 2.5 in (6.4 cm) across.
Round 4: Ch 3 (this is the first dc of the first group), 2 dc in the next st, [dc in the next st, 2 dc in the next st] 3 times, dc in the next st. [Dc in the next st, 2 dc in the next st] 4 times, dc in the next st; repeat from * 3 more times. Join. (65 dc)*
Each group turns 9 stitches into 13, so you now have 5 even sections of 13 dc, one for each star point. The 5 extra stitches beyond a perfectly flat 60 feed the points in the next round. Place a marker in the first st of each 13-st section if you like.
Round 5 (points): Ch 1 (doesn’t count). Work the following across each 13-st section, 5 times total:
- sl st in the 1st st
- sc in the 2nd
- hdc in the 3rd
- dc in the 4th
- 2 dc in the 5th
- 2 tr in the 6th
- (dtr, ch 2, dtr) in the 7th (the tip)
- 2 tr in the 8th
- 2 dc in the 9th
- dc in the 10th
- hdc in the 11th
- sc in the 12th
- sl st in the 13th
Join to the first sl st.
Each section now has 18 sts plus a ch-2 tip sp. (90 sts + 5 ch-2 sps)
Each valley now has 2 sl sts side by side, and each point rises evenly to a dtr tip. The stitches go sc, hdc, dc, tr, dtr on one side and back down the same way on the other, so the points are symmetrical.
Round 6 (smoothing round): Ch 1. Sk the first sl st; you’ll come back to it at the end. Sc in each of the next 8 sts (sc, hdc, dc, 2 dc, 2 tr, dtr). Work (sc, ch 2, sc) in the ch-2 tip sp. Sc in each of the next 8 sts (dtr, 2 tr, 2 dc, dc, hdc, sc). Sc2tog over the next 2 sl sts. Repeat from * to * 4 more times. On the last repeat, work the sc2tog over the last sl st and the first sl st you skipped. Join to the first sc.
Count per point: 8 sc + 1 tip sc + ch 2 + 1 tip sc + 8 sc + 1 sc2tog = 19 sts + 1 ch-2 sp.
(95 sts + 5 ch-2 sps)
Each side, from a tip to the valley, now has 1 tip sc + 8 sc, with the sc2tog valley shared between neighboring points.
Checkpoint: 5 in (12.7 cm) point to point. Fasten off Color A and weave in the tails. Lightly finger-press the points flat before you start the border.
Border (Color B, Cream)
Border gauge: One dc plus one ch-1 sp spans 2 sc of Round 6. That’s the same width as those 2 sc, so the border lies flat along each straight side.
To keep track in Round 7, label each side’s 8 plain sc as s1–s8, counting from the tip toward the valley. The valley itself is “V” (the sc2tog).
Round 7 (lace round): Join Color B with a sl st in any ch-2 tip sp. Ch 3 (counts as dc), ch 3, dc in the same sp. Then:
Ch 1, sk the tip sc, dc in s1. [Ch 1, sk 1 sc, dc in the next sc] 3 times (dc in s3, s5, s7). Ch 1, sk s8, dc in V. Ch 1, sk the next sc (s8 of the next side), dc in the next sc (s7). [Ch 1, sk 1 sc, dc in the next sc] 3 times (s5, s3, s1). Ch 1, sk the tip sc, (dc, ch 3, dc) in the next ch-2 tip sp.
Repeat from * to * 3 more times. Then repeat from * to the final tip once more, but end with “ch 1, sk the tip sc” and join to the top of the beginning ch 3.
Per point: 2 tip dc + 9 dc between tips = 11 dc, 10 ch-1 sps, 1 ch-3 sp.
(55 dc, 50 ch-1 sps, 5 ch-3 sps)
The single dc at each valley skips one sc on each side. This gathers the inner corner so it doesn’t flare.
Round 8 (rim): Sl st into the first ch-3 sp, ch 1. (2 sc, ch 2, 2 sc) in the ch-3 tip sp. Sc in the next dc. [Sc in the ch-1 sp, sc in the next dc] 4 times. Sc3tog over (the next ch-1 sp, the valley dc, the next ch-1 sp). [Sc in the next dc, sc in the next ch-1 sp] 4 times. Sc in the next dc. Repeat from * to * 4 more times. Join to the first sc and fasten off.
Per point: 4 tip sc + 1 + 8 + 1 sc3tog + 8 + 1 = 23 sts + 1 ch-2 sp.
(115 sts + 5 ch-2 sps)
Why the math works: Each straight side of Round 6 has 9 sc from the tip sc to the valley. In Round 7, that becomes 4 dc with 4 ch-1 sps on the side, plus the tip dc and the shared valley dc. That’s the same width, so the side stays flat. The extra ch-3 and (2 sc, ch 2, 2 sc) at each tip give the outer corner room to turn. The skipped stitches and sc3tog at each valley remove fullness where the outline turns inward. Two rounds add 0.5 in (1.3 cm) on every edge, so the 5 in (12.7 cm) star becomes 6 in (15.2 cm).
Final Blocking
- Weave in all tails along the back of stitches of the same color.
- Lay the coaster right side up on a blocking mat.
- Spray it evenly until it’s damp, not dripping.
- Pin the 5 tips first, with each tip 6 in (15.2 cm) from the tip opposite the gap between its two neighbors. Space them evenly around the center.
- Pin each valley gently toward the center so all 5 valleys sit the same distance from the middle.
- Open each lace space with your fingertip so the cream posts stand straight.
- Let it dry completely, at least 6 hours, before you unpin.
Final Quality-Control Checklist
- [ ] Round 6 count: 95 sts + 5 ch-2 sps
- [ ] Round 7 count: 55 dc, 50 ch-1 sps, 5 ch-3 sps
- [ ] Round 8 count: 115 sts + 5 ch-2 sps
- [ ] Yellow star measures 5 in (12.7 cm) point to point
- [ ] Finished coaster measures 6 in (15.2 cm) point to point
- [ ] All 5 points are the same height and shape
- [ ] Border is 0.5 in (1.3 cm) deep all around
- [ ] Coaster lies flat with no cupping or ruffling
- [ ] All tails are woven in securely and invisibly
Troubleshooting
The center cups after Round 3. Your stitches are too tight for the increases. Go up half a hook size or loosen your yarn overs.
Round 4 ruffles badly. A slight wave is normal and disappears in Round 5. If it’s strong, change Round 4 to (dc 2, 2 dc in the next) 15 times for 60 sts, and work Round 5 over 12-st sections, with a single sl st valley and 1 dc in the 5th and 8th sts.
The points lean to one side. Check that the tip (dtr, ch 2, dtr) is in the 7th st of each section, and that the 2 sl sts sit evenly at each valley.
The border ruffles along the sides. Check that you’re skipping one sc between dc posts. Working into every sc doubles the stitch count.
The border pulls the valleys too tight. Replace the sc3tog with sc2tog over the ch-1 sp and the valley dc, then sc in the next ch-1 sp. That adds 1 st per point.
The tips look blunt. Pin each tip sharply during blocking, and keep the ch-2 at the rim tip snug.
Care
Hand wash in cool water with mild soap, press out the water in a towel, and dry flat. Re-pin the points if they soften over time.

Final Notes
The measurement chain is short and easy to check. Round 3 is 2.5 in (6.4 cm), Round 4 is 3.25 in (8.3 cm), the yellow star after Round 6 is 5 in (12.7 cm), and the two cream border rounds add 0.5 in (1.3 cm) per edge for a finished 6 in (15.2 cm) star. If those checkpoints match, the counts of 95, then 55 dc, then 115 will fall into place, and your coaster will lie flat with five even points. Make one for yourself and a few more as gifts.
Happy crocheting!