

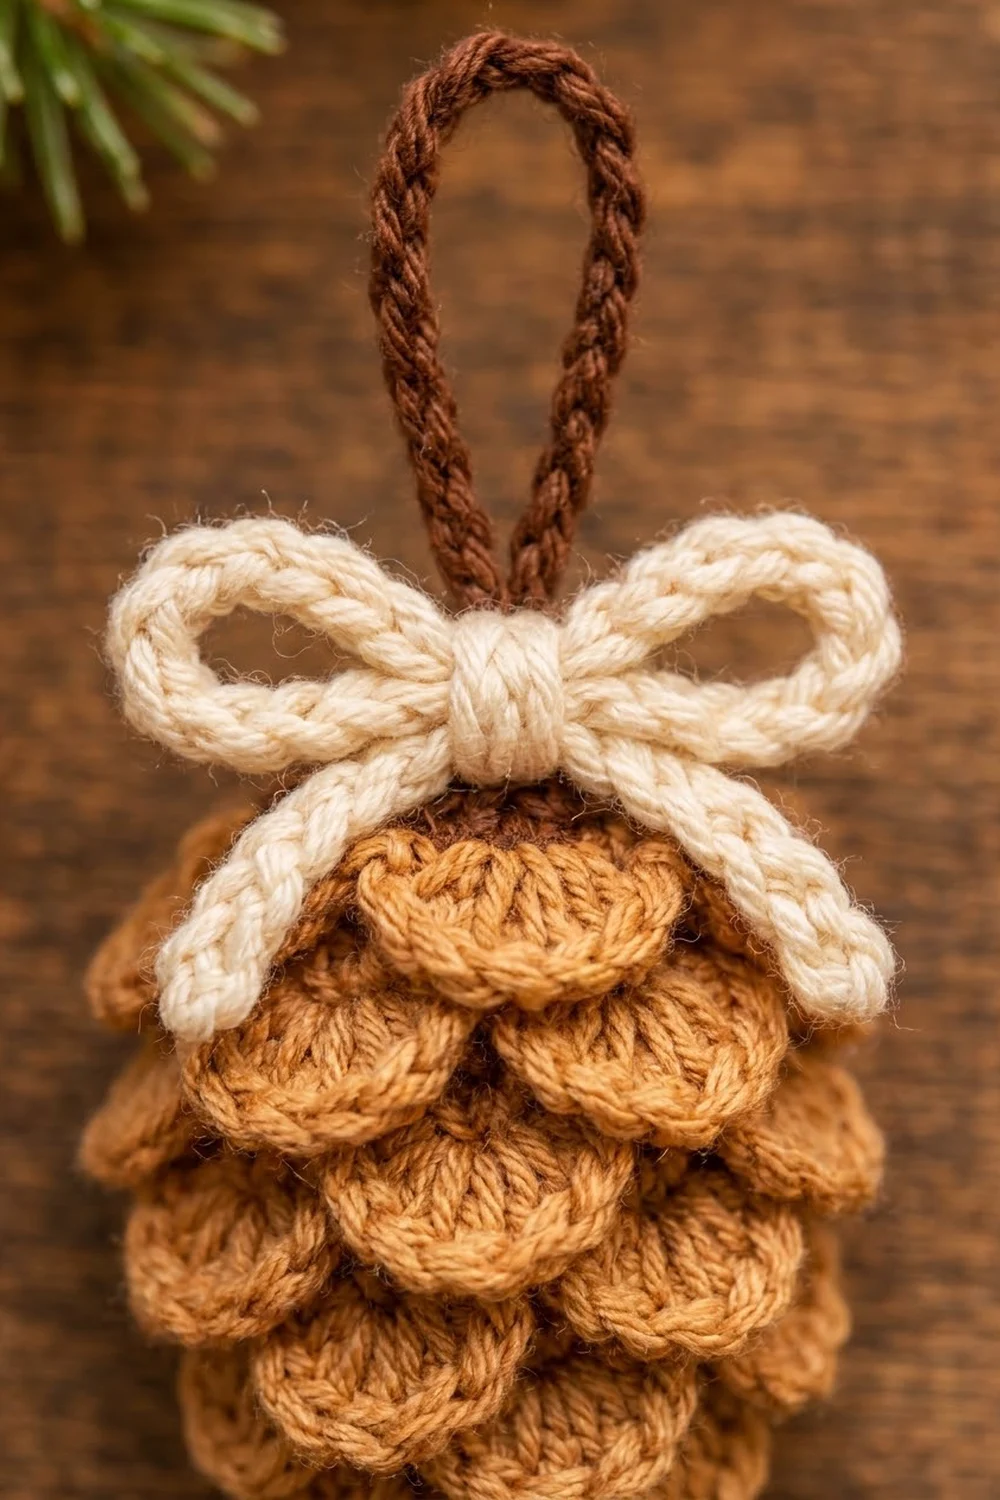
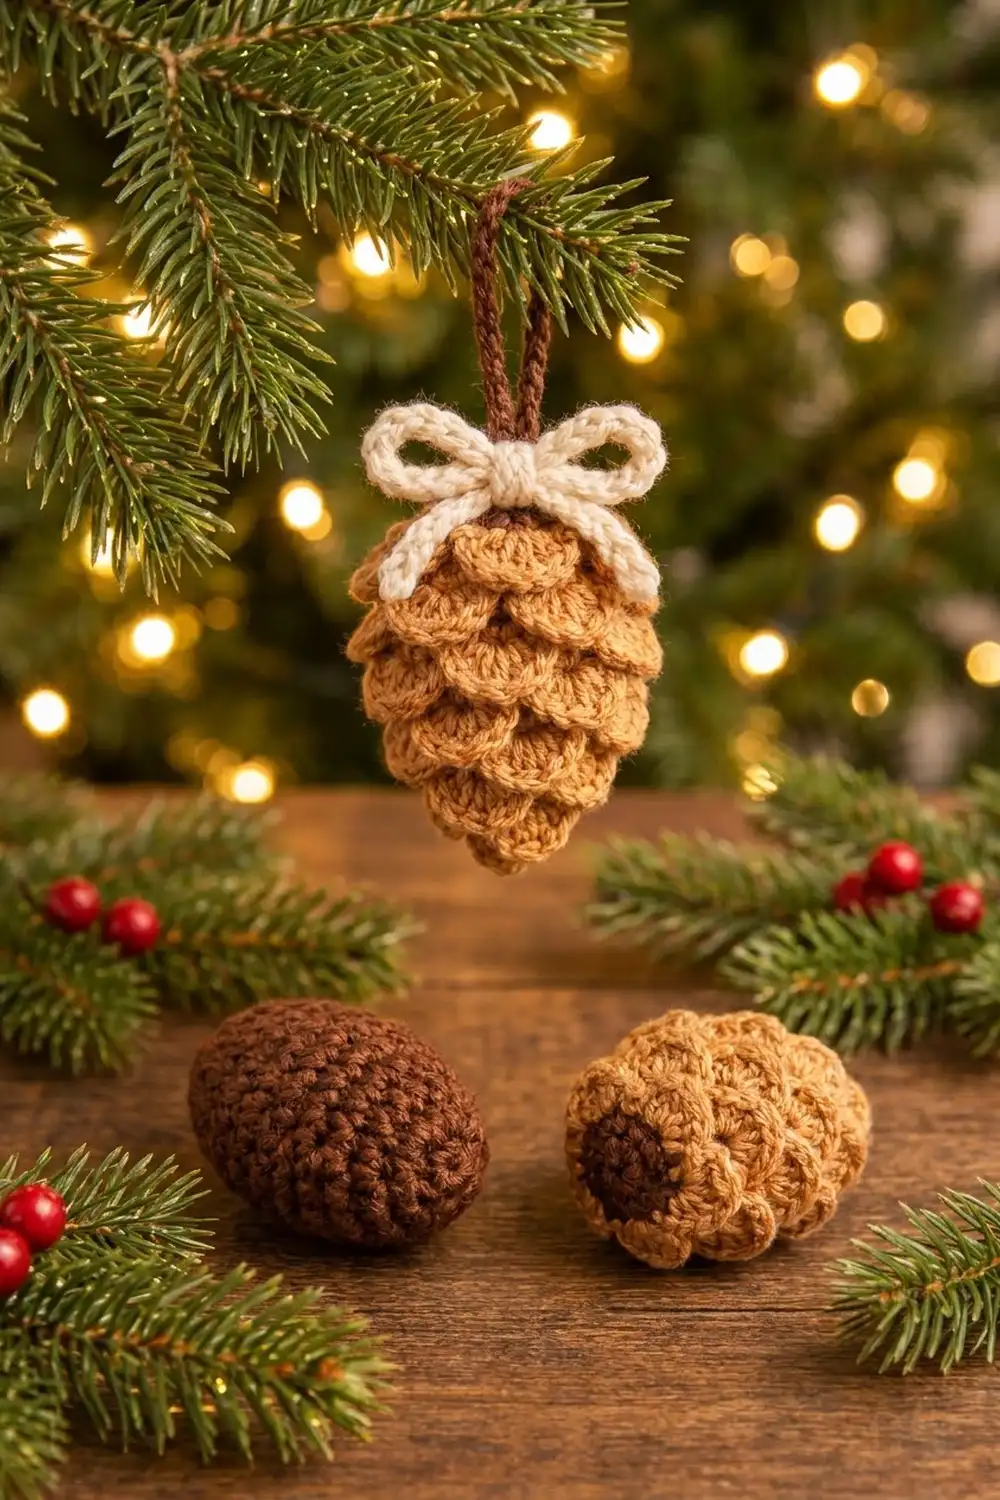
This Woodland Pinecone is a small, cozy tree ornament. It has a plump dark-brown core covered in nine tiers of golden tan scales and is finished with a cream chain bow and a brown hanging loop. It looks rustic and traditional, a bit like something from a cabin in the woods, but it is soft and unbreakable.
There are three colors. Dark chocolate brown is used for the core and loop, golden tan for the scales and cream for the bow. The pattern uses US crochet terms throughout.
The finished pinecone body measures about 2.6 in (6.6 cm) wide and 3.8 in (9.7 cm) tall. With the hanging loop, the ornament is about 5.8 in (14.7 cm) tall.
Construction is simple and very satisfying. You crochet one stuffed core in continuous rounds. Every second round is worked in the back loops only, which leaves rings of free front loops on the surface. Then you work the scale tiers into those front loops, from the bottom tip up to the crown. Finally you make a slip-stitch cord bow and hanging loop and sew them on.
Finished Size and Construction
- Finished size: 2.6 in (6.6 cm) wide × 3.8 in (9.7 cm) tall, plus a 2 in (5.1 cm) loop
- Skill level: Easy+ (confident beginner)
- Terminology: US crochet terms
- Yarn weight: Worsted (#4)
- Hook: 3.5 mm (E/4)
- Number of pieces: 1 ornament body, plus 2 small trims (bow and loop)
- Layout: Single standalone ornament, no joining
- Piece size (core before scales): 1.8 in (4.6 cm) wide × 3.5 in (8.9 cm) tall
- Size before border: Same as the core, 1.8 in × 3.5 in (4.6 cm × 8.9 cm)
- Border depth: In this pattern the “border” is the scale tiers. Each scale stands about 0.4 in (1.0 cm) off the core.
Materials
Yarn: Use a smooth worsted-weight acrylic or cotton blend. Smooth yarn shows the shell edges clearly, while fuzzy yarn blurs the scales. Pick a tan that is clearly lighter than the brown so the core reads as shadow between the scales.
- Color A – Dark Chocolate Brown (core, loop): 10 g, about 17 m
- Color B – Golden Tan/Camel (scales): 15 g, about 26 m
- Color C – Cream (bow): 4 g, about 7 m
These quantities include a margin of roughly 20%, which covers a gauge swatch and an extra scale tier if you need one.
Tools:
– 3.5 mm (E/4) crochet hook
– About 5 g polyester fiberfill
– 1 stitch marker
– Tapestry needle
– Scissors
– Pins
Abbreviations (US Terms)
- ch – chain
- sc – single crochet
- dc – double crochet
- sl st – slip stitch
- inc – 2 sc in the same stitch
- dec – sc2tog, preferably an invisible decrease
- MR – magic ring
- BLO – back loop only
- FL – front loop
- sk – skip
- rep – repeat
Special stitch: Scale shell. Sk next FL, 5 dc in next FL, sk next FL, sl st in next FL. One scale uses exactly 4 front loops.
Gauge and Checkpoints
Core gauge: 5 sc and 6 rounds = 1 in (2.5 cm), worked tightly in the round.
Scale gauge: One scale is 0.8 in (2.0 cm) wide and 0.4 in (1.0 cm) deep.
Use your first core as the test piece rather than a flat swatch. Check it at these points:
- After Rnd 5 (16 sts): The cone is about 1 in (2.5 cm) across.
- After Rnd 11 (28 sts): The circumference is 5.6 in (14.2 cm), the diameter is 1.8 in (4.6 cm) and the height is about 1.8 in (4.6 cm).
- Finished core: 3.5 in (8.9 cm) tall.
- After the scales: 2.6 in (6.6 cm) wide.
If your core is too big (diameter over 2 in / 5.1 cm), or stuffing shows through, go down to a 3.25 mm or 3.0 mm hook.
If your core is too small (diameter under 1.6 in / 4.1 cm), go up to a 3.75 mm hook. The scale math does not change, because the scales are counted in loops, not inches.
Core (Color A)
Work in continuous spiral rounds. Move the marker up each round, and keep the start of the round at the back of the ornament.
Rounds marked (BLO) leave the front loops of the round before them free. Those free front loops are the “ridges” you will use for the scale tiers.
- Rnd 1: 6 sc in MR. (6)
- Rnd 2: (sc, inc) × 3. (9)
- Rnd 3: (2 sc, inc) × 3. (12)
- Rnd 4 (BLO): sc in each st. (12) This leaves Ridge 1: 12 free FL of Rnd 3.
- Rnd 5: (2 sc, inc) × 4. (16)
- Rnd 6 (BLO): sc in each st. (16) This leaves Ridge 2: 16 free FL.
- Rnd 7: (3 sc, inc) × 4. (20)
- Rnd 8 (BLO): sc in each st. (20) This leaves Ridge 3: 20 free FL.
- Rnd 9: (4 sc, inc) × 4. (24)
- Rnd 10 (BLO): sc in each st. (24) This leaves Ridge 4: 24 free FL.
- Rnd 11: (5 sc, inc) × 4. (28) Do the 1.8 in (4.6 cm) diameter checkpoint now.
- Rnd 12 (BLO): sc in each st. (28) This leaves Ridge 5: 28 free FL.
- Rnd 13: sc in each st. (28)
- Rnd 14 (BLO): sc in each st. (28) This leaves Ridge 6: 28 free FL.
- Rnd 15: (5 sc, dec) × 4. (24)
- Rnd 16 (BLO): sc in each st. (24) This leaves Ridge 7: 24 free FL.
- Rnd 17: (4 sc, dec) × 4. (20) Stuff firmly from the tip upward, shaping an egg that is widest at Rnds 11–14.
- Rnd 18 (BLO): (3 sc, dec) × 4. (16) This leaves Ridge 8: 20 free FL of Rnd 17.
- Rnd 19: (2 sc, dec) × 4. (12)
- Rnd 20 (BLO): (sc, dec) × 4. (8) This leaves Ridge 9: 12 free FL of Rnd 19. Top up the stuffing.
- Rnd 21: dec × 4. (4)
Fasten off and leave a 6 in (15.2 cm) tail. Weave it through the 4 front loops, pull closed and hide the end.
The core is now 3.5 in (8.9 cm) tall and has nine free front-loop ridges. This matches the plain brown egg stage in the photos.
Hanging Loop (Color A)
Leave a 6 in (15.2 cm) tail. Ch 26, then sl st in the back bump of each ch across. (25 sl st)
The cord is about 4 in (10.2 cm) long and has a firm, braided look. Fold it in half to make a loop 2 in (5.1 cm) tall. Set it aside with both tails.
Bow (Color C)
Leave an 8 in (20.3 cm) tail. Ch 50, then sl st in the back bump of each ch across. (49 sl st) Fasten off. The cord is about 7.7 in (19.6 cm) long.
To shape the bow:
1. Fold the cord into two loops of about 1 in (2.5 cm) each, leaving two tails of about 1.2 in (3.0 cm).
2. Pinch the center.
3. Wrap the 8 in (20.3 cm) tail 4–5 times around the center to make a plump knot.
4. Secure the wrap with a few stitches through the back.
The finished bow is about 2.4 in (6.1 cm) wide.
Border: Scale Tiers (Color B)
On this ornament the scales are the edge finish. They are worked as nine short rounds into the ridges, starting at the bottom tip.
Work each tier with the tip pointing toward you and fold the shells down toward the tip as you go. Each new tier then sits over the base of the tier below, so the scales overlap like shingles. To get the brick offset, join each new tier in the FL directly above the center dc of a scale in the tier below.
Each tier: Join Color B with a sl st in the chosen FL. *Sk next FL, 5 dc in next FL, sk next FL, sl st in next FL; rep from * around. Work the last sl st into the joining sl st. Fasten off and weave in the end on the inside of the scales.
| Tier | Ridge (FL of Rnd) | Free loops | Scales | Stitches |
|---|---|---|---|---|
| 1 | Rnd 3 | 12 | 3 | 15 dc + 3 sl st |
| 2 | Rnd 5 | 16 | 4 | 20 dc + 4 sl st |
| 3 | Rnd 7 | 20 | 5 | 25 dc + 5 sl st |
| 4 | Rnd 9 | 24 | 6 | 30 dc + 6 sl st |
| 5 | Rnd 11 | 28 | 7 | 35 dc + 7 sl st |
| 6 | Rnd 13 | 28 | 7 | 35 dc + 7 sl st |
| 7 | Rnd 15 | 24 | 6 | 30 dc + 6 sl st |
| 8 | Rnd 17 | 20 | 5 | 25 dc + 5 sl st |
| 9 | Rnd 19 | 12 | 3 | 15 dc + 3 sl st |
That makes 46 scales in total. Tier 1 hangs about 0.3 in (0.8 cm) below the core tip, which brings the body to 3.8 in (9.7 cm) tall. Tier 9 frames a small dark-brown cap at the crown.
Why the math works: Every ridge holds a multiple of 4 loops, and each scale uses exactly 4. That means every tier closes evenly with no leftover loops and no fudged repeats.
The scale count also grows and shrinks with the circumference. At the core gauge of 5 sts per inch, 4 loops are always 0.8 in (2.0 cm). So the scales stay the same width from the tip to the widest point and back.
The widest tiers sit on 28-st rounds: 5.6 in (14.2 cm) around and 1.8 in (4.6 cm) across. Each side gains 0.4 in (1.0 cm) of scale, so the width is 1.8 + 0.4 + 0.4 = 2.6 in (6.6 cm).
Attach the trims:
1. Thread both tails of the hanging loop down through the center of the crown, out about 0.4 in (1.0 cm) lower, and back up. Knot them and bury the ends inside the stuffing.
2. Pin the bow to the front of the crown so it covers the base of the loop and the tails rest on Tiers 8–9.
3. Stitch the bow down at the knot and at each tail tip.
Final Blocking
- Hold the ornament by the loop and look at it from the front, the sides and the back.
- Gently push each scale downward and outward with your fingers so the curves sit evenly.
- Hover a steam iron or garment steamer 1 in (2.5 cm) above the scales. Never press, and keep heat away from acrylic for longer than a second or two.
- While the yarn is warm, shape the bow loops round and open and straighten the tails.
- Pin the bow loops to a foam pad if needed and let everything cool and dry completely, at least 1 hour.
- Measure again. You should get 2.6 in (6.6 cm) wide and 3.8 in (9.7 cm) tall.
Final Quality-Control Checklist
- The core is firm and egg-shaped, with no fiberfill showing.
- All nine tiers are complete, with 46 scales in total.
- Every scale has exactly 5 dc and lies downward.
- The tiers are offset brick-fashion, not stacked in columns.
- The color-change jogs are hidden at the back.
- The crown cap is closed neatly.
- The loop is secure and stands 2 in (5.1 cm) tall.
- The bow is centered, symmetrical and stitched at three points.
- All ends are woven in and invisible.
Troubleshooting
Scales flare upward instead of lying down: You worked the tier with the tip pointing away from you. Remove it and rework it with the tip toward you, folding each shell down as you go.
A tier has leftover loops: Recount the ridge. A missed stitch or extra increase in the core round changes the loop count. Fix the core round if possible. If not, work one scale over 3 loops (sl st, 4 dc, sl st) at the back.
Scales look ruffled: Your dc are too loose. Go down half a hook size for the scales only.
Core gaps show between scales: Stuff more firmly, or use a smaller hook for the core.
Ornament tilts when hanging: The loop is off-center. Re-anchor it in the center of the 4-st closure.
Bow droops: Add a hidden tack stitch behind each bow loop.
Care
Spot clean with a damp cloth and mild soap, then reshape the scales and let the ornament air dry. Store it in a box with light padding so the scales and bow keep their shape.
Final Notes
The whole ornament comes down to a short chain of measurements:
1. At 5 sc and 6 rounds per inch, the 21-round core grows to 28 sts, which is 1.8 in (4.6 cm) across and 3.5 in (8.9 cm) tall.
2. Nine ridges, each a multiple of 4 loops, hold 46 scales that are each 0.8 in (2.0 cm) wide.
3. The scales add 0.4 in (1.0 cm) per side and 0.3 in (0.8 cm) at the tip, for a finished body of 2.6 in × 3.8 in (6.6 cm × 9.7 cm).
4. The 2 in (5.1 cm) loop brings the full ornament to 5.8 in (14.7 cm).
If you match the gauge at the Rnd 11 checkpoint, everything after it falls into place. Make one for the tree, then a little cluster for gifts and gift toppers.
Happy crocheting!