

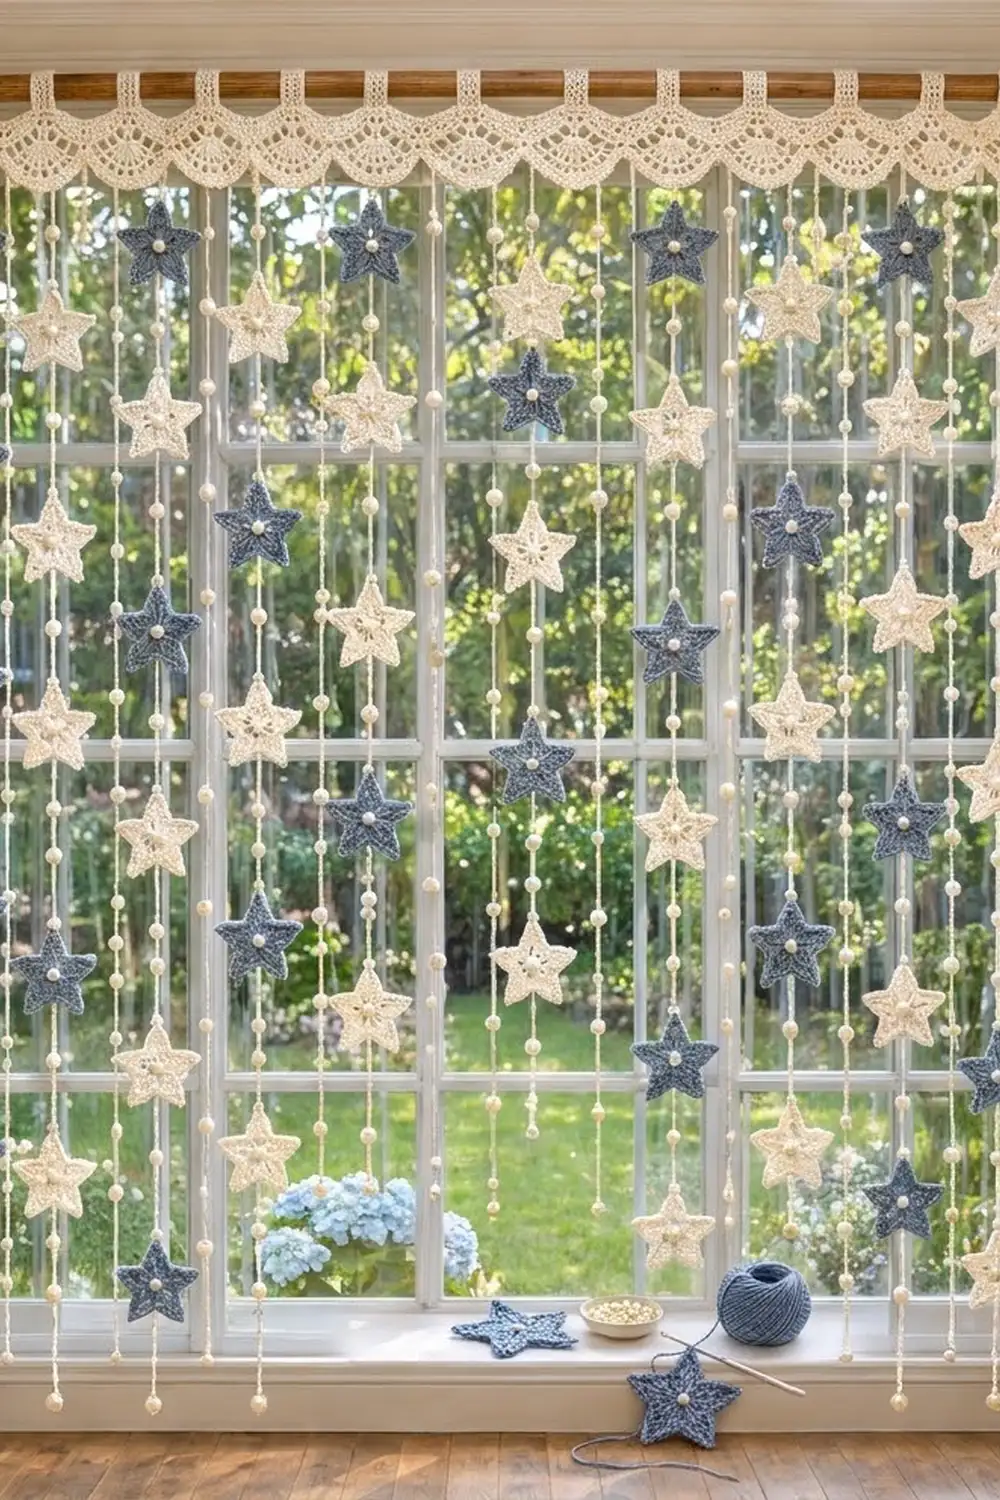
This curtain hangs soft, starry strands across a window without blocking the light. A cream lace valance with tab tops slides onto your rod. Below it hang sixteen beaded chain strands carrying flat five-point stars in dusty denim blue and cream. Each star has a pearl at its center.
The look is cottage-style and calm. The blue and cream stars sit in a staggered checkerboard, and the pearl beads catch the light between them. Everything is written in US crochet terms.
The finished curtain measures 36 in (91.4 cm) wide and about 52½ in (133.4 cm) long from the top of the valance to the lowest bead. Each star measures 3¼ in (8.3 cm) from tip to tip.
You make it in four parts: stars, a valance worked in rows, tab loops worked off the top edge, and the scallop border along the bottom. Then you chain the beaded strands straight down from the valance and join the stars in as you go. One continuous strand of yarn makes each column.
Finished Size and Construction
- Finished size: 36 in wide x 52½ in long (91.4 x 133.4 cm)
- Skill level: Intermediate (simple stitches, long project)
- Terminology: US
- Yarn weight: #3 light/DK cotton
- Hook: 4.0 mm (G-6)
- Number of pieces: 120 stars, 1 valance with 8 tabs, 16 strands
- Layout: 16 strands spaced 2.4 in (6.1 cm) apart; 8 stars on odd strands, 7 on even strands
- Star size: 3¼ in (8.3 cm) tip to tip
- Valance size before border: 36 x 2¼ in (91.4 x 5.7 cm)
- Border depth: 1¼ in (3.2 cm), giving a 3½ in (8.9 cm) deep valance
- Strand drop: about 49 in (124.5 cm)
Materials
Use a smooth mercerized or combed cotton with about 110 m per 50 g. Cotton holds the star points crisp and doesn’t stretch much under the weight of the beads.
- Cream: 300 g / 660 m (valance, tabs, strands, 64 stars)
- Denim blue: 150 g / 330 m (56 stars)
- Pearl beads, 8 mm, large hole (2–2.5 mm): 400 (264 for strands, 120 for star centers, plus spares)
- 4.0 mm (G-6) crochet hook
- Tapestry needle
- Big-eye beading needle or dental floss threader for stringing beads
- Sewing needle and cream thread for the center pearls
- Stitch markers, tape measure, blocking mat and rustproof pins
- Curtain rod up to 1 in (2.5 cm) in diameter
All quantities include a margin of about 20 percent.
Abbreviations (US Terms)
- ch – chain
- sl st – slip stitch
- sc – single crochet
- hdc – half double crochet
- dc – double crochet
- tr – treble crochet
- sp – space
- st(s) – stitch(es)
- RS – right side
Special stitch – Bead chain (bch): Slide one pre-strung bead up against the hook, yarn over behind the bead, and pull through. The bead is locked into that chain.
Gauge and Checkpoints
Gauge: 20 sc and 22 rows = 4 in (10.2 cm). Chain gauge: 5 ch = 1 in (2.5 cm), measured relaxed.
Make one star first. It’s your test piece.
- After star Rnd 1: the circle measures 1¼ in (3.2 cm) across.
- After star Rnd 3: 3¼ in (8.3 cm) tip to tip, with each point about 1 in (2.5 cm) long.
- After valance Row 3: 36 in (91.4 cm) wide, ½ in (1.3 cm) deep.
- After valance Row 6: 36 x 2¼ in (91.4 x 5.7 cm).
- After border: 3½ in (8.9 cm) deep at the scallop centers.
If your star or swatch is too big, go down a half size in hook. If it’s too small, go up. Don’t skip this step. A curtain that’s 1 in (2.5 cm) too wide or narrow is very noticeable on a rod.
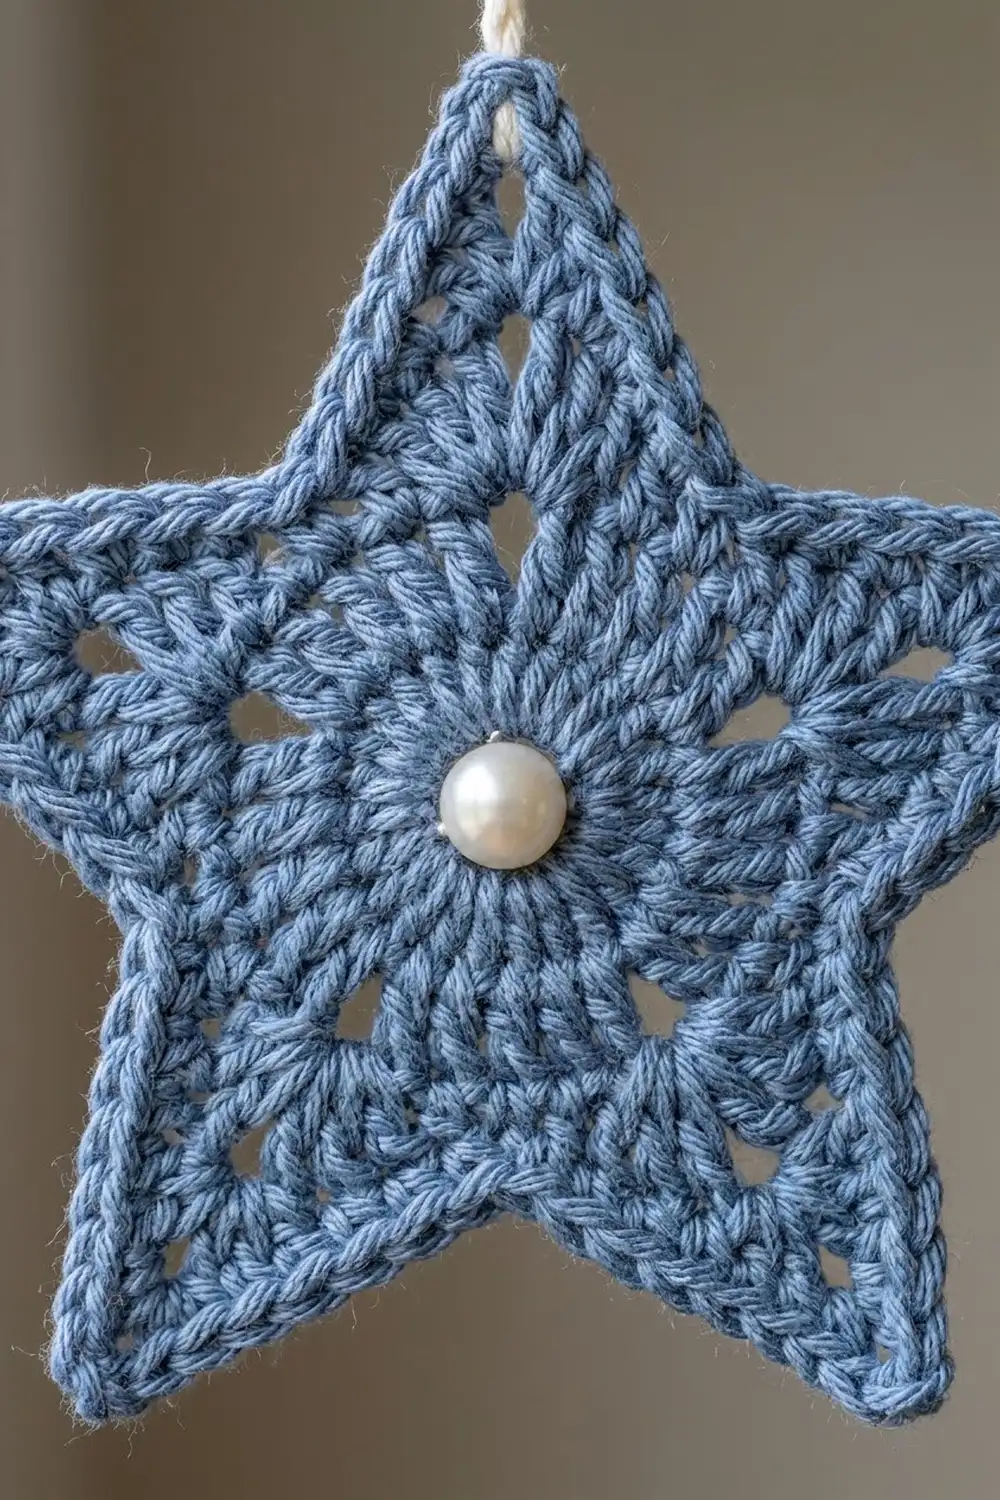
Star (Make 120)
Make 56 in denim blue and 64 in cream.
Rnd 1: Make a magic ring. Ch 3 (counts as dc), 14 dc in ring, pull the ring closed, then sl st to the top of the ch-3. (15 dc)
Rnd 2 (points): Ch 6, sc in 2nd ch from hook, hdc in next ch, dc in next ch, tr in each of next 2 ch, skip next 2 dc of Rnd 1, sl st in next dc. Repeat from * 4 more times. The last sl st lands in the joining st. (5 points, each 5 sts plus the tip ch)
Each point is a slim triangle. One long edge is the free loops of the chain, and the other edge is the tops of the sc, hdc, dc, tr, and tr.
Rnd 3 (edging): Working up the first point, sc in each of the 5 free loops of the chain. Then (sc, ch 2, sc) in the tip ch. Working down the other side, sc in each of the 5 sts. Sl st in the sl st at the valley. Repeat this for each point. Fasten off. (60 sc, 5 ch-2 tip sps, 5 valley sl sts)
Pearl: With sewing thread, sew one pearl over the magic ring. Leave the thread tail long enough to stitch through the strand later. Weave in the yarn ends.
Mark one point as the top. The valley opposite it, between the two lower points, is the bottom valley.
Valance
Use cream. The valance is worked flat from the top edge down.
Row 1: Ch 182, sc in 2nd ch from hook and in each ch across. Turn. (181 sc)
Rows 2–3: Ch 1, sc in each st across. Turn. (181 sc)
181 sts = 1 + (15 x 12). Each 12-st repeat later becomes one scallop that is 2.4 in (6.1 cm) wide.
Row 4 (small fans): Ch 1, sc in first sc. Skip 2 sc, 7 dc in next sc, skip 2 sc, sc in next sc. Repeat from * 29 more times. Turn. (30 fans of 7 dc + 31 sc = 241 sts)
Row 5 (offset fans): Ch 3 (counts as dc), 3 dc in first sc for a half fan. Sc in 4th dc of next fan, 7 dc in next sc. Repeat from * 28 more times. Sc in 4th dc of last fan, 4 dc in last sc. Turn. (4 + 29 x 8 + 1 + 4 = 241 sts)
Row 6 (mesh): Ch 1, sc in first dc. Ch 6, sc in 4th dc of next full fan. Repeat from * 28 more times. Ch 6, sc in top of the turning ch-3. Turn. (31 sc, 30 ch-6 sps)
Checkpoint: 36 x 2¼ in (91.4 x 5.7 cm). Don’t fasten off yet. Continue with the Border section below, then come back for the tabs.
Tabs (Make 8)
With RS facing, work into the free loops of the foundation chain on the top edge. Count the loops 1 to 181 from the right. The tabs go over loops 1–6, 26–31, 51–56, 76–81, 101–106, 126–131, 151–156, and 176–181. That leaves 19 loops, or 3.8 in (9.7 cm), between tabs.
Row 1: Join cream in the first loop of the tab, ch 1, sc in the same loop and in the next 5 loops. Turn. (6 sc)
Rows 2–22: Ch 1, sc in each st across. Turn. (6 sc)
The tab measures 1.2 x 4 in (3.0 x 10.2 cm). Fasten off, leaving a 10 in (25.4 cm) tail. Fold the tab to the wrong side and whipstitch the last row across the back of Row 3.
For a thicker rod, add 4 rows to each tab for every extra ¼ in (0.6 cm) of rod diameter.
Make All Pieces
- Denim blue stars: 56
- Cream stars: 64
- Valance: 1, with 8 tabs and the scallop border
- Strands: 16 in cream. Odd strands (1, 3, 5 … 15) carry 8 stars each. Even strands (2, 4 … 16) carry 7 stars each.
Layout grid. Columns are strands 1–16 from left to right. Rows are star-center depths below the valance. B = blue, C = cream, · = bead chain only.
 4 in (10.2 cm):  B·B·B·B·B·B·B·B·
 7 in (17.8 cm):  ·C·C·C·C·C·C·C·C
10 in (25.4 cm):  C·C·C·C·C·C·C·C·
13 in (33.0 cm):  ·B·B·B·B·B·B·B·B
16 in (40.6 cm):  B·B·B·B·B·B·B·B·
19 in (48.3 cm):  ·C·C·C·C·C·C·C·C
22 in (55.9 cm):  C·C·C·C·C·C·C·C·
25 in (63.5 cm):  ·B·B·B·B·B·B·B·B
28 in (71.1 cm):  B·B·B·B·B·B·B·B·
31 in (78.7 cm):  ·C·C·C·C·C·C·C·C
34 in (86.4 cm):  C·C·C·C·C·C·C·C·
37 in (94.0 cm):  ·B·B·B·B·B·B·B·B
40 in (101.6 cm): B·B·B·B·B·B·B·B·
43 in (109.2 cm): ·C·C·C·C·C·C·C·C
46 in (116.8 cm): C·C·C·C·C·C·C·C·
Odd strands get 4 B + 4 C. Even strands get 4 C + 3 B. That gives 32 + 24 = 56 blue and 32 + 32 = 64 cream.
Joining
Finish the border (next section) before you join the strands. The strands hang from the 16 valley sc of Border Row 8. These are sts 1, 24, 47, 70, 93, 116, 139, 162, 185, 208, 231, 254, 277, 300, 323, and 346, so each valley sc carries one strand. Strand spacing is 36 ÷ 15 = 2.4 in (6.1 cm).
Stringing: Before each strand, use the beading needle to string beads onto the cream ball. String 16 beads for an odd strand or 17 for an even strand.
Star join (SJ): Sl st in the top-tip ch-2 sp of a star, from front to back. Ch 11 behind the star, about 2¼ in (5.7 cm). Sl st in the bottom valley sl st from the back. Use the star’s thread tail to stitch the pearl through the 6th ch behind it.
Gap unit (GU): Ch 5, bch, ch 6, bch, ch 5. That’s about 3¾ in (9.5 cm).
Odd strand: Join in the valley sc with a sl st. Ch 6, bch, ch 6. This lead is about 2¾ in (7.0 cm). Then work (SJ, GU) 7 times and SJ once more. Finish with ch 6, bch, ch 1. Fasten off and weave the tail up into the chain. (219 ch, 16 beads, 8 stars)
Even strand: Join as before. Ch 8, bch, ch 9, bch, ch 8. This lead is about 5¾ in (14.6 cm). Then work (SJ, GU) 6 times and SJ once more. Finish with (ch 6, bch) 3 times, ch 1. Fasten off. (217 ch, 17 beads, 7 stars)
The even strand’s extra 8 mm bead takes up the length of its 2 missing ch. That means every strand drops about 49 in (124.5 cm).
Tension: Chain at a relaxed, even tension. Don’t tug the chain behind each star, or the star will cup.
Checkpoint: Hang the curtain on the rod. The strands should be 2.4 in (6.1 cm) apart, and the lowest beads should sit level within ½ in (1.3 cm).
Border
The border is the scallop edge along the bottom of the valance. The top and short sides are not bordered.
Border gauge: One scallop is built on 2 ch-6 spaces, which sit over 12 base sts, or 2.4 in (6.1 cm).
Row 7 (scallops): Ch 1, sc in first sc. 7 dc in next ch-6 sp, dc in next sc, 7 dc in next ch-6 sp, sc in next sc. Repeat from * 14 more times. Turn. (15 scallops of 15 dc + 16 sc = 241 sts)
Row 8 (rounding): Ch 1, sc in first sc. Sc in next 2 dc, hdc in next 2 dc, 2 dc in each of next 7 dc, hdc in next 2 dc, sc in next 2 dc, sc in next sc. Repeat from * 14 more times. Fasten off. (15 scallops of 22 sts + 16 valley sc = 346 sts)
Why the math works: The 30 ch-6 spaces pair up evenly into 15 scallops. The 31 sc of Row 6 split into 16 valleys and 15 scallop centers. In Row 8, the 7 increases sit on the center 7 dc of each scallop, so the scallop curves outward while the valleys stay put. The border adds 1¼ in (3.2 cm), for a total valance depth of 3½ in (8.9 cm).
Final Blocking
- Before joining the strands, lightly mist the stars and pin them flat. Pin each tip out to 3¼ in (8.3 cm) and let them dry.
- Pin the valance flat to 36 in (91.4 cm) wide.
- Pin each scallop to a smooth curve, 1¼ in (3.2 cm) deep.
- Mist, then let it dry completely.
- After joining, hang the curtain and lightly mist the strands so they settle straight under the beads’ weight.
Final Quality-Control Checklist
- 120 stars: 56 blue and 64 cream, each 3¼ in (8.3 cm), with a pearl centered
- Valance is 36 in (91.4 cm) wide with 346 sts in Row 8
- 8 tabs, evenly spaced and securely sewn
- 16 strands: 219 ch on odd strands, 217 ch on even strands, all ending level
- Stars match the layout grid
- All ends woven in at least 2 in (5.1 cm)
Troubleshooting
- Star points curl: Your Rnd 3 tension is too tight. Re-edge with a looser hand, or block harder.
- Valance ruffles: Your Row 4 fans are too loose. Go down a hook size for Rows 4–5.
- Valance pulls in: Use ch 7 for the Row 6 spaces.
- Beads won’t pass over the yarn: Use a floss threader, or choose beads with 2.5 mm holes.
- Strands are uneven: Recount the ch. Even a 5-ch difference is 1 in (2.5 cm).
- Stars twist: Stitch the center pearl firmly through the chain behind the star.
Care
Hand wash in cool water, roll in a towel, and dry flat with the strands laid straight. Don’t wring the strands or tumble dry the curtain.
Final Notes
The measurement chain runs like this. A gauge of 20 sc to 4 in (10.2 cm) makes 181 sts measure 36 in (91.4 cm). That width splits into 15 scallops of 2.4 in (6.1 cm) and gives 16 valleys for 16 strands. At 5 ch per inch, each strand’s chains plus its beads drop about 49 in (124.5 cm). Check each stage, and the curtain will hang straight and even.
Happy crocheting!