

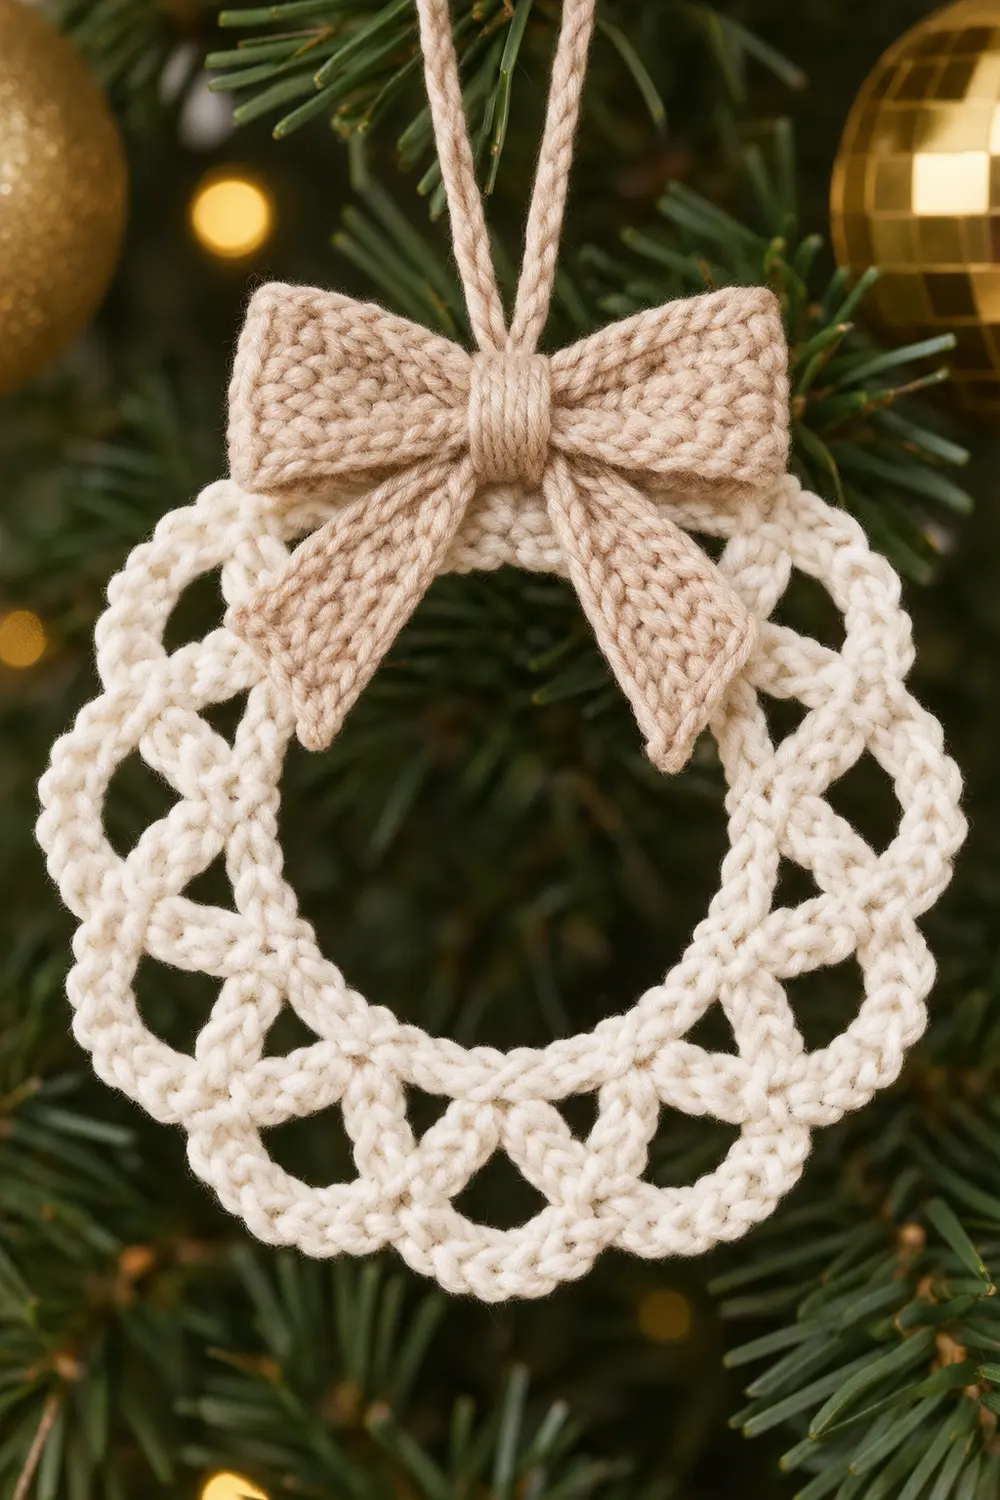
This little wreath ornament is light, lacy, and quietly festive. A ring of open double crochet stitches leads into a round of chain arches, and the outer edge finishes in a continuous row of soft, shell-like scallops. The center stays open, so tree branches and twinkle lights show through.
The wreath is worked in cream or white yarn. A small light-beige bow sits at the top center, and the hanging loop is bound into the bow’s center wrap. Among gold baubles and warm lights, the neutral palette looks elegant rather than busy.
All terms are US crochet terms. The finished ornament measures 3.75 in (9.5 cm) across, with an inner opening of about 1.5 in (3.8 cm).
Construction is simple. You crochet a chain ring and work four rounds into it. The last round is the scalloped edge. You then make a ridged bow from two small flat strips, wrap its center together with a chain hanging loop, and sew it to the top of the wreath.
Finished Size and Construction
- Finished size: 3.75 in (9.5 cm) diameter, blocked
- Inner opening: 1.5 in (3.8 cm)
- Ring width: about 1.125 in (2.9 cm)
- Skill level: Advanced beginner
- Terminology: US crochet terms
- Yarn weight: DK (#3), cotton or cotton blend
- Hook: 3.5 mm (E-4)
- Number of pieces: 1 wreath, with 1 bow (made from 2 small strips) and 1 chain hanging loop attached
- Layout: Single circular motif with the bow at top center
- Wreath size before border (after Rnd 3): 3.25 in (8.3 cm)
- Border depth: 0.25 in (0.6 cm) on each side, adding 0.5 in (1.3 cm) to the diameter
Materials
Yarn advice: Use a smooth, tightly plied DK cotton. Cotton holds the scallop shapes crisply and blocks well. Avoid fuzzy or brushed yarns, because they blur the openwork.
- Cream or white (wreath): 10 g, about 24 m
- Light beige or tan (bow and hanging loop): 8 g, about 19 m
These quantities include a generous margin for tails, swatching, and one restart. A single ornament uses less.
Tools:
– 3.5 mm (E-4) crochet hook
– Tapestry needle
– Scissors
– 1 stitch marker
– Rustproof pins and a foam blocking mat
– Spray bottle with water
– Optional: fabric stiffener, for a firmer ornament
– Optional: paper circle template, 3.75 in (9.5 cm) across
Abbreviations (US Terms)
- ch – chain
- sl st – slip stitch
- sc – single crochet
- hdc – half double crochet
- dc – double crochet
- sp – space
- st(s) – stitch(es)
- sk – skip
- BLO – back loop only
- Rnd – round
- * * – repeat the instructions between asterisks as directed
Special stitch – Scallop: (sc, hdc, 3 dc, hdc, sc) all in the same ch-4 arch. One scallop = 7 sts.
Gauge and Checkpoints
Exact gauge is not critical for an ornament, but size and flatness are. Test the first two rounds before committing.
Base gauge: 5 sc = 1 in (2.5 cm). The chain runs at about 5.5 ch per 1 in (2.5 cm).
Measurement checkpoints:
- Foundation ch 24: about 4.5 in (11.4 cm) long before joining
- After Rnd 1: 2 in (5.1 cm) outer diameter, 1.5 in (3.8 cm) opening
- After Rnd 2: 2.75 in (7.0 cm)
- After Rnd 3: 3.25 in (8.3 cm)
- After Rnd 4 (border), blocked: 3.75 in (9.5 cm)
If too big (more than 0.25 in / 0.6 cm over at Rnd 2), go down to a 3.25 mm or 3.0 mm hook.
If too small, go up to a 3.75 mm or 4.0 mm hook.
If the ring ruffles at Rnd 2, your dc are wider than your sc. Go down half a hook size for Rnd 2 only.
If the ring cups like a bowl, your tension is tightening as you go. Relax your grip, or go up half a hook size for Rnds 2–4.
Wreath Rounds 1–3
Use the cream yarn. Do not turn at the end of any round. Work with the right side facing throughout.
Foundation: Ch 24. Sl st into the first ch to form a ring, making sure the chain is not twisted.
Rnd 1: Ch 1. Work 30 sc into the center of the ring, working over the chain rather than into individual chains. Join with a sl st to the first sc. (30 sc)
Push the stitches evenly around the ring as you go so they don’t bunch on one side. Place a marker at the join. This spot will become the top of the wreath, hidden behind the bow.
Rnd 2: Ch 3 (counts as first dc). Dc in the next sc, ch 1. *Dc in each of the next 2 sc, ch 1*. Repeat from * to * 14 more times. Join with a sl st to the top of the beginning ch-3. (30 dc, 15 ch-1 sps)
This round’s count is its own complete total. Each of the 30 sc from Rnd 1 receives exactly 1 dc, giving 15 pairs of dc. The ch-1 between pairs opens the lace.
Checkpoint: 2.75 in (7.0 cm) across, lying flat.
Rnd 3: Sl st in the next dc (the second dc of the first pair), then sl st into the next ch-1 sp. Ch 1, sc in the same sp, ch 4. *Sc in the next ch-1 sp, ch 4*. Repeat from * to * 13 more times. Join with a sl st to the first sc. (15 sc, 15 ch-4 arches)
There is one sc per ch-1 sp from Rnd 2 (15 total). The final ch 4 before the join makes the 15th arch. The arches total 60 ch.
Checkpoint: 3.25 in (8.3 cm) across. The arches should lie flat and curve gently outward, not flip up.
Do not fasten off. Continue straight into the border.
Bow (Make 1)
Use the light beige or tan yarn. The bow is made from two flat strips: a body and a tail piece.
Bow body:
Ch 21.
Row 1: Sc in the 2nd ch from the hook and in each ch across. Ch 1, turn. (20 sc)
Rows 2–4: Sc in the BLO of each st across. Ch 1, turn. (20 sc per row)
Fasten off, leaving a 6 in (15.2 cm) tail.
The body measures about 4 in (10.2 cm) by 0.8 in (2.0 cm). The BLO rows create the fine ridges you see on the bow in the photo.
Bow tails:
Ch 13.
Row 1: Sc in the 2nd ch from the hook and in each ch across. Ch 1, turn. (12 sc)
Row 2: Sc in the BLO of each st across. (12 sc)
Fasten off and weave in the ends. The tail strip measures about 2.4 in (6.1 cm) by 0.4 in (1.0 cm).
Hanging Loop
Use the tan yarn. Leave an 8 in (20.3 cm) starting tail, then ch 30. Fasten off, leaving another 8 in (20.3 cm) tail.
The chain measures about 5.5 in (14.0 cm). Folded in half, it gives a loop about 2.75 in (7.0 cm) long.
Border: Scalloped Shell Edge (Rnd 4)
The border is the wreath’s fourth round. It is worked directly into the Rnd 3 arches with the cream yarn.
Border gauge: about 4 scallops per 3 in (7.6 cm) of outer edge. The full blocked outer circumference is roughly 11.8 in (30.0 cm), carrying 15 scallops.
Rnd 4: Sl st into the first ch-4 arch. Ch 1 (does not count as a st). Work 1 Scallop, (sc, hdc, 3 dc, hdc, sc), in the same arch. *Work 1 Scallop in the next ch-4 arch*. Repeat from * to * 13 more times. Join with a sl st to the first sc. (15 scallops, 105 sts)
Count per arch: 7 sts in each of the 15 arches. A circle has no sides, so the arch is the unit to check. The total is 15 × 7 = 105 sts.
Fasten off, leaving a 6 in (15.2 cm) tail, and weave in all cream ends.
Why the math works: Everything flows from Rnd 1.
– 30 sc ÷ 2 = 15 dc pairs in Rnd 2.
– 15 pairs give 15 ch-1 sps.
– 15 sps give 15 arches in Rnd 3.
– 15 arches give 15 scallops in Rnd 4.
No round adds or loses repeats, so the scallops sit evenly around the ring with no crowded or stretched section.
The 7-st scallop holds more stitches than its ch-4 arch is long. That extra fullness is what makes each scallop dome outward into a shell shape while the ring itself stays flat.
Checkpoint: Unblocked, the wreath measures 3.5–3.75 in (8.9–9.5 cm) across.
Final Blocking
Block the wreath and bow first, then assemble.
-
Wet the wreath. Mist it thoroughly with water, or dip it and press it gently in a towel. For a firmer ornament, soak it in diluted fabric stiffener instead.
-
Pin the wreath to the template. Lay it on the blocking mat over a 3.75 in (9.5 cm) paper circle. Center the 1.5 in (3.8 cm) opening.
-
Pin each scallop. Place one pin at the tip of each scallop’s center dc, so all 15 points touch the template line. Pin opposite scallops in turn so the circle stays even.
-
Open the arches. Use a pin tip to nudge each Rnd 3 arch and each Rnd 2 ch-1 sp open so the lace reads clearly.
-
Block the bow pieces. Mist the bow body and tail strip. Pin them flat and straight.
-
Dry completely. Leave everything for at least 6–8 hours, or until fully dry.
-
Shape the bow.
- Fold both short ends of the bow body to the center back, overlapping them by about 0.25 in (0.6 cm). This gives two loops and a bow about 2 in (5.1 cm) wide.
-
Fold the tail strip into an inverted V and place it behind the bow center so both tails point down.
-
Bind the hanging loop. Fold the hanging chain in half. Lay both of its ends vertically behind the bow center.
-
Wrap the center. Using the bow body’s 6 in (15.2 cm) tail, wrap the bow center 6–8 times. Bind the bow loops, tails, and hanging-loop ends together in one tight band. Secure the wrap with a few stitches on the back.
-
Attach to the wreath.
- Position the bow at top center, over the marked join.
- Use the hanging loop’s tails to sew the bow assembly through Rnds 2–3 of the wreath from the back.
- Knot securely and weave in all ends.
- Remove the marker.
Final Quality-Control Checklist
- Rnd 1 has 30 sc. Rnd 2 has 30 dc and 15 ch-1 sps.
- Rnd 3 has 15 arches. Rnd 4 has 15 scallops of 7 sts each, 105 sts total.
- The wreath measures 3.75 in (9.5 cm) across, within 0.25 in (0.6 cm).
- The inner opening measures about 1.5 in (3.8 cm).
- The ornament lies flat, with no ruffling or cupping.
- All scallops are the same size and evenly spaced.
- The bow is about 2 in (5.1 cm) wide, centered at the top, and covers the round joins.
- The hanging loop is about 2.75 in (7.0 cm) long, centered, and holds the ornament straight.
- All ends are woven in invisibly on the back.
Troubleshooting
The wreath ruffles. Your Rnd 2 dc are too wide. Redo Rnd 2 half a hook size smaller, or check that you made only 1 dc per sc.
The wreath cups upward. Your tension is tightening across the rounds. Redo Rnds 3–4 with a looser grip or half a hook size larger.
You have fewer or more than 15 arches. Recount your Rnd 2 ch-1 sps. Each pair needs its own ch 1, including the last pair before the join.
The scallops look flat. Make sure each scallop has all 3 dc in the center. Pin the center dc points firmly during blocking.
The opening is too small. Rnd 1 stitches are bunched over the chain ring. Spread them evenly, or start again with ch 26.
The bow droops. Wrap the center tighter, or stiffen the bow lightly.
The ornament hangs crooked. The hanging loop is off-center. Re-sew it directly over the top center scallop.
Care
Spot clean with cool water and lay flat to dry, reshaping the scallops with your fingers. Store flat in tissue paper to keep the bow and scallops crisp.

Final Notes
The measurement chain is simple, and each step builds on the last:
- Foundation ring: 4.5 in (11.4 cm)
- Rnd 1: 2 in (5.1 cm) across, with a 1.5 in (3.8 cm) opening
- Rnd 2: 2.75 in (7.0 cm)
- Rnd 3: 3.25 in (8.3 cm)
- Scalloped Rnd 4, blocked: 3.75 in (9.5 cm)
The stitch counts follow one line: 30 sc, 15 pairs, 15 arches, 15 scallops. If each checkpoint matches, the finished ornament will too.
Once the tan bow and hanging loop are bound together and stitched at the top center, your lacy wreath is ready for the tree. Optional: make several in the same colors for a matching set of tree ornaments.
Happy crocheting!