

This crescent moon ornament is a small, lacy keepsake made for the tree. A white openwork band of radiating fans forms the moon. A warm sand-colored edge outlines the outer curve, and a tiny beige star hangs from the upper tip on a short chain.
The look is soft and Scandinavian-inspired: two neutral colors, crisp lace, and a corded edge that holds the shape after blocking. It looks good against green branches, on a gift package, or hung in a window.
This pattern uses US crochet terms. The finished crescent is 4.5 in (11.4 cm) tall and 3.75 in (9.5 cm) wide. The star is 1.25 in (3.2 cm) across, and the hanging loop rises 2.75 in (7.0 cm) above the moon.
The crescent is one piece worked flat in rows along a foundation chain that becomes the inner curve. Each row gets longer, so the band curves naturally into a C. You then add a beige border, crochet the star separately, attach it with a short chain, and add a corded hanging loop.
Finished Size and Construction
- Finished crescent size: 4.5 in (11.4 cm) tall × 3.75 in (9.5 cm) wide
- Skill level: Easy-intermediate
- Terminology: US crochet terms
- Yarn weight: Sport-weight cotton (CYC 2, fine)
- Hook: 3.25 mm (US D-3)
- Number of pieces: 1 crescent + 1 small star charm. No motif joining.
- Layout: A single crescent with the star hanging inside the curve from the upper tip
- Band width before border: 1.25 in (3.2 cm)
- Crescent size before border: 4 in (10.2 cm) tall × 3.25 in (8.3 cm) wide
- Border depth: 0.25 in (0.6 cm)
- Star size: 1.25 in (3.2 cm) point to point
Materials
Yarn: Use a smooth, mercerized or combed sport-weight cotton. Cotton shows off the spokes clearly and blocks crisply. Acrylic softens the lace and won’t hold the points as well.
- Color A – White: 8 g (about 25 m)
- Color B – Sand/Beige: 5 g (about 15 m)
These quantities include a margin for your gauge swatch and weaving in ends.
Tools:
– 3.25 mm (US D-3) crochet hook
– Tapestry needle
– Scissors
– Blocking mat or foam board
– Rust-proof pins
– Spray bottle with water
– Optional: diluted fabric stiffener or spray starch
Abbreviations (US Terms)
- ch – chain
- sl st – slip stitch
- sc – single crochet
- hdc – half double crochet
- dc – double crochet
- sp – space
- st(s) – stitch(es)
- BLO – back loop only
- RS – right side
Special stitch – Fan: In the same stitch, work (dc, ch 1) 4 times, then dc. Each fan has 5 dc and 4 ch-1 spaces.
Gauge and Checkpoints
Gauge: 12 sc × 12 rows = 2 in (5.1 cm) with Color A and the 3.25 mm hook.
Lace ornaments are small, so it’s quicker to make one test crescent than a big swatch. Measure at each of these checkpoints:
- After Row 1: The sc strip measures about 5.25 in (13.3 cm) laid straight.
- After Row 2: Each fan is about 0.5 in (1.3 cm) tall, measured from the Row 1 edge.
- After Row 4: The band is 1.25 in (3.2 cm) wide. Laid in a C, the crescent is about 4 in (10.2 cm) tall.
- After the border: The crescent is 4.5 in (11.4 cm) tall × 3.75 in (9.5 cm) wide.
Too big? Go down to a 2.75 mm hook, or switch to a slightly finer cotton.
Too small? Go up to a 3.5 mm (US E-4) hook.
Don’t change the stitch counts. The C shape depends on the ratio between the inner and outer edges, so adjust size with the hook only.
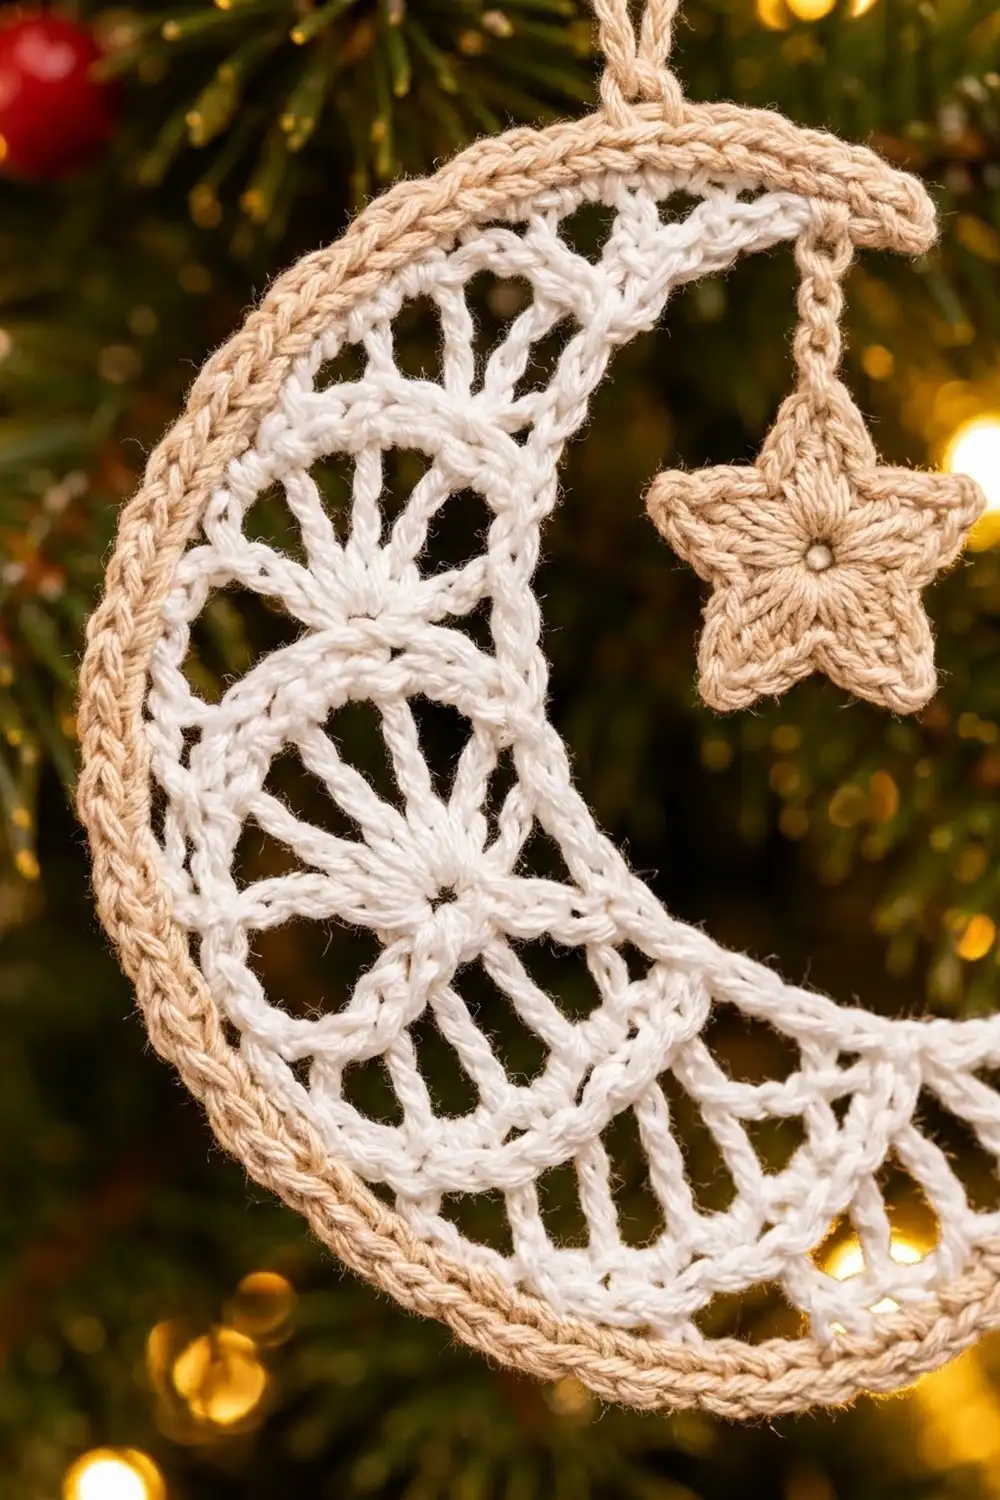
Crescent Moon (Color A – White)
The crescent is worked in rows. Turn at the end of every row. The ch 1 at the start of a row does not count as a stitch.
Foundation: With Color A, ch 32.
Row 1 (RS – inner curve): Sc in the 2nd ch from the hook and in each ch across. Turn.
Count: 31 sc.
This row becomes the solid inner edge of the moon.
Row 2 (fan row): Ch 1, sc in the first sc. Skip 2 sc, Fan in the next sc, skip 2 sc, sc in the next sc. Repeat from * to * 4 more times. Turn.
Count: 5 fans (25 dc, 20 ch-1 sps) and 6 sc.
Check: 1 + 5 × (2 + 1 + 2 + 1) = 31. Every Row 1 stitch is either used or skipped exactly once. The fans spread outward, and the band starts to curve.
Row 3 (spoke row): Ch 1, sc in the first sc. Ch 1, dc in the next ch-1 sp, (ch 2, dc in the next ch-1 sp) 3 times, ch 1, sc in the next sc. Repeat from * to * 4 more times. Turn.
Count: 20 dc and 6 sc. Each fan section now has 2 ch-1 sps and 3 ch-2 sps.
The dc land between the Row 2 spokes and open each fan into a wider arch. This gives the radiating lace you see in the photo.
Row 4 (outer edge row): Ch 1, sc in the first sc. Sc in the ch-1 sp, (sc in the next dc, 2 sc in the next ch-2 sp) 3 times, sc in the next dc, sc in the ch-1 sp, sc in the next sc. Repeat from * to * 4 more times.
Count: 66 sc (12 sc per fan section × 5 = 60, plus 6 sc on the separating stitches).
Fasten off Color A.
Checkpoint: Lay the piece in a C with Row 1 on the inside. The band should measure 1.25 in (3.2 cm) wide and curve without ruffling. The outer edge is a little more than twice as long as the inner edge (66 vs. 31 stitches), which produces the crescent shape.
Border (Color B – Sand)
Border gauge: 6 sc = 1 in (2.5 cm), the same as the body gauge. That keeps the border flat.
The border wraps the first tip, runs along the outer curve, and wraps the second tip. The inner edge stays white.
Row 5: With the RS facing, join Color B with a sl st at the free end of the foundation chain, where the inner edge meets the first tip. Ch 1.
– First tip: Work 4 sc evenly up the row ends of Rows 1–4 (1 sc per row end).
– Outer curve: Sc in each of the 66 sc of Row 4.
– Second tip: Work 4 sc evenly down the row ends of Rows 4–1 (1 sc per row end).
Turn.
Count: 4 + 66 + 4 = 74 sc.
Row 6 (corded edge): Ch 1, sl st in the BLO of each sc across. Fasten off, leaving a 6 in (15.2 cm) tail.
Count: 74 sl st.
Why the math works: Row 4 already has the length the outer curve needs, so the border works exactly 1 sc per stitch, with no increases. Each of Rows 1–4 begins with a short sc, so the row ends at the tips are short. One sc per row end fills them without bunching. The slip stitch row adds a raised, cord-like line that matches the photo, while adding almost no width. The border adds 0.25 in (0.6 cm) per side. That takes the crescent from 4 in (10.2 cm) to 4.5 in (11.4 cm) tall, and from 3.25 in (8.3 cm) to 3.75 in (9.5 cm) wide.
Star Charm (Color B – Sand)
Round 1: Make a magic ring. Ch 1, then work 10 sc into the ring. Pull the ring closed and sl st to the first sc.
Count: 10 sc. Diameter: about 0.5 in (1.3 cm).
Round 2 (points): Ch 4, sl st in the 2nd ch from the hook, sc in the next ch, hdc in the next ch, skip 1 sc of Round 1, sl st in the next sc. Repeat from * to * 4 more times. The last sl st goes into the starting sl st.
Count: 5 points. Each point uses 2 sc of Round 1, so 5 × 2 = 10.
Fasten off, leaving an 8 in (20.3 cm) tail.
Checkpoint: The star measures 1.25 in (3.2 cm) from point to point.
Attaching the Star and Hanging Loop
Star drop: Insert the hook into the tip of one star point and pull up a loop of the star’s tail. Ch 6, which is about 1 in (2.5 cm). Sl st into the inner corner of the upper tip, then fasten off and weave in the end. The star should hang inside the curve of the moon without touching the band.
Hanging loop: Join Color B with a sl st into the Row 6 edge at the top of the outer curve, about 0.75 in (1.9 cm) from the upper tip. Ch 34. Sl st in the 2nd ch from the hook and in each ch back down (33 sl st), which makes a firm cord. Sl st into the same edge stitch you started from to close the loop. Fasten off.
Folded loop height: 2.75 in (7.0 cm).
Final Blocking
- Weave in all ends along the border on the wrong side, but don’t trim them yet.
- Spray the crescent until it’s evenly damp, but not dripping.
- Lay it RS up on the blocking mat.
- Pin the inner edge into a smooth arc. Pin the tips first, keeping them 1.25 in (3.2 cm) apart at their inner corners.
- Pin the outer curve, easing the beige edge so the crescent is 4.5 in (11.4 cm) tall and 3.75 in (9.5 cm) wide.
- Use one pin per fan section to open each fan, so the spokes radiate evenly.
- Pin the star flat with its points spread, keeping the drop chain straight.
- If you want a stiffer ornament, mist lightly with starch or diluted stiffener.
- Let it dry completely, then unpin and trim the tails.
Final Quality-Control Checklist
- [ ] Row 1 has 31 sc, and the inner edge is smooth and white.
- [ ] There are 5 fans, each with 5 dc spokes.
- [ ] Row 4 has 66 sc, and the outer curve lies flat.
- [ ] The border has 74 sc and 74 sl st and wraps both tips.
- [ ] The crescent is 4.5 in (11.4 cm) × 3.75 in (9.5 cm).
- [ ] The star has 5 even points and measures 1.25 in (3.2 cm).
- [ ] The star hangs freely on a 1 in (2.5 cm) chain.
- [ ] The hanging loop is 2.75 in (7.0 cm) tall and firmly secured.
- [ ] No ends are visible on the right side.
Troubleshooting
The band stays straight instead of curving. Your Row 1 is probably too loose compared with the fans. Work Row 1 a little more snugly, or use a hook one size smaller for the foundation and Row 1 only.
The outer edge ruffles. The Row 4 tension is too loose, or you’ve added stitches. Recount to 66, and work Row 4 firmly.
The outer edge cups or pulls the tips inward. The border is too tight. Work Row 5 more loosely, or use a hook one size larger for the border rows only.
The fans look crowded. Check that you skipped 2 sc on both sides of every fan in Row 2.
The star points curl. Block the star flat and pin each point. Working the Round 2 chains a little tighter also helps.
The ornament twists when it hangs. Move the hanging loop slightly toward the upper tip so the star’s weight balances the moon.
Care
Hand wash in cool water with mild soap, press out the water in a towel, and reshape it flat to dry. If you used stiffener, re-block it after washing.

Final Notes
The measurement chain is simple:
– A 31-stitch inner edge measures 5.25 in (13.3 cm).
– Five fans and two lace rows build a 66-stitch outer edge.
– That gives a 1.25 in (3.2 cm) band and a 4 in (10.2 cm) crescent.
– The 74-stitch, 0.25 in (0.6 cm) border brings the moon to 4.5 in (11.4 cm) × 3.75 in (9.5 cm).
– The finishing details are a 1.25 in (3.2 cm) star on a 1 in (2.5 cm) chain and a 2.75 in (7.0 cm) loop.
If your gauge matches, every checkpoint will match too. Make one moon, hang it, and you’ll probably want a whole sky of them.
Happy crocheting!