

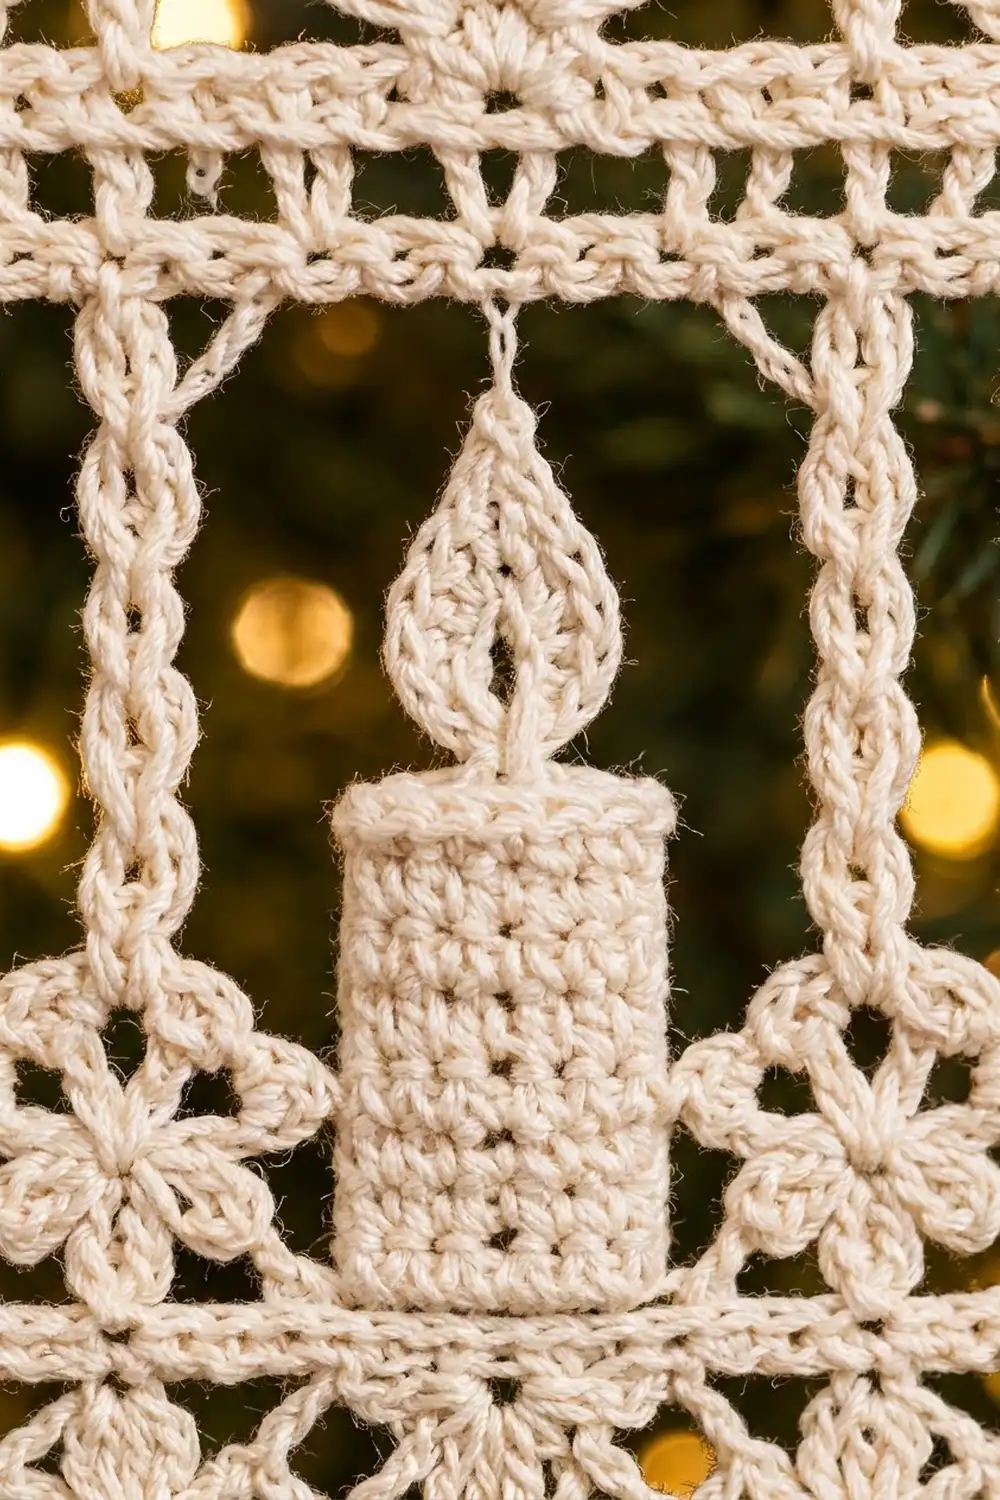
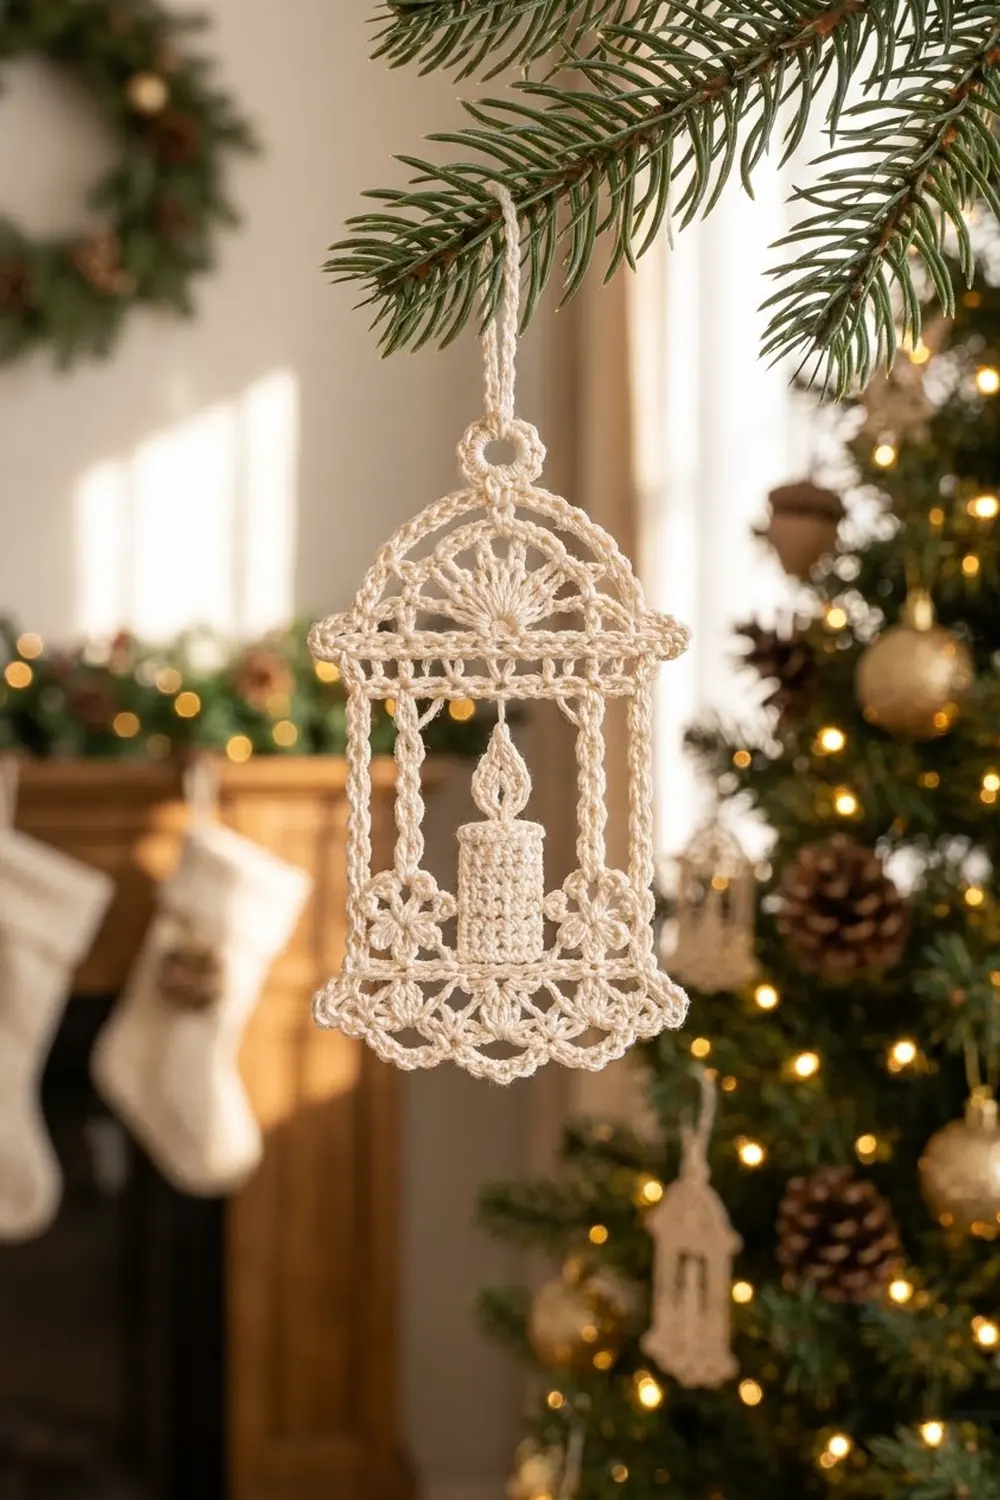
This little lantern is made in fine cream cotton thread. It has a sunburst dome, slim pillars, and a small candle with a teardrop flame glowing in the middle. Once it is starched flat, it reads like a piece of vintage lace hanging on the tree.
The design uses one color, ivory or cream, which lets the openwork stand out against green branches and warm lights. The look is classic thread lace: solid bars and the candle contrast with airy windows, two tiny flowers, and a scalloped skirt.
All terms are US crochet terms. The finished ornament measures 2.6 in (6.6 cm) wide by 3.75 in (9.5 cm) tall, not counting the hanger. To the top of the ring it is 4.25 in (10.8 cm), and the hanging loop adds about 1.25 in (3.2 cm).
You work it in one piece. First you make the dome as a half-circle fan in rows. Next you work the crossbar along the dome’s straight edge. Then you crochet the pillars, flame, candle and flowers downward in filet-style rows, finish with a flared skirt, and add the ring and hanging loop last.
Finished Size and Construction
- Finished size: 2.6 in (6.6 cm) wide × 3.75 in (9.5 cm) tall, excluding the hanger
- Skill level: Intermediate (thread crochet, clusters, decreases)
- Terminology: US
- Yarn weight: Size 10 cotton crochet thread (Lace, weight 0)
- Hook: 1.5 mm (US steel 8)
- Number of pieces: 1
- Layout: Dome on top, crossbar, pillared body, skirt at the bottom
- Piece size: The dome is 1.9 in (4.8 cm) wide × 1 in (2.5 cm) tall
- Size before the skirt border: 2.1 in (5.3 cm) wide × 3.2 in (8.1 cm) tall
- Border depth: about 0.55 in (1.4 cm)
Materials
Yarn: Use mercerized size 10 cotton crochet thread. It holds starch well and keeps the stitches crisp. Pick a cream, ivory or ecru shade; bright white also works but looks colder.
- Cream (main and only color): 5 g, about 26 m (28 yd)
Tools:
– 1.5 mm (US steel 8) crochet hook
– Fine tapestry needle
– Small scissors
– Fabric stiffener or heavy spray starch
– Foam blocking board and rustproof pins
– Plastic wrap to protect the board
These quantities include a margin of about 25% for the gauge swatch and weaving in ends. One ornament actually uses about 4 g.
Abbreviations (US Terms)
- ch – chain
- sl st – slip stitch
- sc – single crochet
- dc – double crochet
- tr – treble crochet
- sp – space
- st(s) – stitch(es)
- RS / WS – right side / wrong side
Special stitches:
- CL (3-dc cluster): *Yarn over, insert the hook in the stitch or space, pull up a loop, yarn over, pull through 2 loops.* Repeat from * to * 2 more times in the same place (4 loops on the hook). Yarn over and pull through all 4 loops.
- dc5tog: *Yarn over, insert the hook in the next stitch, pull up a loop, yarn over, pull through 2 loops.* Repeat from * to * in each of the next 4 stitches (6 loops on the hook). Yarn over and pull through all 6 loops.
Gauge and Checkpoints
Gauge: 10 sts and 5 dc rows = 1 in (2.5 cm). At this tension, sc rows are about 0.1 in (0.3 cm) tall, dc rows about 0.2 in (0.5 cm), and tr rows about 0.3 in (0.8 cm).
Thread crochet gauge depends heavily on how firmly you work. Crochet the dome first and use it as your swatch.
Checkpoints:
1. After dome Row 5: about 1.9 in (4.8 cm) across the straight edge and 1 in (2.5 cm) tall.
2. After the crossbar: 2.1 in (5.3 cm) wide and 1.5 in (3.8 cm) tall in total.
3. After body Row 8: the body adds 1.6 in (4.1 cm), for 3.1 in (7.9 cm) in total.
4. After body Row 9: 3.2 in (8.1 cm) tall.
5. Finished: 2.6 in (6.6 cm) wide × 3.75 in (9.5 cm) tall.
Too big? Change to a 1.25 mm hook (US steel 10). Too small? Change to a 1.75 mm hook (US steel 6). If the dome ruffles, your dc and tr stitches are too short, so pull up a slightly longer loop. If the dome cups, go up a hook size.
Part 1: Dome
The dome is a half-circle worked in turned rows. The center of the fan is at the bottom middle of the dome.
Row 1 (RS): Ch 5. Work 10 tr in the 5th ch from the hook. The skipped ch-4 counts as the first tr. Turn. (11 tr)
Row 2: Ch 4 (counts as dc + ch 1). Dc in the next tr, *ch 1, dc in the next tr*; repeat from * to the end, working the last dc in the top of the turning chain. Turn. (11 dc, 10 ch-1 sps = 21 sts)
The dc and the chain spaces stretch the tr spokes outward, which gives the dome its sunburst lines.
Row 3: Ch 1. Sc in the first dc, *sc in the ch-1 sp, sc in the next dc*; repeat from * across. Turn. (21 sc)
Row 4: Ch 5 (counts as dc + ch 2). Skip the next sc, dc in the next sc, *ch 2, skip the next sc, dc in the next sc*; repeat from * across. Turn. (11 dc, 10 ch-2 sps)
This row forms the open chain-arch band of the dome.
Row 5: Ch 1. Sc in the first dc, *2 sc in the ch-2 sp, sc in the next dc*; repeat from * 10 times in total. Do not turn or fasten off. (1 + 10 × 3 = 31 sc)
Check the dome against Checkpoint 1 before you continue.
Part 2: Crossbar
Rotate the dome so the straight edge is on top, and work along it.
Row A: Ch 1. Working into the row ends, work:
– 1 sc in the Row 5 end
– 2 sc in the Row 4 end
– 1 sc in the Row 3 end
– 2 sc in the Row 2 end
– 3 sc in the Row 1 end
Then work 1 sc in the foundation ch at the center of the fan. Repeat the row-end sequence in reverse on the other side (3, 2, 1, 2, 1). Turn. (9 + 1 + 9 = 19 sc)
Row B: Ch 1. Work 2 sc in the first sc, sc in the next 17 sc, then 2 sc in the last sc. Turn. (17 sc worked one per stitch + 4 sc from the two increases = 21 sc)
These 2 extra stitches create the small overhang at each end of the crossbar.
Row C: Ch 3 (counts as dc). Dc in each sc across. Turn. (21 dc)
Row D: Ch 1. Sc in each dc across, ending in the top of the turning chain. Turn. (21 sc)
Check against Checkpoint 2. The dome now hangs above the crossbar, and every following row hangs below it.
Part 3: Body (Pillars, Flame, Candle and Flowers)
The 21 sts are divided into sections. Reading from either edge:
| Section | Width |
|---|---|
| Outer pillar | 2 sts |
| Window | 3 sts |
| Inner pillar | 1 st |
| Center | 9 sts |
| Inner pillar | 1 st |
| Window | 3 sts |
| Outer pillar | 2 sts |
That gives 2 + 3 + 1 + 9 + 1 + 3 + 2 = 21. Every row below keeps each section at the same width.
In every body row, work each pillar dc into the matching pillar stitch of the row before. The turning ch-3 always counts as the first dc of the outer pillar. Each row ends with a dc in the last dc and a dc in the top of the turning chain.
Row 1 (flame point): Ch 3. Dc in the next sc. Ch 3, skip 3 sc, dc in the next sc (inner pillar). Ch 4, skip 4 sc, dc in the next sc. This is the center stitch, st 11, and it forms the flame stem. Ch 4, skip 4 sc, dc in the next sc (inner pillar). Ch 3, skip 3 sc, dc in the last 2 sc. Turn. (7 dc, 2 ch-3 sps, 2 ch-4 sps = 21 sts)
Row 2 (flame top): Ch 3, dc in the next dc. Ch 3, dc in the inner pillar dc. Ch 2, work 5 dc in the stem dc, ch 2. Dc in the inner pillar dc, ch 3, dc in the last 2 sts. Turn. (Center: 2 + 5 + 2 = 9)
Row 3 (flame belly): Work the pillars and windows as in Row 2. For the center: ch 1, 2 dc in the first shell dc, dc in the next 3 dc, 2 dc in the last shell dc, ch 1. Turn. (Center: 1 + 7 + 1 = 9)
Row 4 (flame base): Work the pillars and windows as before. For the center: ch 4, skip the first dc, dc5tog over the next 5 dc, skip the last dc, ch 4. Turn. (Center: 4 + 1 + 4 = 9)
The dc5tog closes the teardrop into a rounded bottom and also acts as the wick.
Row 5 (candle top): Work the pillars and windows as before. For the center: ch 1, 3 dc in the ch-4 sp, dc in the dc5tog, 3 dc in the next ch-4 sp, ch 1. Turn. (Center: 1 + 7 + 1 = 9; the candle is 7 dc wide)
Row 6 (candle and flower top petal): Ch 3, dc in the next dc. For the window: ch 1, CL in the ch-3 sp, ch 1. Dc in the inner pillar. For the center: ch 1, dc in each of the 7 candle dc, ch 1. Dc in the inner pillar. Work the second window the same way (ch 1, CL, ch 1), then dc in the last 2 sts. Turn. (Each window: 1 + 1 + 1 = 3)
Row 7 (side petals): Work the outer and inner pillars as before. In each window: CL in the first ch-1 sp, ch 1, CL in the next ch-1 sp. For the center: ch 1, dc in each of the 7 dc, ch 1. Turn. (Each window: 3 sts)
Row 8 (bottom petal): Work the pillars as before. In each window: ch 1, CL in the ch-1 sp, ch 1. For the center: ch 1, 7 dc, ch 1. Turn.
The single cluster in Row 6, the two in Row 7 and the single cluster in Row 8 form a four-petal flower around a small hole. The candle is now 4 dc rows tall, about 0.7 in (1.8 cm) wide × 0.8 in (2.0 cm) tall.
Row 9 (base bar): Ch 1. Sc in each dc, CL and ch across. Count each ch-1 as 1 st, and each ch-3 or ch-4 as 3 or 4 sts. Turn. (21 sc)
Check against Checkpoints 3 and 4: 2.1 in (5.3 cm) wide × 3.2 in (8.1 cm) tall.
Border: Flared Skirt
On this ornament the only border is along the bottom edge. The side edges stay as plain pillar edges, and the dome edge is already finished by Row 5.
Border gauge: Each shell repeat takes up 5 sts, or 0.5 in (1.3 cm). The skirt adds about 0.55 in (1.4 cm) of depth.
Row 10: Ch 3 (counts as dc). *Dc in the next 3 sc, 2 dc in the next sc*; repeat from * 5 times in total. Turn. (1 + 20 = 21 sts worked one per stitch, + 5 increases = 26 dc)
The 5 increases widen the bottom edge from 2.1 in (5.3 cm) to 2.6 in (6.6 cm), which gives the bell flare.
Row 11 (shells): Ch 1. Sc in the first dc, *skip 2 dc, 5 dc in the next dc, skip 2 dc, sc in the next dc*; repeat from * 5 times in total. Turn. (5 shells and 6 sc = 31 sts)
Row 12 (loop edge): Ch 1. Sc in the first sc, *ch 3, sc in the 3rd (center) dc of the shell, ch 3, sc in the next sc*; repeat from * 5 times in total. Fasten off. (11 sc, 10 ch-3 loops)
Why the math works: Row 10 uses 1 + (4 × 5) = 21 sts, so it matches Row 9 exactly. Row 11 needs 1 + (5 × number of repeats) sts. With 26 dc that gives exactly 5 repeats, with a sc at each end. Row 12 then has one tip per shell and one anchor per sc, so the edge is symmetrical, with the 3rd shell centered under the candle.
Hanger
- With the RS facing, find the center sc of dome Row 5. It is st 16 of 31.
- Join the thread with a sl st in that stitch, ch 1, and sc in the same stitch.
- Ch 8, then sl st in the sc to form a ring.
- Ch 1 and work 12 sc over the ring. Sl st in the first sc.
- Sl st in the next 6 sc to reach the top of the ring.
- Ch 25, then sl st in the same sc to make the hanging loop.
- Fasten off.
The ring adds about 0.5 in (1.3 cm) of height.
Final Blocking
- Weave in all ends along the solid areas: the crossbar, the candle and the base bar.
- Wet the ornament fully in fabric stiffener or a strong starch solution. Gently squeeze out the excess.
- Lay it RS up on a board covered with plastic wrap.
- Pin the center bottom of the dome first. Then pin the crossbar straight at 2.1 in (5.3 cm) wide.
- Pin each outer pillar straight and parallel. Pin the base bar to 2.1 in (5.3 cm).
- Pin the skirt out to 2.6 in (6.6 cm), putting a pin in each ch-3 loop so the scallops open.
- Use a pin to round each window, the flame and the flower holes.
- Check that the height is 3.75 in (9.5 cm) and the dome has an even curve.
- Let it dry completely, at least 12 hours, before you unpin it.
Final Quality-Control Checklist
- The dome has 31 sc in Row 5 and a symmetrical fan of 11 spokes.
- The crossbar has 21 sts and sticks out evenly on both sides.
- All four pillars are straight, and both windows are the same size.
- The flame point is centered on st 11, and the candle is 7 dc wide.
- Both flowers show four distinct petals.
- The skirt has 5 even shells and 10 open loops.
- The ornament measures 2.6 in (6.6 cm) × 3.75 in (9.5 cm).
- The hanger is centered and secure, and no ends show.
Troubleshooting
- The dome ruffles: Your tr and dc are too short. Make the stitches taller or go down one hook size.
- The dome cups: Your tension is too loose for this count. Go down one hook size.
- The body leans: You may have missed the turning chain at the end of a row. Count to 21 after every row.
- The flame is off-center: Re-check Row 1. You need exactly 4 skipped stitches on each side of the stem.
- The flowers look like blobs: Close each CL fully, and keep the ch-1 spaces loose so the center hole stays open.
- The skirt is too flat: Check that Row 10 has 26 dc and that you didn’t skip any of the increases.
Care
Hand wash in cool water only if you need to, then re-starch and pin it flat to dry. Store it flat between tissue paper so it stays crisp.
Final Notes
The measurements build like this:
– The dome is 1.9 in (4.8 cm) wide and 1 in (2.5 cm) tall.
– The crossbar brings the piece to 2.1 in (5.3 cm) wide and 1.5 in (3.8 cm) tall.
– The 8-row body adds 1.6 in (4.1 cm), and the base bar brings the height to 3.2 in (8.1 cm).
– The skirt flares to 2.6 in (6.6 cm) for a finished 3.75 in (9.5 cm) lantern.
– The ring brings it to 4.25 in (10.8 cm), plus the hanging loop.
If each checkpoint matches, the finished lantern will match too. Make one, then a few more to fill the tree.
Happy crocheting!