

This little strawberry hangs from your car’s grab handle and keeps a pocket pack of tissues within reach. The body is a round berry made in tight single crochet. A soft, rimmed opening on the front lets the tissues pull out one at a time.
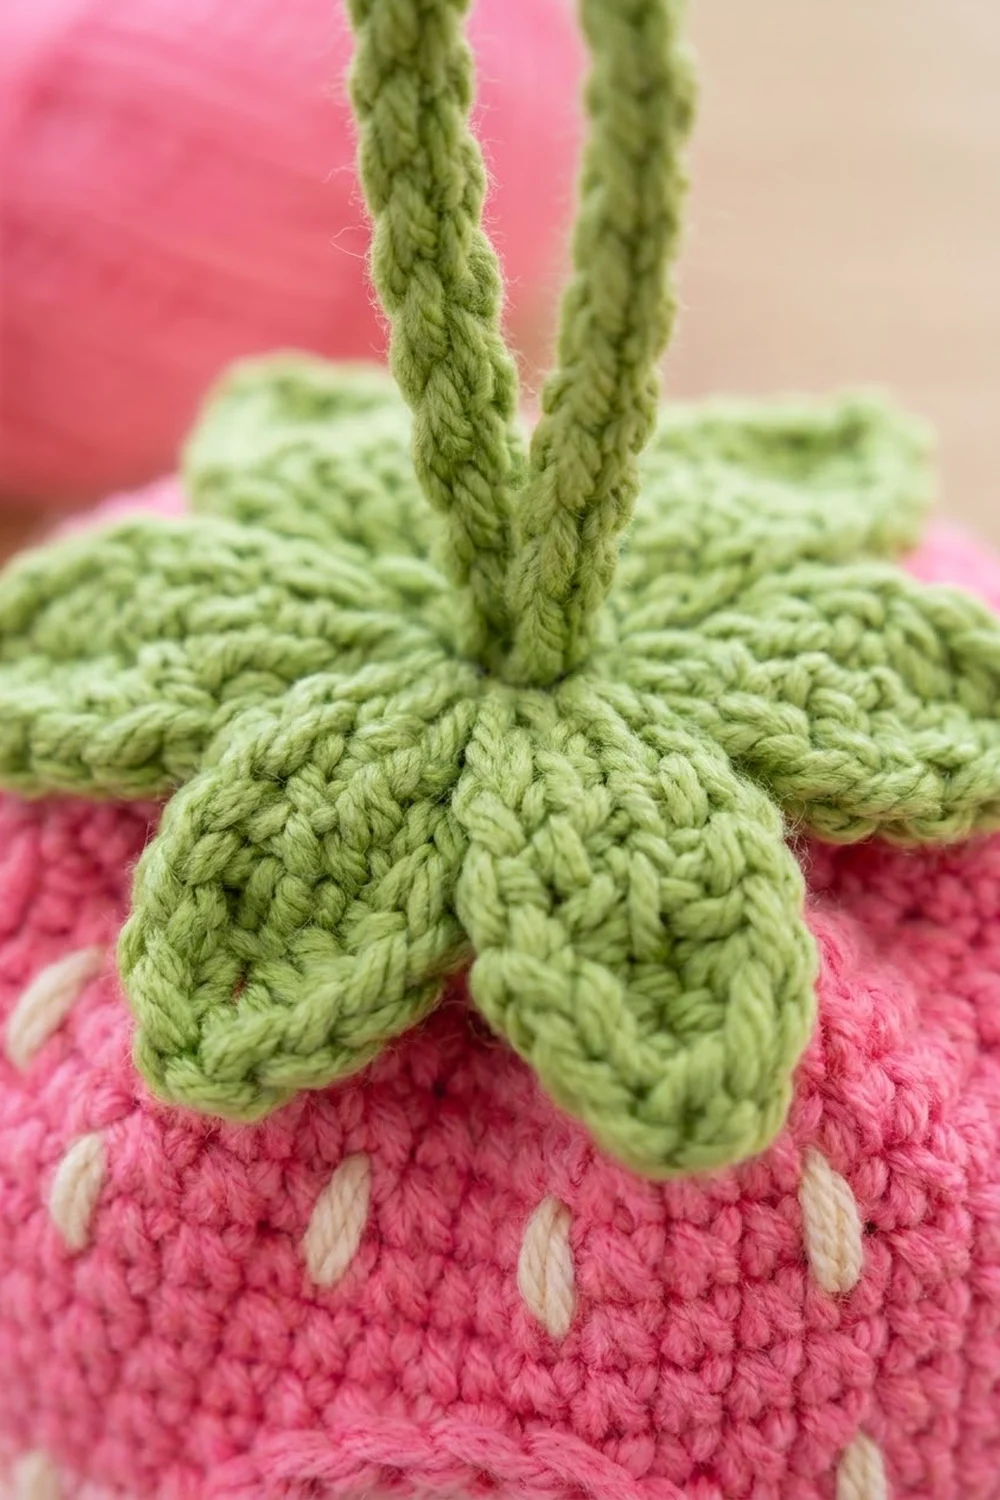
The colors are simple. Light pink covers the lower part of the berry and bright pink covers the top, with cream seeds embroidered over both. A green leaf calyx and a green cord hanging loop finish the top. It looks cute and a little retro, and it works well in a car, a nursery or a bag.
The pattern uses US crochet terms. The finished holder is about 4.75 in (12.1 cm) wide and 5.75 in (14.6 cm) tall, not counting the loop.
The body is worked in one continuous spiral from the bottom up. For the opening, you work turned rows that leave a 12-stitch gap. A chain closes the gap, and you continue in rounds to the top. After that you edge the opening, embroider the seeds, and sew on the calyx and loop.
Finished Size and Construction
- Finished size: about 4.75 in (12.1 cm) wide x 5.75 in (14.6 cm) tall, plus the hanging loop
- Skill level: Advanced beginner / easy intermediate
- Terminology: US crochet terms
- Yarn weight: Worsted (#4), cotton or cotton blend
- Hook: 4.0 mm (G-6)
- Number of pieces: 1 finished item, made from 3 parts: body, calyx and hanging cord
- Layout: body worked bottom-up in a spiral, with a section of rows for the front opening
- Opening size before edging: about 2.7 in (6.9 cm) wide x 2.6 in (6.6 cm) tall
- Opening size after edging: about 2.2 in (5.6 cm) wide x 2.1 in (5.3 cm) tall
- Edging depth: about 0.25 in (0.6 cm)
- Fits: a standard pocket tissue pack, about 2.1 x 4.1 x 1 in (5.3 x 10.4 x 2.5 cm)
Materials
Choose a smooth worsted cotton or cotton blend. Cotton holds the berry’s shape, keeps the stitches crisp and stands up to washing. Soft acrylic also works, but the body will be a little floppier.
- Light pink: 25 g / 50 m
- Bright pink: 35 g / 70 m
- Green: 15 g / 30 m
- Cream: 5 g / 10 m
These amounts include a margin of about 30%, so you will have yarn left over.
Tools:
- 4.0 mm (G-6) crochet hook
- 3 stitch markers
- Yarn needle
- Scissors
- Measuring tape
- Pins
- 1 pocket tissue pack, for fitting and blocking
Abbreviations (US Terms)
- ch: chain
- sl st: slip stitch
- sc: single crochet
- hdc: half double crochet
- dc: double crochet
- inc: 2 sc in the same stitch
- sc2tog / dec: single crochet 2 together
- MR: magic ring
- st(s): stitch(es)
- rnd: round
- RS / WS: right side / wrong side
Special stitch: Picot. Ch 2, then sl st in the 2nd ch from the hook.
Seed stitch (embroidery). With cream yarn, bring the needle up at the bottom of one sc and down at the top of the same sc. Repeat once in the same holes, so the seed is 2 wraps side by side.
Gauge and Checkpoints
Gauge: 18 sc and 20 rnds = 4 in (10.2 cm) in sc, worked in the round. That is 4.5 sts and 5 rnds per inch, so each rnd is about 0.2 in (0.5 cm) tall.
Use Rnds 1–11 of the body as your test piece. If it matches the gauge, keep going. If it doesn’t, pull it out and change hooks.
Checkpoints:
- After Rnd 11: the base is about 4.4 in (11.2 cm) across and about 14.7 in (37.3 cm) around the edge, with 66 sts.
- After Row 25: the opening is about 2.7 in (6.9 cm) wide and 2.6 in (6.6 cm) tall.
- After Rnd 27: the open cup stands about 4.5 in (11.4 cm) tall.
- Finished: about 4.75 in (12.1 cm) wide and 5.75 in (14.6 cm) tall.
If the test piece is too big, use a hook 0.25–0.5 mm smaller. If it is too small, use a hook 0.25–0.5 mm larger. If the fabric looks loose and holey, also go down a hook size, or the tissue pack will show through.
Body
Work in a continuous spiral without joining. Mark the first st of each rnd and move the marker up as you go.
With light pink:
- Rnd 1: 6 sc in MR. (6 sts)
- Rnd 2: Inc in each st around. (12 sts)
- Rnd 3: (Sc 1, inc) 6 times. (18 sts)
- Rnd 4: (Sc 2, inc) 6 times. (24 sts)
- Rnd 5: (Sc 3, inc) 6 times. (30 sts)
- Rnd 6: (Sc 4, inc) 6 times. (36 sts)
- Rnd 7: (Sc 5, inc) 6 times. (42 sts)
- Rnd 8: (Sc 6, inc) 6 times. (48 sts)
- Rnd 9: (Sc 7, inc) 6 times. (54 sts)
- Rnd 10: (Sc 8, inc) 6 times. (60 sts)
- Rnd 11: (Sc 9, inc) 6 times. (66 sts)
Check Checkpoint 1.
- Rnd 12: Sc in each st around. (66 sts)
Opening Section (Turned Rows)
Now you work back and forth over 54 sts. The last 12 sts of Rnd 12 stay unworked and become the bottom edge of the opening. Put a marker in the 1st and 12th of these unworked sts.
- Row 13 (RS): Sc in the next 54 sts and turn, leaving the last 12 sts unworked. (54 sts)
- Rows 14–16: Ch 1 (does not count as a st), sc in each st across, turn. (54 sts)
On the last yarn-over of Row 16, change to bright pink. Carry the light pink end to the inside and cut it, leaving a 6 in (15.2 cm) tail.
With bright pink:
- Rows 17–25: Ch 1, sc in each st across, turn. At the end of Row 25, do not turn. (54 sts)
Rows 13–25 make 13 rows, an odd number. So Row 25 is a RS row, and the rounds that follow keep the right side facing out.
Check Checkpoint 2.
Closing the Opening
- Rnd 26 (conversion round): Ch 12 to bridge the gap. Then sc in the first st of Row 25 and in each remaining st of Row 25. That is 54 sc, one in each existing st, plus 12 new ch. (54 + 12 = 66 sts)
- Rnd 27: Sc in each of the 12 ch, working through the top loop only so the other loop stays free for the edging. Then sc in each of the 54 sc. (66 sts)
Check Checkpoint 3.
Top Shaping
- Rnd 28: (Sc 9, sc2tog) 6 times. (60 sts)
- Rnd 29: (Sc 8, sc2tog) 6 times. (54 sts)
- Rnd 30: (Sc 7, sc2tog) 6 times. (48 sts)
- Rnd 31: (Sc 6, sc2tog) 6 times. (42 sts)
- Rnd 32: (Sc 5, sc2tog) 6 times. (36 sts)
- Rnd 33: (Sc 4, sc2tog) 6 times. (30 sts)
- Rnd 34: (Sc 3, sc2tog) 6 times. (24 sts)
- Rnd 35: (Sc 2, sc2tog) 6 times. (18 sts)
- Rnd 36: (Sc 1, sc2tog) 6 times. (12 sts)
- Rnd 37: Sc2tog 6 times. (6 sts)
Fasten off, leaving a 6 in (15.2 cm) tail. Thread it through the front loops of the last 6 sts, pull the hole closed and weave the tail in on the inside.
The body has 37 rnds and rows in all. Light pink covers 16 of them (Rnds 1–12 and Rows 13–16), which is about 40% of the height.
Calyx
With green:
- Rnd 1: 6 sc in MR. (6 sts)
- Rnd 2: Inc in each st around. (12 sts)
- Rnd 3: (Sc 1, inc) 6 times. (18 sts)
The center should now be about 1.3 in (3.3 cm) across.
- Rnd 4: Sl st in the next st. Ch 5, skip the next 2 sts, sl st in the next st. Work from * to * 6 times. The last sl st goes in the same st as the first sl st. (6 ch-5 loops, using all 18 sts)
- Rnd 5: In each ch-5 loop, work (sc, hdc, 2 dc, picot, 2 dc, hdc, sc), then sl st in the next sl st of Rnd 4. (6 leaves, each with 8 sts and 1 picot)
Fasten off, leaving a 12 in (30.5 cm) tail for sewing. The picot makes each leaf’s pointed tip. The leaves are large compared with the small center, so they ruffle a little. Each leaf is about 1 in (2.5 cm) long, and the calyx is about 3.5 in (8.9 cm) across.
Hanging Cord
With green: Ch 39. Sl st in the back bump of the 2nd ch from the hook and in each ch across. (38 sl sts)
Fasten off, leaving a 6 in (15.2 cm) tail at each end. The cord is about 8 in (20.3 cm) long. Folded in half, it makes a loop that rises about 4 in (10.2 cm) above the berry.
Border (Opening Edging)
The opening has 4 sides:
- Bottom: the 12 unworked sts of Rnd 12
- Sides: 13 row ends on each side (Rows 13–25)
- Top: the 12 free loops of the Rnd 26 chain
That makes 12 + 13 + 12 + 13 = 50 edge positions in total.
Border gauge: the edging uses the body gauge. Work 1 sc into each st and each row end. Row ends (5 per inch) are a little closer together than stitches (4.5 per inch), but in tight sc, 1 sc per row end still lies flat.
Edging Rnd 1 (bright pink, RS facing): Join the yarn with a sc in the 2nd unworked st at the bottom right of the opening. Then:
- Bottom: sc in the next 9 sts. (10 sc on this side, counting the joining sc)
- Corner: sc2tog over the last bottom st and the first row end.
- Side: sc in the next 11 row ends.
- Corner: sc2tog over the last row end and the first ch loop.
- Top: sc in the next 10 ch loops.
- Corner: sc2tog over the last ch loop and the first row end on the other side.
- Side: sc in the next 11 row ends.
- Corner: sc2tog over the last row end and the first bottom st.
- Sl st to the first sc to join.
That gives 10 + 11 + 10 + 11 = 42 sc on the sides, plus 4 corner sc2tog. (46 sts)
Edging Rnd 2: Sl st loosely in each st around. (46 sl sts) Fasten off and weave in the ends on the inside.
Why the math works: each sc2tog uses 2 edge positions, so the 4 corners use 8 of the 50. The other 42 positions get 1 sc each, and 42 + 8 = 50, so every position is worked once. Losing 1 st at each corner rounds the opening into an oval. The firm slip-stitch round pulls the edge into a raised rim but barely shrinks the opening. The result is about 2.2 x 2.1 in (5.6 x 5.3 cm), which still fits the 2.1 x 1 in (5.3 x 2.5 cm) short end of a pocket pack.
Seeds and Assembly
Seeds: With cream yarn, embroider seeds on Rnds/Rows 8, 11, 14, 17, 20, 23, 26, 29 and 32.
- Place one seed in every 6th st, so the seeds are about 1.25 in (3.2 cm) apart.
- On each new seed rnd, start 3 sts over so the seed rows are staggered.
- Keep every seed at least 2 sts away from the opening rim.
- Knot the ends on the inside and keep your tension relaxed so the fabric doesn’t pucker.
Calyx: Pin the calyx to the top of the berry, centered over the closed Rnd 37. Sew all the way around through Rnd 3, then tack down the base of each leaf. Leave the leaf tips free.
Cord: Fold the cord in half. Push both ends down through the center of the calyx into the body. Reach in through the opening and sew the ends firmly to Rnds 35–37 from the inside, knotting each end twice.
Final Blocking
- Put a pocket tissue pack inside, short end first, through the opening.
- Mist the berry lightly until it is damp but not wet.
- Shape it by hand: round the bottom, smooth the sides and ease the opening into an even oval.
- Flatten the calyx leaves with your fingers and pin the tips so they point slightly outward.
- Straighten the cord loop.
- Let it dry completely with the pack inside, which takes about 12–24 hours.
- Remove the pins and check that the size is about 4.75 in (12.1 cm) wide and 5.75 in (14.6 cm) tall.
Final Quality-Control Checklist
- The bottom is round, with no bumps from the increase rounds.
- The color change makes one even line around the body.
- The opening is centered on the front, and its edges are not stretched or rippled.
- The edging has 46 sts, and its corners are smoothly rounded.
- The seeds are evenly staggered, and none of them pucker.
- All 6 leaves lie flat, are evenly spaced and have pointed tips.
- The cord is anchored firmly enough to hold a full pack.
- All yarn ends are woven in on the inside.
- The pack goes in easily, and the tissues pull out one at a time.
Troubleshooting
The base cups too early. Your tension is too tight. Go up 0.25 mm in hook size, or relax your grip during the increase rounds.
The base ruffles. Your tension is too loose, or you added an extra increase. Recount Rnds 1–11.
There is a step at the edge of the opening. Ch 1 at the start of each row, and work the last st of every row.
The body is inside out after Rnd 26. You worked an even number of rows. There must be exactly 13 rows (Rows 13–25).
The opening is too tight. Work Edging Rnd 2 more loosely, or leave it out.
The opening sags. Block it with the pack inside, or work the edging with a smaller hook.
The leaves curl. Steam them lightly and pin them flat until they are dry.
Care
Take the tissues out first. Hand wash in cool water with mild soap, press out the water in a towel, reshape the berry and dry it flat. Do not tumble dry.

Final Notes
Each step depends on the one before it. A gauge of 18 sc x 20 rnds = 4 in (10.2 cm) gives a 66-st base 4.4 in (11.2 cm) across. A 12-st gap over 13 rows gives an opening of 2.7 x 2.6 in (6.9 x 6.6 cm). The 46-st edging brings it to about 2.2 x 2.1 in (5.6 x 5.3 cm). The finished berry is about 4.75 x 5.75 in (12.1 x 14.6 cm). If each measurement matches before you move on, the berry will fit its tissue pack.
Happy crocheting!