

The Trellis Tier is a two-tier hanging organizer: two oval baskets stacked on side cords, spread apart by wooden dowels and hung from a single wall hook. Each basket has a firm oval base, open diamond-lattice walls and a solid rim, so it’s light to look at but strong enough to hold toilet rolls, bottles and brushes.
The whole piece uses one color, a warm oatmeal greige. Raised diagonal strips across the front of each basket break up the lattice and give the design its woven look. It fits a calm, natural bathroom with stone tile, wood and brass.
This pattern uses US crochet terms. Each basket measures about 12 in (30.5 cm) long, 5 in (12.7 cm) deep and 5.5 in (14.0 cm) tall. Hung, the organizer is about 24 in (61.0 cm) from the hook point to the bottom of the lower basket.
Construction overview: you work each basket base in joined oval rounds, then go straight up into the wall. The wall is a solid band, then a chain-loop lattice, then a solid rim. You make the diagonal strips flat and sew them on. Two slip-stitch cords run up both short ends of each basket, wrap around two dowels and tie together at the top.
Finished Size and Construction
- Finished size (each basket): 12 in x 5 in x 5.5 in (30.5 cm x 12.7 cm x 14.0 cm)
- Hanging length: 24 in (61.0 cm), hook point to bottom of lower basket
- Skill level: Intermediate
- Terminology: US
- Yarn weight: Bulky (5) cotton or cotton-blend cord
- Hook: 6 mm (US J-10)
- Number of pieces: 8 crocheted pieces (2 baskets, 4 diagonal strips, 2 cords) plus 2 dowels
- Layout: 1 column of 2 baskets, stacked vertically
- Base size before walls: 12 in x 5 in (30.5 cm x 12.7 cm)
- Wall height before rim: 4 in (10.2 cm)
- Rim depth: 1.5 in (3.8 cm)
Materials
Yarn: Use a smooth bulky cotton cord or a chunky cotton blend at about 110 m per 100 g. Cotton holds its shape well and copes with bathroom humidity. Don’t use a very soft acrylic, because the walls will sag.
- Oatmeal greige: 300 g (330 m) in total
- Baskets: 130 g (143 m) each
- Diagonal strips: 20 g (22 m) for all 4
- Cords: 20 g (22 m) for both
These quantities include a margin of about 15%.
Tools:
– 6 mm (US J-10) crochet hook
– Tapestry needle with a large eye
– 4 stitch markers
– 1 wooden dowel, 9 in (22.9 cm) long and 1/2 in (1.3 cm) across (top spreader)
– 1 wooden dowel, 13 in (33.0 cm) long and 1/2 in (1.3 cm) across (middle spreader)
– Tape measure
– Pins and a blocking form (a box or a rolled towel about 12 in x 5 in / 30.5 cm x 12.7 cm)
Abbreviations (US Terms)
- ch – chain
- sc – single crochet
- sl st – slip stitch
- sk – skip
- st(s) – stitch(es)
- sp – space
- BLO – back loop only
- rnd(s) – round(s)
- rev sc – reverse single crochet (crab stitch)
Reverse single crochet: Work single crochet from left to right (if you’re right-handed). Insert the hook into the next stitch to the right, yarn over, pull up a loop, then yarn over and pull through both loops. This makes the rope-like top edge.
Back-bump slip stitch: Insert the hook under the bump on the back of the chain, then slip stitch. You’ll use this for the braided-look cords.
Gauge and Checkpoints
Gauge: 11 sc and 12 rnds = 4 in (10.2 cm) in sc. In lattice, 8 rnds = 3 in (7.6 cm).
Make one full basket before you start the second. Measure it at each checkpoint:
- After Rnd 1: 8 in x 1 in (20.3 cm x 2.5 cm)
- After Rnd 4: 10 in x 3 in (25.4 cm x 7.6 cm)
- After Rnd 7: 12 in x 5 in (30.5 cm x 12.7 cm)
- After Rnd 10: wall 1 in (2.5 cm) tall
- After Rnd 18: wall 4 in (10.2 cm) tall
- After Rnd 23: wall 5.5 in (14.0 cm) tall
If the base is too big, go down to a 5.5 mm hook. If it’s too small, go up to 6.5 mm. If the base ripples, you’re working too loosely at the ends: tighten up on the increases. If it cups, your increases are too tight. Don’t change the stitch counts, because the lattice needs a multiple of 3.
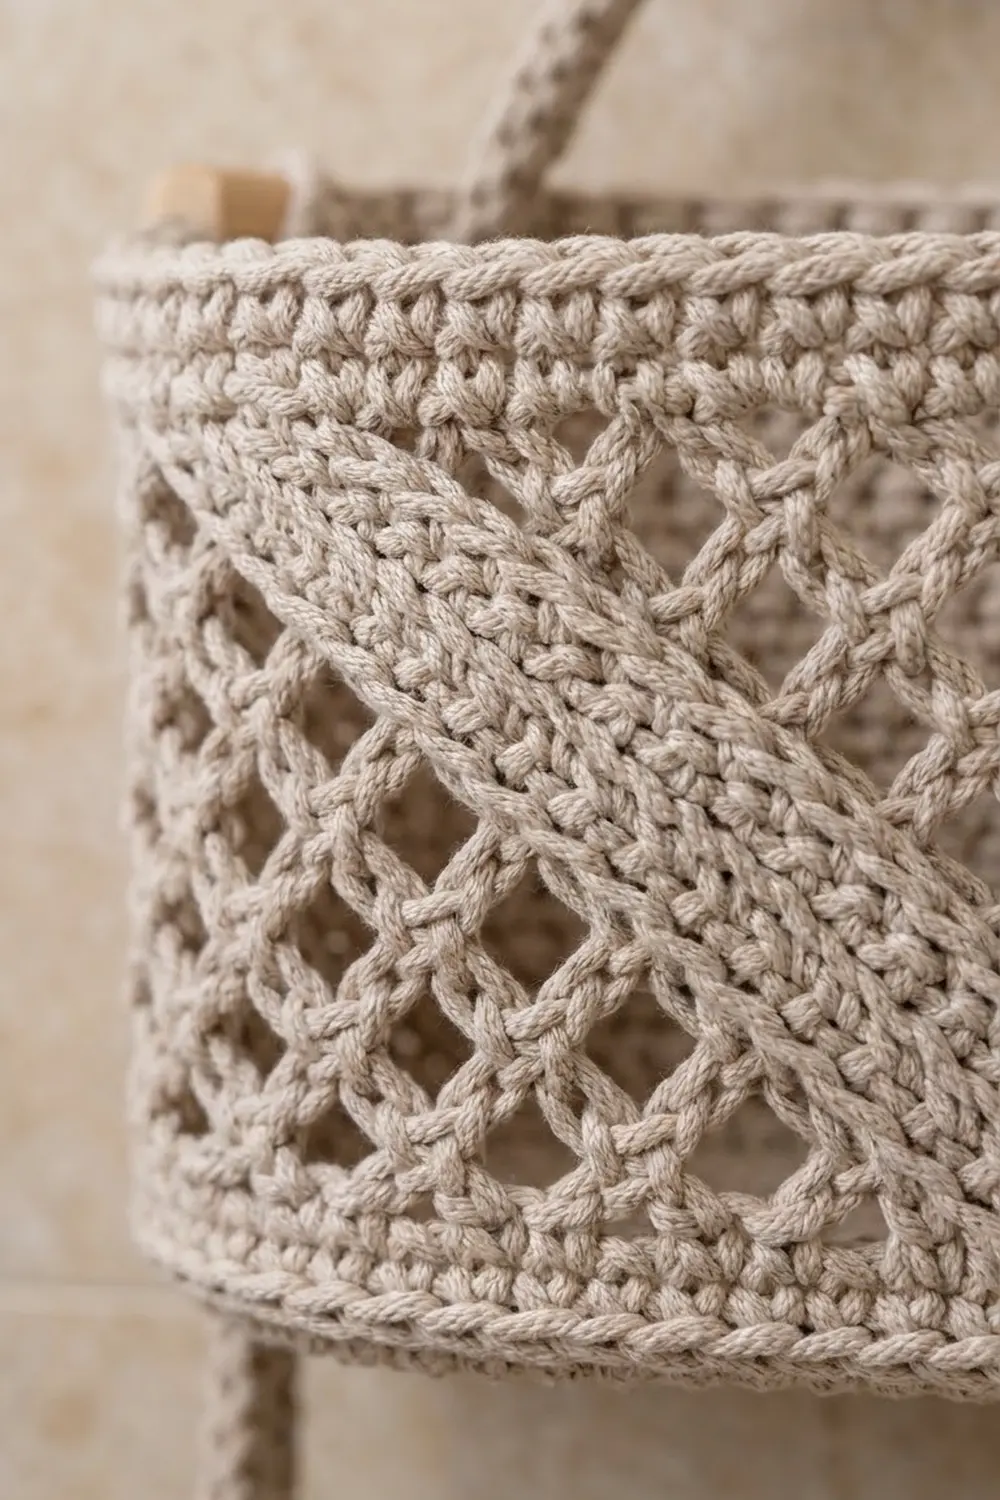
Basket (Make 2)
Oval Base
Work in joined rounds with the right side facing. Don’t turn.
Ch 21.
Rnd 1: Sc in 2nd ch from hook and in next 18 ch, then 3 sc in last ch. Turn to the other side of the foundation chain and sc in next 18 ch, then 2 sc in the same ch as the first sc. Sl st to first sc. (42 sts: 18 per side, 3 per end)
Place a marker in the middle st of each 3-sc end group. Move the markers up each round.
Rnd 2: Ch 1, sc in each st, working 2 sc in each of the 3 end sts at both ends. Sl st to first sc. (48 sts: 18 per side, 6 per end)
Rnd 3: Ch 1, sc around, working (sc, 2 sc in next) 3 times across each end. (54 sts: 18 per side, 9 per end)
Rnd 4: Ch 1, sc around, working (sc in next 2, 2 sc in next) 3 times across each end. (60 sts: 18 per side, 12 per end)
Rnd 5: As Rnd 4, but with (sc in next 3, 2 sc in next) at each end. (66 sts: 18 per side, 15 per end)
Rnd 6: As before, with (sc in next 4, 2 sc in next) at each end. (72 sts: 18 per side, 18 per end)
Rnd 7: As before, with (sc in next 5, 2 sc in next) at each end. (78 sts: 18 per side, 21 per end)
Each round adds 6 sts, 3 at each end. That’s the same rate as a flat sc circle split into two halves, so the base stays flat. Check that the base measures 12 in x 5 in (30.5 cm x 12.7 cm).
Lower Wall
Rnd 8: Ch 1, sc in BLO of each st around. Sl st to first sc. (78 sts) The unused front loops make the raised ridge around the base edge.
Rnds 9–10: Ch 1, sc in each st around. Sl st to first sc. (78 sts)
Lattice Section
Rnd 11: Ch 1, sc in first st. Then (ch 3, sk 2 sts, sc in next st) 25 times. Ch 3, sk last 2 sts, sl st to first sc. (26 ch-3 loops: 6 per side, 7 per end)
Check the math: each repeat uses 3 base sts, and 26 x 3 = 78.
Rnd 12: Sl st into first ch-3 sp. Ch 1, sc in same sp, then (ch 3, sc in next ch-3 sp) 25 times. Ch 3, sl st to first sc. (26 loops)
Rnds 13–18: Repeat Rnd 12. (26 loops each rnd)
Each sc sits in the middle of a loop below, so each new loop is offset half a loop from the one beneath it. That offset makes the diamond-shaped windows. The wall should now be 4 in (10.2 cm) tall.
Rim (Border)
The solid rim works as the border of each basket. Rim gauge is the same as the base: 11 sc = 4 in (10.2 cm).
Rnd 19 (conversion round): Sl st into first ch-3 sp. Ch 1, work 3 sc in each ch-3 sp around, skipping the sc between loops. Sl st to first sc. (26 spaces x 3 sc = 78 sc, 0 extra sts added; 18 per side, 21 per end)
Rnds 20–22: Ch 1, sc in each st around. Sl st to first sc. (78 sts: 18 per side, 21 per end)
Rnd 23: Ch 1, rev sc in each st around. Sl st to first st. (78 sts) Fasten off and weave in the ends.
Why the math works: Rnd 11 turned 18 side sts into 6 loops and 21 end sts into 7 loops. Rnd 19 turns those back into 6 x 3 = 18 and 7 x 3 = 21. So the rim has exactly as many stitches as the base and lower wall. The basket stays straight and doesn’t flare or pull in. The rim is 1.5 in (3.8 cm) deep, and the total wall height is 1 + 3 + 1.5 = 5.5 in (14.0 cm).
Diagonal Strips (Make 4)
Ch 20.
Row 1: Sc in 2nd ch from hook and in each ch across. (19 sts)
Rows 2–3: Ch 1, turn, sc in each st across. (19 sts)
Edging: Ch 1, then sl st evenly around the whole strip to give it a firm, rounded edge. Fasten off and leave a 12 in (30.5 cm) tail for sewing.
Each strip should measure about 7 in x 1 in (17.8 cm x 2.5 cm).
Cords (Make 2)
Ch 91. The chain should measure about 30 in (76.2 cm), at about 3 ch per inch.
Row 1: Sl st in back bump of 2nd ch from hook and in each ch across. (90 sl sts) Fasten off and leave a 6 in (15.2 cm) tail.
The cord should measure 30 in (76.2 cm) and feel firm, like rope. If yours comes out shorter, add chains and keep going until you reach the length. The cord length matters more than the chain count.
Make All Pieces
All pieces are in Oatmeal greige:
- Baskets: 2
- Diagonal strips: 4 (2 per basket)
- Cords: 2
- Dowels: 9 in (22.9 cm) x 1 and 13 in (33.0 cm) x 1
Layout, with sizes measured down from the hook point:
            [ HOOK POINT ]
               /      \        cords, 7 in (17.8 cm)
      [=== TOP DOWEL 9 in ===]
              |        |       cords, 3 in (7.6 cm)
      (    TOP BASKET 12 in   )  5.5 in (14.0 cm)
   [===== MIDDLE DOWEL 13 in =====]
              |        |       cords, 3 in (7.6 cm)
      (  LOWER BASKET 12 in   )  5.5 in (14.0 cm)
7 + 3 + 5.5 + 3 + 5.5 = 24 in (61.0 cm).
Joining
Attaching the Strips
On the front long side of each basket, pin 2 strips diagonally across the lattice, 2 in (5.1 cm) apart. Run each strip from the solid Rnds 8–10 at the lower left up to the rim at the upper right.
Tuck about 1/4 in (0.6 cm) of each end under the strip so it lies on solid fabric. Whipstitch all around the strip edge. On the lattice, catch the ch-3 loops. On the solid bands, catch one loop of each sc. Keep the stitches snug but not tight. If the lattice puckers, loosen up.
Attaching the Cords
Find the center of each basket end, which is st 11 of the 21 end sts. Mark that st in the rim and at the base edge.
- Start with the lower basket. Lay one cord’s starting tail at the base ridge, on the center end st. Sew the cord up the outside of the wall along that column. Catch the cord to the basket at the base ridge, at Rnds 10, 14, 18 and 21, and at the rim edge.
- Leave 3 in (7.6 cm) of cord free above the lower rim.
- Wrap the cord once around the middle dowel, about 1/2 in (1.3 cm) from the dowel end. Sew the wrap closed with 2–3 stitches.
- Right above the dowel, sew the cord up the end of the top basket in the same way.
- Leave 3 in (7.6 cm) free above the top rim and wrap the cord around the top dowel near its end.
- Repeat Steps 1–5 on the other end with the second cord.
- Bring both cord ends together 7 in (17.8 cm) above the top dowel. Tie them in a firm overhand knot to make the hanging point, and sew the tails into the knot.
Tension advice: Pull each cord until it is straight but not tight before you sew it. Both cords must be exactly the same length between the dowels and baskets, or the tiers will tilt.
Size checkpoint: Hang the organizer. It should measure 24 in (61.0 cm) from the knot to the base, and both baskets should hang level. If one end hangs low, unpick the dowel wrap on that side and adjust it.
Final Blocking
- Remove the dowels if you haven’t sewn the wraps yet. Otherwise, just block around them.
- Mist each basket until it’s damp but not soaked.
- Push a blocking form inside each basket, about 12 in x 5 in (30.5 cm x 12.7 cm).
- Pull the lattice straight up so the diamond windows open evenly.
- Press the rim flat and pin the diagonal strips smooth.
- Let it dry completely, which takes 24 hours.
- Hang the organizer empty overnight so the cords settle.
Final Quality-Control Checklist
- Each base has 78 sts and measures 12 in x 5 in (30.5 cm x 12.7 cm)
- The BLO ridge shows evenly around both bases
- There are 26 loops in every lattice rnd
- The rim has 78 sts: 18 per side, 21 per end
- Each wall is 5.5 in (14.0 cm) tall
- The strips are parallel and their ends are hidden
- Both cords are 30 in (76.2 cm) before assembly
- Both tiers hang level
- All ends are woven in securely
Troubleshooting
- The base cups: The end increases are too tight. Work them more loosely or go up a hook size for the base only.
- The base waves: Check that you’ve added exactly 6 sts per rnd.
- The lattice leans: You skipped the starting sl st into the ch-3 sp. Start every lattice rnd inside a loop.
- The rim flares: You worked more than 3 sc into some loops. Count 78.
- The tiers tilt: Adjust the cord wraps on the dowels until both sides match.
- The strips pucker: Your sewing stitches are too tight. Unpick and sew again more loosely.
Care
Hand wash in cool water with mild soap, then reshape the baskets and dry them flat over a form. Take the dowels out first, and don’t put the organizer in the dryer.

Final Notes
Here’s how the measurements build. Gauge is 11 sc and 12 rnds = 4 in (10.2 cm). The base grows to 78 sts and 12 in x 5 in (30.5 cm x 12.7 cm). The wall is a 1 in (2.5 cm) solid band, 3 in (7.6 cm) of lattice in 26 loops, and a 1.5 in (3.8 cm) rim, for a total height of 5.5 in (14.0 cm). The cords are 30 in (76.2 cm), and the assembled organizer hangs 24 in (61.0 cm). If each stage checks out, the next one will too.
Happy crocheting!