

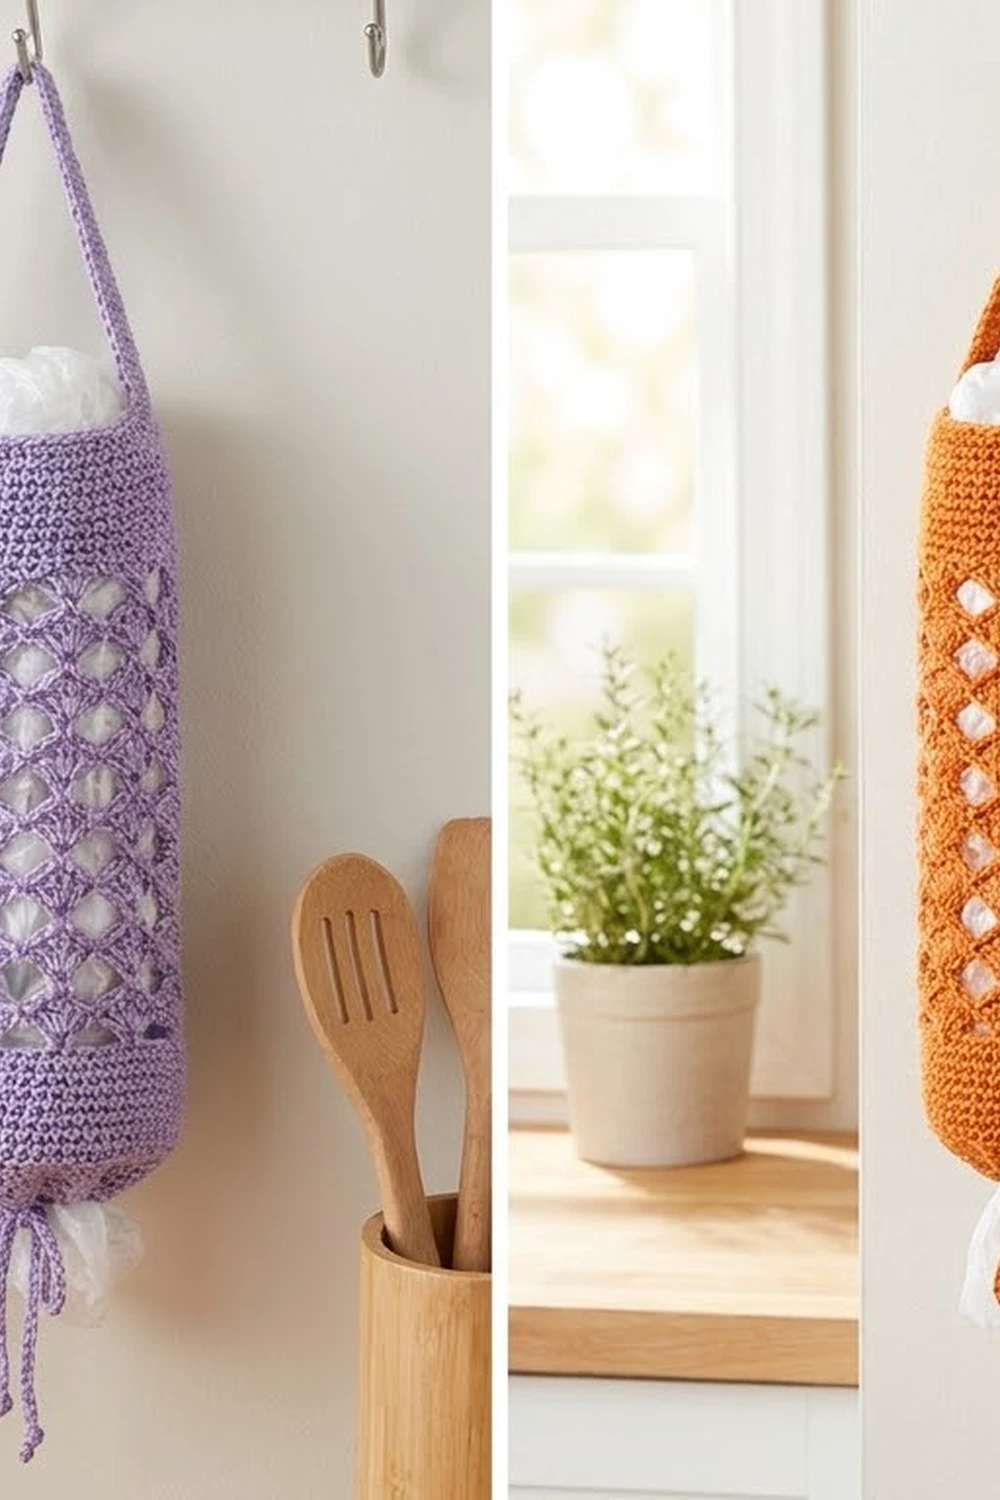
The Sunfan Lattice Bag Holder is a tall tube that keeps loose grocery bags tidy on a wall hook. The body is an open lattice of small fans stacked in offset rounds, so you can see the white bags through the diamond-shaped windows. Solid bands at the top and bottom keep the shape firm. A narrow strap arches over the opening for hanging, and a knotted drawstring gathers the bottom so bags pull out one at a time.
The sample holders are worked in a bright pumpkin orange and a soft lavender. Each holder uses a single color. The style is practical and cheerful, and the lattice shows up clearly in any smooth, solid shade of cotton.
This pattern uses US crochet terms. The finished holder is 6 in (15.2 cm) wide laid flat, which is 12 in (30.5 cm) around, and 16 in (40.6 cm) tall from the bottom edge to the top rim. The strap adds about 3 in (7.6 cm) of arch above the rim.
Construction is simple:
- Chain a ring and work the bottom band in the round, including an eyelet round for the drawstring.
- Work the fan lattice in joined rounds.
- Switch back to solid stitches for the top band.
- Work the strap in rows straight off the rim.
The drawstring is a separate chain cord threaded through the eyelets.
Finished Size and Construction
- Finished size: 6 in (15.2 cm) wide flat x 16 in (40.6 cm) tall, plus a 3 in (7.6 cm) strap arch
- Skill level: Easy to intermediate
- Terminology: US crochet terms
- Yarn weight: Worsted (#4), cotton or cotton blend
- Hook: 5.0 mm (H-8)
- Number of pieces: 1 body (worked in one piece with its strap) + 1 drawstring cord
- Layout: One vertical tube, open at the top, gathered at the bottom
- Piece size: 12 in (30.5 cm) around, 48 stitches
- Size before border (top band): 14 in (35.6 cm) tall
- Border depth (top band): 2 in (5.1 cm)
Materials
Choose a smooth worsted-weight cotton. Cotton holds its shape on a hook, resists stretching under the weight of the bags, and washes well. Acrylic also works, but the lattice will stretch a little more over time.
- Orange holder: 110 g / 200 m (219 yd) of pumpkin orange
- Lavender holder: 110 g / 200 m (219 yd) of lavender
Each holder takes one color. The photo shows one holder in each color, so buy both amounts if you want the matching pair.
Tools:
- 5.0 mm (H-8) crochet hook
- 2 locking stitch markers
- Yarn needle
- Scissors
- Measuring tape
- Rustproof pins and a towel for blocking
The quantities include a margin of about 15 percent for your gauge check and for weaving in ends.
Abbreviations (US Terms)
- ch – chain
- sl st – slip stitch
- sc – single crochet
- dc – double crochet
- sk – skip
- st(s) – stitch(es)
- sp(s) – space(s)
- rnd(s) – round(s)
- beg – beginning
- rep – repeat
Special stitch – Shell: Work 5 dc in the same stitch. The 3rd dc is the center dc of the shell.
Gauge and Checkpoints
Solid gauge: 16 sc and 16 rnds = 4 in (10.2 cm), in sc worked in joined rounds.
Lattice gauge: One fan repeat (shell + ch 3 + sc + ch 3) is 2 in (5.1 cm) wide. Five lattice rnds are 3 in (7.6 cm) tall, so each lattice rnd is about 0.6 in (1.5 cm).
Test one piece first. Work the bottom band below and measure it before you continue. It doubles as your gauge swatch, so nothing is wasted.
Checkpoints:
- After the bottom band: 12 in (30.5 cm) around, 2 in (5.1 cm) tall.
- After Lattice Rnd 10: 8 in (20.3 cm) total height.
- After Lattice Rnd 20: 14 in (35.6 cm) total height.
- After the top band: 16 in (40.6 cm) total height, 12 in (30.5 cm) around.
- Strap: 7 in (17.8 cm) long before you attach it.
If the band is more than 12 in (30.5 cm) around, go down one hook size. If it is smaller, go up one hook size.
If the band is right but the lattice grows too long, work 18 lattice rnds instead of 20. Always stop on an even-numbered lattice rnd so the conversion round still lines up.
Bottom Band
Ch 48. Join with a sl st to the first ch to form a ring, taking care not to twist the chain. Place a marker in the first st of each rnd.
Rnd 1: Ch 1, sc in each ch around, join with sl st to first sc. (48 sc)
Rnd 2: Ch 1, sc in each st around, join. (48 sc)
Rnd 3 (eyelet round): Ch 4 (counts as dc + ch 1), sk next st, *dc in next st, ch 1, sk next st; rep from * 22 more times, join with sl st to 3rd ch of beg ch-4. (24 dc + 24 ch-1 sps = 48 sts)
Rnd 4: Ch 1, sc in each dc and each ch-1 sp around, join. (24 sc in dc + 24 sc in sps = 48 sc)
Rnds 5–7: Ch 1, sc in each st around, join. (48 sc)
The band is now 6 sc rnds at 0.25 in (0.6 cm) each plus one dc rnd at 0.5 in (1.3 cm), for a total of 2 in (5.1 cm). Check Checkpoint 1.
Fan Lattice Body
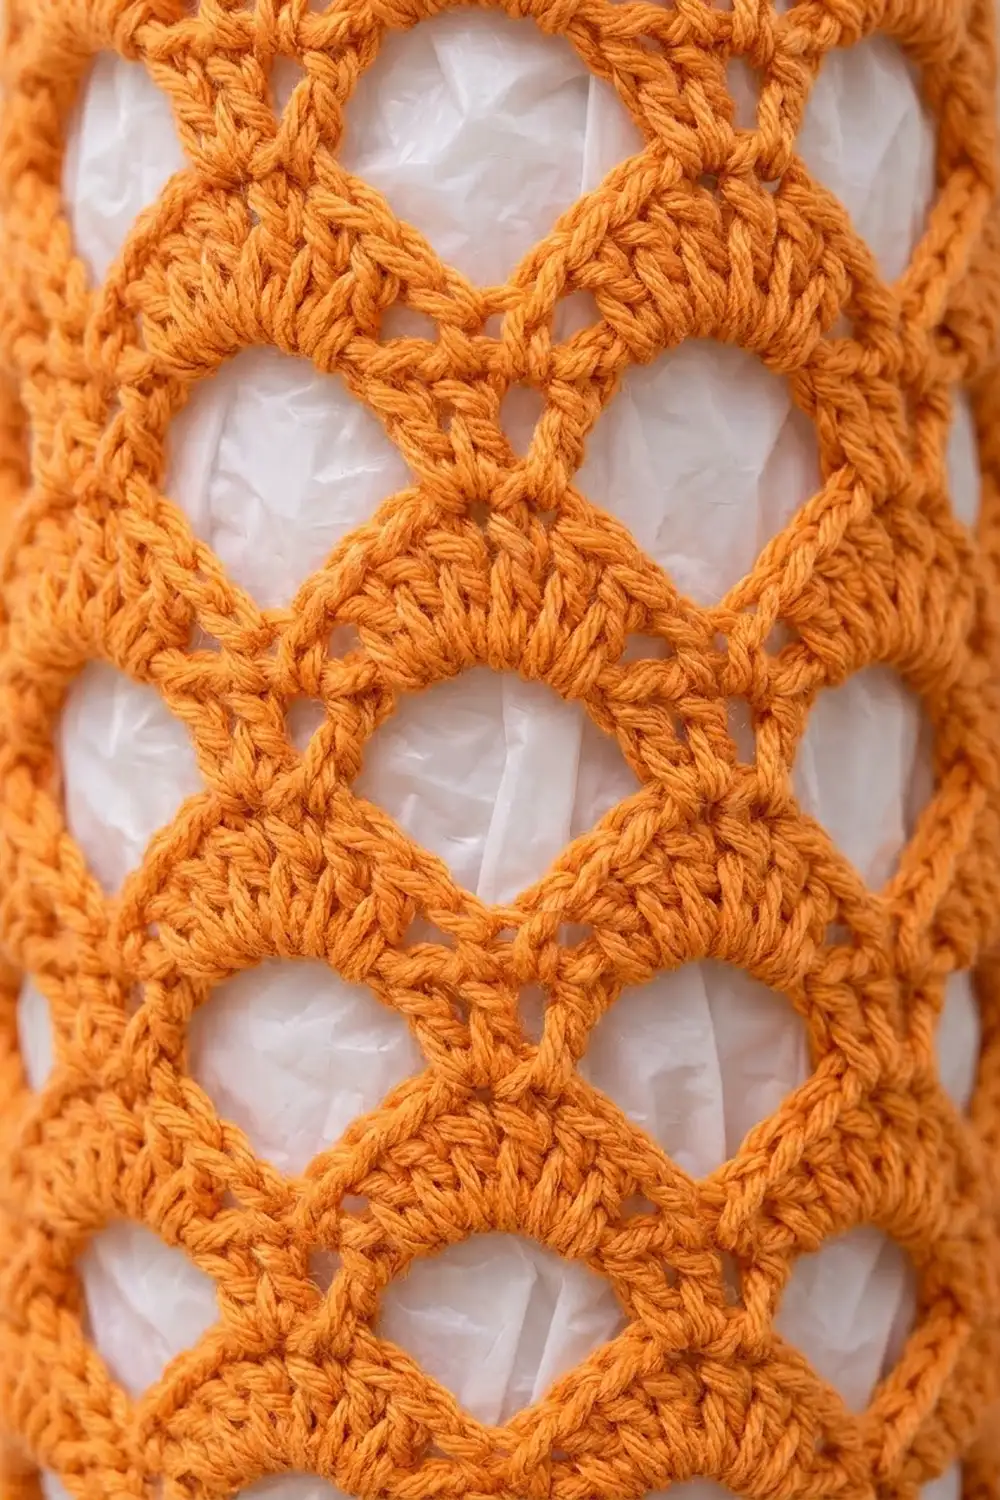
The lattice uses two round types that alternate. Shells always go into the previous rnd’s sc, and each new sc goes into the center dc of a shell below. This half-repeat offset builds the stacked fans and the diamond windows.
Lattice Rnd 1 (set-up): Ch 1, sc in first st, ch 3, sk 3 sts, shell in next st, ch 3, sk 3 sts, *sc in next st, ch 3, sk 3 sts, shell in next st, ch 3, sk 3 sts; rep from * 4 more times, join with sl st to first sc. (6 shells, 6 sc, 12 ch-3 sps)
Each repeat uses 8 band sts (1 + 3 + 1 + 3). Six repeats x 8 sts = 48 sts, so the set-up rnd uses every band stitch exactly once.
Lattice Rnd 2 (Round A – shells over sc): Ch 3 (counts as first dc), 4 dc in same sc as join (first shell made), ch 3, sk ch-3 sp and next 2 dc, sc in center dc of next shell, ch 3, *sk next 2 dc and ch-3 sp, shell in next sc, ch 3, sc in center dc of next shell, ch 3; rep from * 4 more times, join with sl st to top of beg ch-3. (6 shells, 6 sc, 12 ch-3 sps)
Lattice Rnd 3 (Round B – sc over shell centers): Sl st in next 2 dc. You are now in the center dc of the first shell. Ch 1, sc in same dc, ch 3, shell in next sc, ch 3, *sc in center dc of next shell, ch 3, shell in next sc, ch 3; rep from * 4 more times, join with sl st to first sc. (6 shells, 6 sc, 12 ch-3 sps)
Lattice Rnds 4–20: Work Round A on even rnds and Round B on odd rnds, ending with Lattice Rnd 20 (a Round A). Every rnd has 6 shells, 6 sc and 12 ch-3 sps.
Check Checkpoint 2 after Rnd 10 and Checkpoint 3 after Rnd 20. Twenty rnds at 0.6 in (1.5 cm) each give 12 in (30.5 cm) of lattice. Add the 2 in (5.1 cm) bottom band and the body is 14 in (35.6 cm) tall.
Tension tip: keep the ch-3 sps relaxed but not loose. If the chains are pulled tight, the fans will cup and the windows will close up. If they are too loose, the tube will sag when it is full of bags.
Once bags are inside, the lattice will look slightly wider than the bands. That gentle bulge is intended and matches the photo.
Top Band and Hanging Strap (Border)
Border gauge: The same 16 sc = 4 in (10.2 cm) as the bottom band, so 48 sc = 12 in (30.5 cm) around. Laid flat, each side shows 24 sts = 6 in (15.2 cm). The folds fall between sts 24 and 25 and between sts 48 and 1, so no stitch is counted on both sides.
Top Rnd 1 (conversion round): Ch 1, sk the beg ch-3 at the base of the join, sc in next 3 dc, sk next dc, 2 sc in ch-3 sp, sc in next sc, 2 sc in next ch-3 sp, *sk next dc, sc in next 3 dc, sk next dc, 2 sc in ch-3 sp, sc in next sc, 2 sc in next ch-3 sp; rep from * 4 more times, join to first sc.
The count for this rnd has two parts:
- Stitches worked 1-per-existing-stitch: 3 dc + 1 sc = 4 per repeat x 6 = 24.
- Extra sc worked into spaces: 2 + 2 = 4 per repeat x 6 = 24.
That gives 24 + 24 = 48 sc in total, or 24 per flat side.
Top Rnds 2–8: Ch 1, sc in each st around, join. (48 sc)
Eight sc rnds at 0.25 in (0.6 cm) each give a 2 in (5.1 cm) band. Check Checkpoint 4.
Why the math works: Each lattice repeat was built from 8 band sts and is turned back into exactly 8 sc. Six repeats return you to 48 sts, the same count as the bottom band. The top and bottom rims are both 12 in (30.5 cm) around, so the tube hangs straight.
Strap: Do not fasten off. Place a marker in st 25, directly opposite the beginning of the rnd.
- Row 1: Ch 1, sc in first 4 sts of Top Rnd 8 (sts 1–4), turn. (4 sc)
- Rows 2–28: Ch 1, sc in each st across, turn. (4 sc)
The strap is 1 in (2.5 cm) wide and 28 rows = 7 in (17.8 cm) long. Check Checkpoint 5.
Bring the end of the strap across the opening without twisting it. Sl st through both the last strap row and sts 25–28 of the rim. (4 sl sts) Fasten off and weave in the end through the solid band.
The strap forms an arch about 3 in (7.6 cm) above the rim. The holder hangs about 19 in (48.3 cm) overall, from the hook to the bottom edge.
Drawstring
Join the same color with a slip knot. Ch until the chain measures 22 in (55.9 cm). Sl st in the back bump of the 2nd ch from the hook and in each ch back to the start, to make a firm cord. Fasten off.
Start at the front center and weave the cord in and out of the ch-1 sps of bottom band Rnd 3, passing over one dc and under the next. Both ends should come out of neighboring sps.
Tie an overhand knot about 0.5 in (1.3 cm) from each end and trim, leaving a small tuft. Pull the cord until the bottom opening is about 1.5 in (3.8 cm) across, then tie a bow.
Final Blocking
- Weave in all ends, but don’t trim them close yet.
- Soak the holder in cool water for 10 minutes. Press the water out; do not wring.
- Roll it in a towel to remove excess moisture.
- Slide a rolled towel inside the body, or a cardboard tube 12 in (30.5 cm) around and wrapped in plastic.
- Lay it flat at 6 in (15.2 cm) wide and 16 in (40.6 cm) tall. Pin the top and bottom bands straight.
- Open each fan gently with your fingers so the windows are even. Pin the strap flat at 7 in (17.8 cm).
- Let it dry completely, then trim the woven ends.
Final Quality-Control Checklist
- The bottom band and the top band each have 48 sc and measure 12 in (30.5 cm) around.
- Every lattice rnd has 6 shells, 6 sc and 12 ch-3 sps.
- The fans shift by half a repeat on each rnd, with no straight vertical columns of shells.
- The holder is 16 in (40.6 cm) from the bottom edge to the rim.
- The strap is untwisted, 7 in (17.8 cm) long, and attached exactly opposite its start.
- The drawstring passes through all 24 eyelets and both knots are secure.
- All ends are woven in along solid stitches, not through the lattice chains.
Troubleshooting
- Ring twisted on Rnd 1: If you notice within 2 rnds, pull out the stitches and rechain. You can’t fix a twist later.
- Shells stack in straight columns: You skipped the sl st shift at the start of a Round B, or worked a shell into a center dc. Check that every shell goes into a sc.
- Lattice wider than the bands: Your dc are loose. Use a hook 0.5 mm smaller for the lattice only.
- Top band ruffles: The conversion rnd has too many sts. Count 8 sc per repeat and 48 in total.
- Top band pulls in: You skipped too many sts, or worked 1 sc into a ch-3 sp instead of 2. Rework with 2 sc in each sp.
- Strap leans to one side: It wasn’t attached at sts 25–28. Undo the sl sts and reposition it.
- Bags fall out the bottom: Tighten the drawstring to a smaller opening and double-knot the bow.
Care
Hand wash, or machine wash on a gentle cool cycle in a mesh bag. Reshape while damp and lay flat to dry.
Final Notes
The whole holder depends on one number: 48 sts.
- The bottom band sets 48 sc at 12 in (30.5 cm) around and 2 in (5.1 cm) tall.
- Six lattice repeats of 8 sts use those 48 sts.
- Twenty lattice rnds add 12 in (30.5 cm), bringing the body to 14 in (35.6 cm).
- The conversion rnd returns to 48 sc.
- The 2 in (5.1 cm) top band brings the body to 16 in (40.6 cm).
- A 7 in (17.8 cm) strap and a 22 in (55.9 cm) drawstring finish it.
Check each link in that chain as you go, and your holder will hang straight and hand out bags neatly.
Happy crocheting!