

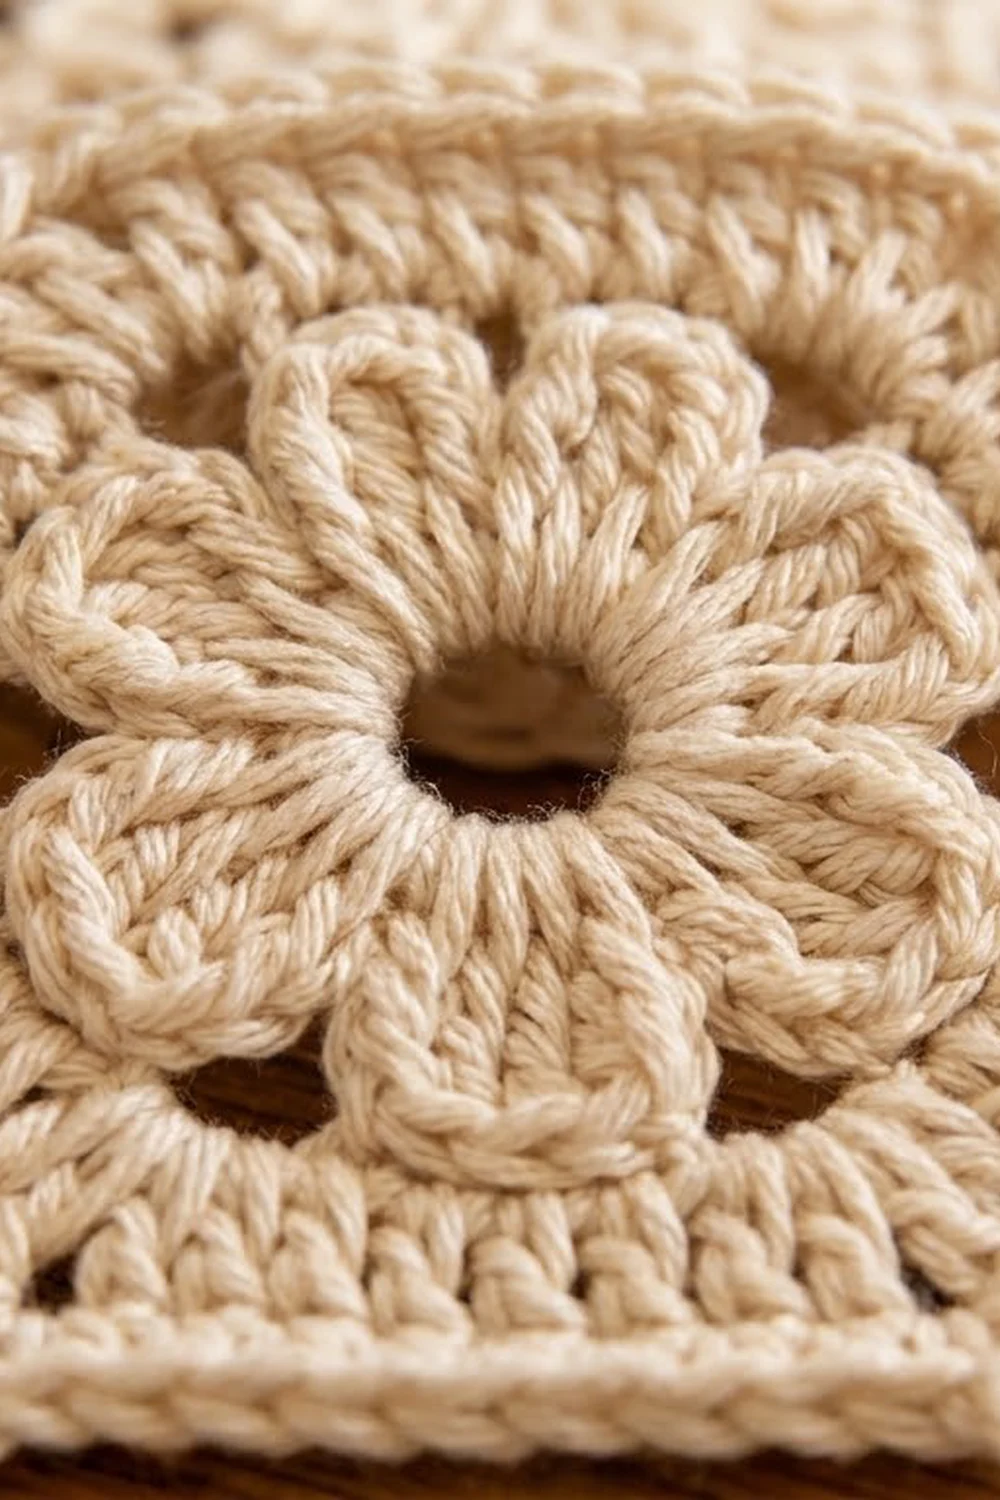
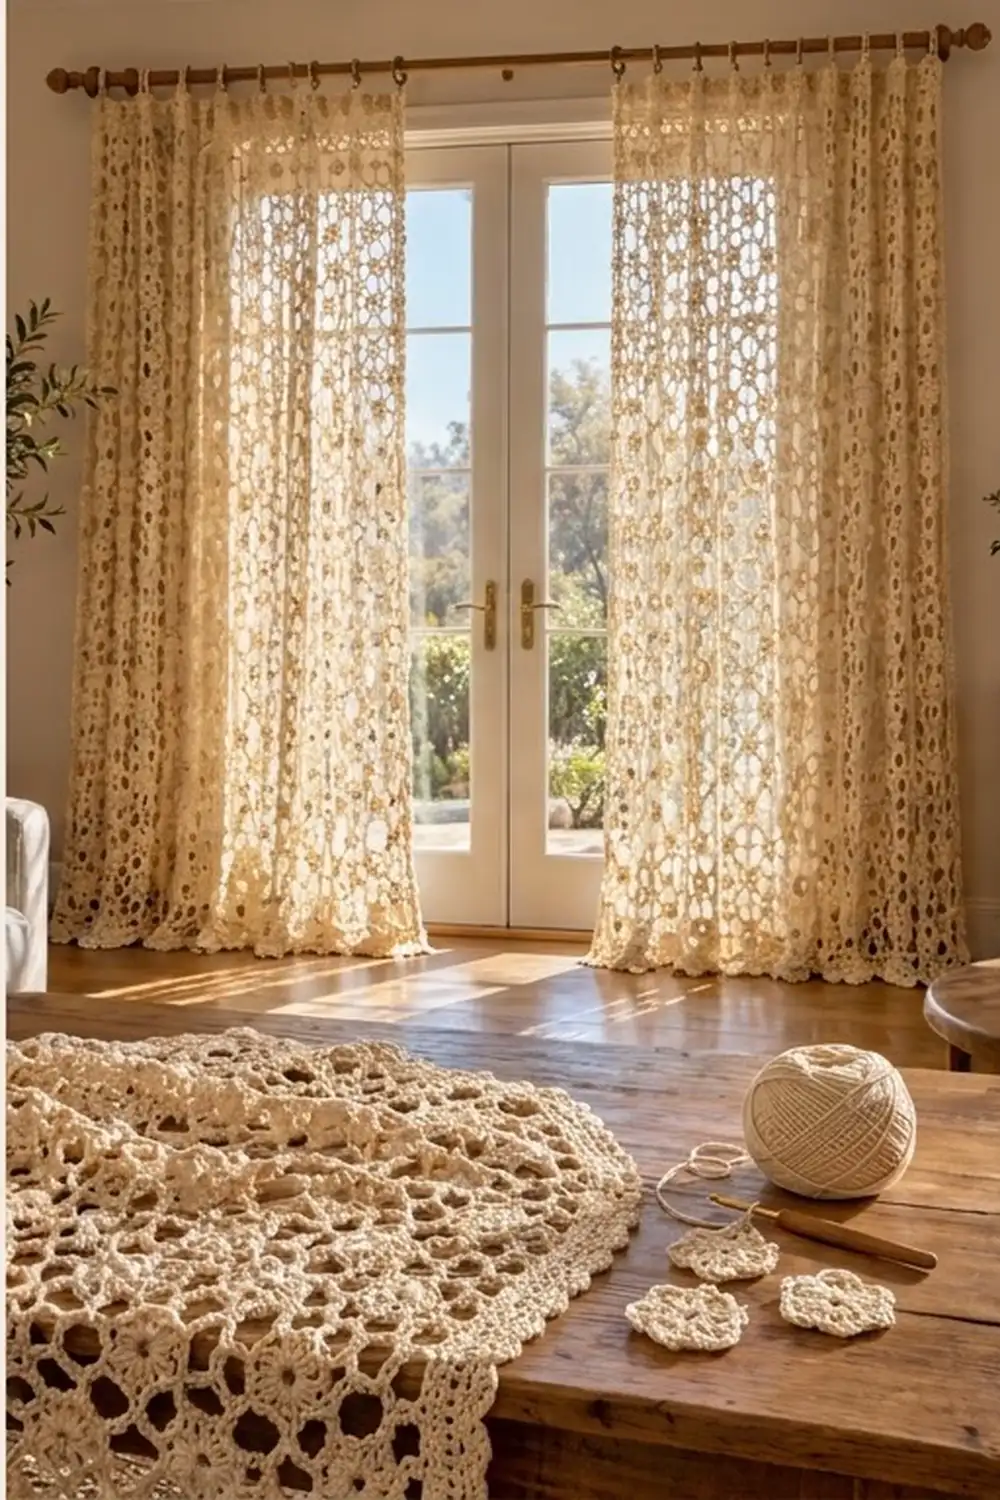
These curtain panels turn crochet lace into a honeycomb of little flowers. Each cell holds a six-petal blossom with an open center. Every flower sits inside a raised hexagonal frame, and the frames are joined into an airy mesh that lets the light through.
The panels use one cream cotton yarn, so the texture does all the work. In soft light they glow warm and natural, which suits farmhouse, boho and cottage rooms.
This pattern uses US crochet terms. One finished panel measures 41.5 x 81.8 in (105.4 x 207.8 cm). The photo shows a pair of panels, so you’ll make the panel instructions twice.
For construction, you crochet full hexagon motifs and half-hexagon motifs, then slip stitch them together in offset rows. A three-round border straightens the edges. Round 1 fills the shallow dips along the top and bottom with graded stitches, then two rounds of single crochet finish all four sides.
Finished Size and Construction
- Finished size (one panel): 41.5 x 81.8 in (105.4 x 207.8 cm)
- Skill level: Intermediate
- Terminology: US
- Yarn weight: DK (#3) cotton
- Hook: 4 mm (G-6)
- Pieces per panel: 219 full hexagons + 22 half-hexagons = 241 pieces
- Layout: 23 rows. The 12 odd rows have 10 full hexagons each. The 11 even rows have 9 full hexagons with a half-hexagon at each end.
- Full hexagon: 4 in (10.2 cm) flat to flat, 4.6 in (11.7 cm) point to point, sides 2.3 in (5.8 cm)
- Half-hexagon: 2 in (5.1 cm) wide x 4.6 in (11.7 cm) tall
- Size before border: 40 x 80.8 in (101.6 x 205.2 cm), measured from hexagon points
- Border depth: 0.75 in (1.9 cm) on the sides; 0.5 in (1.3 cm) beyond the points at the top and bottom
Materials
Pick a smooth, mercerized or combed cotton in DK weight. Cotton holds the lace shape, resists sagging better than acrylic, and can take sunlight and washing.
- Cream: 700 g / 1540 m (1684 yd) per panel; 1400 g / 3080 m (3368 yd) for the pair
Other tools:
- 4 mm (G-6) crochet hook
- Tapestry needle
- Scissors
- Stitch markers
- Rust-proof pins and a blocking surface
- 12 curtain clip rings per panel
These quantities include a margin of about 10% for swatching and joining.
Abbreviations (US Terms)
- ch – chain
- sl st – slip stitch
- sc – single crochet
- hdc – half double crochet
- dc – double crochet
- dtr – double treble crochet
- sk – skip
- sp(s) – space(s)
- st(s) – stitch(es)
- RS – right side
Special stitch – Petal: (sc, hdc, 3 dc, hdc, sc) all in the same ch-3 space.
Special stitch – dtr: Yarn over 3 times, insert hook, pull up a loop, then [yarn over, pull through 2 loops] 4 times.
Gauge and Checkpoints
Make one full hexagon before anything else. With 241 pieces per panel, a small error grows into several inches.
- After Round 1: ring diameter 1 in (2.5 cm)
- After Round 3: flower diameter 2.25 in (5.7 cm)
- After Round 5: 4 in (10.2 cm) flat to flat, 4.6 in (11.7 cm) point to point, each side 2.3 in (5.8 cm)
If your hexagon measures more than 4 in (10.2 cm) flat to flat, go down to a 3.75 mm hook. If it measures less, go up to a 4.5 mm hook. Also check the Round 4 chains: if they’re loose, the frame ripples, and if they’re tight, the motif cups. Block the test motif lightly before measuring.
Full Hexagon (make 219 per panel)
Round 1: Make a magic ring. Ch 3 (counts as dc), work 11 dc in the ring, then sl st to the top of the ch-3. Pull the ring snug, but leave a small open center. (12 dc)
Round 2: Ch 1, sc in the same st, ch 3, sk 1. [Sc in the next st, ch 3, sk 1] 5 times. Sl st to the first sc. (6 sc, 6 ch-3 sps)
Round 3: Sl st into the first ch-3 sp, ch 1, and work a Petal in each ch-3 sp around. Sl st to the first sc. (6 petals, 42 sts)
Round 4: Work behind the petals. Insert the hook from the back into the first Round 2 sc and sl st. Ch 1, sc in the same Round 2 sc, ch 7. [Sc in the next Round 2 sc, ch 7] 5 times. Sl st to the first sc. (6 sc, 6 ch-7 sps)
Each sc becomes a corner of the hexagon. Each ch-7 arch passes over one petal.
Round 5: Ch 1. [(Sc, ch 2, sc) in the next sc, 8 sc in the next ch-7 sp] 6 times. Sl st to the first sc and fasten off. (60 sc, 6 corner ch-2 sps)
Each side now has 10 sc: 1 corner sc + 8 sc + 1 corner sc. The ch-2 corner spaces sit between the sides. The packed sc over the arches makes the thick, cord-like frame.
Half-Hexagon (make 22 per panel)
This is the right half of a hexagon, cut through its top and bottom points. Flip it over to use it on the other side.
Row 1: Make a magic ring. Ch 3 (counts as dc) and work 6 dc in the ring. Turn. (7 dc)
Row 2: Ch 1, sc in the first dc. [Ch 3, sk 1, sc in the next dc] 3 times. Turn. (4 sc, 3 ch-3 sps)
Row 3: Ch 1, sc in the first sc, work a Petal in each ch-3 sp, then sc in the last sc. Turn. (3 petals, 23 sts)
Row 4: Ch 1, sc in the first sc, ch 7. Working behind the petals, sc in the next Row 2 sc, ch 7, sc in the next Row 2 sc, ch 7. Sc in the last sc. Turn. (4 sc, 3 ch-7 sps)
Row 5: Ch 1, (sc, ch 2, sc) in the first sc. [8 sc in the ch-7 sp, (sc, ch 2, sc) in the next sc] 3 times. Fasten off. (32 sc, 4 ch-2 sps)
The three frame sides have 10 sc each, the same as a full hexagon side. The straight cut edge is made of row ends.
Checkpoint: 2 in (5.1 cm) wide x 4.6 in (11.7 cm) tall.
Make All Pieces
There’s only one color, so the totals are simple:
- Per panel: 219 full hexagons (Cream) + 22 half-hexagons (Cream)
- Pair of panels: 438 full hexagons + 44 half-hexagons
Layout per panel, with the hexagons pointy-top (F = full hexagon, ½ = half-hexagon, cut edge facing out):
Row 1:   F F F F F F F F F F
Row 2:  ½ F F F F F F F F F ½
Row 3:   F F F F F F F F F F
Row 4:  ½ F F F F F F F F F ½
...continue alternating...
Row 23:  F F F F F F F F F F
The odd rows give 12 x 10 = 120 full hexagons. The even rows give 11 x 9 = 99 full hexagons plus 22 halves.
Joining
Method: Use a slip stitch seam worked on the RS through the back loops. It leaves a raised, braided ridge that matches the motif frames.
Stitch-to-stitch logic: Line up two sides with the RS facing up. Sl st through both corner ch-2 sps, then sl st through the back loops of the 10 matching sc pairs. Finish with a sl st through the next pair of corner ch-2 sps. That’s 12 sl sts per seam, and you never add or skip stitches.
Order: Join Row 1 into a strip along the vertical sides. Each even-row piece then joins to two hexagons above it along its two upper slanted sides, and to its neighbor along a vertical side. Odd rows join the same way. Where three corners meet, the ch-2 sps stack together in one spot, so work through all of them.
Tension: Keep your sl sts as loose as the sc they’re joining. If you can’t easily slide a finger under a seam, it’s too tight and the panel will pucker. If needed, use a 4.5 mm hook for joining only.
Size checkpoint: After Rows 1–2, the strip should measure 40 in (101.6 cm) wide and 8.1 in (20.6 cm) from the top points of Row 1 to the bottom points of Row 2. Each new row adds about 3.46 in (8.8 cm). The full joined panel is 40 x 80.8 in (101.6 x 205.2 cm).
Border
Border gauge: 16 sc = 4 in (10.2 cm) across the top and bottom edges. Along the sides it’s about 18 sc = 4 in (10.2 cm).
Round 1 (fill and straighten): With the RS facing, join the yarn at a panel corner. The corners are the outer ch-2 sps of the corner hexagons in Rows 1 and 23. Work (dtr, ch 2, dtr) in each panel corner sp.
Top and bottom edges, for each hexagon: Ch 3, sk the first 5 sts of the upper side, dc in the 6th st, ch 3. Sc in the point ch-2 sp, ch 3. Sk 4 sts of the next side, dc in the 5th st, ch 3. Then work 1 dtr through both joined ch-2 sps at the valley between this hexagon and the next one. The last hexagon on each edge ends at the corner instead of a valley.
Each edge has 2 corner dtr + 9 valley dtr + 20 dc + 10 sc = 41 sts and 40 ch-3 sps. The tall dtr fills each valley, which is about 1.2 in (3.0 cm) deep. The dc fills the middle of each side, and the sc sits at the point, so the edge comes out straight.
Sides: Work 1 sc in each of the 10 sts on each vertical hexagon side. Work 1 sc through both ch-2 sps at each junction between rows (22 per side). Work 20 sc across each half-hexagon cut edge, 10 per half-edge: 1 in the Row 5 end, 4 in the Row 4 end, 2 in the Row 3 end, 1 in the Row 2 end and 2 in the Row 1 end.
Each side has 1 + 120 + 220 + 22 + 1 = 364 sts, counting the corner dtrs. Sl st to the first dtr.
Round 2: Ch 1. Work (sc, ch 2, sc) in each corner ch-2 sp, sc in each st, and 3 sc in each ch-3 sp. On the sides, work 1 sc in the top of each corner dtr plus 3 sc around its post, which covers the post’s height.
Count per side, including the corner sc:
– Top and bottom: 1 + 41 + (40 x 3) + 1 = 163 sc
– Sides: 1 + 4 + 362 + 4 + 1 = 372 sc
Sl st to the first sc.
Round 3: Ch 1, sc in each sc, and (sc, ch 2, sc) in each corner ch-2 sp. Sl st to the first sc and fasten off.
- Top and bottom: 165 sc
- Sides: 374 sc
Why the math works: Each hexagon is 4 in (10.2 cm) wide and gives 15 sc across the top in Round 2, plus 1 sc over each shared valley dtr. That’s about 16 sc per 4 in, which matches the border gauge. Ten hexagons give 160 sc across 40 in (101.6 cm). The corner stitches bring Round 2 to 163. On the sides, each stitch is worked into an existing motif stitch or seam point, so the edge length is set by the joined panel and can’t flare.
Final Blocking
- Weave in every end along a frame line or seam, not through the flower centers.
- Soak the panel in cool water for 15 minutes, then press the water out without wringing.
- Roll it in towels to remove more water.
- Lay it flat on a large clean surface or several blocking mats pushed together.
- Pin the side edges straight at 81.8 in (207.8 cm), then pin the top and bottom at 41.5 in (105.4 cm).
- Gently open each flower center and square up any hexagon frames that have drifted.
- Let the panel dry completely. Repeat for the second panel and compare their sizes.
Final Quality-Control Checklist
- Every full hexagon has 60 sc and 6 ch-2 corner sps
- Every half-hexagon has 32 sc and 4 ch-2 sps
- Every seam is 12 sl sts with no gaps at the three-corner meeting points
- Each border Round 1 side has 364 sts and each top or bottom edge has 41 sts + 40 ch-3 sps
- The final Round 3 counts are 165 / 374 / 165 / 374
- The panel measures 41.5 x 81.8 in (105.4 x 207.8 cm)
- Both panels match within 0.5 in (1.3 cm)
Troubleshooting
- Hexagon cups: Your Round 4 chains are too tight. Chain more loosely or use a larger hook for that round only.
- Frame ripples: Your chains are too loose, or you put more than 8 sc in an arch. Recount.
- Seams pucker: Rework the seam more loosely or with a larger hook.
- Top edge is wavy: Check that every valley got a dtr and every point got an sc.
- Panel is too long: Block it narrower, or leave off one odd and one even row (about 6.9 in / 17.5 cm). The top and bottom rows must both stay odd.
- Small holes at the corners: Make sure you worked through every stacked ch-2 sp.
Care
Hand wash or machine wash cold on a gentle cycle inside a large mesh bag. Lay flat to dry, re-pin if needed, and don’t tumble dry.
Final Notes
The measurement chain is simple:
- One 4 in (10.2 cm) hexagon with 10 sc per side
- 10 hexagons per row, joined with 12-sl-st seams, make 40 in (101.6 cm)
- 23 offset rows make 80.8 in (205.2 cm)
- The border adds 0.75 in (1.9 cm) to each side and 0.5 in (1.3 cm) to the top and bottom, for a finished panel of 41.5 x 81.8 in (105.4 x 207.8 cm)
If your first hexagon matches the gauge, every later number follows from it. Clip 12 rings across the top of each panel, one at each Row 1 point plus one at each corner, and hang.
Happy crocheting!