

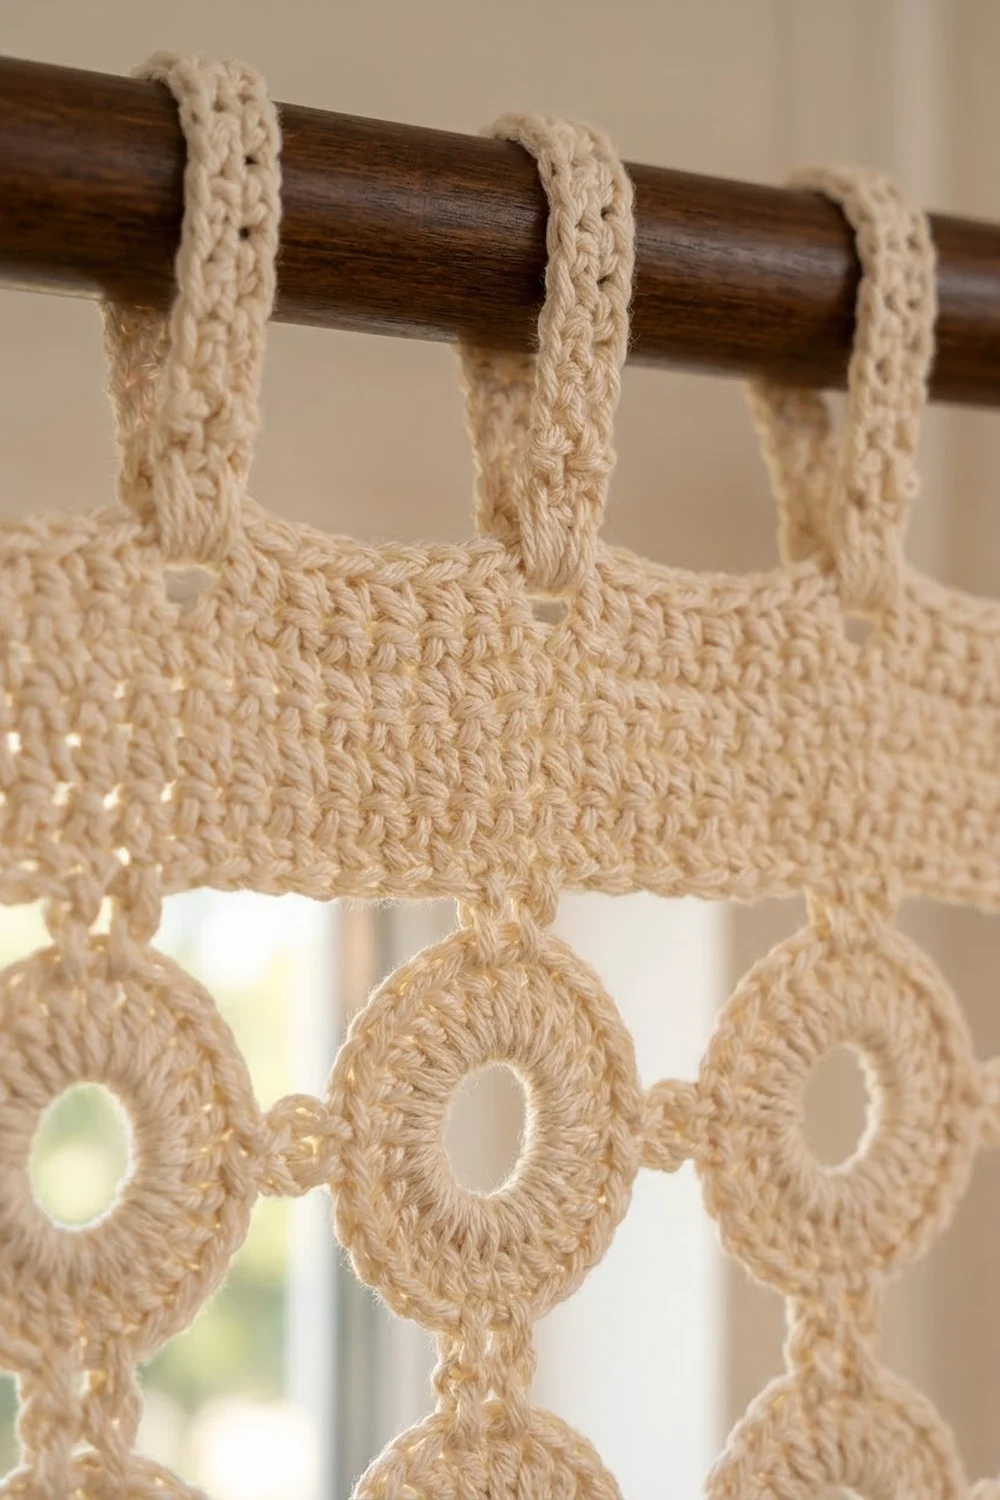
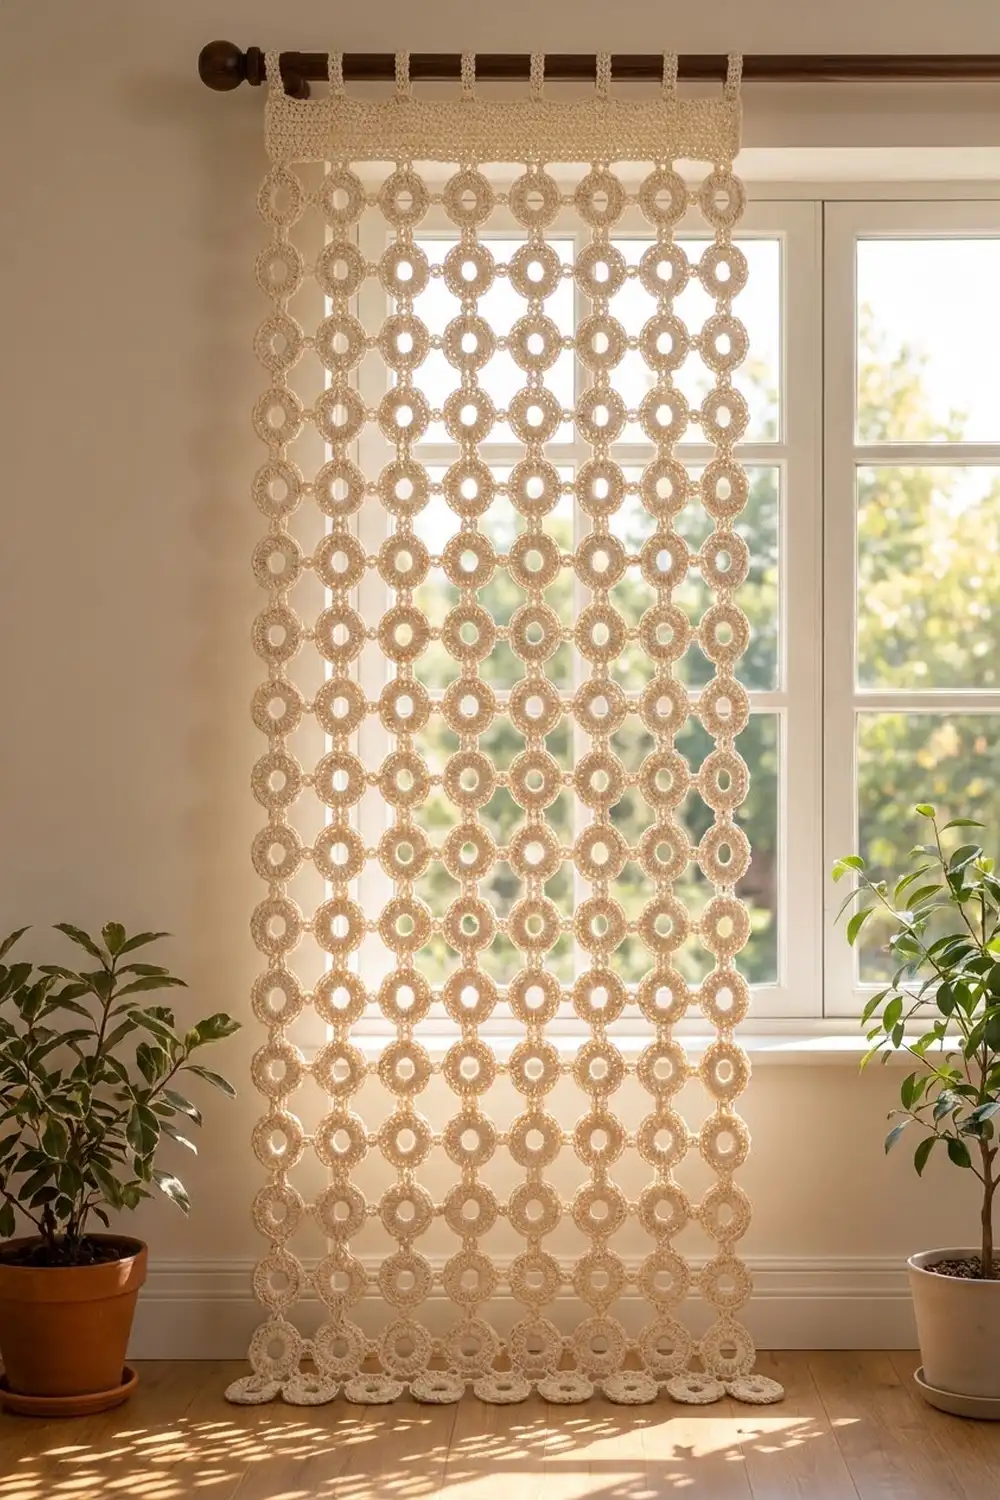
The Sunlit Rings Curtain Panel is a light, airy window panel built entirely from small crochet donut rings. Each ring has a thick, textured rim around an open center. Little chain-loop connectors join the rings into a neat grid, so daylight shines through every hole and every gap between the rings.
The panel uses a single cream or ivory cotton yarn. It has a warm, boho-farmhouse look that suits bright rooms, wooden floors and natural textures. A solid header band and simple tab tops finish the upper edge, so the panel slides straight onto a standard curtain rod. The side and bottom edges keep their soft scalloped ring outline.
This pattern uses US crochet terms. One finished panel measures 23.5 in (59.7 cm) wide. The ring grid is 77.5 in (196.9 cm) tall, and the header adds 2 in (5.1 cm), for 79.5 in (201.9 cm) from the bottom rings to the top of the header. With the tabs, the panel hangs about 82 in (208.3 cm) from the rod. The photo shows a matching pair, so make two panels for a full window.
Construction is simple. You crochet 208 ring motifs, 8 across and 26 down. From the second ring onward, you join each ring to its neighbors as you work its last round. You then work the header band across the top row of rings and add five hanging tabs.
Finished Size and Construction
- Finished size (one panel): 23.5 in (59.7 cm) wide × 79.5 in (201.9 cm) tall, plus tabs (about 82 in / 208.3 cm hanging length)
- Skill level: Easy. Join-as-you-go is the only technique beyond basic stitches.
- Terminology: US crochet terms
- Yarn weight: Worsted (#4), cotton or cotton blend
- Hook: 5 mm (H-8)
- Number of pieces: 208 ring motifs per panel, joined as you go
- Layout: 8 rings wide × 26 rings tall
- Piece size: each ring is 2.5 in (6.4 cm) across, with a center hole of about 0.75 in (1.9 cm)
- Size before border: joined ring grid is 23.5 in × 77.5 in (59.7 cm × 196.9 cm)
- Border depth: the header band is 2 in (5.1 cm) deep along the top edge only. The tab loops stand about 2.5 in (6.4 cm) above it.
Materials
Yarn: Use a smooth worsted-weight cotton or cotton blend with a soft twist. Cotton gives the crisp stitch definition shown in the photo and keeps the rings from stretching out of shape as the panel hangs. Avoid very fuzzy or very splitty yarns, because they hide the ring texture.
- Cream / ivory: 600 g (about 1020 m / 1115 yd) per panel, or 1200 g (about 2040 m / 2230 yd) for a pair
The estimate allows about 4 m (4.4 yd), or about 2.4 g, per ring. That comes to roughly 500 g for the rings, plus about 30 g for the header and tabs. These quantities include a safety margin of roughly 15%. Buy every skein from the same dye lot.
Tools:
– 5 mm (H-8) crochet hook
– Tapestry needle
– Stitch markers (4 or more)
– Rigid ruler or tape measure
– Blocking mats and rust-proof pins
– Spray bottle
– Curtain rod (for test-hanging)
Abbreviations (US Terms)
- ch: chain
- sl st: slip stitch
- sc: single crochet
- hdc: half double crochet
- dc: double crochet
- st(s): stitch(es)
- sp: space
- rep: repeat
- RS: right side
Special stitch: Joining loop (JL). You use this in place of a ch-3 loop when connecting to a finished ring. Work ch 1, sl st into the matching ch-3 loop of the neighboring ring, then ch 1. The JL sits in the same position as a ch-3 loop and counts as one loop.
Gauge and Checkpoints
Make and measure one test ring before starting the panel.
- After Round 1: the ring measures 2 in (5.1 cm) across.
- After Round 2: the ring measures 2.5 in (6.4 cm) across, not counting the ch-3 loops.
- Two joined rings: they measure 5.5 in (14.0 cm) side to side, with a 0.5 in (1.3 cm) gap between rims.
- Ring pitch: the distance from the center of one ring to the center of the next is 3 in (7.6 cm).
- One full row of 8 rings: 23.5 in (59.7 cm).
- First 10 rows: 29.5 in (74.9 cm) tall.
- Header gauge: 14 hdc = 4 in (10.2 cm), and 10 hdc rows = 4 in (10.2 cm).
If your ring is too big (over 2.6 in / 6.6 cm), go down a hook size to 4.5 mm (7). Also check that you pull the center ring closed snugly.
If your ring is too small (under 2.4 in / 6.1 cm), go up to 5.5 mm (I-9).
Even a small gauge error adds up. Over 26 rows, an extra 0.1 in (0.3 cm) per ring adds about 2.6 in (6.6 cm) of length.
Ring Motif
Round 1: Ch 10 and sl st to the first ch to form a ring. Ch 3 (counts as dc), then work 23 dc into the ring. Sl st to the top of the beginning ch-3. (24 dc)
The large ch-10 ring creates the open center. Push the dc together evenly so they cover the chain fully without ruffling.
Round 2 (first ring only, no joins): Ch 1. Work [sc, ch 3, sc] in the same st as the join; this is the top point. Then:
– Sc in the next 5 sts, then [sc, ch 3, sc] in the next st (left point).
– Sc in the next 5 sts, then [sc, ch 3, sc] in the next st (bottom point).
– Sc in the next 5 sts, then [sc, ch 3, sc] in the next st (right point).
– Sc in the last 5 sts.
Sl st to the first sc and fasten off. (28 sc: 24 sc worked one per st + 4 extra sc; plus 4 ch-3 loops)
This is a conversion round. Each of the 24 dc gets one sc, and each of the 4 compass points gets one extra sc, for 28 sc. The four ch-3 loops sit at exactly 90° to each other, which keeps the grid square.
The rings are worked counterclockwise as seen from the RS. That is why the order is top, left, bottom, right. Left-handed crocheters work the same order but clockwise (top, right, bottom, left).
Make All Pieces
All 208 rings use the cream yarn: 8 rings per row × 26 rows = 208 rings per panel, or 416 for a pair. Every ring after the first is joined during its Round 2, so you never sew rings together.
Work the layout in the order below: left to right in each row, top to bottom. Row 1 is the top row, under the header.
Row 1:   R1  - R2  - R3  - R4  - R5  - R6  - R7  - R8
          |     |     |     |     |     |     |     |
Row 2:   R9  - R10 - R11 - R12 - R13 - R14 - R15 - R16
          |     |     |     |     |     |     |     |
 ...    (same pattern, 8 rings per row)
          |     |     |     |     |     |     |     |
Row 26:  R201- R202- R203- R204- R205- R206- R207- R208
Each “-” and “|” is one joined loop pair. A full panel has 7 horizontal joins per row × 26 rows = 182 horizontal joins, and 8 vertical joins between each pair of rows × 25 = 200 vertical joins.
Joining (Join-As-You-Go)
Every ring works Round 1 as written. Only Round 2 changes: when a loop must attach to a finished ring, replace its ch 3 with a JL.
Row 1, rings 2–8: Work Round 2 as usual, but at the right point, work [sc, JL, sc]. Make the JL into the left ch-3 loop of the ring just finished.
Wait — read that carefully: the new ring sits to the right of the previous ring. Its own left point touches the previous ring’s right loop. So work [sc, JL, sc] at the new ring’s left point, sl stitching into the previous ring’s right ch-3 loop. Keep ch-3 loops at the new ring’s top, bottom and right points.
Rows 2–26, first ring of each row: At the top point, work [sc, JL, sc], sl stitching into the bottom ch-3 loop of the ring directly above. Keep ch-3 loops at the left, bottom and right points.
Rows 2–26, rings 2–8: At the top point, JL into the bottom loop of the ring above. At the left point, JL into the right loop of the previous ring. Keep ch-3 loops at the bottom and right points.
Stitch-to-stitch logic: Each connector is always one finished ch-3 loop plus one JL from the new ring. Together they form the small bead-like link seen in the photo. The connector adds no stitches to either ring. Every ring still has 28 sc and 4 loops, so the grid stays perfectly even.
Tension advice: Keep the ch 1 on either side of each JL the same size as your normal chains. If those chains are too tight, the rings pucker and the gap shrinks below 0.5 in (1.3 cm). If they are too loose, the panel droops between rings. Also make sure the sl st goes into the neighbor’s loop, not around a single strand, so the link sits centered.
Size checkpoint: After Row 1, the strip should measure 23.5 in (59.7 cm). After Row 10, the panel should measure 29.5 in (74.9 cm) tall. The finished grid should measure 23.5 in × 77.5 in (59.7 cm × 196.9 cm) before the header.
Border: Header Band and Hanging Tabs
The border is worked along the top edge only. The sides and bottom keep their open scalloped ring edge, as in the photo.
Border gauge: 14 hdc and 10 rows = 4 in (10.2 cm). Row 1 is designed to spread 81 sts evenly across the 23.5 in (59.7 cm) panel width.
Header Band
Row 1 (RS): With the RS facing, join the yarn with a sc in the unused left ch-3 loop of ring 1 (the top-left ring). Then:
– Ch 3, then work 3 sc in the top ch-3 loop of ring 1.
– Ch 7, then work 3 sc in the top ch-3 loop of the next ring. Rep from * 6 more times, ending at ring 8.
– Ch 3, then sc in the unused right ch-3 loop of ring 8.
Turn. (81 sts)
Why the math works: Each of the 8 rings gives 3 sc, so 8 × 3 = 24. Each of the 7 gaps between rings gives 7 ch, so 7 × 7 = 49. Each outer end gives 1 sc + 3 ch = 4 sts, so 2 × 4 = 8. Total: 24 + 49 + 8 = 81 sts.
No extra stitches are added at the seams; the ch-7 span is the whole bridge. Over the 3 in (7.6 cm) ring pitch, the repeat is 3 sc + 7 ch = 10 sts. That matches the header gauge closely, so the band lies flat without cupping or flaring.
Row 2: Ch 2 (does not count as a st). Hdc in each st and in each ch across. Turn. (81 hdc)
Rows 3–5: Ch 2. Hdc in each st across. Turn. (81 hdc)
Checkpoint: The header measures 2 in (5.1 cm) deep and 23.5 in (59.7 cm) wide. Do not fasten off.
Hanging Tabs
You will make 5 tabs, each 5 sts wide. The 4 gaps between them are each 14 sts wide. Check: 5 × 5 + 4 × 14 = 25 + 56 = 81 sts. The tabs sit over sts 1–5, 20–24, 39–43, 58–62 and 77–81.
Tab 1, Row 1: Ch 1. Sc in the first 5 sts. Turn. (5 sc)
Tab 1, Rows 2–18: Ch 1. Sc in each st across. Turn. (5 sc)
The tab is now about 5 in (12.7 cm) long and 1.5 in (3.8 cm) wide. Fasten off, leaving a 10 in (25.4 cm) tail. Fold the tab to the wrong side and whipstitch its last row to the back of header Row 2, directly behind where it started. This makes a loop about 2.5 in (6.4 cm) tall.
Tabs 2–5: Skip 14 sts after the previous tab. Join the yarn in the next st and repeat the tab rows across 5 sts. The last tab ends exactly on st 81.
Final Blocking
- Weave in all ends along the ring rims, never through the connector links.
- Wet the panel fully in cool water. Press out the water gently; do not wring.
- Roll the panel in towels to remove excess moisture.
- Lay it flat on mats in sections. Pin each ring at its 4 compass points so it is 2.5 in (6.4 cm) across, with 0.5 in (1.3 cm) gaps.
- Pin the header straight at 23.5 in (59.7 cm) wide and 2 in (5.1 cm) deep.
- Check the overall size: 23.5 in × 79.5 in (59.7 cm × 201.9 cm) without tabs.
- Let it dry completely, then hang it on the rod for 24 hours so the rings settle evenly.
Final Quality-Control Checklist
- Every ring has 24 dc in Round 1 and 28 sc plus 4 loops in Round 2.
- Every connector is centered and the same size.
- The grid is exactly 8 rings wide and 26 rings tall.
- No ring is accidentally joined at the wrong point, which would twist the grid.
- Header Row 1 has 81 sts, and Rows 2–5 each have 81 hdc.
- There are 5 tabs, evenly spaced, with gaps of 14 sts.
- All ends are woven in securely and are invisible from the RS.
- The panel measures within 0.5 in (1.3 cm) of the target size.
Troubleshooting
Rings cup or ruffle: Round 1 is too tight or too loose around the ch-10 ring. Redo it, spacing the 24 dc evenly.
Center hole closes up: Your chains are too tight. Use a looser chain or try ch 11.
Grid leans diagonally: A ring was joined at the wrong compass point. Undo Round 2 of that ring and rejoin.
Gaps vary in size: The ch 1 on either side of the JL is uneven. Keep both chains identical.
Header cups: The ch-7 bridges are too tight. Make them looser, or go up a hook size for Row 1 only.
Header flares: The bridges are too loose. Use a tighter chain.
Panel grows too long when hung: This happens with heavy or stretchy yarn. Block it, hang it, then re-measure; if needed, remove a final row of rings before making the second panel.
Care
Hand wash in cool water with a mild detergent and dry flat, reshaping the rings while damp. Avoid tumble drying, which can stretch the connectors and distort the grid.
Final Notes
Everything in this panel follows one measurement chain:
– 24 dc make a 2 in (5.1 cm) ring.
– 28 sc bring it to 2.5 in (6.4 cm).
– A 0.5 in (1.3 cm) connector sets a 3 in (7.6 cm) pitch.
– 8 rings across make 23.5 in (59.7 cm), and 26 rows make 77.5 in (196.9 cm).
– An 81-stitch header 2 in (5.1 cm) deep brings the panel to 79.5 in (201.9 cm), and the tabs finish it on the rod.
If each checkpoint matches, the finished panel will too. Make a second panel to frame your window just like the photo.
Happy crocheting!