

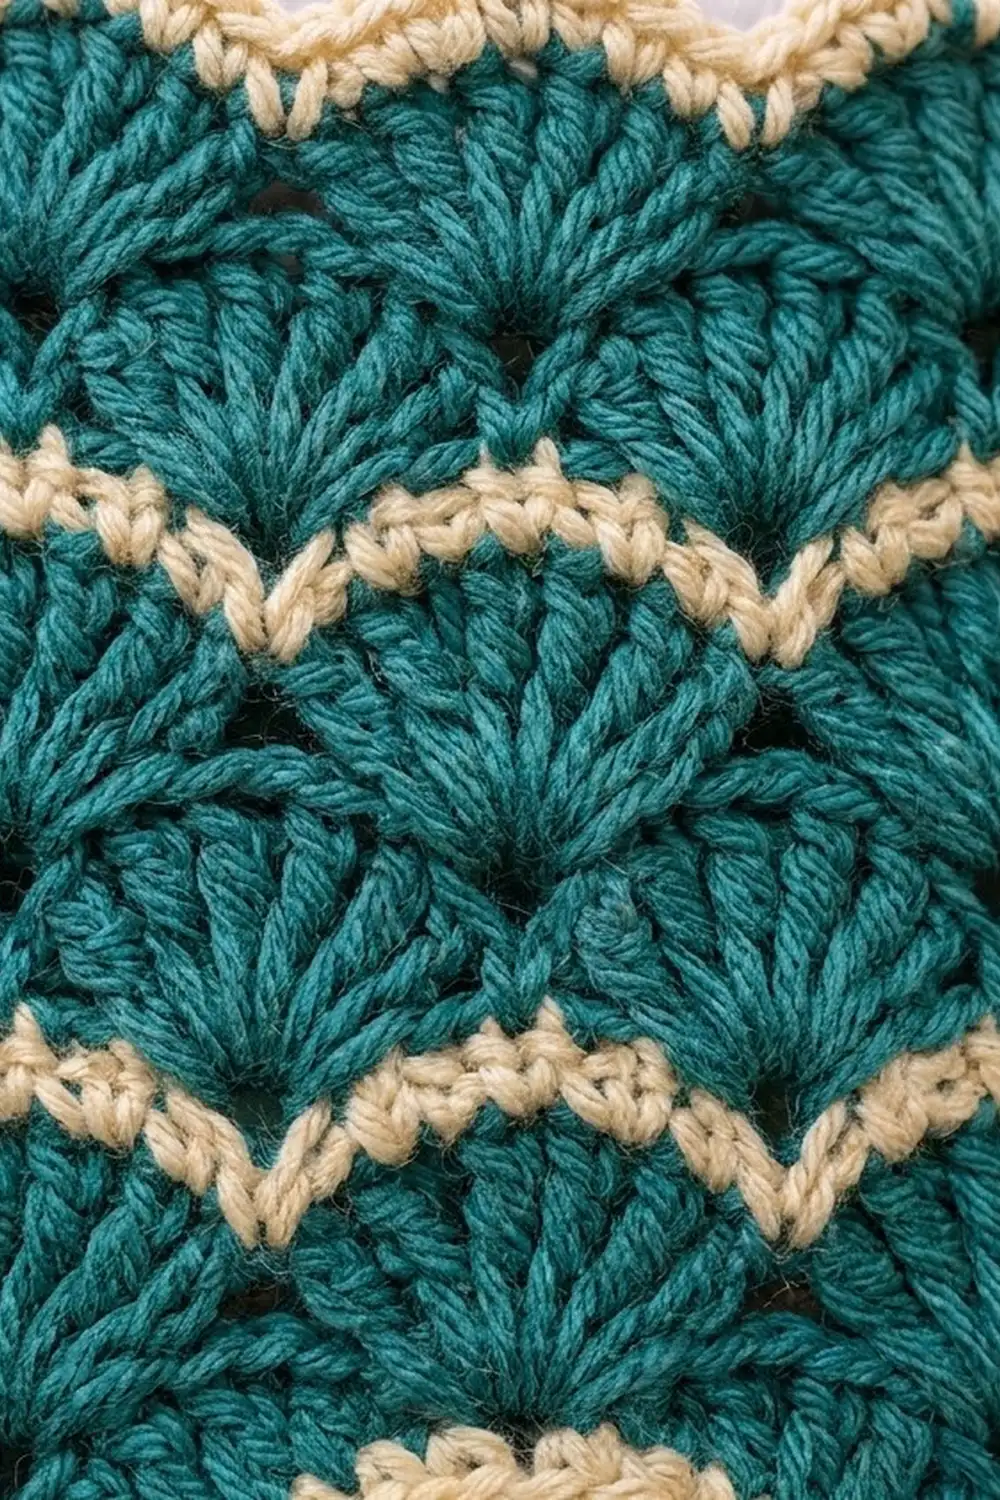
This hanging plastic bag holder adds a calm, coastal touch to your kitchen. Rows of deep teal shell stitches cover the body. Thin cream stripes ripple across it, a cream scalloped edge finishes the top, and a cream rim outlines the small dispensing opening at the bottom.
The pattern uses two colors, teal and cream. Cream also outlines both side edges and both long edges of the strap, which frames the whole piece. Fill the holder with bags through the wide top, then pull them out one at a time through the bottom.
All instructions use US terms. The finished holder measures about 9 in (22.9 cm) wide laid flat and 10.25 in (26.0 cm) tall, not counting the strap. The strap is 20 in (50.8 cm) long before you attach it.
You work the body in the round from the bottom up. A chain ring becomes the dispensing opening. Five dc rounds with corner increases shape the angled lower corners. Next come four bands of teal shells separated by cream sc stripes, then a cream scalloped top. You crochet a flat strap separately and sew it inside the top edge.
Finished Size and Construction
- Finished size: 9 in x 10.25 in (22.9 cm x 26.0 cm), laid flat, not counting the strap
- Skill level: Easy to intermediate
- Terminology: US crochet terms
- Yarn weight: Worsted (#4)
- Hook: 5.0 mm (H-8)
- Number of pieces: 1 body worked in the round plus 1 sewn-on strap (no motifs to join)
- Layout: A flattened tube with 36 stitches on each face (front and back), 72 stitches around
- Body size before trims: 9 in x 9.5 in (22.9 cm x 24.1 cm) after Round 17
- Trim depth: Top scallops 0.5 in (1.3 cm); bottom opening rim 0.25 in (0.6 cm)
- Strap: 20 in x 1.5 in (50.8 cm x 3.8 cm)
Materials
Use a smooth worsted-weight cotton or cotton blend. Cotton shows the shell shapes clearly and won’t stretch much once the holder is full. Acrylic works too, but it will relax a little over time.
- Teal (main color): about 120 g / 216 m
- Cream (contrast color): about 40 g / 72 m
These amounts include about 15 percent extra for swatching and differences in tension.
Tools:
- 5.0 mm (H-8) crochet hook
- 4 locking stitch markers
- Tapestry needle
- Scissors
- Measuring tape
- Rust-proof pins and a blocking surface
Abbreviations (US Terms)
- ch – chain
- sl st – slip stitch
- sc – single crochet
- dc – double crochet
- sk – skip
- st(s) – stitch(es)
- rnd – round
- corner group – 3 dc worked in the same stitch
Shell: 5 dc worked in the same stitch.
Surface slip stitch: Hold the yarn behind the work. Insert the hook from front to back through the fabric, yarn over, and pull the loop through the fabric and through the loop on your hook.
Gauge and Checkpoints
Dc gauge: 16 sts and 8 rnds = 4 in (10.2 cm). That means 4 sts = 1 in (2.5 cm) and 2 rnds = 1 in (2.5 cm).
Shell gauge: 2 shell repeats (12 sts) = 3 in (7.6 cm) wide; 2 shell rounds = 1.5 in (3.8 cm) tall.
Sc gauge (strap): 16 sts = 4 in (10.2 cm); 4 rows = 1 in (2.5 cm).
Check your gauge on the base first. It’s quick to work, and every later measurement depends on it.
Checkpoints (measured flat):
- Foundation ring: 4 in (10.2 cm) across
- After Round 5: 9 in (22.9 cm) wide, 2.5 in (6.4 cm) tall
- After Round 8: 4.25 in (10.8 cm) tall
- After Round 11: 6 in (15.2 cm) tall
- After Round 14: 7.75 in (19.7 cm) tall
- After Round 17: 9.5 in (24.1 cm) tall
- After Round 18: 10 in (25.4 cm) tall
- After the bottom rim: 10.25 in (26.0 cm) tall
Too big? Go down one hook size, to 4.5 mm. Too small? Go up one hook size, to 5.5 mm. Make any hook change before you start the shell rounds. The stitch counts stay the same either way.
Body
Work in joined rounds without turning. The foundation ring becomes the dispensing opening.
Base (Angled Lower Corners)
Foundation: With teal, ch 32. Join with a sl st to the first ch to form a ring, making sure the chain isn’t twisted. Lay the ring flat: chains 1–16 are the front and chains 17–32 are the back. Place markers in ch 1, ch 16, ch 17 and ch 32. These are the 4 corner stitches.
Rnd 1: Ch 3 (counts as dc), 2 dc in ch 1. Dc in the next 14 ch. 3 dc in ch 16, 3 dc in ch 17. Dc in the next 14 ch. 3 dc in ch 32. Join with a sl st to the top of the beginning ch-3. (40 sts: 20 per face)
Move each marker to the center dc of its corner group.
Rnd 2: Sl st in the next dc (the center of the first corner group). Ch 3 (counts as dc), 2 dc in the same st. Dc in each dc up to the next marked st, then work 3 dc in the marked st. Repeat from * 2 more times. Dc in each remaining dc, including the beginning ch-3 of the previous round. Join with a sl st to the top of the beginning ch-3. (48 sts: 24 per face)
After every round, move the markers up to the new center corner dc.
Rnd 3: Repeat Rnd 2. (56 sts: 28 per face)
Rnd 4: Repeat Rnd 2. (64 sts: 32 per face)
Rnd 5: Repeat Rnd 2. (72 sts: 36 per face)
Each round adds 4 sts per face, so each face gets 1 in (2.5 cm) wider per round. Over 2.5 in (6.4 cm) of height, the face grows from 4 in (10.2 cm) to 9 in (22.9 cm), which forms the angled lower corners. Remove the markers.
Shell Band 1 (Teal)
Rnd 6 (Shell Round A): Ch 1, sc in the same st as the join. Sk 2 sts, shell in the next st, sk 2 sts, sc in the next st. Repeat from * 10 more times. Sk 2 sts, shell in the next st, sk 2 sts. Join with a sl st to the first sc. (12 shells + 12 sc = 72 sts)
Rnd 7 (Shell Round B): Sl st in the next 2 dc to reach the center dc of the first shell. Ch 1, sc in the same st. Shell in the next sc, sc in the center dc of the next shell. Repeat from * 10 more times. Shell in the last sc. Join with a sl st to the first sc, changing to cream on the final yarn over. Fasten off teal. (12 shells + 12 sc = 72 sts)
In Round B, each shell sits directly above an sc from Round A, which staggers the shells into a fish-scale pattern.
Cream Stripe 1
Rnd 8: With cream, ch 1, sc in each st around. Join with a sl st to the first sc, changing to teal. Fasten off cream. (72 sts)
Round 7 has tall shells next to short sc, so this sc round naturally forms a wavy line.
Remaining Bands
Rnds 9–10: With teal, repeat Rnds 6–7. (72 sts each)
Rnd 11: With cream, repeat Rnd 8. (72 sts)
Rnds 12–13: With teal, repeat Rnds 6–7. (72 sts each)
Rnd 14: With cream, repeat Rnd 8. (72 sts)
Rnds 15–16: With teal, repeat Rnds 6–7. (72 sts each)
Rnd 17: With cream, repeat Rnd 8, but keep working with cream instead of changing colors. (72 sts)
Checkpoint: 9 in x 9.5 in (22.9 cm x 24.1 cm). This is the body size before the trims.
Border
Work all trims in cream. The border gauge is the same as the body: 4 sts = 1 in (2.5 cm).
Top Scalloped Edge
Rnd 18: Ch 1, sc in the same st as the join. Sk 2 sts, shell in the next st, sk 2 sts, sc in the next st. Repeat from * 10 more times. Sk 2 sts, shell in the next st, sk 2 sts. Join with a sl st to the first sc. Fasten off. (12 scallops + 12 sc = 72 sts: 36 per face, 6 scallops per face)
Why the math works: Each scallop repeat takes 6 sts (1 sc, 2 skipped, 1 shell st, 2 skipped). Each face has 36 sts, and 36 ÷ 6 = 6 scallops with nothing left over. Each scallop spans 1.5 in (3.8 cm), so 6 scallops span 9 in (22.9 cm), the full body width.
Bottom Opening Rim
Turn the holder upside down. Join cream in any foundation ch and work into the free loops of the chain.
Rim Rnd: Ch 1, sc in each foundation ch around. Join with a sl st to the first sc. Fasten off. (32 sc: 16 per face)
Why the math works: You work 1 sc into each of the 32 chains, so the opening stays 4 in (10.2 cm) wide laid flat. Adding stitches would make it ruffle, and fewer stitches would pull it tight.
Side Outlines
Lay the holder flat. Each side fold runs up the corner stitches of the base and then straight up through the shell rounds. With cream, work surface sl sts along each fold, from the bottom rim to the top scallop:
- 2 per dc round (Rnds 1–5): 10 sts
- 3 per shell round (8 rounds): 24 sts
- 1 per cream sc round (Rnds 8, 11, 14, 17): 4 sts
- 2 in the scallop round: 2 sts
Total: 40 surface sl sts per side. Keep these stitches loose so the edge doesn’t pucker.
Strap
Row 1: With teal, ch 81. Sc in the 2nd ch from the hook and in each ch across. (80 sc)
Rows 2–4: Ch 1, turn, sc in each st across. (80 sc) Fasten off. The strap now measures 20 in x 1 in (50.8 cm x 2.5 cm).
Edging: Join cream at one end of a long edge. Ch 1, sc in each st across. (80 sc) Fasten off. Repeat along the other long edge, working into the free loops of the foundation chain. (80 sc) The strap now measures 20 in x 1.5 in (50.8 cm x 3.8 cm).
Attaching: Put one strap end inside the bag at each side fold, so it overlaps the inside top edge by 1.25 in (3.2 cm). Check that the strap isn’t twisted. With teal, whipstitch around all 4 sides of each overlap through the back layer only. Then add a second line of stitching just below the scallops for strength.
Final Blocking
- Weave in all ends through stitches of the same color.
- Soak the holder in cool water and gently squeeze out the excess without wringing.
- Roll it in a towel to remove more moisture.
- Lay it flat and shape it to 9 in (22.9 cm) wide and 10 in (25.4 cm) tall, measured to the scallop tops.
- Pin each scallop into an even arch.
- Straighten the angled corners and round out the bottom opening with your fingers.
- Pin the strap straight at 20 in (50.8 cm).
- Let everything dry completely before hanging.
Final Quality-Control Checklist
- The body is 9 in (22.9 cm) wide on both faces.
- The total height is 10.25 in (26.0 cm), not counting the strap.
- Every round from Rnd 5 through Rnd 18 has 72 sts.
- Each face shows 6 shells per shell round and 6 top scallops.
- All 3 cream stripes are unbroken, with the color changes hidden at a side fold.
- The bottom rim has 32 sc and lies flat.
- Each side outline has 40 surface sl sts and doesn’t pucker.
- The strap is untwisted and firmly stitched at both ends.
Troubleshooting
The base cups upward: Your tension may be tight or you may be missing stitches. Recount each round and check the corner groups.
The base ruffles: You have extra stitches. Work only 1 dc in each non-corner stitch.
The shells lean: Make sure each Round B shell goes into the sc below it.
A stitch is left over at the end of a shell round: You skipped 1 or 3 sts somewhere instead of 2. The round should work out to exactly 12 repeats (72 ÷ 6 = 12).
The opening is too tight: Make the foundation chain looser, or work it with a hook one size larger.
The strap stretches: Use cotton and keep your sc rows firm.
Care
Hand wash in cool water with mild soap and lay flat to dry. Reshape the scallops while the holder is still damp.

Final Notes
All the measurements in this pattern build on each other. The 32-chain ring gives a 4 in (10.2 cm) opening. Five corner-increase rounds widen it to 72 sts, or 9 in (22.9 cm) per face. Twelve 6-stitch shell repeats keep that width through four teal bands and three cream stripes. The final 6 scallops per face fit that same 9 in (22.9 cm) exactly. If you match the gauge at each checkpoint, your holder will come out true to size.
Happy crocheting!