

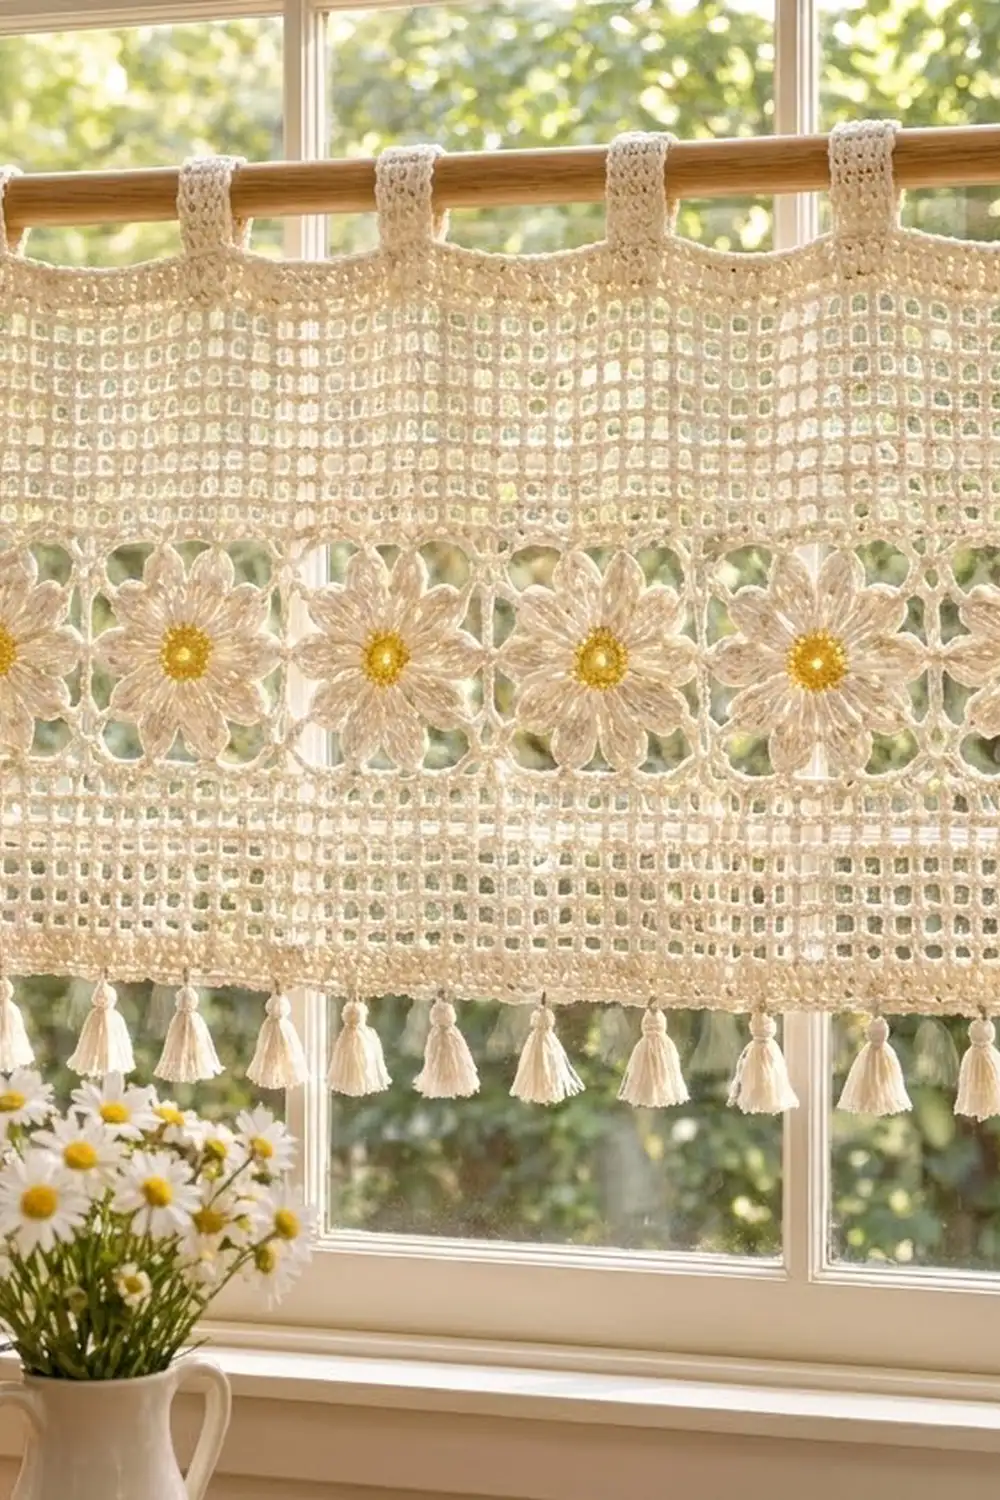
This valance brings a row of cheerful daisies to a kitchen or breakfast-nook window. A band of eight square daisy motifs runs across the middle, with airy filet mesh above and below. Slim tab loops slide onto a curtain rod, and a row of small tassels finishes the bottom edge.
The palette is simple: soft cream cotton for almost everything, with golden-yellow for the daisy centers. The mesh lets light through, while the textured petals and chain lattice give the band some depth. The style is cottage-farmhouse, light and fresh.
The pattern uses US crochet terms. The finished valance measures about 33¼ in wide x 16 in tall (84.5 cm x 40.6 cm) after blocking, not counting tabs or tassels. With the tassels it hangs about 18.5 in (47.0 cm) from the top edge.
The construction is straightforward. First you make eight daisy squares and slip-stitch them into a strip. Then you work the upper mesh panel in rows off the top edge of the strip, and the lower mesh panel off the bottom edge. A two-round border, nine tabs, and fifteen tassels finish the piece.
Finished Size and Construction
- Finished size: 33¼ in x 16 in (84.5 cm x 40.6 cm), not counting tabs and tassels
- Skill level: Intermediate
- Terminology: US crochet terms
- Yarn weight: DK / light (#3) cotton
- Hook: 4.0 mm (G-6)
- Number of pieces: 8 daisy motifs, plus mesh panels, tabs, and tassels that are worked onto or attached to the joined strip
- Layout: 8 motifs in 1 horizontal row
- Motif size: 4 in (10.2 cm) square
- Size before border: about 32¼ in x 15 in (81.9 cm x 38.1 cm)
- Border depth: ½ in (1.3 cm) on each side
Materials
Choose a smooth DK-weight cotton, either mercerized or soft combed. Cotton keeps the mesh square and washes well, which matters for a window piece. Avoid fuzzy blends because they blur the mesh.
- Cream (main color): 325 g, about 750 m (820 yd), including tassels
- Golden yellow (centers): 10 g, about 25 m (27 yd)
These amounts assume a cotton of about 115 m (126 yd) per 50 g and include a margin of roughly 10%.
Tools:
- 4.0 mm (G-6) crochet hook
- Tapestry needle
- Stitch markers
- Scissors
- Stiff card 3 in (7.6 cm) tall, for tassels
- Rustproof pins and a blocking surface
- Measuring tape
Abbreviations (US Terms)
- ch – chain
- sl st – slip stitch
- sc – single crochet
- hdc – half double crochet
- dc – double crochet
- tr – treble crochet
- MR – magic ring
- sk – skip
- sp – space
- st(s) – stitch(es)
- BLO – back loop only
- RS / WS – right side / wrong side
Special stitches:
- Petal: In the same ch-2 sp, work (sc, hdc, dc, 2 tr, dc, hdc, sc). The petal tip is the gap between the 2 tr.
- Mesh: Ch 1, sk 1 st, dc in next st. Each ch-1 sp plus its dc makes one open square.
Gauge and Checkpoints
Gauge: 17 dc and 8 rows = 4 in (10.2 cm) in dc rows.
Make one complete motif before anything else. It is both your gauge swatch and your first checkpoint.
- After Round 2, the yellow center is about 1 in (2.5 cm) across.
- After Round 4, the flower is about 3¼ in (8.3 cm) across.
- After Round 6, the square measures 4 in (10.2 cm) per side.
- After joining, the strip measures 32 in x 4 in (81.3 cm x 10.2 cm).
- After the upper panel, the piece measures 32¼ in x 11 in (81.9 cm x 27.9 cm).
- After the lower panel, the piece measures 32¼ in x 15 in (81.9 cm x 38.1 cm).
If your motif is larger than 4 in, change to a 3.75 mm hook. If it is smaller, change to a 4.5 mm hook. Don’t change the stitch counts, because the panel math depends on them.
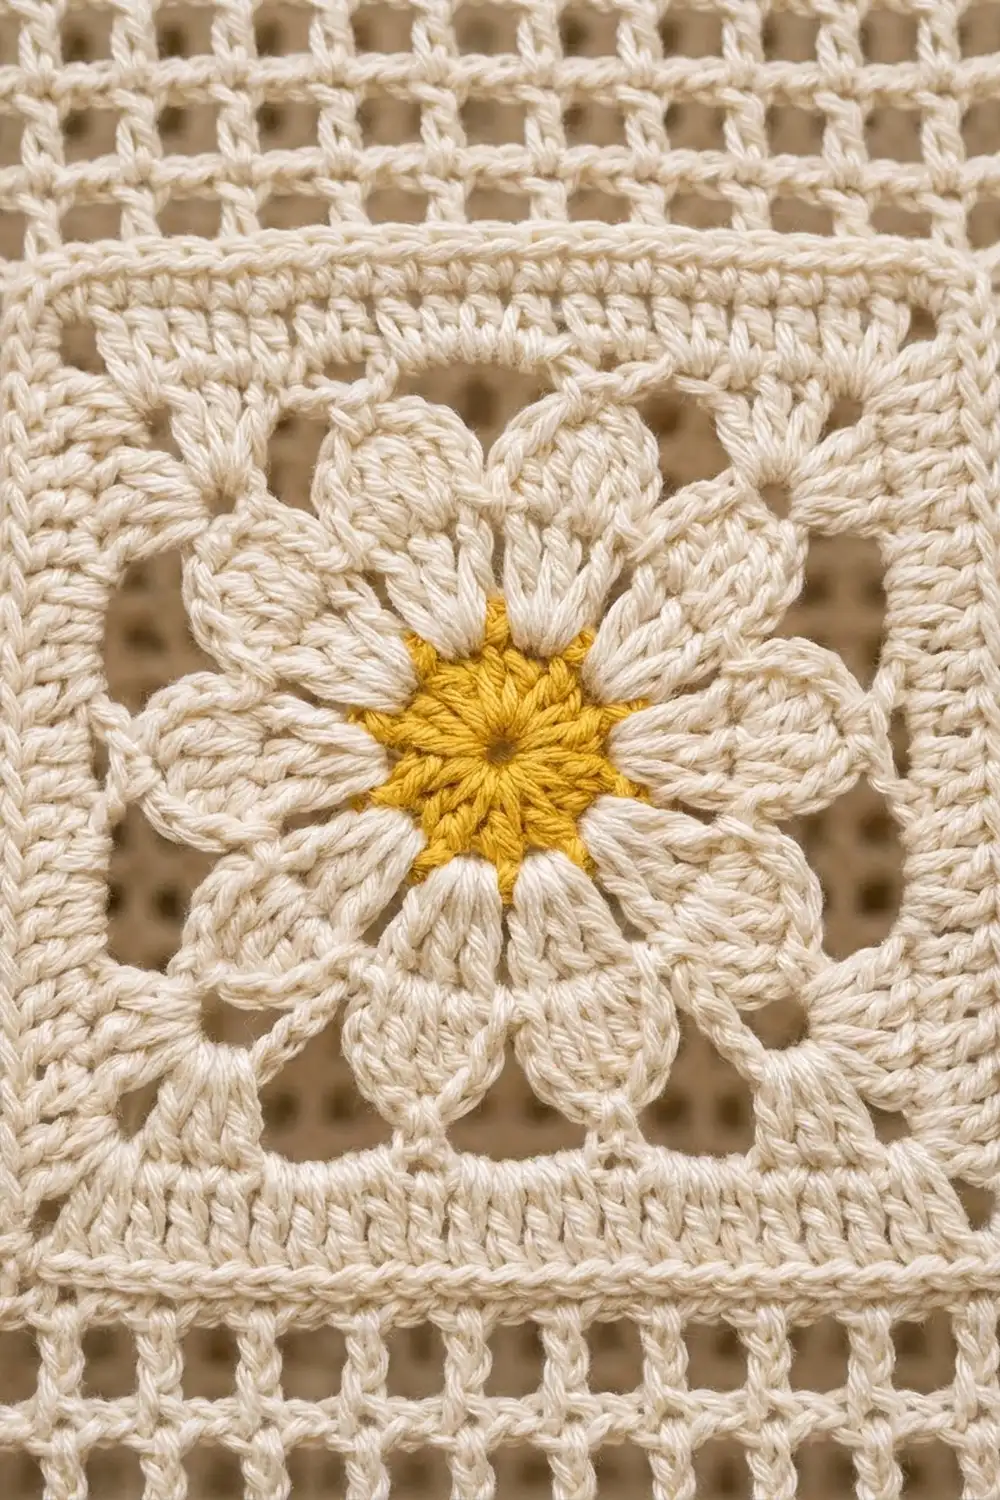
Daisy Motif (Make 8)
Round 1 (yellow): MR, ch 1, 8 sc in ring, sl st to first sc. Pull the ring closed. (8 sc)
Round 2 (yellow): Ch 1, 2 sc in each st around, sl st to first sc. (16 sc) Fasten off yellow.
Round 3 (cream): Join cream in any sc. Ch 1, sc in same st, ch 2, sk 1, sc in next st, ch 2, sk 1; repeat from * 6 more times, sl st to first sc. (8 sc, 8 ch-2 sps)
Round 4 (petals): Work Petal in next ch-2 sp, sl st in next sc; repeat from * around. (8 petals of 8 sts each, 8 sl sts)
The petals sit edge to edge and form the rounded daisy.
Round 5 (lattice): Sl st in the first sc, hdc, dc, and tr of the first petal, then sl st into the petal tip. Ch 1, sc in same tip, ch 5, (tr, ch 3, tr) in tip of next petal, ch 5, sc in tip of next petal, ch 5; repeat from * 2 more times, (tr, ch 3, tr) in tip of last petal, ch 5, sl st to first sc. (4 sc, 8 tr, 4 corner ch-3 sps, 8 ch-5 sps)
The four petals that get (tr, ch 3, tr) become the corners. The ch-5 loops arch between the petal tips and form the open lattice around the flower.
Round 6 (square): Ch 3 (counts as dc), 5 dc in ch-5 sp, dc in tr, 3 dc in corner ch-3 sp, dc in tr, 5 dc in ch-5 sp, dc in sc; repeat from * around, leaving out the final dc on the last repeat, sl st to top of ch-3. (64 dc)
Count check: Each side has 15 dc between corner centers (1 + 1 + 5 + 1 + 5 + 1 + 1). Counting both corner dc, each side has 17 sts. Four sides x 15, plus 4 corner dc, equals 64.
Fasten off and weave in ends.
Make All Pieces
- Yellow: 8 centers (Rounds 1–2)
- Cream: 8 motifs (Rounds 3–6), both mesh panels, border, 9 tabs, 15 tassels
Layout (1 row of 8):
[D1][D2][D3][D4][D5][D6][D7][D8]
Block all eight motifs lightly to 4 in (10.2 cm) square before joining. Squares of the same size make a straight strip.
Joining
Method: Slip-stitch join through back loops.
Hold two motifs RS together with the edges lined up. Using cream, sl st through the BLO of both layers, matching stitch to stitch, from corner dc to corner dc. That is 17 sl sts per seam. Join D1 to D2, then D2 to D3, and so on, for 7 seams.
Each motif side has 17 sts and the seam uses only the outer loops, so no stitches are added or lost. Each long edge of the strip has 8 x 17 = 136 sts.
Tension: Keep the sl sts as loose as your dc. A tight seam puckers the band and pulls the mesh above it into a curve. If needed, go up one hook size for joining only.
Checkpoint: The strip should lie flat at 32 in x 4 in (81.3 cm x 10.2 cm).
Upper Mesh Panel
With RS facing, join cream in the top-right corner dc of D1.
Row 1 (solid): Ch 3 (counts as dc), dc in each st across, working 2 dc in the last st. Count: 136 sts worked 1-per-stitch + 1 extra = 137 dc. Turn.
The extra stitch gives the mesh the odd count it needs.
Row 2 (mesh): Ch 4 (counts as dc + ch 1), sk next dc, dc in next dc, ch 1, sk 1, dc in next dc; repeat from * across, working the last dc in top of the turning ch. (69 dc + 68 ch-1 sps = 137 sts; 68 squares) Turn.
Rows 3–13 (mesh): Ch 4, sk ch-1 sp, dc in next dc, ch 1, sk ch-1 sp, dc in next dc; repeat from * across, working the last dc in the 3rd ch of the turning ch-4. (137 sts; 68 squares) Turn.
Row 14 (solid): Ch 3, dc in each ch-1 sp and each dc across. (137 dc) Fasten off.
Checkpoint: 14 rows at 8 rows per 4 in = 7 in (17.8 cm). The piece now measures 32¼ in x 11 in (81.9 cm x 27.9 cm).
Lower Mesh Panel
Rotate the piece. With RS facing, join cream in the bottom-right corner dc of D8.
Row 1 (solid): Ch 3, dc in each st across, 2 dc in last st. Count: 136 + 1 extra = 137 dc. Turn.
Rows 2–7 (mesh): Work the same as upper panel Rows 2–13. (137 sts; 68 squares)
Row 8 (solid): Ch 3, dc in each ch-1 sp and dc across. (137 dc) Fasten off.
Checkpoint: 8 rows = 4 in (10.2 cm). The piece measures 32¼ in x 15 in (81.9 cm x 38.1 cm).
Border
Border gauge: Work sc 1 per dc along the top and bottom, and 2 per dc row-end on the sides. This keeps the edges flat at the panel gauge.
Round 1: With RS facing, join cream in the first st of the top row. Ch 1, 3 sc in first st (corner), sc in next 135 sts, 3 sc in last st (corner). Along the side, work:
- 2 sc in each row-end of upper Rows 13–1 (26 sc)
- 1 sc in each of the 17 motif-edge sts
- 2 sc in each row-end of lower Rows 1–7 (14 sc)
That makes 57 sc between corner groups. Repeat along the bottom (3 sc, 135 sc, 3 sc) and the second side (57 sc). Sl st to first sc. (396 sc)
Per-side counts, Round 1 (including both corner sc):
- Top and bottom: 1 + 1 + 135 + 1 + 1 = 139 sts each
- Sides: 1 + 1 + 57 + 1 + 1 = 61 sts each
Check: 139 + 139 + 61 + 61 − 4 shared corners = 396.
Round 2: Ch 1, sc in each st around, working 3 sc in each corner sc. Sl st to first sc. (404 sc)
Per-side counts, Round 2: 141 sts each on top and bottom; 63 sts on each side. Check: 141 + 141 + 63 + 63 − 4 = 404.
Why the math works: Each corner group adds 2 sts per round to every side. The top edge’s 137 sts become 139, then 141, which is exactly what the tab spacing below needs. The two sc rounds add ½ in (1.3 cm) per side, taking the valance to 33¼ in x 16 in (84.5 cm x 40.6 cm).
Tabs (Make 9)
Number the 141 top-edge sts from right to left. Start tabs at sts 1, 18, 35, 52, 69, 86, 103, 120, and 137. Each tab is 5 sts wide with 12 sts between tabs: 9 x 5 + 8 x 12 = 141.
Row 1: With RS facing, join cream in the starting st. Ch 1, sc in same st and next 4 sts. (5 sc) Turn.
Rows 2–20: Ch 1, sc in each st across. (5 sc) Turn.
Each tab measures about 5 in (12.7 cm) long and 1.2 in (3.0 cm) wide. Fold it to the WS and whipstitch Row 20 to the base of border Round 1. The loop fits a rod up to 1¼ in (3.2 cm) across.
Tassels (Make 15)
Wrap cream 25 times around the 3 in (7.6 cm) card. Tie the top with a 6 in (15.2 cm) strand, then cut the bottom loops. Wrap the neck tightly ½ in (1.3 cm) below the top and trim to 2.5 in (6.4 cm).
Attach tassels to bottom-edge sts 1, 11, 21, and every 10th st through st 141. That spaces them about 2.35 in (6.0 cm) apart, with one at each corner.
Final Blocking
- Weave in all ends before blocking. Run them through solid dc rows, not through the mesh.
- Soak the valance in cool water for 10 minutes. Press the water out in a towel; don’t wring.
- Lay it flat and pin to 33¼ in x 16 in (84.5 cm x 40.6 cm).
- Pin the top and bottom edges in straight lines first, then the sides.
- Run a ruler along the mesh and nudge each square open and even.
- Shape each daisy with your fingers, rounding the petals and centering the yellow.
- Fluff and comb out the tassels. Let everything dry fully before unpinning.
Final Quality-Control Checklist
- Each motif has 8 petals and 17 sts per side.
- All 7 seams are flat, and the strip is 32 in (81.3 cm) long.
- Every mesh row has 68 squares and 137 sts.
- Border Round 2 has 141 sts on top and bottom and 63 on each side.
- The nine tabs are evenly spaced, with 12 sts between them.
- All fifteen tassels hang at the same length.
- The blocked size is 33¼ in x 16 in (84.5 cm x 40.6 cm).
Troubleshooting
- Petals cup or ruffle: Your tension is tight in Round 3. Make the ch-2 sps slightly longer, or use a larger hook for Rounds 3–4.
- Motif corners won’t square: Check that the Round 5 corners are (tr, ch 3, tr), not single tr.
- Mesh slants: Make sure the last dc goes into the turning ch on every row.
- Band puckers under the mesh: The joining sl sts are too tight. Rework them with a larger hook.
- Sides ripple: Use 2 sc per row-end, not 3, and ease them in gently.
- Tabs twist: Sew the fold square to the border, centered over its 5 sts.
Care
Hand wash in cool water with mild detergent, then dry flat and reshape the mesh and daisies. Keep it out of the dryer so the tabs and tassels hold their shape.
Final Notes
The measurements build on each other. One 4 in (10.2 cm) motif has 17 sts per side. Eight motifs make a 32 in (81.3 cm) strip of 136 sts. The panels add 1 st and bring the piece to 32¼ in x 15 in (81.9 cm x 38.1 cm). The border finishes it at 33¼ in x 16 in (84.5 cm x 40.6 cm). Check each measurement before moving on, and the valance will hang straight and bright in your window.
Happy crocheting!