

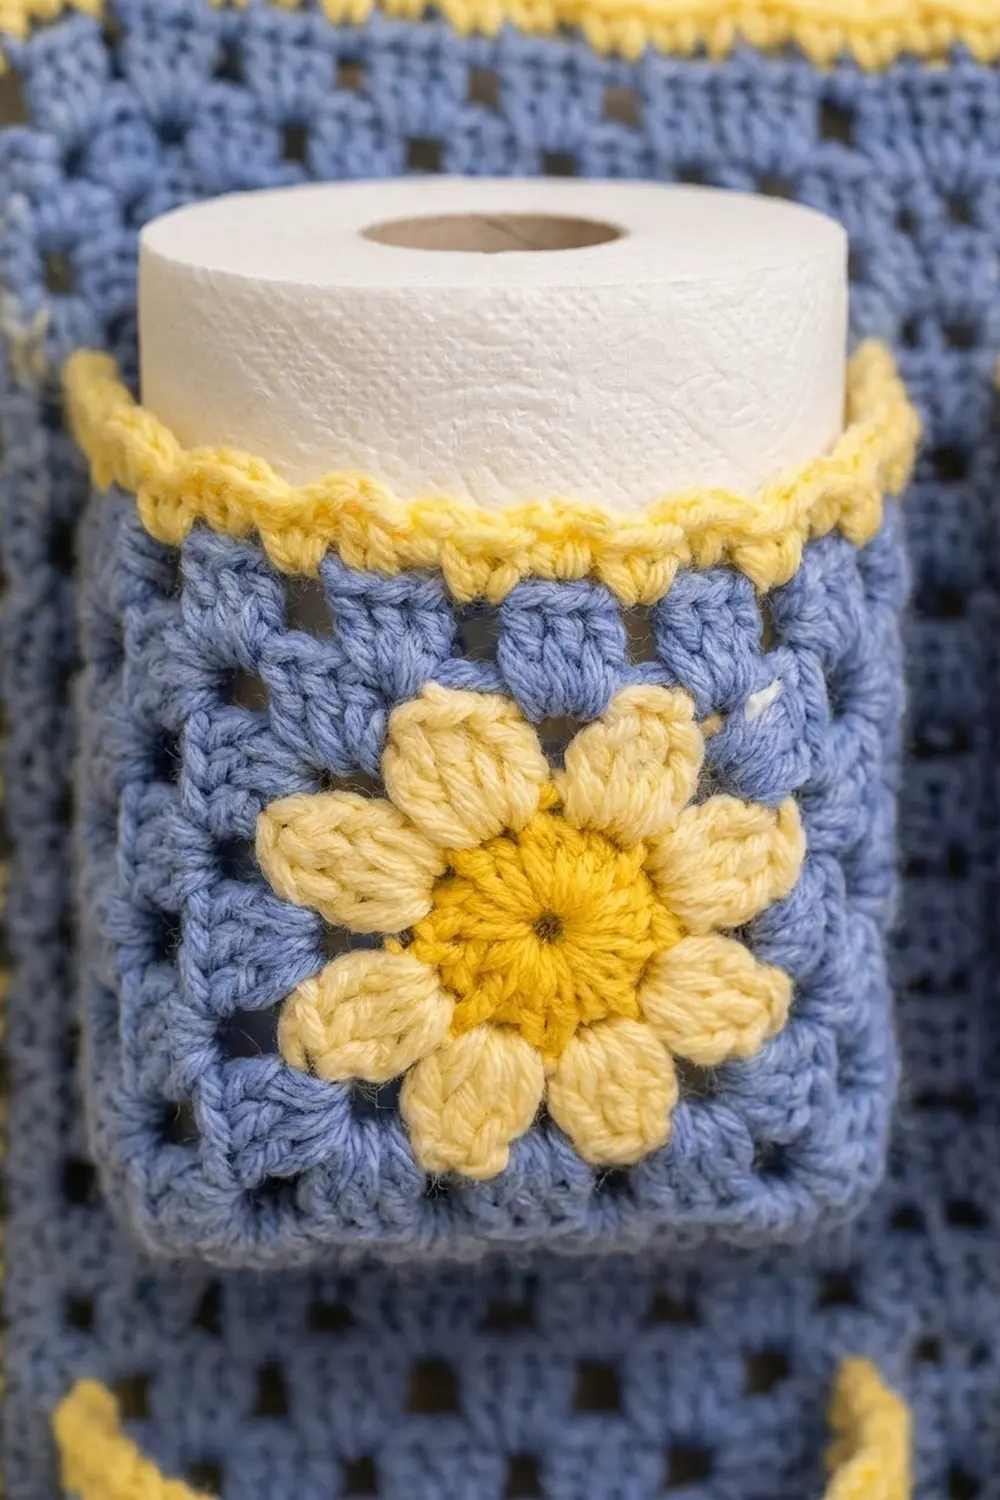
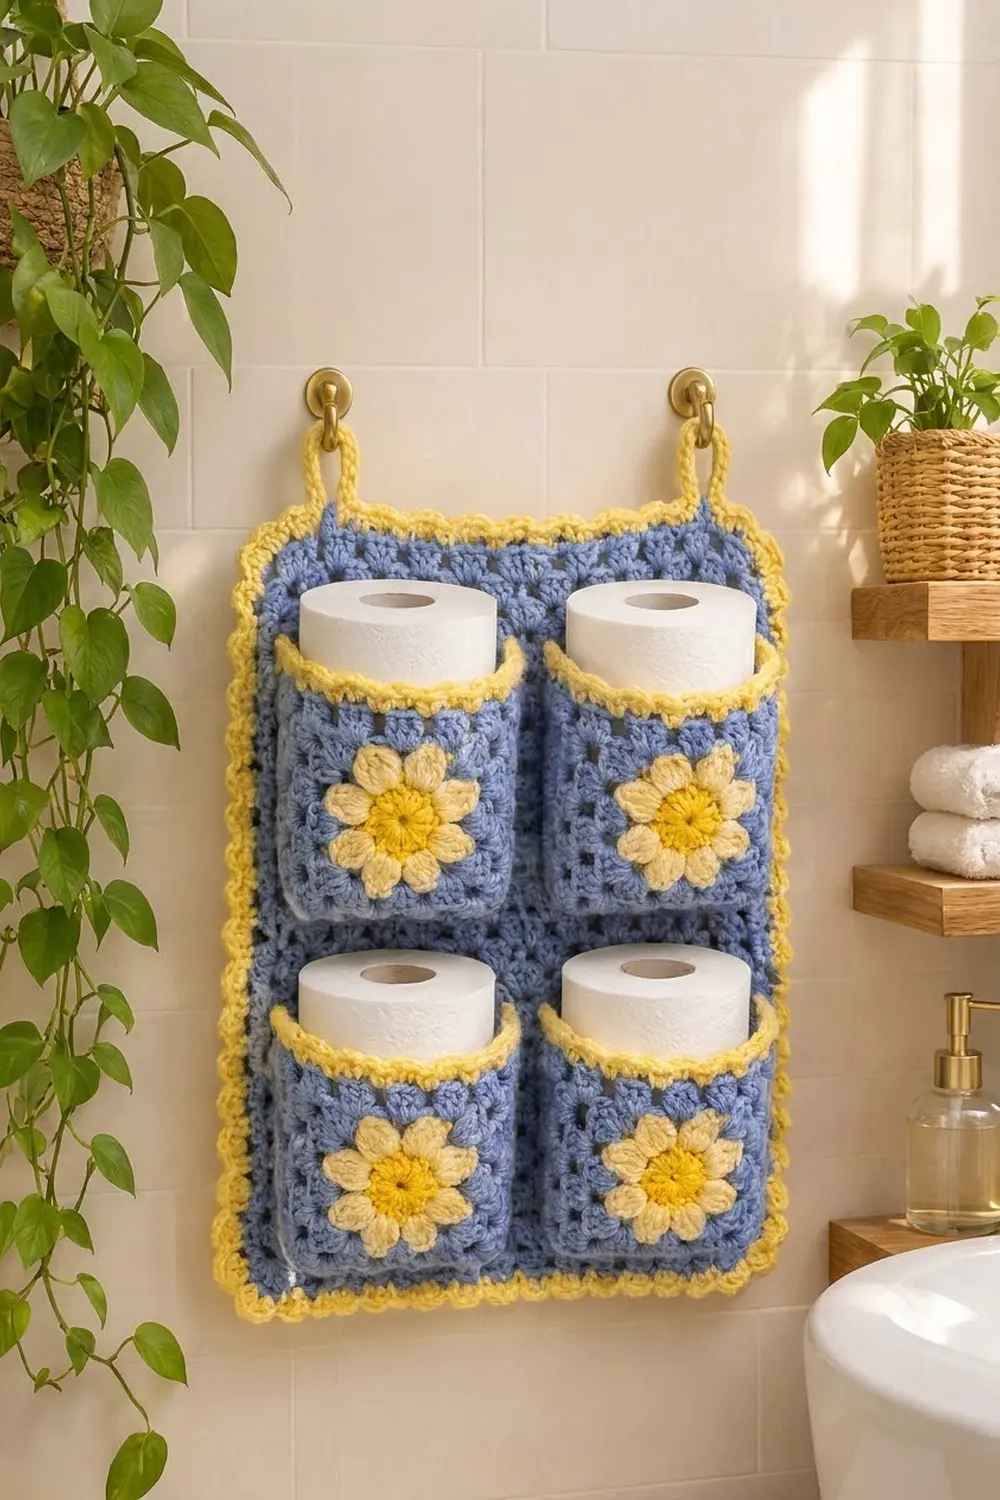
This cheerful bathroom organizer holds four rolls of toilet paper in boxy pockets. Each pocket front is a daisy granny square. The pockets are sewn onto a blue granny back panel, and the whole piece hangs from two yellow loops.
The palette is soft periwinkle blue with golden yellow and pale butter yellow. The blue gives a calm background, and the yellow trims, flower centers and scalloped border add a sunny, cottage-style finish.
The pattern uses US crochet terms. The finished holder measures 14 in x 20 in (35.6 cm x 50.8 cm) without the hanging loops. The loops add about 1.5 in (3.8 cm) at the top.
You will make six plain granny squares and join them into the back panel. Next you make four daisy squares. Each one gets a gusset and a top trim to turn it into a pocket. You then work a three-round border around the panel, add the hanging loops and sew the pockets in place.
Finished Size and Construction
- Finished size: 14 in x 20 in (35.6 cm x 50.8 cm), plus 1.5 in (3.8 cm) loops
- Skill level: Easy–Intermediate
- Terminology: US
- Yarn weight: Worsted (#4)
- Hook: 5.0 mm (H-8)
- Number of pieces: 6 back-panel squares + 4 pockets
- Layout: Back panel is 2 squares wide x 3 squares tall; pockets sit in a 2 x 2 arrangement
- Back-panel square size: 6 in (15.2 cm)
- Pocket front size: 5.5 in (14.0 cm) square, 1.25 in (3.2 cm) deep
- Panel size before border: 12 in x 18 in (30.5 cm x 45.7 cm)
- Border depth: 1 in (2.5 cm) per side
Materials
Use a smooth worsted-weight yarn, either acrylic or a cotton blend. The quantities below assume a yarn with 200 m (219 yd) per 100 g. Cotton blends hold the pocket shape especially well.
- Color A, periwinkle blue: 180 g, about 360 m
- Color B, golden yellow: 50 g, about 100 m
- Color C, pale butter yellow: 15 g, about 30 m
These quantities include a margin of roughly 15% for gauge differences and swatching.
Tools:
– 5.0 mm (H-8) crochet hook
– Tapestry needle
– Locking stitch markers
– Rust-proof pins
– Tape measure
– Blocking mat and spray bottle
– Scissors
Abbreviations (US Terms)
- ch – chain
- sl st – slip stitch
- sc – single crochet
- dc – double crochet
- sp(s) – space(s)
- BLO – back loop only
- st(s) – stitch(es)
- sk – skip
- RS – right side
Special stitches:
- Petal (4-dc cluster): Yarn over, insert hook in the stitch, pull up a loop, yarn over, pull through 2 loops. Repeat from * 3 more times in the same stitch (5 loops on hook). Yarn over and pull through all 5 loops.
- Beginning petal: Ch 3, then work a 3-dc cluster in the same stitch, following the petal method above with 3 repeats instead of 4.
- Shell: 5 dc in the same stitch.
Gauge and Checkpoints
Square gauge: One plain square measures 6 in (15.2 cm) after Round 6.
Single crochet gauge: 4 rows of sc measure 1 in (2.5 cm) in height.
Make one plain square first and measure it at these points:
- After Round 1: 1.75 in (4.4 cm)
- After Round 3: 3.5 in (8.9 cm)
- After Round 5: 5.5 in (14.0 cm)
- After Round 6: 6 in (15.2 cm)
For the daisy square, check these measurements:
- After Round 2: 2.75 in (7.0 cm) across
- After Round 4: 5.5 in (14.0 cm)
The pocket front must match the plain square at Round 5.
If your square comes out larger, go down to a 4.5 mm hook. If it is smaller, go up to a 5.5 mm hook. A difference of 0.25 in (0.6 cm) per square adds up to 0.75 in (1.9 cm) over the panel’s height, so it is worth fixing early.
Plain Granny Squares (Back Panel)
Make 6 in Color A.
Round 1: Make a magic ring. Ch 3 (counts as dc), 2 dc in ring, ch 2. 3 dc in ring, ch 2. Repeat from * 2 more times. Join with a sl st to the top of ch-3. (12 dc, 4 ch-2 corner sps)
Round 2: Sl st across to the first corner sp. Ch 3, then work (2 dc, ch 2, 3 dc) in the same sp. Ch 1. (3 dc, ch 2, 3 dc) in the next corner sp, ch 1. Repeat from * 2 more times. Join. (24 dc; 6 dc per side)
Round 3: Sl st to the corner sp. Ch 3, then work (2 dc, ch 2, 3 dc) in the same sp. Ch 1. 3 dc in the next ch-1 sp, ch 1, then (3 dc, ch 2, 3 dc) in the corner sp, ch 1. Repeat around, ending with 3 dc in the last ch-1 sp, ch 1. Join. (36 dc; 9 dc per side)
Round 4: Work as for Round 3, placing 3 dc in each ch-1 sp along the sides. (48 dc; 12 dc per side)
Round 5: Repeat Round 4. (60 dc; 15 dc per side, 5 clusters per side)
Round 6: Ch 1. Work sc in each dc and 3 sc in each corner ch-2 sp. Join. (72 sc)
This is a conversion round: 60 sc (1 per dc) + 12 corner sc (3 per corner) = 72 sc. The middle sc of each 3-sc group is the corner stitch. Each side has 19 stitches counting both corner stitches: 1 corner + 17 + 1 corner. Check: 4 x 19 − 4 shared corners = 72.
Fasten off and weave in the ends.
Daisy Pocket Squares
Make 4.
Round 1 (Color B): Make a magic ring. Ch 3 (counts as dc), then 11 dc in the ring. Join. (12 dc) Fasten off.
Round 2 (Color C): Join in any dc. Work a beginning petal, then ch 2. Petal in the next dc, ch 2. Repeat from * 10 more times. Join to the top of the beginning petal. (12 petals, 12 ch-2 sps) Fasten off.
Round 3 (Color A): Join in any ch-2 sp. Ch 3, then (2 dc, ch 2, 3 dc) in the same sp for the corner. Ch 1, [3 dc in the next sp, ch 1] twice. (3 dc, ch 2, 3 dc) in the next sp, ch 1, [3 dc in the next sp, ch 1] twice. Repeat from * 2 more times. Join. (48 dc; 12 dc per side)
This round uses all 12 petal spaces: 4 corners + 8 side spaces.
Round 4: Sl st to the corner sp. Work as for Round 4 of the plain square, with 3 dc in each ch-1 sp. (60 dc; 15 dc per side)
Do not fasten off. The square should measure 5.5 in (14.0 cm).
Gusset
The gusset is worked in rows across the right side, bottom and left side. The BLO stitches in Row 1 leave a ridge that makes the gusset fold back crisply.
Row 1 (RS): Sl st to the top-right corner sp. Ch 1, sc in the corner sp. Working in BLO, sc in each of the 15 dc down the right side. Work 2 sc in the bottom-right corner sp, sc BLO in each of the 15 bottom dc, and 2 sc in the bottom-left corner sp. Sc BLO in each of the 15 dc up the left side, then sc in the top-left corner sp. (51 sc)
Count: 1 + 15 + 2 + 15 + 2 + 15 + 1 = 51.
Rows 2–5: Ch 1, turn. Sc in each sc across. (51 sc)
The gusset should be 1.25 in (3.2 cm) deep. Fasten off, leaving a 40 in (101.6 cm) tail for sewing.
Top Trim
Row 1: With RS facing, join Color B at the top of the right gusset. Work 5 sc evenly across the gusset row ends, 1 per row. Sc in each of the 15 dc along the top of the pocket front, then work 5 sc across the left gusset row ends. (25 sc)
Row 2: Ch 1, turn. Sc in each sc. (25 sc)
Fasten off and weave in the ends.
Pocket opening check: 5.5 in front + 5.5 in back + 2 x 1.25 in gussets gives a 13.5 in (34.3 cm) circumference. A standard roll is about 4.2 in (10.7 cm) across, or 13.2 in (33.5 cm) around, so it fits snugly.
Make All Pieces
- Plain squares: 6, all in Color A
- Daisy pockets: 4, each with a Color B center, Color C petals, Color A outer rounds and gusset, and Color B top trim
Back-panel layout (P = plain square):
[P][P]
[P][P]
[P][P]
Pocket placement (D = daisy pocket):
   (open area)
[D][D]
[D][D]
Joining the Back Panel
Lay out the squares RS up. Use Color A and a tapestry needle to whipstitch through the outer loops only.
Match the seams stitch for stitch: all 19 stitches of one side to all 19 stitches of the neighboring side, corners included. Start in the corner stitch and end in the corner stitch.
- Join each horizontal pair with a vertical seam. This makes 3 rows of 2 squares.
- Join the rows with 2 horizontal seams of 38 stitches each.
Pull each stitch snug but not tight. The seam should lie flat and not shorten the edge. Skip one stitch on one side, and the corners will no longer line up.
Checkpoint: The panel should measure 12 in x 18 in (30.5 cm x 45.7 cm).
Border
Border gauge: Each sc round adds 0.25 in (0.6 cm) per side. The shell round adds 0.5 in (1.3 cm). Together the three rounds add 1 in (2.5 cm) per side.
Starting count: The top and bottom edges each have 2 x 19 = 38 stitches. The long sides each have 3 x 19 = 57 stitches. These counts include the outer corner stitches, which are shared between two edges.
Counted between the outer corners, that leaves 36 stitches on the top and bottom and 55 on each side. The total is 2(36) + 2(55) + 4 = 186 stitches.
Round 1 (Color A): Join in any stitch. Ch 1. Work sc in each stitch and 3 sc in each outer corner stitch. Join. (194 sc)
Count: 186 + 8 extra at the corners = 194. Between the corner centers, the top and bottom have 38 stitches and each side has 57.
Round 2 (Color B): Join, ch 1. Work sc in each stitch and 3 sc in each corner center. On the top and bottom edges only, also work 2 sc in the 10th, 20th and 30th stitch. Join. (208 sc)
Count: 194 + 8 corner + 6 edge = 208. Between the corner centers, the top and bottom have 43 stitches and each side has 59.
Round 3 (Color B): Sl st to the top-right corner center. Ch 1, sc in the same stitch. [Sk 1, shell in the next stitch, sk 1, sc in the next stitch] across to the next corner center, ending with the sc in that corner center. Repeat around, then join.
Why the math works: Each shell repeat uses 4 stitches. The top edge has 43 + 1 = 44 stitches, which gives 11 shells. Each side has 59 + 1 = 60 stitches, which gives 15 shells. That makes 52 shells in total, with the scallops evenly spaced and a clean sc at each corner.
Hanging loops: Join Color B in the sc between the 1st and 2nd shell from the top-left corner. Ch 12, then sl st in the same sc. Work 20 sc into the chain loop and sl st to the start. Repeat at the top-right corner.
Attaching the Pockets
Measure from the bottom edge of the panel, before the border:
- The lower pockets sit with their gusset bottom 1.5 in (3.8 cm) above the bottom edge. The top trim reaches 7 in (17.8 cm).
- The upper pockets sit with their gusset bottom at 9 in (22.9 cm). The top reaches 14.5 in (36.8 cm), leaving room above for the roll tops.
- Center each pocket on its column. The 5.5 in (14.0 cm) pocket leaves a 0.25 in (0.6 cm) margin on each side of the 6 in (15.2 cm) column.
Pin the 51 stitches of gusset Row 5 in a U-shape. With the tail, whipstitch each stitch to the panel, catching the panel stitches but not going all the way through.
Final Blocking
- Pin the holder RS up to 14 in x 20 in (35.6 cm x 50.8 cm).
- Pin the top and bottom edges straight first, then the sides.
- Open each shell into a rounded scallop with a pin at its tip.
- Stuff each pocket lightly with a rolled towel so it holds its box shape.
- Mist everything until damp, but not soaked.
- Let it dry completely, at least 12 hours.
- Unpin it and check the measurements again.
Final Quality-Control Checklist
- [ ] All 6 squares measure 6 in (15.2 cm)
- [ ] All pocket fronts measure 5.5 in (14.0 cm)
- [ ] Every seam is matched 19 to 19
- [ ] Border counts were 194, then 208, then 52 shells
- [ ] Corners are square and scallops are even
- [ ] Pockets are level, centered and firmly sewn
- [ ] Loops are secure and equal in size
- [ ] All ends are woven in
Troubleshooting
Square edges ruffle: Your chain spaces are too long. Tighten the ch-1 sps.
Square cups: Your corners are too tight. Loosen the corner ch-2.
Petals look flat: Pull each loop of the cluster up to the full dc height.
Gusset flares: Your sc tension is loose. Rework it with the next smaller hook.
Roll won’t fit: Add a 6th gusset row, which adds 0.25 in (0.6 cm) of depth.
Border waves: Recount Round 2. Extra stitches cause ruffling.
Panel sags: Reinforce the loop bases with a second pass of sl sts.
Care
Hand wash in cool water and lay flat to dry, reshaping the pockets while damp. Avoid hanging the holder while it is wet, because the weight can stretch the panel.
Final Notes
The measurements build on each other. Each plain square measures 6 in (15.2 cm) with 19 stitches per side. Six squares make a 12 in x 18 in (30.5 cm x 45.7 cm) panel. The border adds 1 in (2.5 cm) per side for a finished 14 in x 20 in (35.6 cm x 50.8 cm). The four 5.5 in (14.0 cm) daisy pockets with 1.25 in (3.2 cm) gussets each hold a standard roll.
If you check your gauge at each stage, everything will line up.
Happy crocheting!