
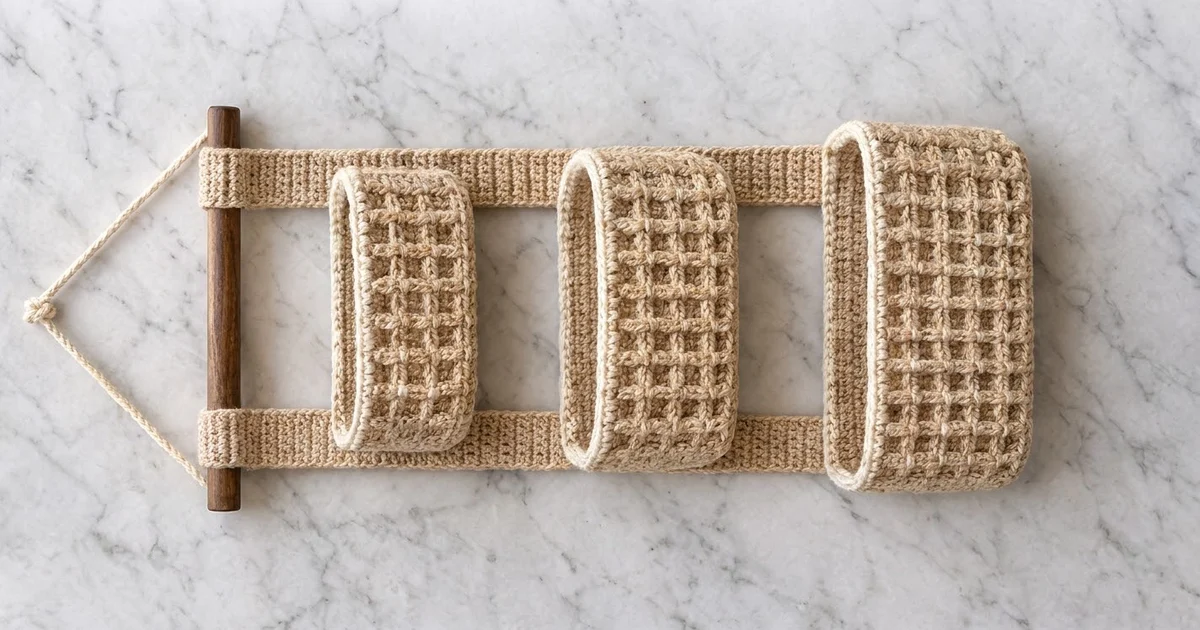
This three-tier hanging organizer has three oval baskets in graduated sizes. They’re stacked on two crocheted straps that hang from a wooden dowel. The basket walls are a raised waffle grid in warm oatmeal tan, each top edge has a soft cream rim, and a twisted cream cord serves as the hanger.
It’s a calm, neutral piece for a bathroom, entryway, or nursery. The grid texture keeps the baskets firm without making them look heavy.
The pattern uses US crochet terms. Assembled, the organizer is about 10.5 in (26.7 cm) wide at the largest basket and 22 in (55.9 cm) from the dowel to the strap ends, not counting the cord.
Each basket starts with a flat oval base in single crochet rounds. A back-loop round turns the edge up into the wall, and the waffle grid is worked in the round with front post double crochet. Two cream rounds finish the rim. The straps are worked flat in rows. Last, you sew the baskets to the straps and fold the strap tops over the dowel.
Finished Size and Construction
- Finished size: about 10.5 in (26.7 cm) wide x 22 in (55.9 cm) tall below the dowel
- Skill level: Intermediate
- Terminology: US crochet terms
- Yarn weight: Bulky (#5) cotton or cotton blend
- Hook: 5.0 mm (H-8)
- Number of pieces: 5 crocheted pieces (3 baskets, 2 straps), plus 1 cord and 1 dowel
- Layout: 3 baskets stacked vertically, smallest on top
- Piece sizes: Small 6.25 x 4 x 3.5 in (15.9 x 10.2 x 8.9 cm); Medium 8 x 4 x 4.25 in (20.3 x 10.2 x 10.8 cm); Large 10.5 x 4 x 5 in (26.7 x 10.2 x 12.7 cm)
- Height before rim: Small 3 in (7.6 cm); Medium 3.75 in (9.5 cm); Large 4.5 in (11.4 cm)
- Rim depth: 0.5 in (1.3 cm)
Materials
Use a firm bulky cotton or cotton-blend yarn with good stitch definition. Soft acrylic will give you floppy baskets. If you’re using worsted (#4) cotton, hold two strands together and check your gauge.
- Oatmeal tan: about 220 g / 310 m (baskets, straps, sewing)
- Cream: about 40 g / 55 m (rims, cord)
The quantities include a margin of about 15%.
Tools:
– 5.0 mm (H-8) crochet hook
– Wooden dowel, 10 in (25.4 cm) long, 5/8 in (1.6 cm) diameter
– Tapestry needle
– 6–8 locking stitch markers
– Measuring tape and scissors
– Spray bottle and small towels for blocking
Abbreviations (US Terms)
- ch – chain
- sl st – slip stitch
- sc – single crochet
- dc – double crochet
- FPdc – front post double crochet
- BLO – back loop only
- rev sc – reverse single crochet (crab stitch)
- st(s) – stitch(es)
- rnd(s) – round(s)
- rep – repeat
FPdc: Yarn over and insert the hook from front to back to front around the post of the stitch. Yarn over and pull up a loop, then [yarn over, pull through 2 loops] twice.
Rev sc: Work from left to right (if you’re right-handed). Insert the hook into the next stitch to the right, pull up a loop, yarn over, and pull through both loops.
Gauge and Checkpoints
- Sc in rounds: 14 sts and 16 rnds = 4 in (10.2 cm)
- Waffle grid: 14 sts and 10 rnds = 4 in (10.2 cm)
Make the Small basket first and use it as your gauge test.
Checkpoint 1 (after base Rnd 7): The Small base should measure about 6.25 x 4 in (15.9 x 10.2 cm) and lie flat.
Checkpoint 2 (after the final tan round): The Small wall should be about 3 in (7.6 cm) tall, measured from the base fold.
Checkpoint 3 (after the rim): The rim should sit straight, neither flaring nor pulling in.
If the base is more than 0.25 in (0.6 cm) too big, go down a hook size. If it’s too small, go up a size.

Basket Base (All Sizes)
Start every round with ch 1 (doesn’t count) and end with a sl st into the first sc. Place a marker in the first st of each round.
The base is a stadium oval with two straight sides of S sts each and two curved ends.
| Size | Foundation ch | S (sts per straight side) |
|---|---|---|
| Small | 12 | 9 |
| Medium | 18 | 15 |
| Large | 27 | 24 |
With tan, ch the foundation number for your size.
Rnd 1: 3 sc in 2nd ch from hook, sc in next S ch, 3 sc in last ch. Rotate and work along the underside of the chain: sc in next S ch. Join. (Small 24, Medium 36, Large 54 sts)
Rnd 2: *2 sc in each of next 3 sts, sc in next S sts; rep from * once. Join. (30 / 42 / 60)
Rnd 3: *[sc in next st, 2 sc in next st] 3 times, sc in next S sts; rep from * once. Join. (36 / 48 / 66)
Rnd 4: *[sc in next 2 sts, 2 sc in next st] 3 times, sc in next S sts; rep from * once. Join. (42 / 54 / 72)
Rnd 5: *[sc in next 3 sts, 2 sc in next st] 3 times, sc in next S sts; rep from * once. Join. (48 / 60 / 78)
Rnd 6: *[sc in next 4 sts, 2 sc in next st] 3 times, sc in next S sts; rep from * once. Join. (54 / 66 / 84)
Rnd 7: *[sc in next 5 sts, 2 sc in next st] 3 times, sc in next S sts; rep from * once. Join. (60 / 72 / 90)
After Rnd 7, each curved end has 21 sts:
– Small: 9 + 21 + 9 + 21 = 60
– Medium: 15 + 21 + 15 + 21 = 72
– Large: 24 + 21 + 24 + 21 = 90
Each round adds 6 sts (3 at each end), which keeps flat sc flat. All three final counts are multiples of 3, which the grid needs.
Basket Walls
The stitch count stays the same from here to the top of the basket.
Rnd 8 (turning round): Ch 1, sc BLO in each st. Join. (60 / 72 / 90) This makes a crisp fold line, and the wall turns up here.
Rnds 9–10: Ch 1, sc in each st. Join. (60 / 72 / 90) This is the plain tan band at the bottom of the wall.
Rnd 11 (grid setup): Ch 2 (doesn’t count), dc in each st. Join to the first dc. (60 / 72 / 90)
Rnd A (vertical ribs): Ch 2, *FPdc around next st, dc in next 2 sts; rep from * around. Join. (60 / 72 / 90; that’s 20 / 24 / 30 repeats)
Rnd B (horizontal ridge): Ch 2, FPdc around each st. Join. (60 / 72 / 90)
Always start Rnd A in the first stitch so the ribs stack in straight columns. Rnd B adds a raised ridge, so each pair of dc sits recessed in a framed square.
| Size | Grid rounds | Sequence |
|---|---|---|
| Small | Rnds 12–15 | A, B, A, B |
| Medium | Rnds 12–17 | A, B x 3 |
| Large | Rnds 12–19 | A, B x 4 |
Every size ends on Rnd B, so the top of the grid is a full ridge.
Final tan round (Small Rnd 16, Medium Rnd 18, Large Rnd 20): Ch 1, sc in each st. Join. (60 / 72 / 90) Fasten off the tan.
Height check: Small 3 in (7.6 cm), Medium 3.75 in (9.5 cm), Large 4.5 in (11.4 cm).
Straps (Make 2)
With tan, ch 6.
Row 1: Sc in 2nd ch from hook and in each ch across. Turn. (5 sts)
Rows 2–98: Ch 1, sc in each st across. Turn. (5 sts)
Fasten off and leave a 24 in (61.0 cm) tail. Each strap is about 1.5 in (3.8 cm) wide and 24.5 in (62.2 cm) long: 98 rows at 16 rows per 4 in (10.2 cm). Mark Rows 20, 33, 49, 62, 75, and 88 on the edge of each strap.
Make All Pieces
| Piece | Qty | Color |
|---|---|---|
| Small basket | 1 | Tan, cream rim |
| Medium basket | 1 | Tan, cream rim |
| Large basket | 1 | Tan, cream rim |
| Strap | 2 | Tan |
| Twisted cord | 1 | Cream |
Layout on the straps, bottom row first:
        ====== DOWEL ======        rows 89–98 fold over
   |  |                  |  |      rows 76–88: gap 3.25 in
   |  [   SMALL  6.25 in ]  |      rows 62–75: 3.5 in
   |  |                  |  |      rows 50–61: gap 3 in
 [ |     MEDIUM  8 in      | ]     rows 33–49: 4.25 in
   |  |                  |  |      rows 21–32: gap 3 in
[  |     LARGE  10.5 in    |  ]    rows 1–20: 5 in
Total: 20 + 12 + 17 + 12 + 14 + 13 = 88 rows = 22 in (55.9 cm).
Rim (Border)
Rim gauge: The same as the sc gauge, 14 sts = 4 in (10.2 cm). Join cream in the first st of the final tan round.
Rim Rnd 1: Ch 1, sc in each st. Join.
– Small: 9 per straight side, 21 per end = 60
– Medium: 15 per straight side, 21 per end = 72
– Large: 24 per straight side, 21 per end = 90
Rim Rnd 2: Ch 1, rev sc in each st. Join and fasten off. (60 / 72 / 90, with the same per-side counts)
Why the math works: The rim has the same stitch count as base Rnd 7, because the Rnd 8 fold changes the direction of the work but not the count. That means the rim’s circumference matches the base perimeter, so it stands straight with no flare. The 21-stitch ends carry up unchanged, which keeps the curves even. The rim adds 0.5 in (1.3 cm) to the height.
Joining
Method: Whipstitch with tan yarn.
- Lay the straps flat with their outer edges 5 in (12.7 cm) apart and their inner edges 2 in (5.1 cm) apart.
- Center each basket over the straps with its long back wall flat against them. Place the Large basket on Rows 1–20, the Medium on Rows 33–49, and the Small on Rows 62–75.
- Stitch-to-stitch logic: In the sc sections, match 1 strap row-end to 1 wall round, since both are 4 per inch. In the grid, match about 2 strap rows to 1 grid round, and catch an FPdc post each time. Sew both long edges of each strap from the base fold up to the final tan round. Don’t sew into the cream rim.
- On the Small basket, the strap outer edges reach the start of the curved ends. Keep sewing along the curve.
- Tension: Pull each stitch snug but not tight, so the straps lie flat without puckering.
- Fold Rows 89–98 over the dowel to the back and sew Row 98 across Row 88. This makes a 2.5 in (6.4 cm) loop around the dowel.
Size checkpoint: The organizer should be 22 in (55.9 cm) from the dowel to the strap ends. The Small rim should sit 3.25 in (8.3 cm) below the dowel, with 3 in (7.6 cm) gaps between the baskets.
Cord: Cut 3 strands of cream, each 60 in (152.4 cm) long. Twist them tightly, then fold in half and let the cord twist back on itself. You’ll get about 20 in (50.8 cm) of cord. Tie each end around the dowel 1 in (2.5 cm) from its ends, then knot a loop at the center.
Final Blocking
- Spritz each basket until it’s damp, not soaked.
- Stuff each one firmly with rolled towels so the walls stand straight.
- Pinch the Rnd 8 fold line crisp all the way around.
- Pat the rims upright.
- Spritz the straps and smooth them to 1.5 in (3.8 cm) wide.
- Let everything dry for 24 hours before hanging.
Final Quality-Control Checklist
- Rnd 7 counts are 60 / 72 / 90
- Each base end has 21 sts
- The grid ribs line up, and each grid ends on Rnd B
- Heights before the rim are 3 / 3.75 / 4.5 in (7.6 / 9.5 / 11.4 cm)
- The rims stand straight
- The straps are 98 rows x 5 sts
- The dowel loops are snug and the seams are secure
- All ends are woven in on the inside
Troubleshooting
- The base cups: Your increases are too tight. Loosen up at the ends.
- The base ruffles: You have extra stitches. Recount against the totals.
- The walls lean outward: Rework Rnd 8 in the BLO, more firmly.
- The ribs spiral: Always start Rnd A in the first stitch after the join.
- The grid pulls in: Work the FPdc with a slightly taller yarn over.
- The baskets tilt forward: Sew the straps higher, up to the final tan round.
- The rim flares: Redo the rev sc with firmer tension.
Care
Spot clean with mild soap and cool water. If you need to hand wash, reshape the baskets around towels and dry them flat.

Final Notes
All the sizes follow from one chain of measurements. A gauge of 14 sc = 4 in (10.2 cm) gives bases of 60, 72, and 90 sts, and those counts carry up the walls and into the rims unchanged. Grid rounds of 0.4 in (1.0 cm) build walls of 3, 3.75, and 4.5 in (7.6, 9.5, 11.4 cm). The 0.5 in (1.3 cm) rim brings the baskets to 3.5, 4.25, and 5 in (8.9, 10.8, 12.7 cm). The 88 strap rows give the 22 in (55.9 cm) hanging length.
Happy crocheting!