

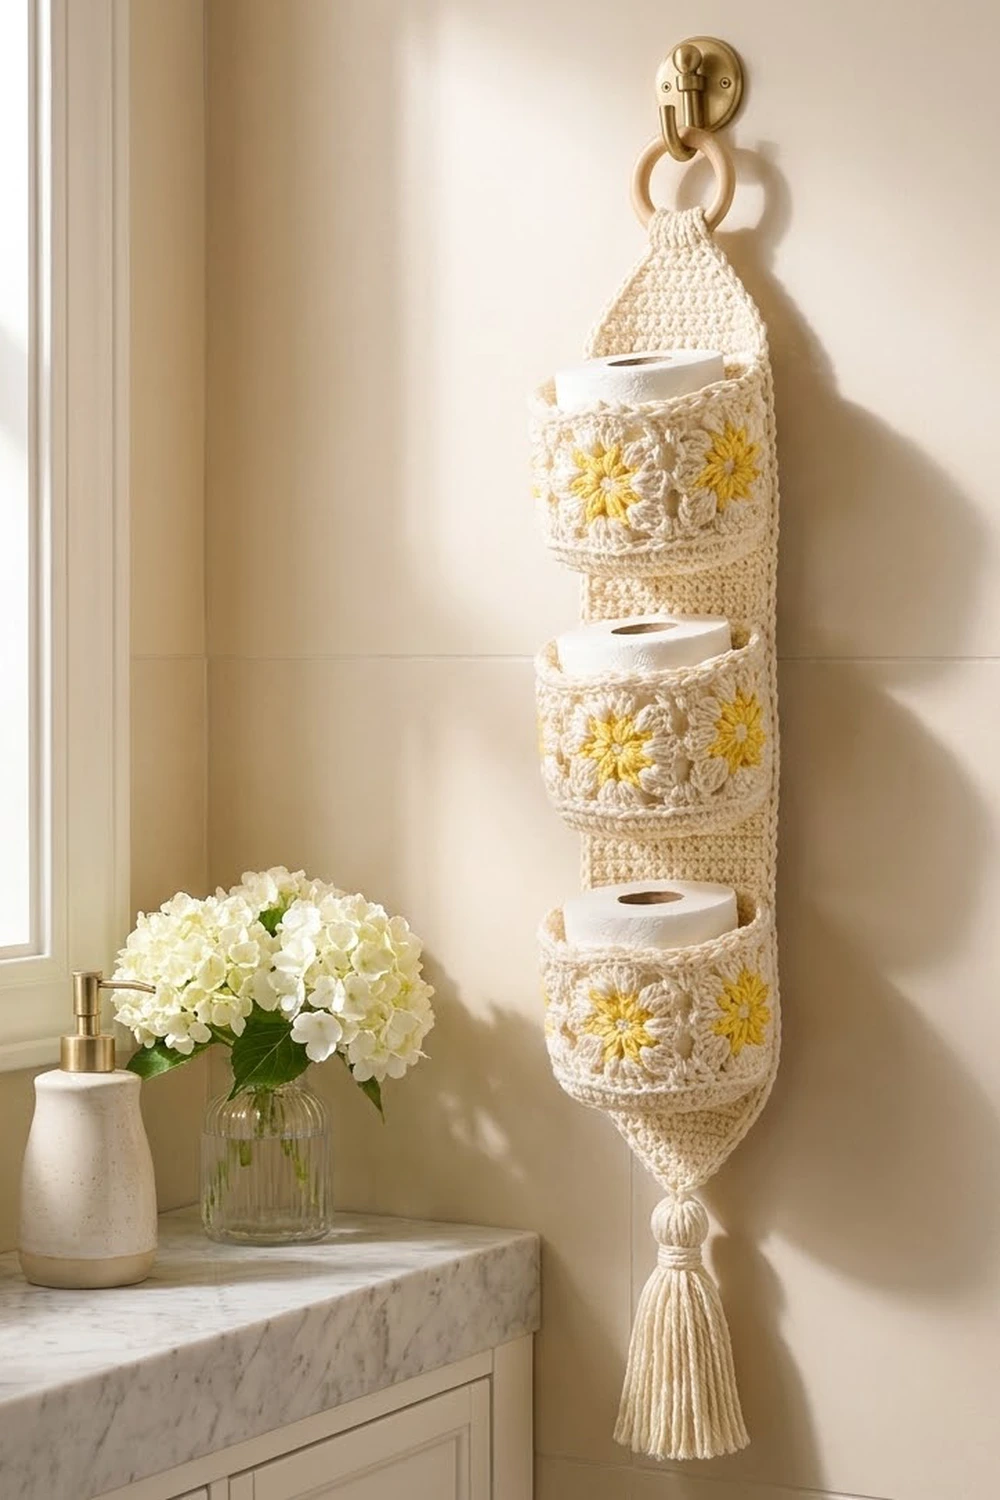
This hanging holder stores three spare toilet rolls in a soft, cheerful way. Three oval baskets are sewn to a long cream panel. Each basket wall has a ring of granny squares with a yellow eight-petal flower in each one. The panel hangs from a wooden ring and ends in a full cream tassel.
There are only two colors: warm cream for the structure and sunny yellow for the flowers. With the corded rims and the solid single crochet panel, it looks cottage-style but still tidy. It fits well in a bathroom with brass or wood details.
The pattern uses US crochet terms. The finished panel is 5.5 in (14.0 cm) wide and about 22.7 in (57.7 cm) long, not counting the ring and tassel. Each basket is 7 in (17.8 cm) long, 4.75 in (12.1 cm) deep and 4.5 in (11.4 cm) tall.
Here is how it goes together. You crochet 18 flower squares, three oval bases and one panel. Each set of six squares is joined into a ring, and each ring is crocheted onto a base. You then add the rims, border the panel, and sew the baskets, ring and tassel in place.
Finished Size and Construction
- Finished panel size: 5.5 x 22.7 in (14.0 x 57.7 cm)
- Basket size: 7 x 4.75 x 4.5 in (17.8 x 12.1 x 11.4 cm)
- Skill level: Intermediate
- Terminology: US
- Yarn weight: Worsted (#4) cotton
- Hook: 4.5 mm (US 7)
- Number of pieces: 18 squares, 3 bases, 1 panel, 1 tassel, plus the wooden ring
- Layout: 3 baskets stacked vertically on one panel, 6 squares per basket wall
- Square size: 3.25 in (8.3 cm)
- Panel size before border: 5 x 24.4 in (12.7 x 62.0 cm), with the tab unfolded
- Border depth: 2 rounds, about 0.25 in (0.6 cm)
Materials
Use a smooth worsted-weight cotton or cotton blend. Cotton holds its shape better than acrylic and copes with bathroom humidity. The quantities below assume about 170 m (186 yd) per 100 g.
- Cream: 300 g, about 510 m (558 yd)
- Yellow: 40 g, about 68 m (74 yd)
Tools:
- 4.5 mm (US 7) hook
- 1 wooden ring, 2.5 in (6.4 cm) outer diameter
- Tapestry needle
- 10 locking stitch markers
- Scissors
- A piece of card 5.5 in (14.0 cm) tall, for the tassel
- Blocking mats and pins
The quantities include roughly a 15% margin for gauge swatches and differences in tension.
Abbreviations (US Terms)
- ch: chain
- sl st: slip stitch
- sc: single crochet
- dc: double crochet
- inc: 2 sc in the same stitch
- sc2tog: single crochet 2 together
- BLO: back loop only
- sp: space
- RS / WS: right side / wrong side
- rev sc: reverse single crochet (crab stitch). Work sc from left to right, inserting the hook into the next stitch to the right.
Special stitches
- Beginning cluster (beg cl): Ch 2, then dc in the ring.
- Cluster (cl): *Yarn over, insert into the ring, pull up a loop, yarn over and pull through 2 loops. Repeat from * 2 more times, then yarn over and pull through all 4 loops on the hook.
Gauge and Checkpoints
Gauge: 16 sc and 18 rows = 4 in (10.2 cm) in sc rows.
Make one flower square before anything else. Every dimension in this pattern depends on it.
- Square, after Round 1: about 1.75 in (4.4 cm) across
- Square, after Round 2: about 2.75 in (7.0 cm)
- Square, after Round 3: 3.25 in (8.3 cm)
- Base, after Round 10: 7 x 4.75 in (17.8 x 12.1 cm)
- Panel, after Row 10: 5 in (12.7 cm) wide and 2.2 in (5.6 cm) tall
If your square is too big, go down 0.5 mm. If it is too small, go up 0.5 mm. Check the base against the same hook. A ring of six squares must measure 19.5 in (49.5 cm) around, which matches the 78 stitches of the base at 4 sc per inch.
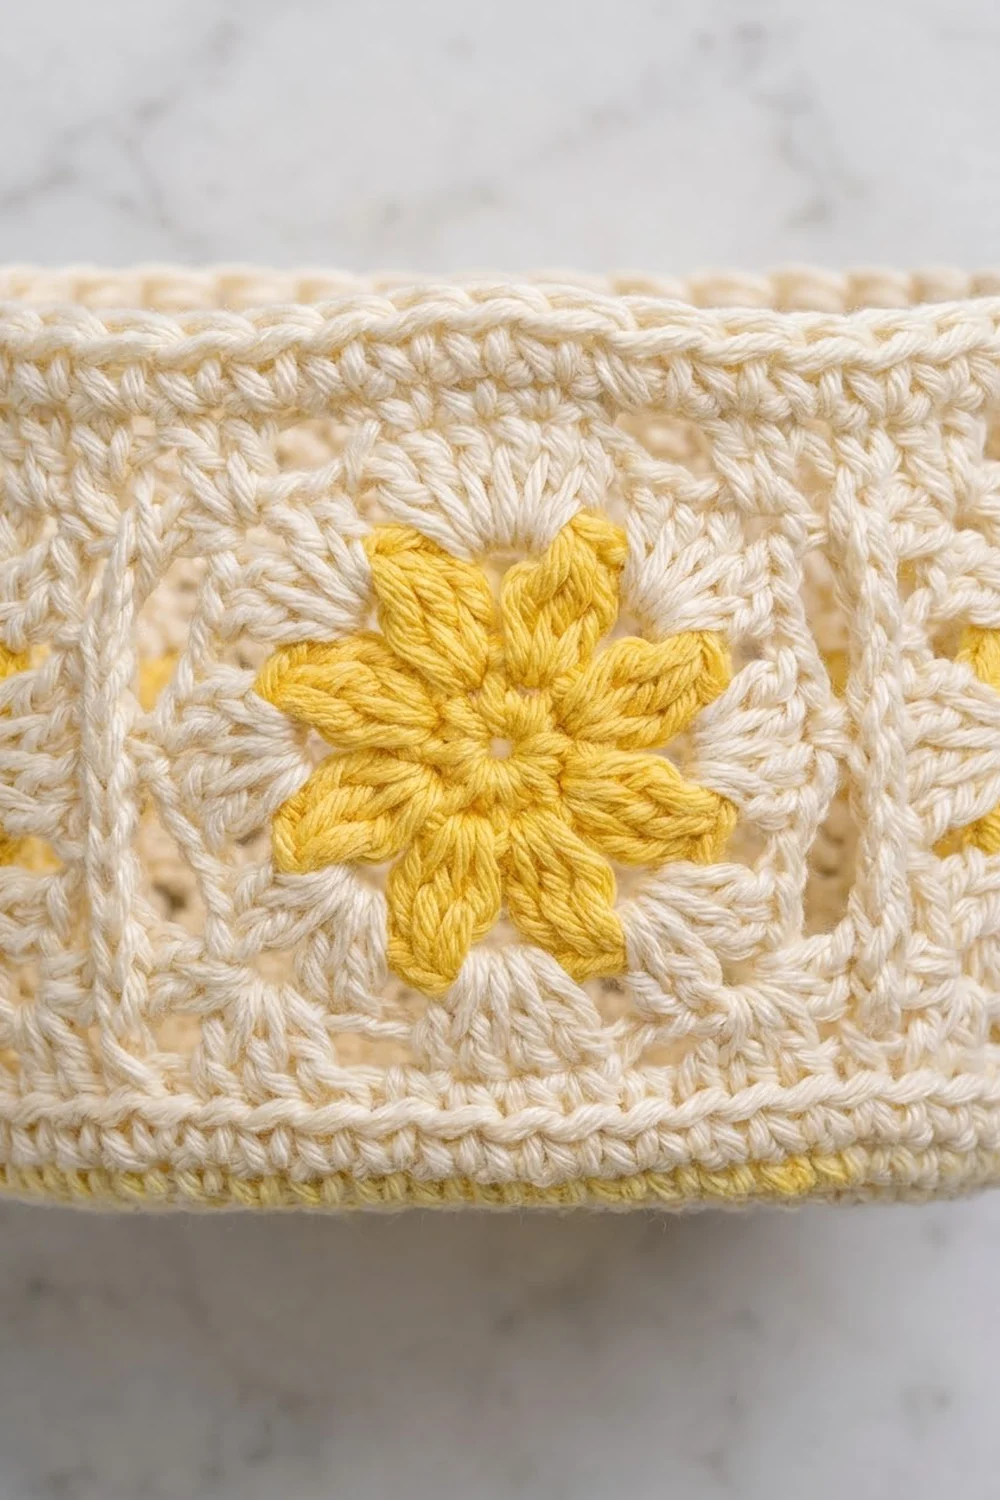
Flower Square (make 18)
Round 1 (yellow): Make a magic ring. Beg cl, ch 3, [cl, ch 3] 7 times. Join with a sl st to the top of the beg cl. (8 petals and 8 ch-3 spaces.) Fasten off.
Round 2 (cream): Join cream in any ch-3 sp. Ch 3 (counts as a dc), then (2 dc, ch 2, 3 dc) in the same sp for the first corner. Ch 1, 3 dc in the next sp, ch 1.
*(3 dc, ch 2, 3 dc) in the next sp, ch 1, 3 dc in the next sp, ch 1. Repeat from * 2 more times. Join to the top of the beginning ch-3.
Count: 36 dc, 8 ch-1 spaces and 4 ch-2 corners. Each side has 11 stitches (9 dc and 2 ch-1 spaces) between the corners.
Round 3 (cream): Sl st in the next 2 dc and into the ch-2 corner. Ch 1, then (sc, ch 1, sc) in the same corner.
*Sc in the next 3 dc, sc in the ch-1 sp, sc in the next 3 dc, sc in the ch-1 sp, sc in the next 3 dc, then (sc, ch 1, sc) in the corner. Repeat from * 2 more times.
Finish the last side by working 3 sc, sc in the ch-1 sp, 3 sc, sc in the ch-1 sp and 3 sc (the last 3 go into the stitches you slipped over). Join.
Count: 13 sc per side, including that side’s 2 corner sc. That is 52 sc in total, plus 4 ch-1 corner spaces that are not counted. Fasten off and leave a 12 in (30.5 cm) tail.
Oval Base (make 3)
Work in continuous spiral rounds and move a marker up with each round.
Round 1: Ch 12. Sc in the 2nd ch from the hook and in the next 9 ch. Work 3 sc in the last ch. Rotate and work along the underside of the chain: sc in the next 9 ch, then 2 sc in the first ch. (24)
Rounds 2–10: Work each round as follows, where n is the round number:
[sc in next (n−2) sts, inc] once, sc in next 9, [sc in next (n−2) sts, inc] 3 times, sc in next 9, [sc in next (n−2) sts, inc] twice.
Each round adds 6 stitches, 3 at each curved end:
| Round | 2 | 3 | 4 | 5 | 6 | 7 | 8 | 9 | 10 |
|---|---|---|---|---|---|---|---|---|---|
| Stitches | 30 | 36 | 42 | 48 | 54 | 60 | 66 | 72 | 78 |
The two straight sides stay at 9 stitches each. The curved ends grow to 30 stitches each, because 18 + 60 = 78. Checkpoint: 7 x 4.75 in (17.8 x 12.1 cm).
Basket Wall and Rim
Round 11: Sc in the BLO of each stitch. (78) This creates the folded ridge along the bottom edge.
Round 12: Sc in each stitch. (78) Do not fasten off. You will join the square ring in Round 13 (see Joining).
Rim, after joining: Join cream in any stitch on the top edge of the square ring.
- Rim Round 1: Sc in each stitch. That is 13 per square x 6 squares = 78. Skip the ch-1 corner spaces.
- Rim Round 2: Sc in each stitch. (78)
- Rim Round 3: Rev sc in each stitch. (78) Fasten off.
Checkpoint: The basket stands 4.5 in (11.4 cm) tall.
Backing Panel (make 1)
Work in turned rows. Ch 1 at the start of each row does not count as a stitch.
Row 1: Ch 3. Sc in the 2nd ch from the hook and in the next ch. (2)
Row 2: Ch 1, 2 sc in each stitch. (4)
Rows 3–10: Ch 1, 2 sc in the first stitch, sc to the last stitch, 2 sc in the last stitch. Row 3: 6. Row 10: 20. This forms the bottom V-point. Checkpoint: 5 in (12.7 cm) wide.
Rows 11–86: Ch 1, sc in each stitch. (20) These 76 rows measure 16.9 in (42.9 cm). Checkpoint after Row 86: 19.1 in (48.5 cm) from the tip.
Rows 87–92: Ch 1, sc2tog, sc to the last 2 stitches, sc2tog. Row 87: 18. Row 92: 8. Checkpoint: 20.4 in (51.8 cm).
Rows 93–110: Ch 1, sc in each stitch. (8) This is the ring tab, 4 in (10.2 cm) long. Do not fasten off. Continue straight into the border.
Tassel
Wrap cream 40 times around the 5.5 in (14.0 cm) card. Tie the loops at the top with a 12 in (30.5 cm) strand, then cut the loops at the bottom. Wrap a second strand tightly 0.75 in (1.9 cm) below the tie to form a rounded head. Trim the tassel to 5 in (12.7 cm).
Make All Pieces
- Yellow: 18 flower centres (Round 1)
- Cream: Rounds 2–3 of all 18 squares, 3 bases, 1 panel and 1 tassel
Layout from top to bottom:
        [ wooden ring ]
        [ tab, folded ]
[ Basket 3: Sq Sq Sq Sq Sq Sq -> ring ]
[ Basket 2: Sq Sq Sq Sq Sq Sq -> ring ]
[ Basket 1: Sq Sq Sq Sq Sq Sq -> ring ]
        [ panel point ]
        [   tassel    ]
Joining
Step 1: Squares into rings. Place two squares RS up, side by side. Whipstitch through the back loops of the facing sides, matching stitch for stitch. That is 13 stitches to 13 stitches, plus one stitch through the ch-1 corner spaces at each end. Join 6 squares into a strip, then join the last square to the first to close the ring.
Keep the tension firm but flat, so the seams do not pucker or gape. Checkpoint: each ring measures 19.5 in (49.5 cm) around and 3.25 in (8.3 cm) tall.
Step 2: Ring to base (Basket Round 13). Slide a ring over the base, RS out, with its bottom edge level with Round 12. Centre one square on a straight side of the base. That side becomes the front.
Work Round 13 as sc through each square stitch and the matching Round 12 stitch together. Skip the corner ch-1 spaces and add no extra stitches at the seams. The count is 6 squares x 13 = 78, which exactly matches Round 12. Fasten off, then work the rim.
Step 3: Mounting. Do this after the panel border is finished.
Place markers on the panel at Rows 14, 39 and 64. These are the base lines for the three baskets. They give a 0.75 in (1.9 cm) margin above the point, gaps of about 1 in (2.5 cm) between baskets, and room below the top taper.
Centre the back straight side of each basket on the panel. Whipstitch along two lines across 20 stitches, 5 in (12.7 cm):
- along Round 13, just above the bottom ridge
- along Rim Round 1
Border
Border gauge: 4 sc per inch along every edge. That matches the stitch gauge, so the edges neither ruffle nor pull in.
Round 1: Continue from Row 110 without turning.
Tab top (Row 110): 3 sc in the first stitch, sc in the next 6, 3 sc in the last stitch. 12, including both corner groups.
Then work down the first long edge:
- Tab side (18 row-ends): [sc in the next 8 row-ends, skip 1] twice. 16
- Top taper (6 row-ends): sc in each row-end, with 2 sc in the 2nd and 5th. 6 + 2 = 8
- Straight side (76 row-ends): [sc in the next 8, skip 1] 8 times, then sc in the last 4. 64 + 4 = 68
- Bottom diagonal (10 row-ends): sc in each row-end, with 2 sc in the 3rd, 6th and 9th. 10 + 3 = 13
- Tip (2 foundation loops): 2 sc in each. 4
Work the second edge as a mirror of the first: 13, 68, 8, 16. Join.
Total: 12 + (2 x 16) + (2 x 8) + (2 x 68) + (2 x 13) + 4 = 226
Round 2: Rev sc in each stitch. (226) Fasten off.
Why the math works:
- The straight sides are 16.9 in (42.9 cm) long, and 68 sc at 4 per inch = 17 in (43.2 cm).
- The tab is 4 in (10.2 cm), and 16 sc = 4 in.
- The top taper runs 1.5 in across and 1.3 in (3.3 cm) up, a diagonal of about 2 in (5.1 cm), and 8 sc = 2 in.
- The bottom diagonal runs 2.25 in (5.7 cm) across and 2.2 in (5.6 cm) up, about 3.15 in (8.0 cm), and 13 sc = 3.25 in (8.3 cm). That small extra eases the corner at the point.
Ring and tassel: Fold the tab over the wooden ring between Rows 101 and 102. Whipstitch the top edge of the tab to Row 93 on the WS. Tie the tassel to the tip, and hide all the tails.
Final Blocking
- Before mounting, spray the panel lightly with water until it is damp.
- Pin it flat to 5.5 x 22.7 in (14.0 x 57.7 cm), keeping the long edges straight.
- Stuff each basket with a towel-wrapped toilet roll and mist the outside.
- Shape the oval and push the squares upright.
- Let everything dry completely, which takes about 24 hours.
- Steam the tassel and trim the ends evenly.
Final Quality-Control Checklist
- [ ] All 18 squares measure 3.25 in (8.3 cm), with 13 sc per side.
- [ ] Every base has 78 stitches and measures 7 x 4.75 in.
- [ ] Each basket ring has 78 stitches in Round 13 and in every rim round.
- [ ] The front of each basket has a square centred on it.
- [ ] Border Round 1 totals 226 stitches.
- [ ] The baskets are level, centred and evenly spaced.
- [ ] The tab is sewn securely around the ring.
- [ ] All tails are woven in on the WS.
Troubleshooting
- The square ring is bigger than the base: Your squares are too loose. Remake them with a smaller hook, or work Round 13 slightly tighter.
- The base curls into a bowl: Your tension is tight at the ends. Go up a hook size for Rounds 6–10.
- The base ripples: Stagger the increases by moving the first inc of each end group one stitch along.
- The panel edge waves: Recount the skipped row-ends in Border Round 1.
- A basket sags forward: Add a third line of stitching along Round 12.
- The panel twists while hanging: Re-block it, and check that the tab is sewn square.
Care
Hand wash in cool water, press out the water in a towel and dry flat, re-shaping the baskets while damp. Do not tumble dry.
Final Notes
Everything depends on the measurement chain:
- 13 sc per square side gives 78 stitches per basket ring.
- 78 sc matches the 78-stitch oval base, at 19.5 in (49.5 cm) around.
- The panel’s 20 stitches give a 5 in (12.7 cm) width.
- Border counts sized to 4 sc per inch keep every edge flat.
If you check your square first, everything else will line up. Happy crocheting!