

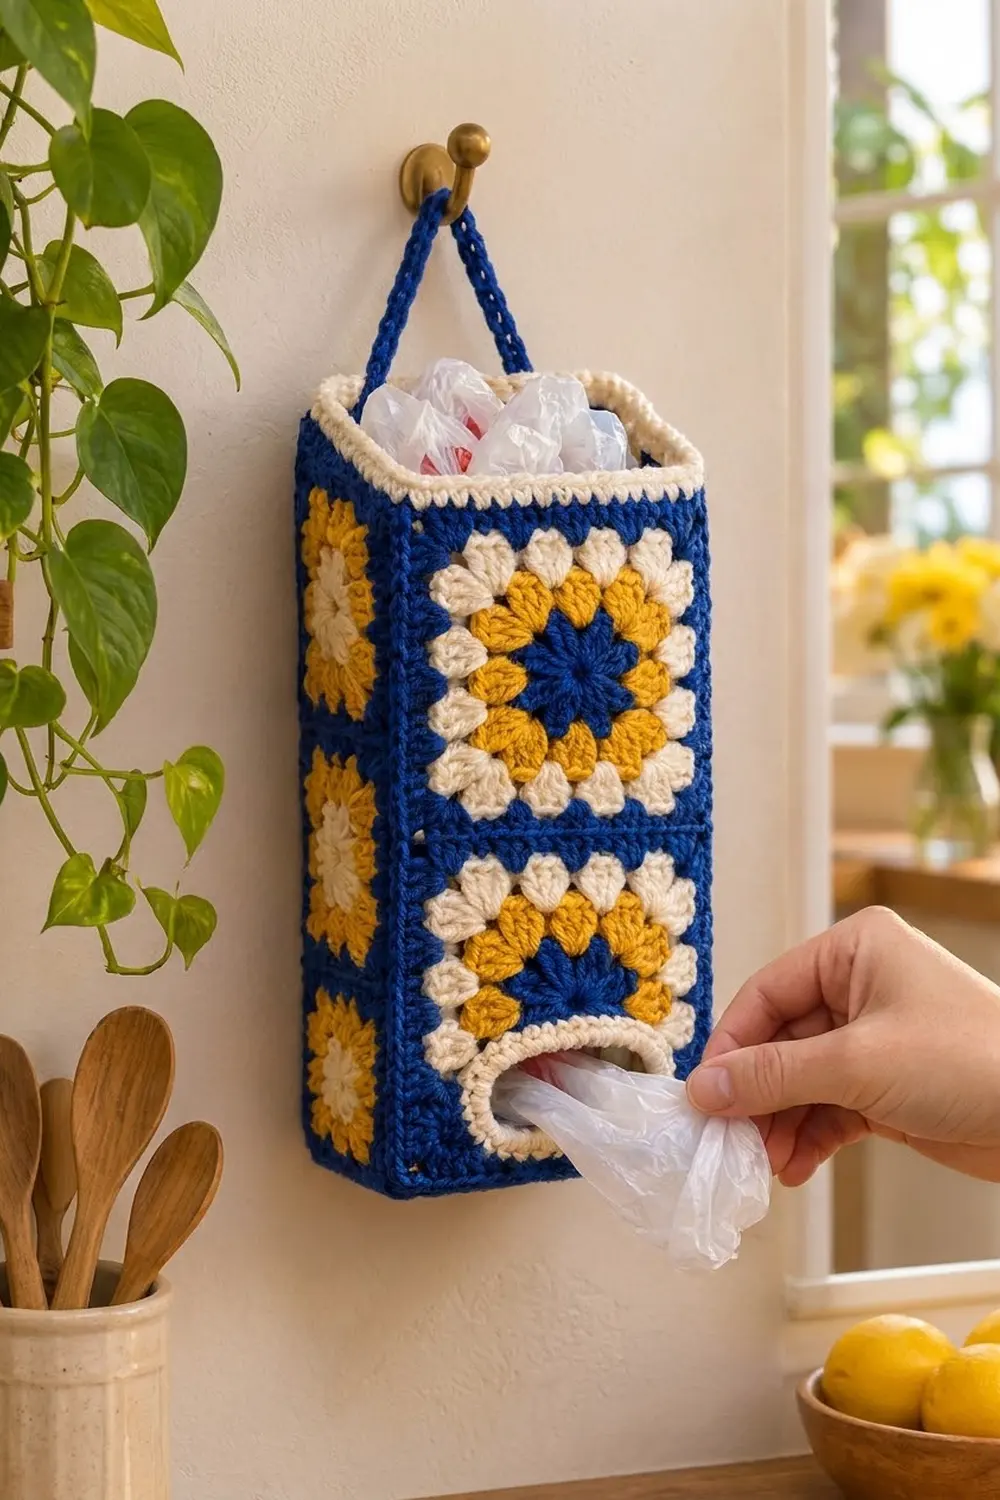
This bag holder is a tall, slim box made of sunburst granny squares. It hangs from a hook by a slim blue strap. You stuff bags in through the wide cream rim at the top and pull them out one at a time through a cream-trimmed oval opening at the bottom front.
The colors are royal blue, golden yellow and cream. The front and back each show two large flower squares with blue centers, gold petals and cream rings, framed in blue. Each narrow side shows three small squares with gold centers and cream rings. The style is bright and a little retro, and it suits a kitchen or laundry room.
The pattern uses US terms. The finished holder is 5 in (12.7 cm) wide, 3⅓ in (8.5 cm) deep and about 10¾ in (27.3 cm) tall, plus a 10 in (25.4 cm) strap.
Here’s the construction in brief. You make 4 large and 6 small squares and join them into a four-sided tube. Then you crochet a blue base with an opening and join it to the bottom. Last, you work a cream border around the top and sew on the strap.
Finished Size and Construction
- Finished size: 5 × 3⅓ × 10¾ in (12.7 × 8.5 × 27.3 cm)
- Skill level: Easy-intermediate
- Terminology: US
- Yarn weight: Worsted (#4) cotton
- Hook: 4.5 mm (US 7)
- Number of pieces: 4 large squares, 6 small squares, 1 base, 1 strap
- Layout: front and back are each 2 large squares stacked; each side is 3 small squares stacked
- Piece size: large square 5 in (12.7 cm); small square 3⅓ in (8.5 cm)
- Size before border: 5 × 3⅓ × 10 in (12.7 × 8.5 × 25.4 cm)
- Border depth: about ¾ in (1.9 cm), 3 rounds
Materials
Use cotton. It holds the box shape, doesn’t sag under the weight of bags and washes well. Use the same brand for all colors so the squares match in size. The amounts below assume about 95 m per 50 g.
- Royal blue (A): 85 g, about 160 m
- Golden yellow (B): 25 g, about 48 m
- Cream (C): 35 g, about 67 m
These quantities include about a 20% margin for swatching and differences in tension.
Tools: 4.5 mm (US 7) hook, tapestry needle, 4 stitch markers, scissors, rustproof pins, blocking mat, measuring tape.
Abbreviations (US Terms)
- ch – chain
- sl st – slip stitch
- sc – single crochet
- dc – double crochet
- sp(s) – space(s)
- st(s) – stitch(es)
- rnd – round
- RS / WS – right side / wrong side
- BLO – back loop only
Standing dc: Start with a slip knot on your hook. Yarn over, insert the hook, and finish a dc as usual. It counts as 1 dc. You can use ch 3 instead if you prefer.
Gauge and Checkpoints
Gauge: Rnd 6 of the large square has 21 sc per side and measures 5 in (12.7 cm), which is 4.2 sc per inch. Every piece is sized from this number.
Make one large square first, steam it lightly, and measure it.
Large square checkpoints:
– Rnd 1: about 1¼ in (3.2 cm) across
– Rnd 2: about 2¼ in (5.7 cm)
– Rnd 3: about 3 in (7.6 cm)
– Rnd 4: about 3¾ in (9.5 cm)
– Rnd 5: about 4½ in (11.4 cm)
– Rnd 6: 5 in (12.7 cm)
Small square checkpoints:
– Rnd 1: about 1½ in (3.8 cm)
– Rnd 2: about 2¼ in (5.7 cm)
– Rnd 3: about 3 in (7.6 cm)
– Rnd 4: 3⅓ in (8.5 cm)
If your square is too big, switch to a 4 mm hook. If it’s too small, switch to a 5 mm hook. Don’t change the stitch counts, because they’re what make the pieces line up.

Large Square (Make 4)
Work every round with the RS facing. Don’t turn.
Rnd 1 (A): Make a magic ring. Ch 3 (counts as dc), then work 15 dc in the ring. Sl st to the top of the ch-3 and pull the ring closed. (16 dc) Fasten off.
Rnd 2 (B): Join B with a standing dc in any sp between 2 dc. Work 2 more dc in the same sp, ch 1. Skip the next sp, work 3 dc in the following sp, ch 1; repeat from * 6 more times. Sl st to the first dc. (24 dc in 8 groups, 8 ch-1 sps)* Fasten off. These 8 groups are the gold petals.
Rnd 3 (C): Join C in any ch-1 sp. Work (standing dc, 2 dc, ch 2, 3 dc) in that sp, ch 1. 3 dc in the next ch-1 sp, ch 1, (3 dc, ch 2, 3 dc) in the next ch-1 sp, ch 1; repeat from * 2 more times. Work 3 dc in the last sp, ch 1. Sl st to join. (36 dc: 9 per side, 2 ch-1 sps per side, 4 ch-2 corners)* Fasten off. This round turns the circle into a square.
Rnd 4 (A): Join A in any corner. Work (standing dc, 2 dc, ch 2, 3 dc) in the corner, ch 1. (3 dc, ch 1) in each ch-1 sp to the next corner, then (3 dc, ch 2, 3 dc) in the corner, ch 1; repeat around. Sl st to join. (48 dc: 12 per side, 3 ch-1 sps per side)* Don’t fasten off.
Rnd 5 (A): Sl st in the next 2 dc and into the corner sp. Ch 3 (counts as dc), then work (2 dc, ch 2, 3 dc) in the same corner, ch 1. Continue the round as in Rnd 4. (60 dc: 15 per side, 4 ch-1 sps per side)
Rnd 6 (A): Sl st into the corner sp. Ch 1, (sc, ch 2, sc) in the corner. Sc in each dc and each ch-1 sp to the next corner, (sc, ch 2, sc) in the corner; repeat around. Sl st to join. (84 sc)*
Each side has 1 corner sc + 15 + 4 + 1 corner sc = 21 sc. The ch-2 corner spaces aren’t counted. Fasten off and weave in the ends.
Small Square (Make 6)
Rnd 1 (B): Make a magic ring. Ch 3 (counts as dc), 2 dc, ch 2. 3 dc, ch 2; repeat from * 2 more times. Sl st to join. (12 dc, 4 ch-2 corners)* Fasten off.
Rnd 2 (C): Join C in a corner. Work (standing dc, 2 dc, ch 2, 3 dc) in each corner, with ch 1 between corners. Sl st to join. (24 dc: 6 per side, 1 ch-1 sp per side) Fasten off.
Rnd 3 (A): Join A in a corner. Work (3 dc, ch 2, 3 dc) in the corner, ch 1, 3 dc in the side ch-1 sp, ch 1; repeat around. Sl st to join. (36 dc: 9 per side, 2 ch-1 sps per side)*
Rnd 4 (A), trim round: Sl st into the corner sp. Ch 1, (sc, ch 2, sc) in the corner. Along each side, work 1 sc in each dc and each ch-1 sp, but work 2 sc in the center dc of the middle group. Work (sc, ch 2, sc) in each corner. Sl st to join.
Each side has (9 dc + 2 sps worked one-for-one = 11 sc) + 1 extra sc = 12 sc between the corners. Add the 2 corner sc for 14 sc per side and 56 sc total. Fasten off.
The extra stitch makes the columns match. Three small squares give 3 × 14 = 42 sts, which equals two large squares at 2 × 21 = 42 sts.
Base (Make 1)
The base is solid A with an oval opening near the front edge.
Foundation: With A, ch 22.
Row 1: Sc in the 2nd ch from the hook and in each ch across. Turn. (21 sc)
Row 2: Ch 1, sc across. Turn. (21 sc)
Rows 3–6, first side: Ch 1, sc in the first 5 sts, turn. Work these 4 rows, then fasten off. (5 sc)
Rows 3–6, second side: Skip the center 11 sts of Row 2. Join A in the next st and work 4 rows of 5 sc. Don’t fasten off.
Row 7: Ch 1, sc in 5 sts, ch 11, sc in the 5 sts of the first side. Turn. (10 sc + 11 ch)
Row 8: Ch 1, sc in 5 sts, sc in each of the 11 ch, sc in 5 sts. Turn. (21 sc)
Rows 9–14: Ch 1, sc across. Turn. (21 sc) Fasten off.
The base should measure 5 × 3⅓ in (12.7 × 8.5 cm). The opening is about 2⅝ × 1 in (6.7 × 2.5 cm) before trimming.
Opening trim (C): Join C at an inner corner of the opening. Work 1 sc in each of the 11 skipped Row 2 sts, 4 sc in the row ends, 11 sc in the Row 7 chains, and 4 sc in the other row ends. Sl st to join. (30 sc) Fasten off.
Strap (Make 1)
Row 1: With A, ch 43. Sc in the 2nd ch from the hook and in each ch across. Turn. (42 sc)
Row 2: Ch 1, sl st in each st across. (42 sl st)
Leave a long tail. The strap is 42 ÷ 4.2 = 10 in (25.4 cm) long.
Joining
Lightly block all the pieces to size before you join them.
Method: Place two pieces RS together. With A, sl st through the back loops of both pieces, joining one stitch to one stitch. This gives a flat seam that barely shows. Skip the ch-2 corner spaces; they tuck into the seam.
Step 1, columns: Join the 2 front squares with 21 sl st, then do the same for the back squares. For each side, join 3 small squares with 14 sl st per seam. Each column now has long edges of 42 sts.
Step 2, tube: Join front to side, side to back, back to the other side, and that side to the front, using 42 sl st for each seam.
Tension: Make your sl sts as loose as the fabric around them. If the seams pucker, go up one hook size for seaming only.
Checkpoint: Lay the tube flat. The front should be 5 × 10 in (12.7 × 25.4 cm), and each side should be 3⅓ in (8.5 cm) wide.
Step 3, base: Turn the tube RS out. Line up the base so its foundation chain is along the front bottom edge, with the opening at the front. Join A at a front corner. Working through both layers, sc around:
- Front: 21 sc into the 21 foundation-chain sts
- Side: 14 sc, one into each of 14 row ends
- Back: 21 sc into Row 14
- Other side: 14 sc, one into each of 14 row ends
Sl st to join. (70 sc) This round makes a neat blue ridge.
Border
Border gauge: 4.2 sc and 4.2 rounds per inch.
The top edge has 21 + 14 + 21 + 14 = 70 sts. Each piece’s count already includes its own corner sc. The seams pair stitches without adding any, so there’s nothing extra at the seams.
Rnd 1 (C): Join C at a back corner. Ch 1, sc in each top st. Sl st to join. (front 21, side 14, back 21, side 14 = 70 sc)
Rnd 2 (C): Ch 1, sc around. Sl st to join. (70 sc)
Rnd 3 (C): Ch 1, sc in the BLO around. Sl st to join. (70 sc) Fasten off.
Why the math works: The perimeter is 5 + 3⅓ + 5 + 3⅓ = 16⅔ in (42.3 cm). At 4.2 sc per inch, that’s exactly 70 sts, so the rim lies flat without ruffling or cupping. Three rounds add about ¾ in (1.9 cm) of height, and the BLO round gives the rim a firm, rolled edge.
Strap: Sew one end inside the border at the 2nd st from each back corner, stitching through all 3 rounds.
Final Blocking
- Weave in the ends along the seams.
- Stuff the holder firmly with a towel or a small wrapped box.
- Pin the corners square and check that it’s 10¾ in (27.3 cm) tall.
- Steam above the fabric without pressing.
- Leave it to dry in shape for at least 6 hours.
- Remove the stuffing and smooth the opening trim.
Final Quality-Control Checklist
- Large squares: 21 sc per side, 5 in (12.7 cm)
- Small squares: 14 sc per side, 3⅓ in (8.5 cm)
- Column edges: 42 sts each
- Base: 21 sts × 14 rows, with the 30-sc trimmed opening at the front
- Bottom join: 70 sc
- Border: 3 rounds of 70 sc
- Strap: 42 sc, sewn evenly at the back
- Seams flat, with no gaps at the corners
Troubleshooting
Squares cup: Loosen your tension or go up half a hook size.
Squares ripple: Check that you used ch 1 between groups, not ch 2.
Side columns are short: You probably missed the extra sc in Rnd 4 of the small squares.
The base doesn’t fit: Adjust Rows 9–14 until the base reaches 3⅓ in (8.5 cm).
The top border flares: Use a smaller hook for the border only.
Care
Hand wash in cool water and dry flat, reshaping the box while it’s damp. A gentle machine cycle in a laundry bag also works.
Final Notes
The whole holder follows one measurement chain. Large squares are 21 sc = 5 in (12.7 cm), and small squares are 14 sc = 3⅓ in (8.5 cm). Both kinds of column reach 42 sts = 10 in (25.4 cm). The base matches the tube at 21 × 14, the bottom join and the border each use 70 sts, and the border brings the height to about 10¾ in (27.3 cm). Check each link as you go and the box will square up neatly.
Happy crocheting!