

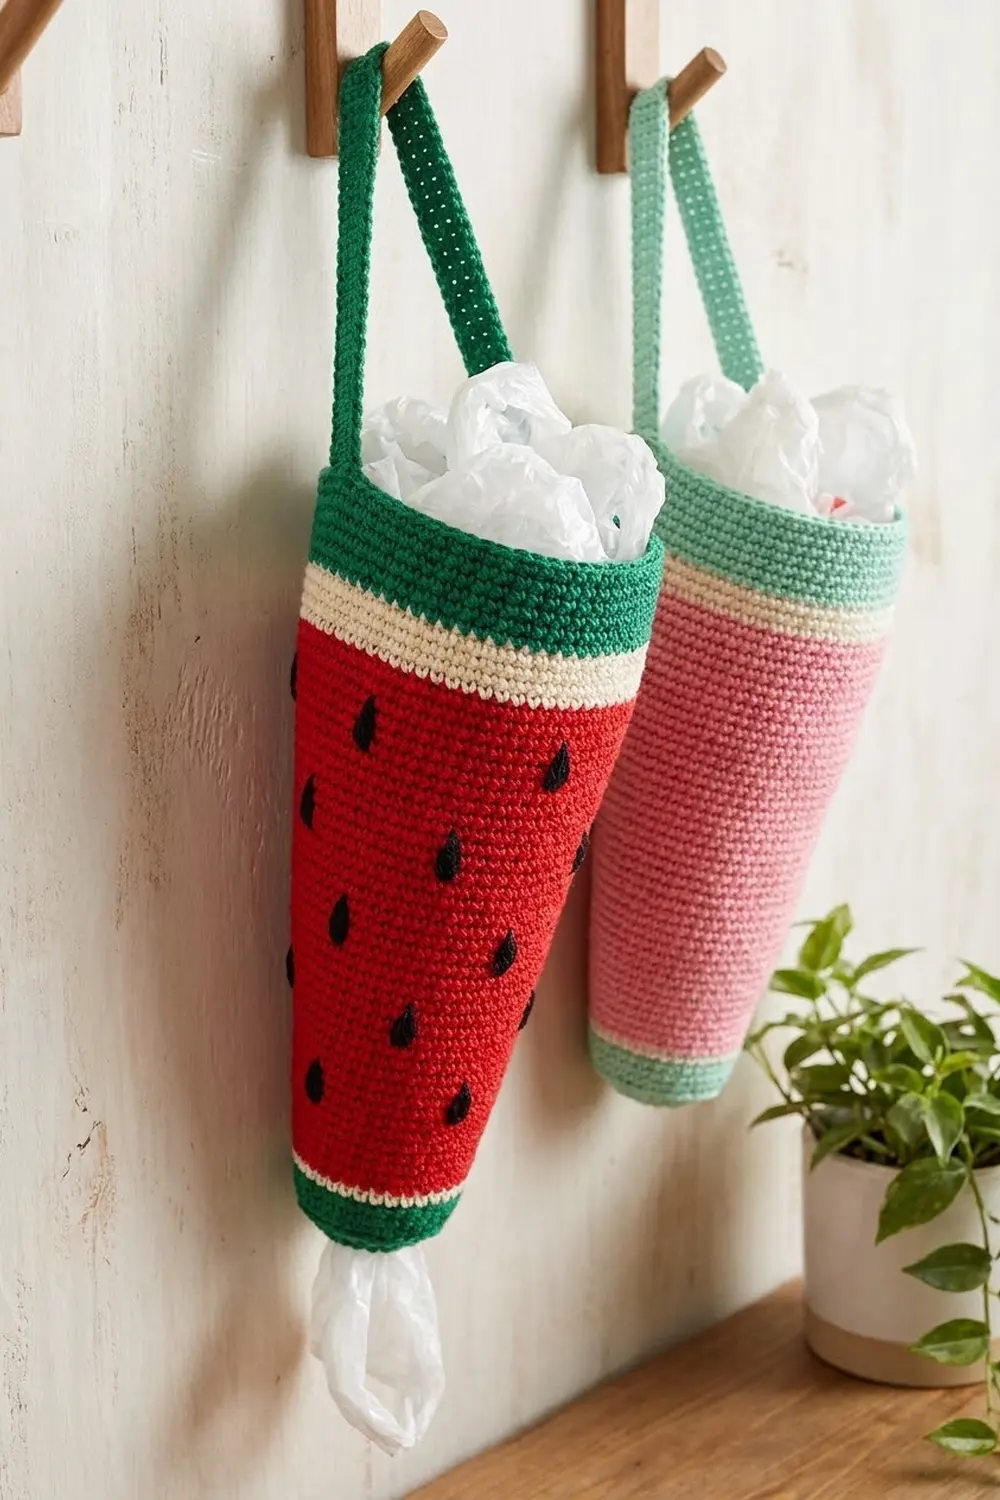
This watermelon slice is really a plastic bag holder. It’s a long cone that hangs from a wall hook by a green strap. You stuff bags in through the wide top and pull them out one at a time through the small opening at the tip. It’s useful and it brightens up a kitchen, laundry room, or pantry wall.
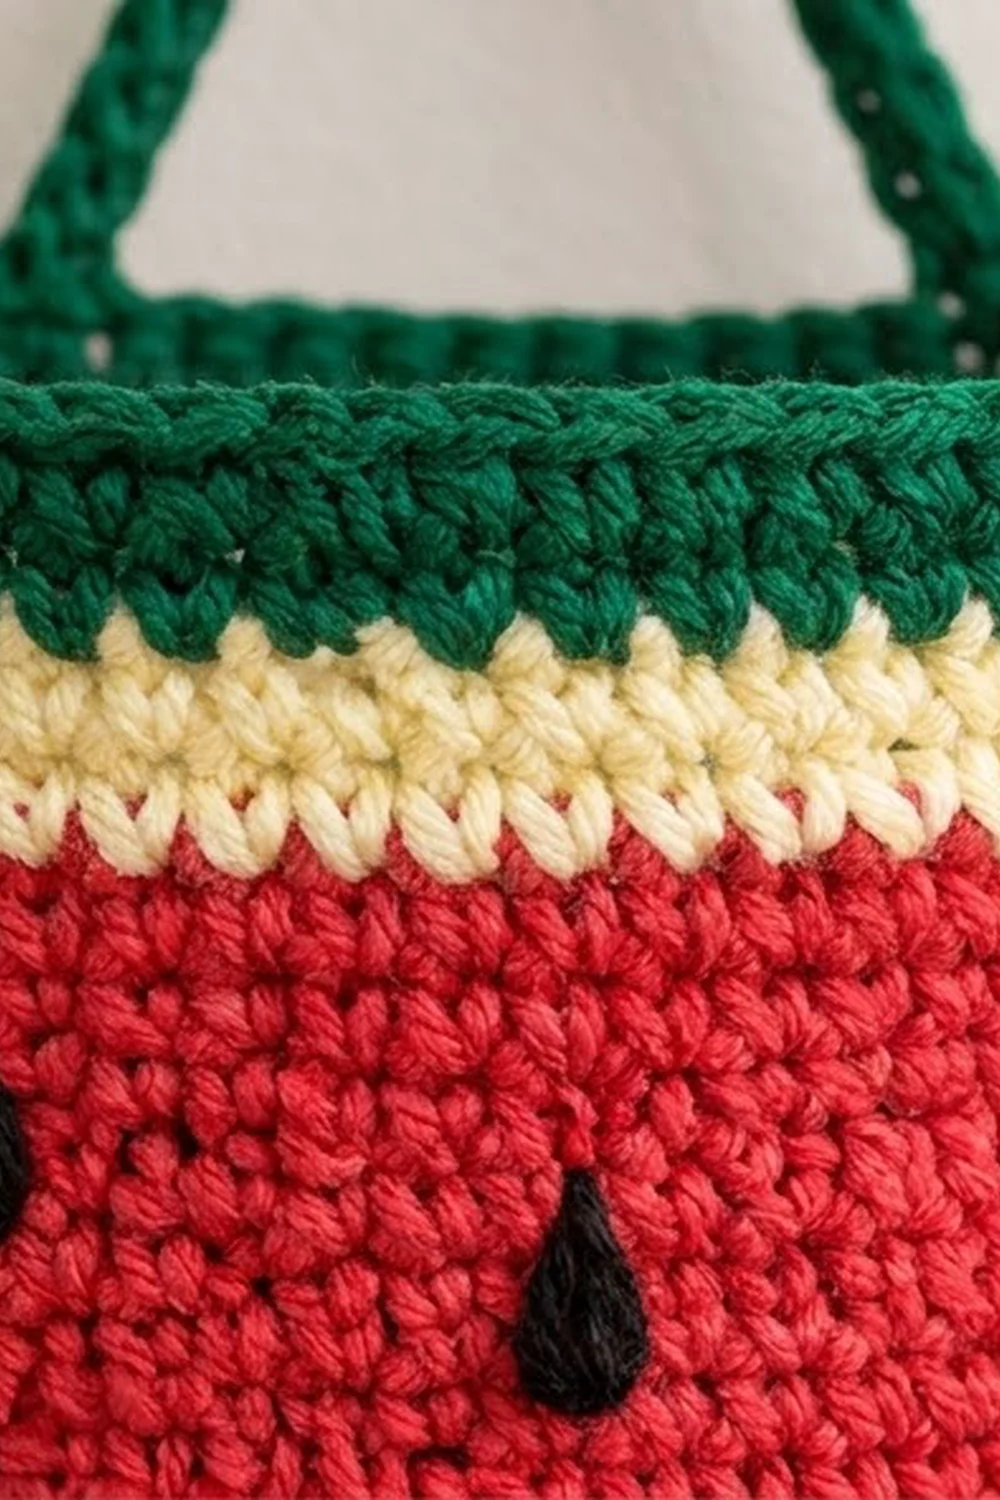
The colors follow a real slice. The cone is red with black teardrop seeds embroidered on it. A cream band stands in for the pale inner rind, and a deep green rim and strap make the outer rind. There’s also a narrow green ring around the dispensing tip, so the bottom looks finished too.
The pattern uses US crochet terms. The finished holder is about 7 in (17.8 cm) wide at the top when laid flat and about 11.3 in (28.7 cm) tall, not counting the strap. The strap rises about 4 in (10.2 cm) above the rim.
It’s made as one piece, worked in joined rounds of single crochet from the small tip up to the wide rim. Gentle increases shape the cone. You add the strap straight onto the last round, then embroider the seeds. There’s no sewing together, so it’s a relaxing project for an evening or two.
Finished Size and Construction
- Finished size: 7 in (17.8 cm) wide flat at the top x 11.3 in (28.7 cm) tall
- Skill level: Easy
- Terminology: US crochet terms
- Yarn weight: Worsted weight (#4), cotton recommended
- Hook: 4.0 mm (G-6)
- Number of pieces: 1 (cone with the strap worked directly on it)
- Layout: Single cone, hung point-down
- Piece size: Top circumference 14 in (35.6 cm); tip opening circumference 6 in (15.2 cm), or 3 in (7.6 cm) flat
- Size before border: 7 in (17.8 cm) flat x 9.6 in (24.4 cm) tall after the red section
- Border depth: 1.8 in (4.6 cm) of cream and green rim rounds
Materials
Use smooth worsted weight cotton or a cotton blend. Cotton keeps its shape when the holder is full and shows the stitches clearly. Acrylic will work too, but the cone will be a little softer and may stretch more.
- Red (watermelon flesh): 90 g, about 140 m
- Green (outer rind, tip ring, strap): 30 g, about 46 m
- Cream (inner rind): 15 g, about 23 m
- Black (seeds): 5 g, about 8 m
These amounts are based on a cotton of about 1.5 m per gram. They include a safety margin of roughly 15 percent for swatching and weaving in ends.
Tools:
- 4.0 mm (G-6) crochet hook
- Tapestry needle
- 1 stitch marker
- Scissors
- Measuring tape
- Pins and a spray bottle for blocking
Optional colorway: For a pink slice, use light pink for the flesh, mint for the rim and tip ring, and keep the cream band and black seeds. The amounts are the same.
Abbreviations (US Terms)
- ch – chain
- sl st – slip stitch
- sc – single crochet
- inc – increase: 2 sc in the same stitch
- st(s) – stitch(es)
- rnd(s) – round(s)
- rep – repeat
Joined round: At the end of each round, sl st in the first sc. Start the next round with ch 1 (this does not count as a stitch) and work the first sc into the same stitch as the join. The joins line up into one faint seam. That seam is the center back of the holder, and it’s the reference point for placing the strap later.
Invisible color change: Work the last sc of the old color until 2 loops are on the hook. Yarn over with the new color and pull through, then make the joining sl st with the new color.
Gauge and Checkpoints
Gauge: 16 sc and 18 rnds = 4 in (10.2 cm) in sc worked in the round. That works out to 4 sts and 4.5 rnds per inch.
Treat Rnds 1–10 as your test. Measure before you go on, because every later size depends on this gauge. Measure with the piece flat and relaxed, not stretched over your hand.
Checkpoints (measured flat, with the seam at center back):
- After Rnd 3: tube is 3 in (7.6 cm) wide and 0.7 in (1.8 cm) tall
- After Rnd 20: top edge is 5 in (12.7 cm) wide and the piece is 4.4 in (11.2 cm) tall
- After Rnd 43: top edge is 7 in (17.8 cm) wide and the piece is 9.6 in (24.4 cm) tall
- After Rnd 51: top edge is 7 in (17.8 cm) wide and the piece is 11.3 in (28.7 cm) tall
If your piece is too big: Change to a 3.5 mm hook, or crochet more tightly.
If your piece is too small: Change to a 4.5 mm hook.
Don’t add or remove stitches to fix size. The increase pattern sets the cone angle, and the strap position depends on the final count of 56.
Pattern: The Cone
Tip Ring (Green)
Rnd 1: With green, ch 24 and sl st to the first ch to form a ring. Don’t twist the chain. Ch 1, then sc in each ch around and join. (24 sts)
Rnds 2–3: Ch 1, sc in each st around and join. (24 sts)
Change to red at the end of Rnd 3. Fasten off green and leave a 6 in (15.2 cm) tail.
Watermelon Body (Red)
From here on, every round starts with ch 1 and ends with a sl st to the first sc.
Rnd 4: Sc in each st around. (24 sts)
Rnd 5: Sc 5, inc 4 times. (28 sts)
Rnds 6–9: Sc in each st around. (28 sts)
Rnd 10: Sc 6, inc 4 times. (32 sts)
Rnds 11–14: Sc in each st around. (32 sts)
Rnd 15: Sc 7, inc 4 times. (36 sts)
Rnds 16–19: Sc in each st around. (36 sts)
Rnd 20: Sc 8, inc 4 times. (40 sts)
Check your gauge here. The top edge should be 5 in (12.7 cm) wide flat.
Rnds 21–24: Sc in each st around. (40 sts)
Rnd 25: Sc 9, inc 4 times. (44 sts)
Rnds 26–29: Sc in each st around. (44 sts)
Rnd 30: Sc 10, inc 4 times. (48 sts)
Rnds 31–34: Sc in each st around. (48 sts)
Rnd 35: Sc 11, inc 4 times. (52 sts)
Rnds 36–39: Sc in each st around. (52 sts)
Rnd 40: Sc 12, inc 4 times. (56 sts)
Rnds 41–43: Sc in each st around. (56 sts)
Change to cream at the end of Rnd 43. Fasten off red.
The red section is 40 rounds (Rnds 4–43). It grows from 24 to 56 sts, which is 8 increase rounds of 4 sts each (8 x 4 = 32, and 24 + 32 = 56). Spreading the increases out every fifth round gives the long, even taper of a watermelon wedge.
Smoother sides (optional): Increases stacked in the same place can make small ridges. You can offset Rnds 15, 25, and 35 as shown below. The totals stay the same.
- Rnd 15: Sc 4, inc, sc 7, inc 3 times, sc 3. (36 sts)
- Rnd 25: Sc 5, inc, sc 9, inc 3 times, sc 4. (44 sts)
- Rnd 35: Sc 6, inc, sc 11, inc 3 times, sc 5. (52 sts)
Top Rim (Border)
The rim acts as the border. It is worked straight up with no increases, so the opening stays 14 in (35.6 cm) around. With the seam at center back, the 56 sts split into 28 sts across the front and 28 sts across the back.
Border gauge: Same as the body, 4 sts and 4.5 rnds per inch.
Inner Rind (Cream)
Rnds 44–46: With cream, sc in each st around and join. (56 sts: 28 front, 28 back)
Change to green at the end of Rnd 46. Fasten off cream.
Outer Rind (Green)
Rnds 47–50: With green, sc in each st around and join. (56 sts: 28 front, 28 back)
Rnd 51: Ch 1, sl st loosely in each st around and join. (56 sl sts: 28 front, 28 back)
Fasten off and weave in the end.
Why the math works: 56 sts at 4 sts per inch gives a circumference of 14 in (35.6 cm), or 7 in (17.8 cm) flat. Because the rim has no increases, it holds that width all the way up. The 3 cream rounds add 0.7 in (1.8 cm), and the 5 green rounds add 1.1 in (2.8 cm). Together that’s the 1.8 in (4.6 cm) rim depth. Stacked on the 9.6 in (24.4 cm) body, it gives the full height of about 11.3 in (28.7 cm). The sl st round firms up the edge so it doesn’t flare when the cone is stuffed.
Hanging Strap (Green)
Lay the cone flat with the seam at center back. Count from the seam to find the two side folds: st 14 and st 42 of Rnd 51.
Row 1: Join green with a sl st in st 14. Ch 40. Without twisting the chain, sl st in st 42, then sl st in the next st. Turn.
Row 2: Sc in each of the 40 ch. Sl st in the rim st next to st 14, then fasten off. (40 sc)
The strap is 2 rows wide, about 0.4 in (1.0 cm). It is 10 in (25.4 cm) long, which makes an arch about 4 in (10.2 cm) high above the rim. Weave the ends back and forth through the rim so the strap is anchored securely.
Seeds (Black Embroidery)
Thread about 20 in (50.8 cm) of black yarn onto the tapestry needle. Each seed is a teardrop about 0.4 in (1.0 cm) long, with the point toward the rim.
- Bring the needle up at the bottom of the seed, 2 rnds below where you want the point.
- Go down 2 rnds higher, at the point.
- Make 2 more stitches over the same path, splaying them a little at the bottom so the base is wider and the top is pointed.
Place the seeds in staggered rows over the red section only. Leave at least 2 rnds of plain red below the cream band and above the tip ring. A good layout is 9 seeds across the front and 9 across the back:
- Rows of 3, 2, 2, 1, and 1 seeds, working from the top down
- Rows about 6 rnds apart
- Each row offset from the row above
Carry the yarn inside the cone between seeds, keeping the strands short and loose so the fabric doesn’t pucker.
Final Blocking
- Weave in all ends on the inside of the cone, following the stitch lines.
- Stuff the cone firmly with plastic bags or a rolled towel to give it a smooth wedge shape.
- Lay it flat with the seam at center back, and the strap and tip centered.
- Pin the top edge to 7 in (17.8 cm) wide and the total height to 11.3 in (28.7 cm).
- Mist it lightly with water until damp but not soaked.
- Let it dry completely. This usually takes 8 to 12 hours.
- Remove the pins and the stuffing. Shape the tip ring into a neat circle with your fingers.
Final Quality-Control Checklist
- Tip ring is 3 in (7.6 cm) flat and 24 sts around
- Red section ends with 56 sts after Rnd 43
- Cream band is 3 rnds and green rim is 5 rnds plus the sl st round
- Top measures 7 in (17.8 cm) flat; total height is 11.3 in (28.7 cm)
- Seam runs straight up the center back
- Strap is attached at sts 14 and 42, is not twisted, and hangs level
- Seeds point toward the rim and are evenly staggered on both sides
- All ends are woven in on the inside
Troubleshooting
Cone leans or twists: The joins have drifted. Make sure each round starts in the same stitch as the join and not in the next stitch.
Visible ridges at the increases: Use the offset versions of Rnds 15, 25, and 35.
Tip is too tight to pull bags through: Your gauge is too tight. Remake the piece with a 4.5 mm hook and check the 3 in (7.6 cm) tip width again.
Top edge flares: Work the sl st round more firmly, or use a hook 0.5 mm smaller for Rnd 51.
Holder tilts on the hook: The strap is off-center. Count the stitches again from the seam and reattach.
Seeds pucker: The carried strands are too tight. Loosen them, then steam lightly.
Care
Spot clean with mild soap, or hand wash in cool water. Reshape and lay flat to dry. Don’t tumble dry, because cotton can shrink and change the shape of the cone.
Final Notes
Everything comes back to gauge. At 4 sts and 4.5 rnds per inch, the 24-st tip measures 3 in (7.6 cm) flat. After 40 red rounds and 8 increases, the cone reaches 56 sts, 7 in (17.8 cm) flat, and 9.6 in (24.4 cm) tall. The 1.8 in (4.6 cm) rim brings it to 11.3 in (28.7 cm). A 10 in (25.4 cm) strap across the side folds lets it hang evenly. Check the gauge, follow the counts, and the slice will come out the right size.
Happy crocheting!