

These lacy vertical blind slats replace plain fabric vanes with long crochet strips that let the light through. Each slat is a column of six-petal flowers set inside an open chain lattice. A narrow solid edge frames it, and a firm header at the top clips into a standard vertical blind track.
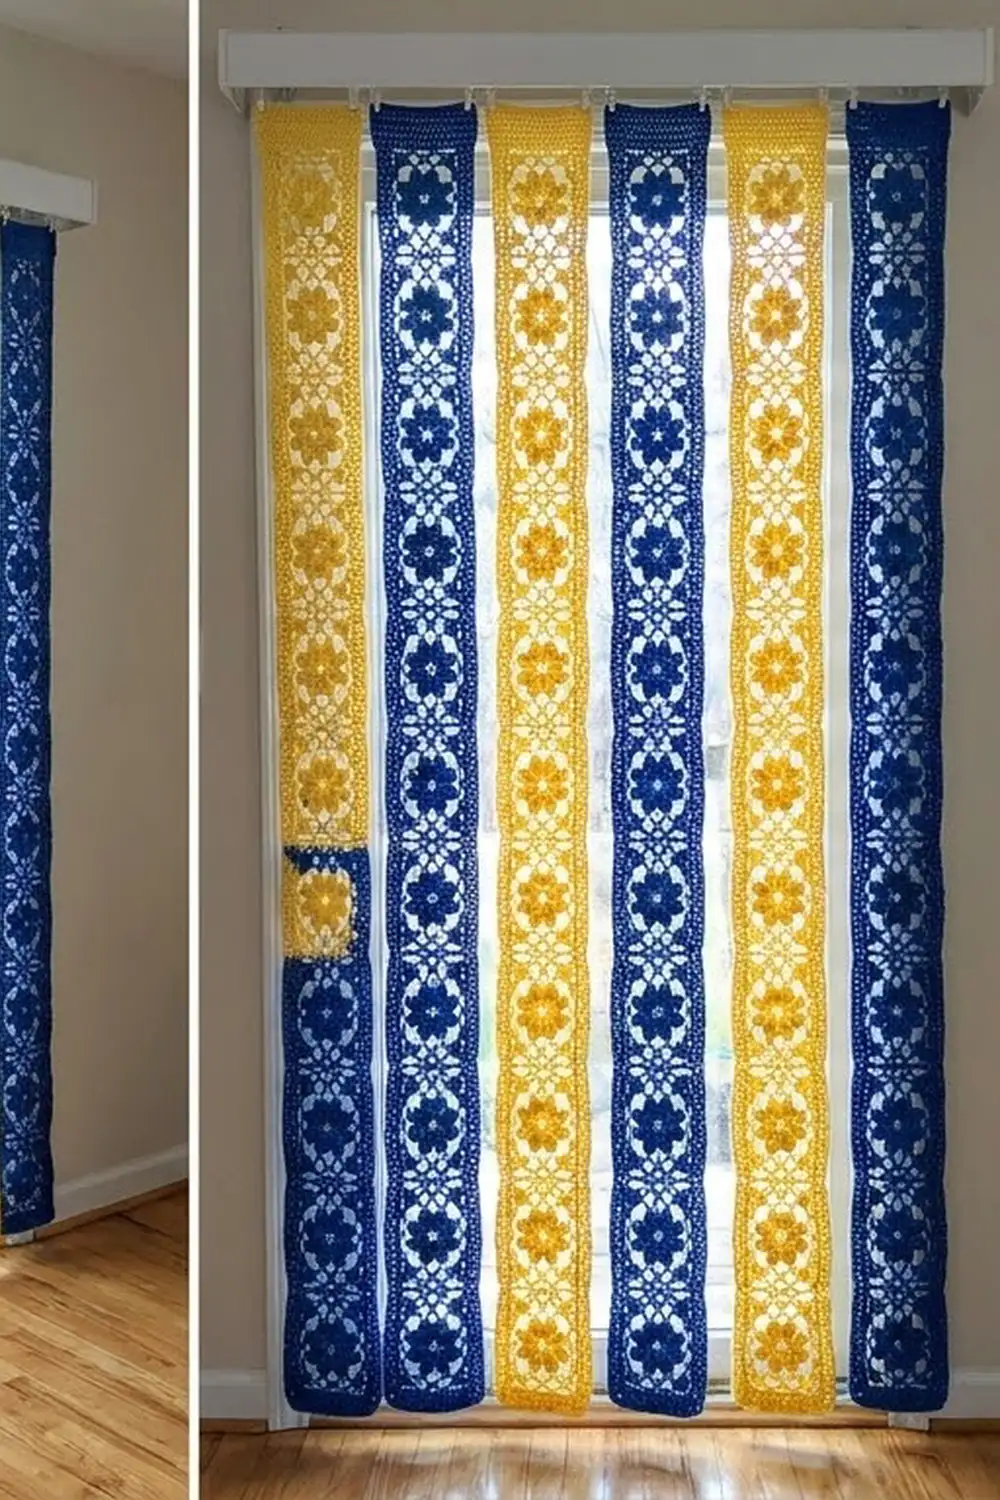
The set uses two bold colors, cobalt blue and buttery yellow, hung in alternating order. Sunlight passes through the lattice, so from inside the room the flowers glow like stained glass. The solid edges keep each slat crisp and straight.
This pattern uses US crochet terms. Each finished slat measures 3.5 in (8.9 cm) wide and 73.5 in (186.7 cm) long, including the header. The set shown has 10 slats: 5 blue and 5 yellow.
You make square flower motifs and join them into a single column with join-as-you-go on the last round. Then you work a 2-round border around the strip and add a header with a small eyelet for the blind clip. The slats are not joined to each other; each one hangs on its own clip.
Finished Size and Construction
- Finished slat size: 3.5 in x 73.5 in (8.9 cm x 186.7 cm), including header
- Skill level: Intermediate
- Terminology: US crochet terms
- Yarn weight: DK / light (3), cotton or cotton blend
- Hook: 3.5 mm (E-4)
- Number of pieces: 240 motifs (120 blue, 120 yellow), forming 10 separate slats
- Layout: each slat is 1 motif wide x 24 motifs tall; the slats hang side by side in alternating colors
- Motif size: 3 in (7.6 cm) square
- Strip size before border: 3 in x 72 in (7.6 cm x 182.9 cm)
- Border depth: 0.25 in (0.6 cm) per side, 2 rounds
- Header depth: 1 in (2.5 cm), 6 rows
To change the drop, add or remove motifs. Each motif changes the length by 3 in (7.6 cm).
Materials
Choose a smooth mercerized cotton or cotton-acrylic DK. Cotton holds the lattice open, resists sagging and keeps its color in a sunny window. Avoid fuzzy yarns, which blur the petals and trap dust.
- Cobalt blue (Color A): 850 g, about 1,955 m (approx. 230 m per 100 g)
- Yellow (Color B): 850 g, about 1,955 m
Each slat uses roughly 156 g (about 360 m): about 6 g per motif plus 12 g for the border and header. These quantities include a margin of about 10 percent for swatching and dye-lot safety. Buy each color from a single dye lot.
Tools:
- 3.5 mm (E-4) crochet hook
- Tapestry needle
- Stitch markers
- Tape measure
- Blocking mats and rust-proof pins
- Spray bottle
- 10 vertical blind clips (or the clips from your existing track)
Abbreviations (US Terms)
- ch – chain
- sl st – slip stitch
- sc – single crochet
- hdc – half double crochet
- dc – double crochet
- sp(s) – space(s)
- st(s) – stitch(es)
- RS – right side
Petal: (sc, hdc, 3 dc, hdc, sc) all in the same ch-3 sp. One petal = 7 sts.
Back post anchor sc: working behind the petals, insert the hook from the back around the post of the named stitch from an earlier round. Yo, pull up a loop, yo, pull through both loops.
Gauge and Checkpoints
Make one complete motif first. Block it lightly and measure it.
- After Round 1: the ring is about 0.5 in (1.3 cm) across.
- After Round 3: the flower is about 2 in (5.1 cm) from one petal tip to the opposite petal tip.
- After Round 5: the square is about 2.75 in (7.0 cm) across.
- After Round 6: the square is 3 in (7.6 cm) across.
Border gauge: 17 sc = 3 in (7.6 cm) along a motif side.
If your motif is larger than 3 in (7.6 cm), go down to a 3.25 mm (D-3) hook. If it is smaller, go up to 3.75 mm (F-5). An error of just 1/8 in (0.3 cm) per motif adds up to 3 in (7.6 cm) over a 24-motif slat.
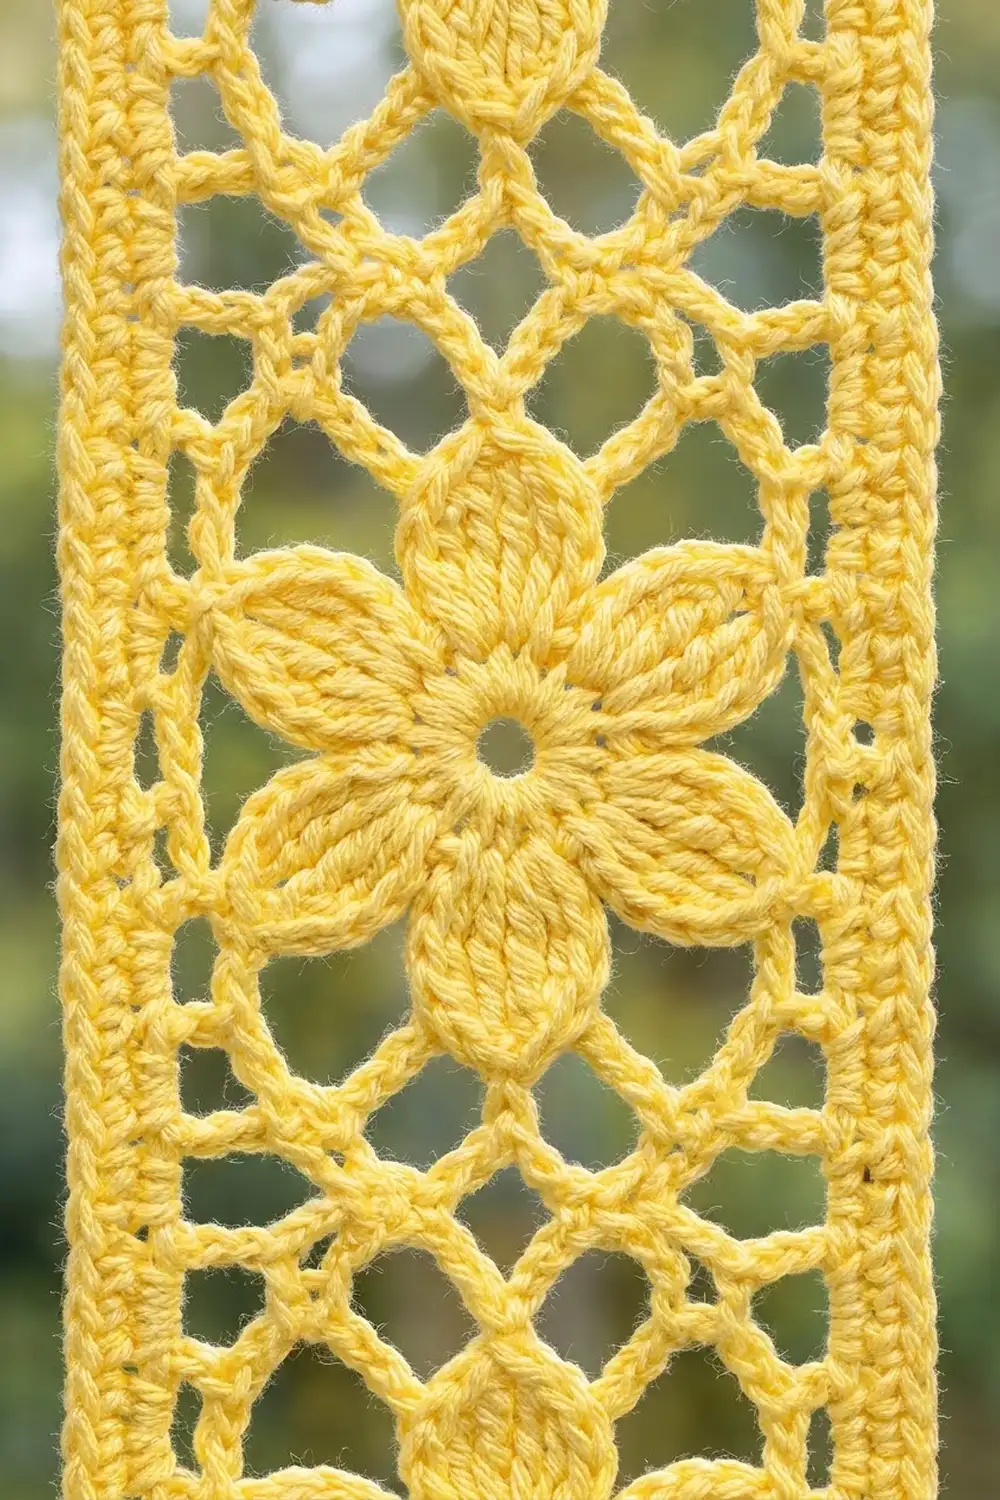
Flower Lattice Motif
Make each motif in Color A or Color B. Work with RS facing throughout.
Round 1: Make a magic ring, ch 1, work 12 sc into the ring, sl st to first sc. (12 sc)
Round 2: Ch 1, sc in same st, ch 3, skip next st, *sc in next st, ch 3, skip next st; repeat from * 4 more times, sl st to first sc. (6 sc, 6 ch-3 sps)
Round 3: Sl st into first ch-3 sp, ch 1, work a Petal in the same sp and in each remaining ch-3 sp, sl st to first sc. (6 Petals, 42 sts)
The Round 2 sc now sit behind the flower, one between each pair of petals.
Round 4: Sl st in next hdc, then sl st in next 2 dc to reach the center dc of the petal. Ch 1, sc in same center dc, ch 4, back post anchor sc around the next Round 2 sc, ch 4, *sc in center dc of next petal, ch 4, back post anchor sc around next Round 2 sc, ch 4; repeat from * 4 more times, sl st to first sc. (12 sc, 12 ch-4 loops)
This round builds the ring of open loops around the flower.
Round 5 (squaring round): Sl st into first ch-4 loop, ch 3 (counts as dc), (2 dc, ch 3, 3 dc) in same loop, ch 3, sc in next loop, ch 5, sc in next loop, ch 3, *(3 dc, ch 3, 3 dc) in next loop, ch 3, sc in next loop, ch 5, sc in next loop, ch 3; repeat from * 2 more times, sl st to top of beginning ch-3.
(24 dc, 8 sc, 4 corner ch-3 sps, 8 side ch-3 sps, 4 ch-5 sps)
Each side uses exactly 3 of the 12 loops: 1 corner loop and 2 side loops.
Round 6 (lattice edge): Sl st in next 2 dc and into the corner ch-3 sp. Ch 1, (sc, ch 2, sc) in corner sp, ch 3, sc in next ch-3 sp, ch 3, sc in ch-5 sp, ch 3, sc in next ch-3 sp, ch 3, *(sc, ch 2, sc) in next corner sp, ch 3, sc in next ch-3 sp, ch 3, sc in ch-5 sp, ch 3, sc in next ch-3 sp, ch 3; repeat from * 2 more times, sl st to first sc. Fasten off (first motif only).
Per side count: 5 sc + 4 ch-3 = 17 sts per side, counting each chain as 1 st and including both corner sc. The 4 corner ch-2 sps are not part of this count.
The ch-3 at each end of a side skips the 3 dc of the Round 5 corner. That skip opens the lattice windows around the flower.
Make All Pieces
Each slat is 24 motifs in one color.
- Color A (blue): 5 slats x 24 motifs = 120 motifs
- Color B (yellow): 5 slats x 24 motifs = 120 motifs
- Total: 240 motifs
Each slat (1 wide x 24 tall), top to bottom:
[M1]
[M2]
[M3]
 ...
[M23]
[M24]
The set as hung, left to right:
A B A B A B A B A B
You can make Rounds 1–5 of every motif in advance, then work Round 6 as you join.
Joining (Join-As-You-Go)
Motifs join only along their top and bottom edges, which builds a single column. The long sides stay free for the border.
Work Round 6 of the first motif completely. For each new motif, work Round 6 as written until you reach the side that will touch the previous motif, then join that side:
- First corner: sc, ch 1, sl st into the matching corner ch-2 sp of the previous motif, ch 1, sc in the same corner sp of the current motif.
- Each of the 4 side ch-3s: ch 1, sl st into the matching ch-3 sp of the previous motif, ch 1, then continue as written.
- Second corner: sc, ch 1, sl st into the matching corner ch-2 sp of the previous motif, ch 1, sc.
Finish Round 6 as written and fasten off.
Stitch-to-stitch logic: each join swaps the middle chain of a ch-3 (or the gap in a ch-2) for a sl st, so each side still has exactly 17 sts. Every seam has 6 connection points: 2 corners and 4 side sps.
Tension: keep the sl st joins snug but not tight. If the joins pull tighter than the lattice, the slat will narrow at every seam.
Size checkpoint: after 8 motifs, the column should measure 24 in (61.0 cm) long and 3 in (7.6 cm) wide, laid flat without stretching. At 24 motifs it should measure 72 in (182.9 cm).
Border
Use the same color as the slat. Border gauge: 17 sc = 3 in (7.6 cm).
Starting counts:
- Each long side: 24 motifs x 17 sts = 408 sts
- Each short side: 1 motif x 17 sts = 17 sts
At each seam on the long sides, the two joined corner ch-2 sps sit next to each other. Do not work any stitches into them. Go straight from the last sc of one motif to the first corner sc of the next. No stitches are added at the seams.
Round 1: With RS facing, join yarn in any outer corner ch-2 sp. Ch 1, 3 sc in the corner sp. Along each side, work 1 sc in each sc and 3 sc in each ch-3 sp. Work 3 sc in each of the 4 outer corner sps. Sl st to first sc.
(408 sc on each long side, 17 sc on each short side, 3 sc in each corner; total 2 x 408 + 2 x 17 + 4 x 3 = 862 sc)
Round 2: Ch 1, sc in each sc around, working 3 sc in the center sc of each corner group. Sl st to first sc. Fasten off.
(Between the corner center sts: 410 sc on each long side and 19 sc on each short side, plus 3 sc at each corner; total 2 x 410 + 2 x 19 + 4 x 3 = 870 sc)
Why the math works: Round 1 matches each motif side stitch for stitch (5 sc + 12 sc from the four ch-3s = 17), so the border fits the lattice without ruffling. Round 2 adds exactly 2 sts per corner (862 + 8 = 870), which keeps the corners square. The two sc rounds add 0.25 in (0.6 cm) per side, so the width becomes 3.5 in (8.9 cm) and the length 72.5 in (184.2 cm).
Header
The header is a solid sc band across the top short edge. It gives the blind clip something firm to grip.
Row 1: With RS facing, join yarn in the center sc of the top right corner. Ch 1, sc in same st, sc in each of next 19 sc, sc in center sc of top left corner, turn. (21 sc)
Rows 2–3: Ch 1, sc in each st across, turn. (21 sc)
Row 4 (eyelet row): Ch 1, sc in next 10 sts, ch 1, skip 1 st, sc in next 10 sts, turn. (20 sc + 1 ch = 21 sts)
Row 5: Ch 1, sc in each sc and in the ch-1 sp, turn. (21 sc)
Row 6: Ch 1, sc in each st across. (21 sc) Fasten off.
The header adds 1 in (2.5 cm), for a finished length of 73.5 in (186.7 cm). Weave in all ends along the solid border and header. Never weave them through the lattice, where they would show against the light.
Final Blocking
- Soak the slat in cool water for 10 minutes.
- Gently press out the water in a towel. Do not wring.
- Lay the slat on blocking mats. If your mats are short, block it in sections of 8 motifs.
- Pin each long edge straight at 3.5 in (8.9 cm) wide. Keep a tape measure along the full length so the slat stays 72.5 in (184.2 cm) up to the base of the header.
- Open each flower by pinning the 6 petal tips lightly outward, then pin the corners of each lattice window.
- Pin the header flat to 3.5 in x 1 in (8.9 cm x 2.5 cm).
- Let it dry completely, at least 24 hours, before you unpin it.
Final Quality-Control Checklist
- Every motif measures 3 in (7.6 cm) square.
- Each slat has exactly 24 motifs.
- Every seam has 6 sl st connections and no gaps.
- Border Round 1 has 862 sc; Round 2 has 870 sc.
- The width is 3.5 in (8.9 cm) along the whole length, with no narrowing at the seams.
- The header has 21 sts per row and a centered eyelet.
- The finished slat is 73.5 in (186.7 cm) long.
- All 10 slats match in length to within 0.5 in (1.3 cm).
- All ends are woven into solid areas.
Troubleshooting
Petals cup forward. Round 3 is tighter than Round 2. Loosen the petal dc, or go up half a hook size for Round 3 only.
Round 4 loops flatten the flower. The ch-4 is too short for your tension. Try ch 5 and keep Round 5 as written.
Motif is not square. Check that each side of Round 5 uses exactly 3 loops.
Long sides ruffle after the border. You probably worked stitches into the seam corner sps. Remove them so each long side has exactly 408 sc.
Long sides pull in. Work border Round 1 with a 3.75 mm (F-5) hook.
Slats hang at different lengths. Re-block the longer slats, since cotton relaxes when wet. If the difference is more than 1 in (2.5 cm), recount the motifs.
Clip tears the header. Thread the clip hook through the eyelet instead of clamping the edge.
Care
Hand wash in cool water and lay flat to dry, re-pinning the edges straight. Between washes, vacuum lightly with a brush attachment to remove dust.
Final Notes
The whole project rests on one chain of measurements. One motif is 3 in (7.6 cm) square with 17 sts per side. Twenty-four motifs make a 3 in x 72 in (7.6 cm x 182.9 cm) column. The 2-round border brings it to 3.5 in x 72.5 in (8.9 cm x 184.2 cm), and the header finishes the slat at 3.5 in x 73.5 in (8.9 cm x 186.7 cm). Check the first motif and the first 8-motif column carefully, and every slat after that will match.
Happy crocheting!