

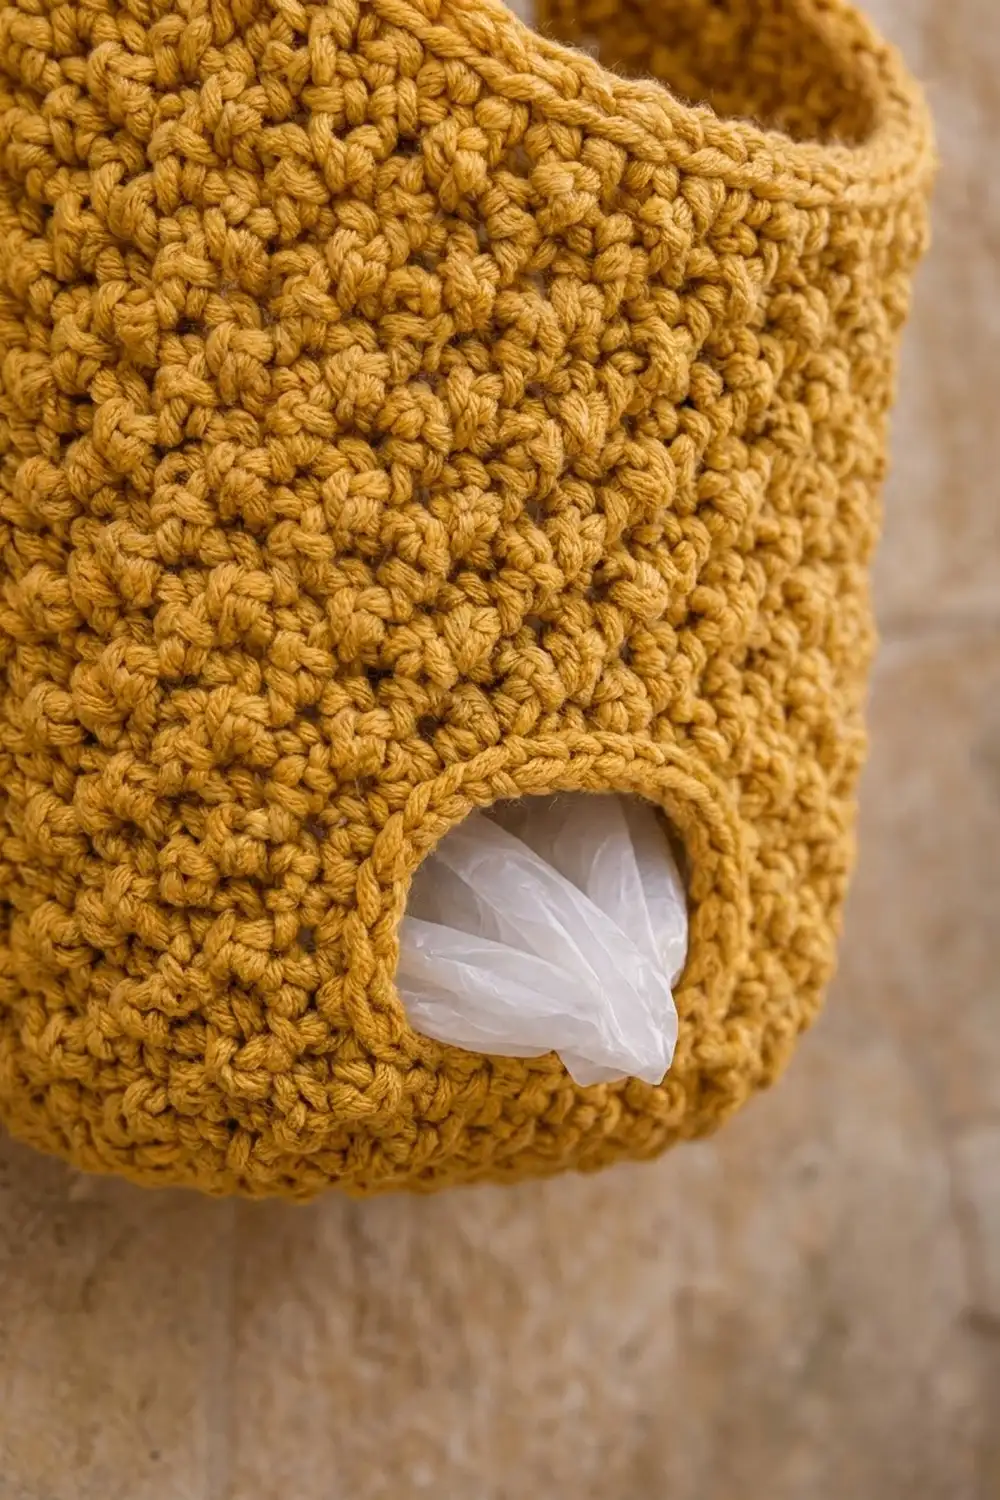
The Sunny Pantry Bag Holder keeps grocery bags tidy in a warm, mustard-yellow tube that hangs from a wall hook. You stuff bags in through the wide slanted top and pull them out one at a time through an oval slot near the bottom.
The bumpy, pebbled texture comes from alternating single crochet and double crochet. It looks like lemon peel, feels sturdy, and hides small tension differences well. Mustard yellow looks great in a sunny kitchen, and rust red makes an equally good second holder.
This pattern uses US crochet terms. The finished holder measures about 6.9 in (17.5 cm) wide when flat and 14.25 in (36.2 cm) tall including the hanging loop. The front edge stands 8.25 in (21.0 cm) tall.
You make it in one piece, starting with an oval base in single crochet. The body is worked upward in joined rounds, with a few turned rows to leave the dispensing slot open. Then a back panel tapers into a strap, and you finish with an edging and a hanging loop. There is no sewing apart from weaving in ends.
Finished Size and Construction
- Finished size: 6.9 in (17.5 cm) wide flat × 14.25 in (36.2 cm) tall including the loop
- Skill level: Easy+ (rounds, simple turned rows, decreases)
- Terminology: US crochet terms
- Yarn weight: Worsted (#4), cotton or cotton blend
- Hook: 5.0 mm (H-8)
- Number of pieces: 1
- Layout: A single seamless tube with an oval base
- Base size: about 5.5 in × 2.25 in (14.0 cm × 5.7 cm)
- Size before edging: front height 8 in (20.3 cm); back height to the top of the strap 12 in (30.5 cm)
- Edging depth: 0.25 in (0.6 cm), one round of sc
Materials
Choose a smooth worsted-weight cotton or cotton-acrylic blend. Cotton holds the holder’s shape and shows off the pebble texture. Avoid fuzzy yarns, because they blur the bumps.
- Mustard yellow: 110 g / 190 m (208 yd)
- Optional rust red (for a second holder): 110 g / 190 m (208 yd)
These quantities include a margin of about 20% for your gauge swatch and for differences in tension.
Tools:
– 5.0 mm (H-8) crochet hook
– 4 locking stitch markers
– Tapestry needle
– Scissors
– Tape measure
– Rust-proof blocking pins and a spray bottle
Abbreviations (US Terms)
- ch: chain
- sl st: slip stitch
- st(s): stitch(es)
- sc: single crochet
- dc: double crochet
- sc2tog: single crochet 2 together (insert hook in next st, yarn over and pull up a loop; repeat in the following st; yarn over and pull through all 3 loops)
- BLO: back loop only
- RS / WS: right side / wrong side
Special stitch – Pebble pattern (sc/dc alternating): Every stitch follows the stitch below it: work a sc into each dc and a dc into each sc. The short sc next to the tall dc pushes the dc outward, which makes the bumps. Always keep a 1:1 rhythm, so the stitch count never changes. The beginning ch 1 never counts as a stitch.
Gauge and Checkpoints
- Base gauge: 14 sc and 16 rounds = 4 in (10.2 cm)
- Body gauge: 14 sts and 14 rounds of Pebble pattern = 4 in (10.2 cm)
Before you start the holder, chain 21 and work 16 rows of Pebble pattern on 20 sts. Measure the middle of the swatch. It should be 14 sts and 14 rows across 4 in (10.2 cm). This holder is only one piece, so the swatch is your test piece.
Checkpoints, measured flat:
– After Rnd 4: the base is about 5.5 in × 2.25 in (14.0 cm × 5.7 cm), and the outer edge is about 13.7 in (34.8 cm) around.
– After Rnd 11: the body is about 2 in (5.1 cm) tall from the base fold.
– After Rnd 16: the body is about 3.4 in (8.6 cm) tall.
– After Rnd 32: the body is 8 in (20.3 cm) tall and 6.9 in (17.5 cm) wide.
– After Row 42: the back is 10.9 in (27.7 cm) tall.
– After Row 46: the back is 12 in (30.5 cm) tall.
If your work is too big (fewer sts per 4 in), go down 0.5 mm in hook size. If it is too small, go up 0.5 mm. Small differences change the bag capacity, not the function. However, a width more than 0.5 in (1.3 cm) off makes the slot sit off-center visually.
Base
Work in joined rounds with the RS facing you.
Ch 15.
Rnd 1: Sc in 2nd ch from hook and in next 12 ch (13 sc), 3 sc in last ch. Working along the opposite side of the chain, sc in next 12 ch, then 2 sc in the last ch (the same ch as the first sc). Join with sl st to first sc. (30 sts)
Layout: 3 sts at each curved end and 12 sts along each straight side.
Rnd 2: Ch 1, 2 sc in first st, sc in next 12 sts, 2 sc in each of next 3 sts, sc in next 12 sts, 2 sc in each of last 2 sts. Join. (36 sts)
Rnd 3: Ch 1, 2 sc in first st, sc in next st, sc in next 12 sts, [2 sc in next st, sc in next st] 3 times, sc in next 12 sts, [2 sc in next st, sc in next st] 2 times. Join. (42 sts)
Rnd 4: Ch 1, 2 sc in first st, sc in next 2 sts, sc in next 12 sts, [2 sc in next st, sc in next 2 sts] 3 times, sc in next 12 sts, [2 sc in next st, sc in next 2 sts] 2 times. Join. (48 sts)
Layout check: sts 5–16 form the front straight side, sts 17–28 one curved end, sts 29–40 the back straight side, and sts 41–48 plus 1–4 the other curved end. The join sits at a curved end, which becomes the side of the holder.
Body
Rnd 5 (turning ridge): Ch 1, sc in BLO of each st around. Join. (48 sts)
The unworked front loops make a crisp fold line where the base meets the wall.
Rnd 6: Ch 1, [sc in next st, dc in next st] around. Join. (48 sts: 24 sc + 24 dc)
Rnds 7–11: Ch 1, work Pebble pattern around (sc in each dc, dc in each sc). Join. (48 sts each round)
Fasten off after Rnd 11.
Dispensing Slot (Rows 12–16)
The slot spans sts 7–14, which is the center of the front side.
With the RS facing, count 14 sts from the join and rejoin the yarn in the 15th st.
Row 12 (RS): Ch 1, work Pebble pattern in sts 15–48, then continue across the join in sts 1–6. Leave sts 7–14 unworked. Turn. (40 sts)
Rows 13–15: Ch 1, work Pebble pattern across. Turn. (40 sts each row)
You end Row 15 at the edge beside the gap, with the WS facing.
Rnd 16 (RS): Turn so the RS faces you. Ch 1, work Pebble pattern across all 40 sts, ch 8 across the gap, and join with sl st to the first st. (48 sts: 40 sts + 8 ch)
This round has a new start point. From now on, st 1 is the first st of Rnd 16, and the slot chain sits in positions 41–48.
Rnd 17: Ch 1, work Pebble pattern over the 40 sts. In the 8 chains, keep alternating sc and dc, working into the top loop of each ch. Join. (48 sts)
Rnds 18–32: Ch 1, work Pebble pattern around. Join. (48 sts each round)
Checkpoint: the body is 8 in (20.3 cm) tall and 6.9 in (17.5 cm) wide when flattened, with the slot centered on the front. Place markers in st 9 and st 32. Sts 9–32 form the back, and sts 33–48 plus 1–8 form the front. Fasten off.
Back Panel and Strap
Row 33 (RS): Rejoin the yarn in st 9. Ch 1, work Pebble pattern in sts 9–32. Turn. (24 sts)
Row 34: Ch 1, sc2tog, work Pebble pattern to the last 2 sts, sc2tog. Turn. (22 sts)
Rows 35–42: Repeat Row 34. Each row decreases by 2 sts and gives its own total: Row 35 has 20 sts, Row 36 has 18, Row 37 has 16, Row 38 has 14, Row 39 has 12, Row 40 has 10, Row 41 has 8 and Row 42 has 6.
After each sc2tog, keep following the stitch below: sc into dc and dc into sc. The texture stays even this way.
Checkpoint: the back measures 10.9 in (27.7 cm) from the base fold, and the panel is 2.9 in (7.4 cm) tall.
Rows 43–46 (strap): Ch 1, work Pebble pattern across. Turn. (6 sts each row)
The strap is 1.7 in (4.3 cm) wide, and the back now measures 12 in (30.5 cm). Do not fasten off.
Edging and Hanging Loop
Edging gauge: 14 sc = 4 in (10.2 cm). In this gauge, one Pebble row is about 0.29 in (0.7 cm) tall, which is the same as the width of one sc. That makes one sc per row end the correct ratio, and the sides will lie flat without ruffling or pulling.
Edging round (RS): Turn to the RS. Ch 1 and go around the opening:
– Top of strap: sc in each of the 6 sts.
– Down the side: 14 sc, one in each row end of Rows 46–33.
– Front: sc in each of the 24 front sts (sts 33–48 and 1–8 of Rnd 32).
– Up the other side: 14 sc, one in each row end of Rows 33–46.
Join to the first sc. Total: 6 + 14 + 24 + 14 = 58 sts.
The edging adds 0.25 in (0.6 cm), bringing the front to 8.25 in (21.0 cm) and the back to 12.25 in (31.1 cm).
Hanging loop: Sl st into the first sc of the strap top. Ch 16, then sl st into the 6th sc of the strap top. Turn, work 20 sc into the ch-16 loop, and sl st into the strap. Fasten off.
The loop is about 2 in (5.1 cm) tall, so the overall height is 14.25 in (36.2 cm).
Slot edging: With the RS facing, join in one bottom corner of the slot.
– Bottom edge: 8 sc, one into each unworked st of Rnd 11.
– Side: 4 sc, one per row end of Rows 12–15.
– Top edge: 8 sc, one into the free bottom loop of each chain.
– Other side: 4 sc, one per row end.
Join. (24 sts) The finished slot is about 2.3 in × 1.1 in (5.8 cm × 2.8 cm). Fasten off and weave in all ends.
Final Blocking
- Spray the holder until it is evenly damp, but not soaking.
- Stuff it firmly with plastic bags or a rolled towel so the tube rounds out.
- Shape the base into a flat oval, about 5.5 in × 2.25 in (14.0 cm × 5.7 cm).
- Lay the holder on its back. Pin the slanted edges straight and the strap flat at 1.7 in (4.3 cm) wide.
- Pat the slot into a smooth oval.
- Let it dry completely, at least 12 hours, then remove the pins and the stuffing.
Final Quality-Control Checklist
- The base is flat and oval, and the Rnd 5 ridge shows as a clean fold line.
- The slot is centered on the front, about 2 in (5.1 cm) above the base.
- The body measures 6.9 in (17.5 cm) wide when flat.
- The front edge is 8.25 in (21.0 cm) and the back is 12.25 in (31.1 cm).
- Both slanted edges mirror each other, with 14 edging sc on each side.
- The hanging loop is secure and centered on the strap.
- All ends are woven in along the WS.
Troubleshooting
- The base cups upward: your tension is tight. Loosen up or go up 0.5 mm for the base only.
- The base ripples: your tension is loose. Go down 0.5 mm for Rnds 1–4.
- The pebble texture looks flat or ribbed: you stacked dc on dc. Check that every dc sits on a sc.
- The slot is off-center: you rejoined at the wrong stitch. Recount 14 sts from the Rnd 11 join.
- The slanted edges ruffle: you worked more than one sc per row end. Rework the side with exactly 14 sc.
- The strap twists: block it flat under a heavy book while it dries.
- The loop stretches: add a second round of sl sts around the loop.
Care
Hand wash in cool water, press out excess moisture in a towel, and dry flat while stuffed to keep the shape. Avoid the dryer, because it softens the cotton and makes the tube slump.

Final Notes
Your measurement chain:
– The base is 5.5 in × 2.25 in (14.0 cm × 5.7 cm), with 48 sts and a 13.7 in (34.8 cm) edge.
– The body is 8 in (20.3 cm) tall and 6.9 in (17.5 cm) wide.
– The back panel rises to 10.9 in (27.7 cm) and the strap to 12 in (30.5 cm).
– The edging adds 0.25 in (0.6 cm), and the loop brings the total to 14.25 in (36.2 cm).
If each checkpoint matches, the slot, the slant and the strap all fall into place. Make one in mustard, another in rust, and enjoy a calmer kitchen drawer.
Happy crocheting!