

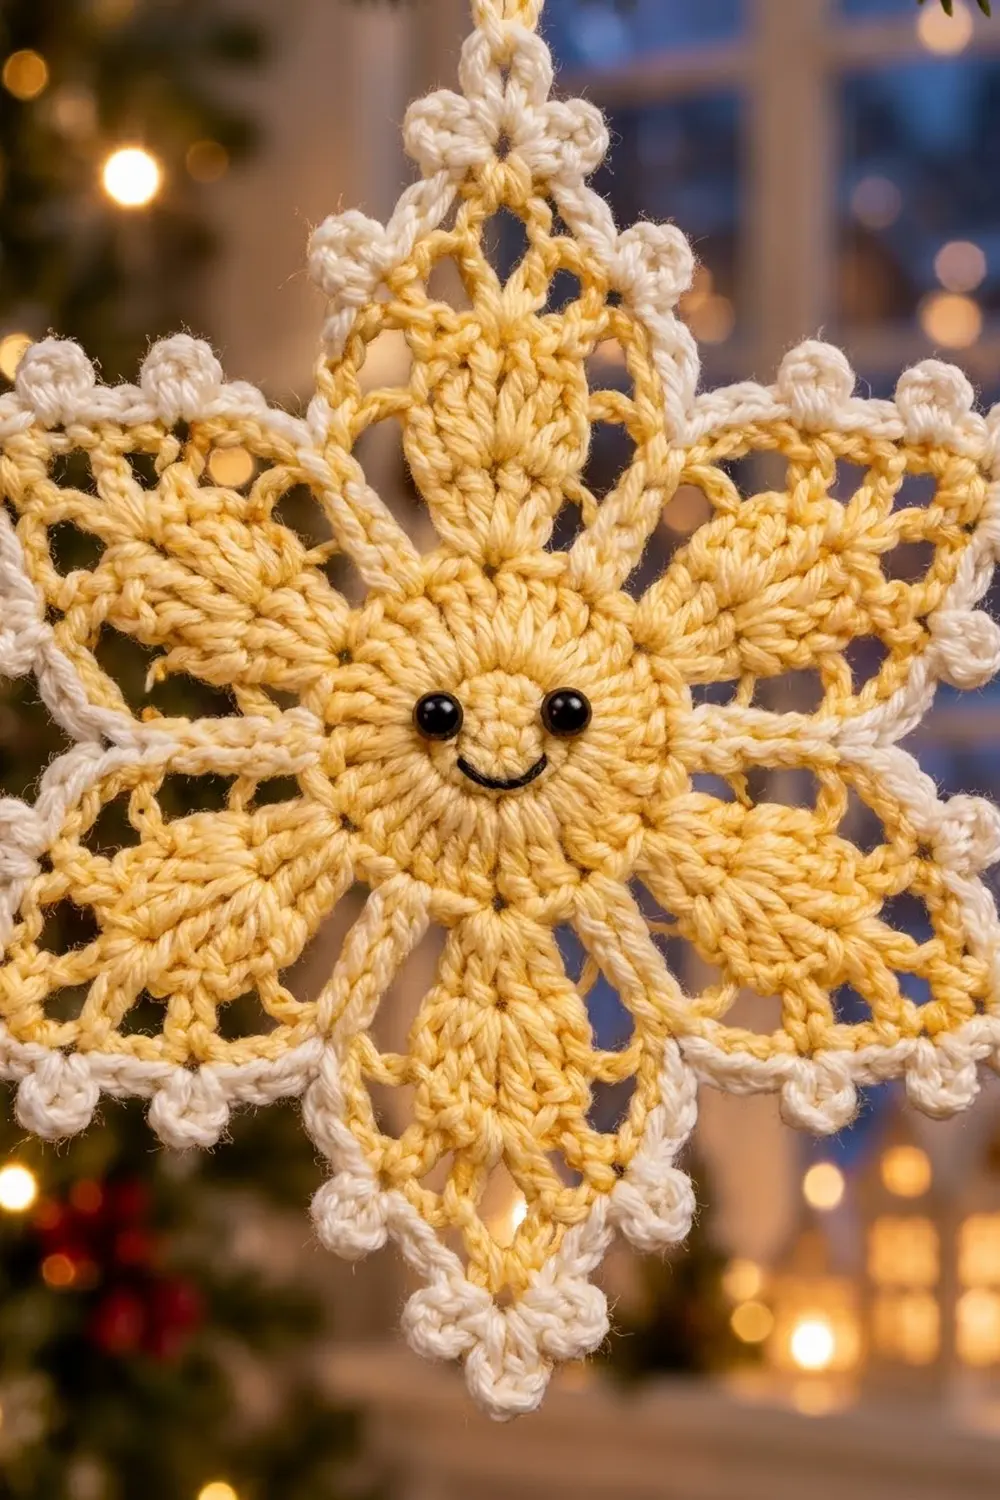
This happy little snowflake mixes lace with a bit of personality. A solid butter-yellow face with bead eyes and a stitched smile sits in the center. Six ribbed leaf petals spread out from it toward six sharp star points, with open chain lattice in between. A crisp cream picot edge frames the whole star so it catches the light on a tree.
The palette is soft and warm: pale butter yellow for the body and creamy ivory for the edging and hanging loop. Black is used only for the face details. The style is classic thread-lace snowflake with a cute twist, so it suits both traditional and playful holiday decor.
The pattern uses US crochet terms. The finished ornament measures about 5.5 in (14.0 cm) from point to point and about 4 in (10.2 cm) from valley to valley after blocking.
Construction is simple and seamless. You work the face in the round, grow six petals with front post ribs, and add chain lattice between them. Then you close each petal into a point and work one solid round to shape the star. Two cream border rounds add the picot edge, and a chain loop finishes it. You add the face details last.
Finished Size and Construction
- Finished size: 5.5 in (14.0 cm) point to point; 4 in (10.2 cm) valley to valley
- Skill level: Intermediate (front post stitches, decreases, chain lattice)
- Terminology: US crochet terms
- Yarn weight: Sport weight (#2) mercerized cotton
- Hook: 2.75 mm (US C-2)
- Number of pieces: 1 (single motif, worked in one piece)
- Layout: Single six-pointed star, worked in the round
- Piece size: 5.5 in (14.0 cm) point to point
- Size before border: 4.75 in (12.1 cm) point to point after Round 10
- Border depth: about 3/8 in (1.0 cm) at each point (2 rounds)
Materials
Use a smooth mercerized cotton. It shows the front post ribs and picots clearly and holds its shape well after starching. Acrylic works, but the points will be softer.
- Color A, butter yellow: 10 g (about 30 m)
- Color B, cream/ivory: 5 g (about 15 m)
- Black embroidery floss: about 18 in (45.7 cm)
- Two black beads, 4 mm, for the eyes (or embroidered French knots for a child-safe version)
Tools:
- 2.75 mm (US C-2) crochet hook
- Tapestry needle
- Fine sewing needle and black thread (for the beads)
- Stitch marker
- Rustproof pins, a foam blocking mat, and spray starch or a fabric stiffener
All quantities include a small margin for your gauge swatch, tails, and the hanging loop.
Abbreviations (US Terms)
- ch – chain
- sl st – slip stitch
- sc – single crochet
- dc – double crochet
- sp – space
- sk – skip
- st(s) – stitch(es)
- MR – magic ring
- rep – repeat
Special stitches:
- FPdc (front post double crochet): Yo, insert your hook from front to back to front around the post of the stitch below, yo, pull up a loop, [yo, draw through 2 loops] twice. This makes the raised leaf vein.
- dc2tog: [Yo, insert in next st, yo, pull up a loop, yo, draw through 2] twice, yo, draw through all 3 loops on hook.
- Beginning dc2tog: Ch 2, dc in next st. This counts as a dc2tog over the first 2 sts.
- dc3tog: [Yo, insert in next st, yo, pull up a loop, yo, draw through 2] 3 times, yo, draw through all 4 loops on hook.
- Beginning dc3tog: Ch 2, dc2tog over the next 2 sts. This counts as a dc3tog over the first 3 sts.
- sc3tog: [Insert in next st, yo, pull up a loop] 3 times, yo, draw through all 4 loops.
- Picot: Ch 3, sl st in the 3rd ch from the hook.
Gauge and Checkpoints
Gauge isn’t critical for an ornament, but it controls how sharp and flat the star turns out. Work Rounds 1–3 as a test first.
Gauge: Rounds 1–3 measure 1.5 in (3.8 cm) across, give or take 1/8 in (0.3 cm).
Checkpoints:
- After Round 1: 0.75 in (1.9 cm) across
- After Round 3: 1.5 in (3.8 cm) across
- After Round 6: 2.75 in (7.0 cm) across from petal tip to petal tip
- After Round 9: 4.25 in (10.8 cm) from point to point, lightly stretched
- After Round 10: 4.75 in (12.1 cm) from point to point
- After the border and blocking: 5.5 in (14.0 cm) from point to point
If your piece is too big: go down to a 2.5 mm hook or tighten your chains. If it’s too small: go up to a 3.0 mm hook. If the lattice rounds ruffle, your chains are too loose for your stitches. If the star cups, your chains are too tight.
Pattern
Face (Color A)
Round 1: Make a MR. Ch 3 (counts as dc), work 11 dc in the ring, then sl st to the top of the ch-3. Pull the ring closed. (12 dc)
Round 2: Ch 3 (counts as dc), dc in the same st, then 2 dc in each st around. Sl st to the top of the ch-3. (24 dc)
Round 3: Ch 1, sc in each st around, then sl st to the first sc. (24 sc)
Check that the face lies flat and measures 1.5 in (3.8 cm).
Petals and Lattice (Color A)
Round 4 (petal bases): Ch 3 (counts as dc), 2 dc in the same st. Ch 2, sk next st, sc in next st, ch 2, sk next st, 3 dc in next st. Rep from * 4 more times. To finish, ch 2, sk next st, sc in next st, ch 2, sk last st, and sl st to the top of the ch-3.
(6 groups of 3 dc = 18 dc, 6 sc, 12 ch-2 sps)
Each repeat uses exactly 4 stitches of Round 3, and 6 x 4 = 24.
Round 5: Ch 3 (counts as dc), dc in the same st, FPdc around the next dc, 2 dc in the next dc. Ch 3, sc in the next sc (skip the ch-2 sps), ch 3, 2 dc in the next dc, FPdc around the next dc, 2 dc in the next dc. Rep from * 4 more times. To finish, ch 3, sc in the last sc, ch 3, and sl st to the top of the ch-3.
(6 petals of 5 sts = 30 petal sts, 6 sc, 12 ch-3 sps)
Round 6: Ch 3 (counts as dc), dc in the same st, dc in the next dc, FPdc around the FPdc, dc in the next dc, 2 dc in the last dc of the petal. Ch 4, sc in the next sc, ch 4, then work the next petal the same way: 2 dc in the first dc, dc, FPdc around the FPdc, dc, 2 dc in the last dc. Rep from * 4 more times. To finish, ch 4, sc in the last sc, ch 4, and sl st to the top of the ch-3.
(6 petals of 7 sts = 42 petal sts, 6 sc, 12 ch-4 sps)
This is the widest part of the leaf. The center rib should stand clearly on the right side.
Round 7 (petals narrow, lattice opens): Beginning dc2tog, dc in the next st, FPdc around the FPdc, dc in the next st, dc2tog over the last 2 petal sts. Ch 5, sc in the next ch-4 sp, ch 5, sc in the next ch-4 sp, ch 5, then work the next petal: dc2tog, dc, FPdc, dc, dc2tog. Rep from * 4 more times. To finish, ch 5, sc in the next sp, ch 5, sc in the next sp, ch 5, and sl st to the top of the beginning dc2tog.
(6 petals of 5 sts = 30 petal sts, 12 sc, 18 ch-5 sps)
Round 8: Beginning dc2tog, FPdc around the FPdc, dc2tog. [Ch 5, sc in the next ch-5 sp] 3 times, ch 5, then work the next petal: dc2tog, FPdc, dc2tog. Rep from * 4 more times. To finish, [ch 5, sc in the next ch-5 sp] 3 times, ch 5, and sl st to the top of the beginning dc2tog.
(6 petals of 3 sts = 18 petal sts, 18 sc, 24 ch-5 sps)
Round 9 (petal points): Beginning dc3tog over the 3 petal sts. [Ch 5, sc in the next ch-5 sp] 4 times, ch 5, dc3tog over the next 3 petal sts. Rep from * 4 more times, leaving off the last dc3tog. Sl st to the top of the beginning dc3tog.
(6 dc3tog clusters, 24 sc, 30 ch-5 sps; 5 ch-5 sps per valley)
Star Outline (Color A)
Round 10: Ch 3 (counts as dc), dc in the top of the same cluster, ch 3, 2 dc in the same cluster. This is the first point shell. 5 sc in the next ch-5 sp, 4 sc in the next sp, 3 sc in the center sp, 4 sc in the next sp, 5 sc in the next sp, then (2 dc, ch 3, 2 dc) in the top of the next cluster. Rep from * 4 more times, leaving off the last point shell. Sl st to the top of the ch-3, then fasten off.
Count: Each repeat has 4 dc + (5 + 4 + 3 + 4 + 5) = 21 sc = 25 sts, plus 1 ch-3 tip sp. In total: 24 dc + 126 sc = 150 sts, plus 6 ch-3 tip sps.
The 3-sc center space pulls each valley inward, while the dc shells push the points outward. That’s what creates the star silhouette. Check that it measures 4.75 in (12.1 cm) from point to point.
Border (Color B)
Border gauge: Each border round adds about 3/16 in (0.5 cm) per point, so the two rounds add about 3/8 in (1.0 cm). The ornament grows from 4.75 in (12.1 cm) to about 5.5 in (14.0 cm) from point to point.
How the counts work: One “section” runs from one tip sp to the next. Round 10 gives each section 2 dc + 21 sc + 2 dc = 25 sts. The tip stitches are counted separately from the section stitches, so nothing is counted twice.
Border Round 1: Join Color B with a sl st in any ch-3 tip sp. Ch 1 and work (2 sc, ch 2, 2 sc) in the same sp. Sc in the next 2 dc, sc in the next 9 sc, sc3tog over the 3 center valley sc, sc in the next 9 sc, sc in the next 2 dc, then (2 sc, ch 2, 2 sc) in the next tip sp. Rep from * around, leaving off the last tip group, and sl st to the first sc.
Per section: 25 sts worked as 2 + 9 + 1 (sc3tog) + 9 + 2 = 23 sts.
Per repeat: 23 + 4 tip sc = 27 sc, plus 1 ch-2 sp.
Total: 6 x 27 = 162 sc, plus 6 ch-2 tip sps.
The sc3tog sharpens each valley.
Border Round 2 (picots): Sl st in the next sc and into the ch-2 sp. Ch 1 and work (sc, ch 4, sc) in the same sp. [Sc in the next 3 sts, picot] 8 times, sc in the next 3 sts, then (sc, ch 4, sc) in the next ch-2 sp. Rep from * around, leaving off the last tip group, and sl st to the first sc.
Per section: The 27 sts between tip sps are the 2 sc after the tip, 23 section sts, and 2 sc before the next tip. They are worked as 8 x 3 + 3 = 27 sc, with 8 picots.
Total: 162 + 12 tip sc = 174 sc, 48 picots, 6 ch-4 tip loops.
Why the math works: The picots fall after stitches 3, 6, 9 … 24 of each 27-stitch section. That leaves 3 plain sc at each end, and the picots sit evenly on both sides of stitch 14. Stitch 14 is the sc3tog, so each valley is perfectly symmetric.
Hanging loop: Pick one tip. With Color B, sl st into its ch-4 loop, ch 40 (about 5 in / 12.7 cm), then sl st into the same loop. Fasten off. The loop hangs about 2.5 in (6.4 cm) above the point.
Face Details
- Sew the two beads onto Round 2, about 0.5 in (1.3 cm) apart and just above the center.
- With black floss, backstitch a shallow smile about 0.4 in (1.0 cm) wide across Round 2, below the eyes.
- Knot the threads securely on the wrong side. For small children, use French knots instead of beads.
Weave in all ends and leave nothing longer than 1/4 in (0.6 cm).
Final Blocking
- Wet the ornament, then press it gently in a towel.
- On a foam mat, draw or place a 5.5 in (14.0 cm) circle and mark six points evenly around it (every 60°).
- Pin each tip loop onto a mark.
- Pin each valley inward so that opposite valleys are 4 in (10.2 cm) apart.
- Pin the outermost picots so they point outward.
- Spray with starch, or brush on diluted fabric stiffener.
- Let it dry completely (several hours), then unpin.
Final Quality-Control Checklist
- 5.5 in (14.0 cm) from point to point, and 4 in (10.2 cm) from valley to valley
- Six petals, each with a straight raised FPdc rib
- 48 picots in total, 8 per section, mirrored around each valley
- All six tip loops the same size
- Face centered, eyes level, smile even
- Hanging loop secure, ends woven in invisibly
Troubleshooting
- The star ruffles: your chains are too loose. Re-chain the lattice rounds more firmly or use a smaller hook.
- The center cups: the lattice is too tight. Loosen your chains a little.
- Ribs disappear: make sure every FPdc goes around the post from the front.
- Valleys are rounded: check the 3-sc center space in Round 10 and the sc3tog in Border Round 1.
- Picots are uneven: count 3 sc between picots exactly. Mark the sc3tog as your center reference.
- Points droop: re-block with a stronger starch.
Care
Spot clean or gently hand wash in cool water, then reshape and re-starch while damp. Store flat between tissue paper.
Final Notes
Each stage sets up the next measurement:
- The face is 1.5 in (3.8 cm).
- The petals reach 2.75 in (7.0 cm).
- The petal points reach 4.25 in (10.8 cm).
- The star outline measures 4.75 in (12.1 cm).
- The border brings it to the finished 5.5 in (14.0 cm).
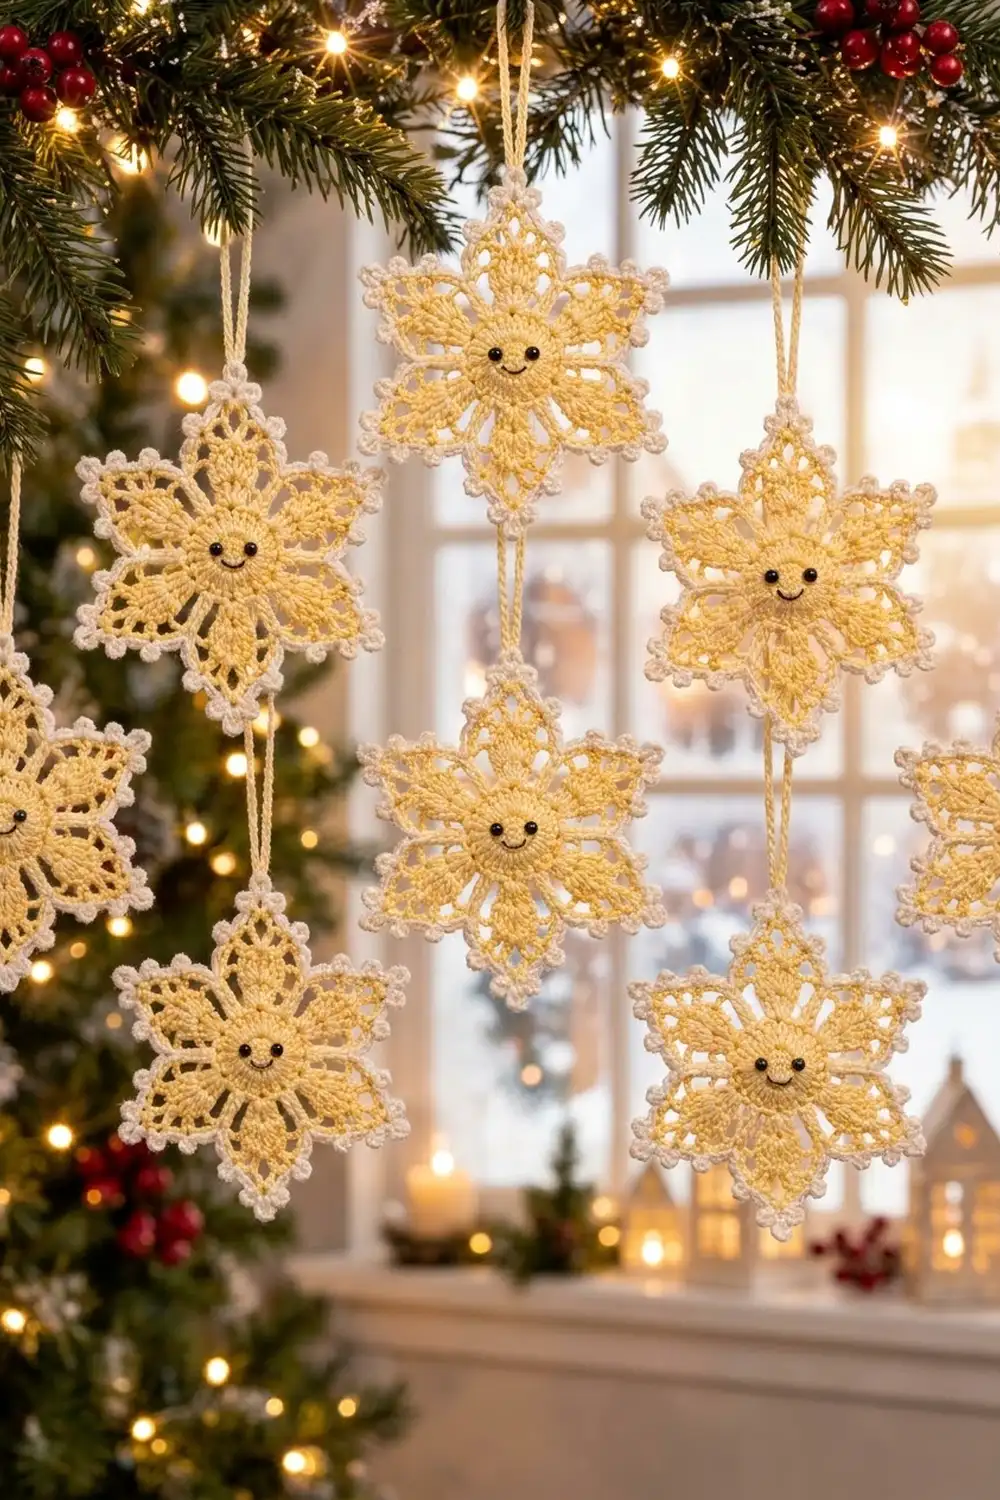
Check each stage before you move on and the star will block crisp and flat. Make several to fill a tree or a window.
Happy crocheting!