

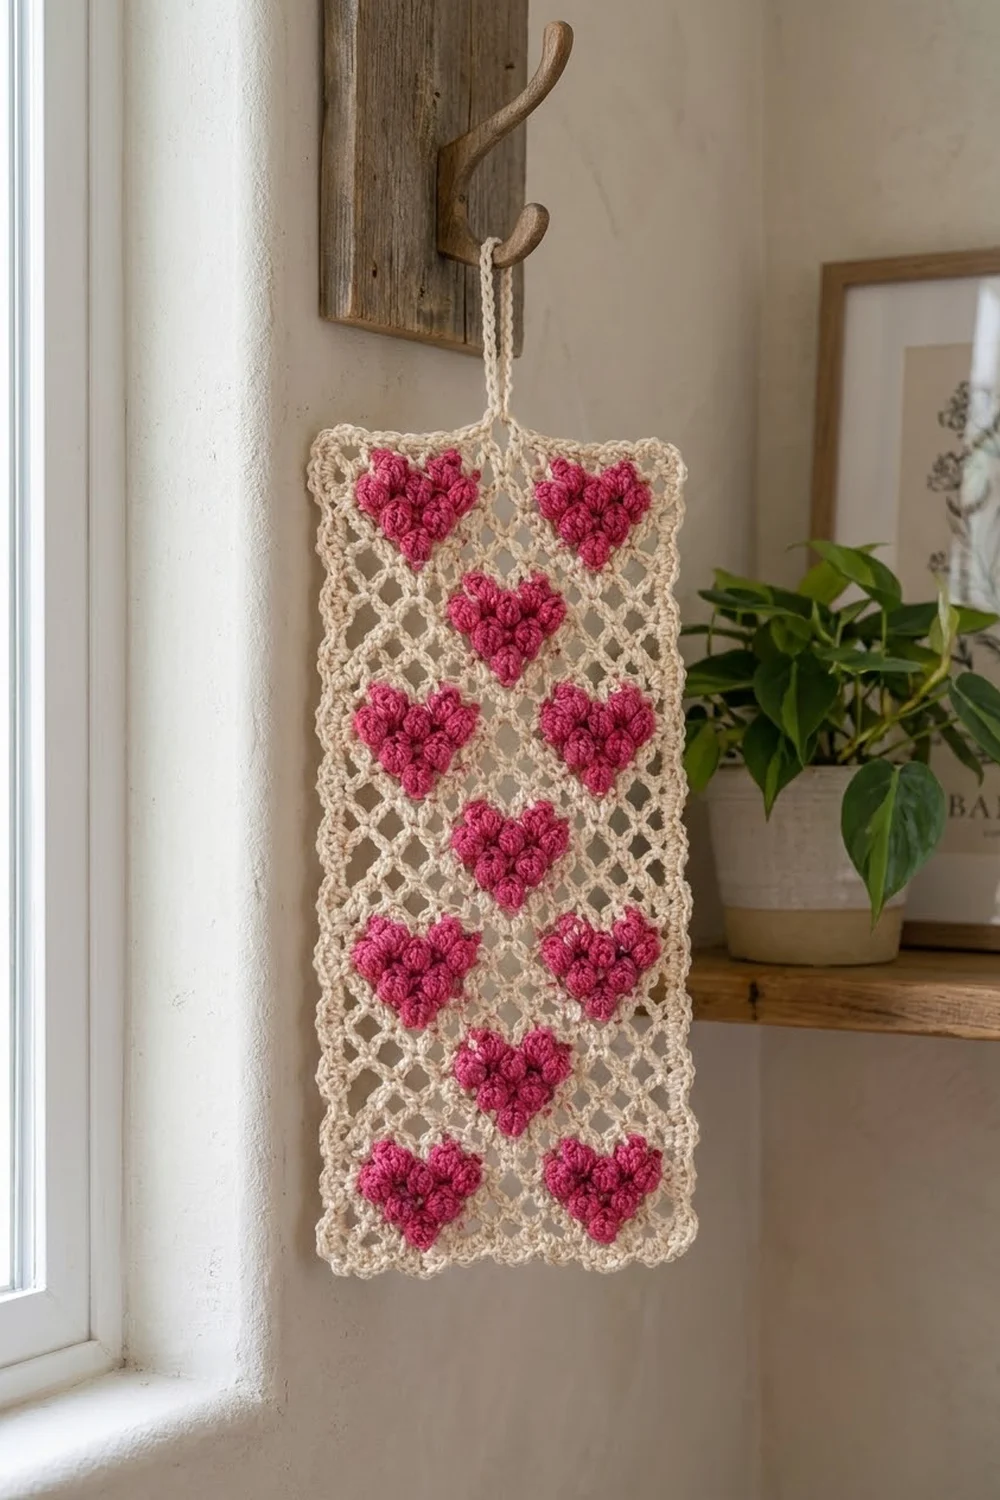
The Sweetheart Lattice Wall Hanging is a slim, rectangular panel of open cream diamond mesh scattered with raised raspberry-pink hearts. Each heart is packed with little bobbles, so it reads as a soft, textured cluster against the airy lattice behind it.
Eleven hearts sit in seven staggered tiers: two, then one in the center, then two, and so on, ending with a pair at the top. A narrow solid cream border frames the mesh, and a small chain loop at the top center lets you hang the panel on a hook or door knob.
This pattern uses US crochet terms. The finished panel measures 8.25 in wide x 16.5 in tall (21.0 cm x 41.9 cm) after blocking.
Construction is simple. You work the cream net-stitch mesh flat in rows, add a two-round single crochet border and the hanging loop, then crochet 11 small bobble hearts in pink and sew each one onto the mesh at marked positions.
Finished Size and Construction
- Finished size: 8.25 in x 16.5 in (21.0 cm x 41.9 cm)
- Skill level: Easy-Intermediate
- Terminology: US crochet terms
- Yarn weight: Worsted (#4), cotton or cotton blend
- Hook: 4.5 mm (US 7)
- Number of pieces: 1 mesh panel + 11 heart appliqués, sewn into one finished piece
- Layout: 11 hearts in 7 staggered tiers (2-1-2-1-2-1-2)
- Heart size: 2 in wide x 1.75 in tall (5.1 cm x 4.4 cm)
- Mesh size before border: 7.25 in x 15.5 in (18.4 cm x 39.4 cm)
- Border depth: 0.5 in (1.3 cm) on every side
Materials
Choose a smooth, mercerized or matte worsted-weight cotton. Cotton holds the open diamonds crisply and shows off the bobbles. Acrylic works too, but the mesh will be softer and stretchier.
- Color A, Cream (mesh, border, hanging loop): 60 g / about 100 m
- Color B, Raspberry Pink (hearts): 40 g / about 70 m
Both quantities include a margin of roughly 20 percent for your gauge swatch and tails.
Tools:
- 4.5 mm (US 7) crochet hook
- Tapestry needle
- 11 locking stitch markers (or scraps of contrasting yarn)
- Scissors
- Measuring tape
- Blocking mat and rust-proof pins
- Spray bottle with water
Abbreviations (US Terms)
- ch – chain
- sl st – slip stitch
- sc – single crochet
- dc – double crochet
- sc2tog – single crochet 2 together
- st(s) – stitch(es)
- sp – space
- RS / WS – right side / wrong side
- bob – bobble (see below)
Special stitch – Bobble (bob): *Yarn over, insert hook in indicated st, yarn over and pull up a loop, yarn over and draw through 2 loops; repeat from * 3 more times in the same st (5 loops on hook), yarn over and draw through all 5 loops. Bobbles are worked on WS rows so they pop out on the RS.
Gauge and Checkpoints
Mesh gauge: 7 ch-5 loops plus the edge stitches = 7.25 in (18.4 cm) wide; 8 rows = 4 in (10.2 cm) tall. Each row is 0.5 in (1.3 cm) tall.
Heart gauge: 9 sc = 2 in (5.1 cm); 9 rows = 1.75 in (4.4 cm).
Border gauge: 4 sc = 1 in (2.5 cm).
Test one heart first. It is a small piece and the quickest way to confirm your tension. If the heart measures more than 2.25 in (5.7 cm) wide, go down to a 4 mm hook. If it is under 1.75 in (4.4 cm) wide, go up to a 5 mm hook.
Checkpoints for the mesh:
- After Row 1: 7.25 in (18.4 cm) wide, measured relaxed.
- After Row 8: 4 in (10.2 cm) tall.
- After Row 16: 8 in (20.3 cm) tall.
- After Row 31: 15.5 in (39.4 cm) tall.
Measure the mesh lying flat, gently nudged into shape, not stretched. Net stitch is elastic, so very small differences block out. If you are more than 0.5 in (1.3 cm) off in width after Row 1, restart with a different hook rather than adjusting later. If your rows run short, you can add 2 rows (keeping an odd final row count) and space the heart tiers slightly farther apart.
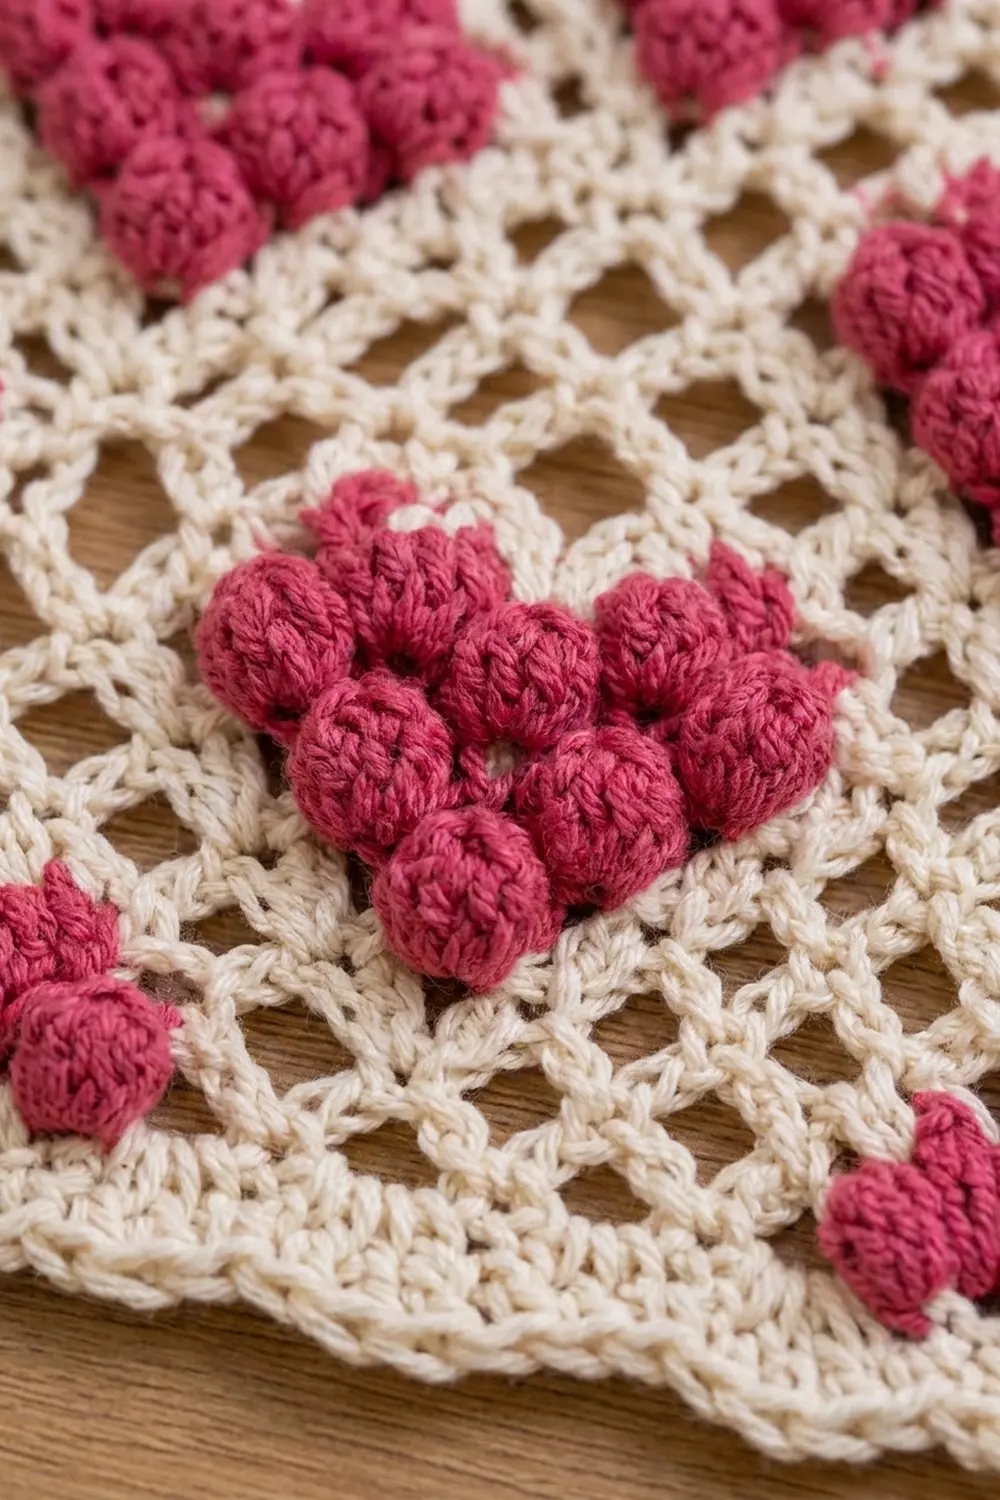
Mesh Panel
With Color A, ch 30.
Row 1: Sc in 2nd ch from hook, *ch 5, sk 3 ch, sc in next ch; repeat from * 6 more times. (8 sc, 7 ch-5 loops)
The sc uses 1 chain, and each repeat uses 4 chains: 1 + (7 x 4) = 29 chains, which is every chain except the turning chain.
Row 2: Ch 5 (counts as dc + ch 2), turn, sc in first ch-5 loop, *ch 5, sc in next ch-5 loop; repeat from * 5 more times, ch 2, dc in last sc. (7 sc, 6 ch-5 loops, plus a half loop at each edge)
Row 3: Ch 1, turn, sc in first dc, *ch 5, sc in next ch-5 loop; repeat from * 5 more times, ch 5, sc in 3rd ch of turning ch-5. (8 sc, 7 ch-5 loops)
The offset sc placement turns each pair of loops into a closed diamond. The half loops on Row 2 keep the side edges straight.
Rows 4–31: Repeat Rows 2 and 3 fourteen more times. You end on an odd row with 8 sc and 7 ch-5 loops. (31 rows total)
Do not fasten off. Check that the mesh measures 7.25 in x 15.5 in (18.4 cm x 39.4 cm).
Border
The border has two rounds of sc. Corners are ch-2 spaces, and the corner spaces are not counted as stitches.
Round 1: Ch 1, turn so you are working along the top edge (Row 31). Sc in first sc, *3 sc in next ch-5 loop, sc in next sc; repeat from * 6 more times (29 sc on top edge), ch 2 for corner.
Work down the side: 2 sc in each row end (62 sc), ch 2.
Work along the bottom, into the opposite side of the foundation chain: sc in each of the 29 chains (29 sc), ch 2.
Work up the second side: 2 sc in each row end (62 sc), ch 2. Join with sl st to first sc.
Count: top 29, bottom 29, each side 62, total 182 sc plus 4 corner ch-2 spaces.
Round 2: Ch 1, sc in each sc around, working (sc, ch 2, sc) in each corner ch-2 sp. Join with sl st to first sc.
Count: top 31, bottom 31, each side 64, total 190 sc plus 4 corner ch-2 spaces. These per-side counts include the sc on each side of the corner chain.
Why the math works: The top edge has 8 sc + (7 loops x 3 sc) = 29 sc, which matches the 29 foundation chains on the bottom. At the border gauge of 4 sc per inch, 29 sc = 7.25 in (18.4 cm), the exact mesh width. Each row is 0.5 in tall, and 2 sc per row end gives 4 sc per inch on the sides: 31 rows x 2 = 62 sc = 15.5 in (39.4 cm). Round 2 adds one sc on each side of every corner. With both rounds about 0.25 in (0.6 cm) deep, the border adds 0.5 in (1.3 cm) all around. The finished size is 8.25 in x 16.5 in (21.0 cm x 41.9 cm).
Hanging loop: Without fastening off, sl st along the top edge to the 16th sc, the center of the 31 top stitches. Ch 8, sl st in the same sc. Work 12 sc into the ch-8 loop and sl st into the same center sc. Fasten off. The loop stands about 1 in (2.5 cm) tall.
Bobble Hearts (Make 11)
With Color B, ch 2.
Row 1 (RS): 3 sc in 2nd ch from hook. (3)
Row 2 (WS): Ch 1, turn, 2 sc in first st, bob in next st, 2 sc in last st. (5 sts: 4 sc, 1 bob)
Row 3 (RS): Ch 1, turn, 2 sc in first st, sc in next 3 sts, 2 sc in last st. (7)
Row 4 (WS): Ch 1, turn, 2 sc in first st, [bob in next st, sc in next st] twice, bob in next st, 2 sc in last st. (9 sts: 6 sc, 3 bob)
Row 5 (RS): Ch 1, turn, sc in each st across. (9)
Row 6 (WS): Ch 1, turn, sc in first st, [bob in next st, sc in next st] 4 times. (9 sts: 5 sc, 4 bob)
Row 7 (RS): Ch 1, turn, sc in each st across. (9)
The heart is now 2 in (5.1 cm) wide. Next you split it into two lobes over stitches 1–4 and 6–9, skipping stitch 5 to form the center dip.
First lobe, Row 8 (WS): Ch 1, turn, sc in first st, bob in next st, sc in next 2 sts. Leave remaining sts unworked. (4 sts: 3 sc, 1 bob)
First lobe, Row 9 (RS): Ch 1, turn, sc2tog twice. (2) Fasten off.
Second lobe, Row 8 (WS): With WS facing, sk the 5th st of Row 7 and join Color B in the 6th st. Ch 1, sc in same st, sc in next st, bob in next st, sc in last st. (4 sts: 3 sc, 1 bob)
Second lobe, Row 9 (RS): Ch 1, turn, sc2tog twice. (2) Fasten off, leaving a 12 in (30.5 cm) tail for sewing.
The two lobes are mirror images, with each bobble sitting second from the outer edge.
Edging round: With RS facing, join Color B at the bottom point. Sl st loosely around the whole heart, working 1 sl st in each row end and each st, (sl st, ch 1, sl st) at the bottom point, and 1 sl st in the skipped center st to sharpen the dip. Fasten off and weave in this short tail only.
Each heart has 10 bobbles (1 + 3 + 4 + 2) and measures 2 in x 1.75 in (5.1 cm x 4.4 cm). For 11 hearts, that is 110 bobbles in total.
Placing and Sewing the Hearts
Lay the bordered panel flat with RS up and the hanging loop at the top. Count rows from the bottom of the mesh. Count loops on the odd row directly below each tier from right to left, 1 to 7.
- Tier 1 (Row 4): hearts centered over loop 2 and loop 6
- Tier 2 (Row 8): heart centered over loop 4
- Tier 3 (Row 12): hearts over loops 2 and 6
- Tier 4 (Row 16): heart over loop 4
- Tier 5 (Row 20): hearts over loops 2 and 6
- Tier 6 (Row 24): heart over loop 4
- Tier 7 (Row 28): hearts over loops 2 and 6
Mark each center with a stitch marker. Tier centers are 2 in (5.1 cm) apart, starting 1.75 in (4.4 cm) above the bottom of the mesh, so the top tier sits 1.75 in (4.4 cm) below the top of the mesh. Because the hearts are 1.75 in tall, there is a 0.25 in (0.6 cm) gap of mesh between tiers.
Pin each heart with its point down. Using the long tail, whipstitch around the edging round, catching the cream mesh strands behind the heart every 0.25 in (0.6 cm). Keep stitches snug but not tight so the mesh doesn’t pucker. Weave the tail through the back of the heart and trim.
Final Blocking
- Weave in all remaining cream tails along the border.
- Pin the panel RS up on a blocking mat at 8.25 in x 16.5 in (21.0 cm x 41.9 cm).
- Square the corners first, then pin each side every 1 in (2.5 cm).
- Gently open the diamonds with your fingertips so they line up in straight diagonals.
- Mist evenly until damp. Do not soak the hearts.
- Press the hearts lightly with a flat palm to settle them without flattening the bobbles.
- Let dry completely, at least 12 hours, before unpinning.
Final Quality-Control Checklist
- Panel measures 8.25 in x 16.5 in (21.0 cm x 41.9 cm).
- Mesh has 7 full diamonds across on every odd row.
- Border Round 2 counts 31 sc on the top and bottom and 64 sc on each side.
- All 11 hearts are present in a 2-1-2-1-2-1-2 layout.
- Every heart points down and sits centered over its loop.
- Bobbles face outward on all hearts.
- Hanging loop is at the exact top center and holds firmly.
- No cream or pink tails show on the RS.
Troubleshooting
Side edges wave or ripple: You may have worked 3 sc into some row ends. Keep exactly 2 sc per row end.
Side edges pull in: Your border is tighter than your mesh. Work Round 1 with a hook 0.5 mm larger.
Diamonds look lopsided: Make sure every sc goes into the loop space, not into a chain, and that the Row 2 turning chain counts as dc + ch 2.
Bobbles appear on the wrong side: Bobbles belong on WS rows (2, 4, 6, and 8). Check that Row 1 was worked as the RS.
Heart lobes uneven: Confirm you skipped only the 5th st of Row 7 and that both lobes start with 4 sts.
Mesh puckers behind a heart: Remove the sewing and restitch with looser whipstitches, catching mesh strands only where they naturally fall.
Care
Hand wash in cool water with mild soap, roll in a towel to remove water, and dry flat, re-pinning to size if needed. Do not tumble dry.
Final Notes
The whole design rests on one measurement chain. Each mesh row is 0.5 in (1.3 cm), so 31 rows make 15.5 in (39.4 cm). Seven loops plus the edge stitches make 7.25 in (18.4 cm). The border’s 29 and 62 stitches per side match that mesh at 4 sc per inch, and two border rounds add 0.5 in (1.3 cm) on every side for a finished 8.25 in x 16.5 in (21.0 cm x 41.9 cm). Each 2 in x 1.75 in (5.1 cm x 4.4 cm) heart fits its 2 in tier with room to spare. Check the gauge at each stage, and the panel will come out square and balanced.
Happy crocheting!