

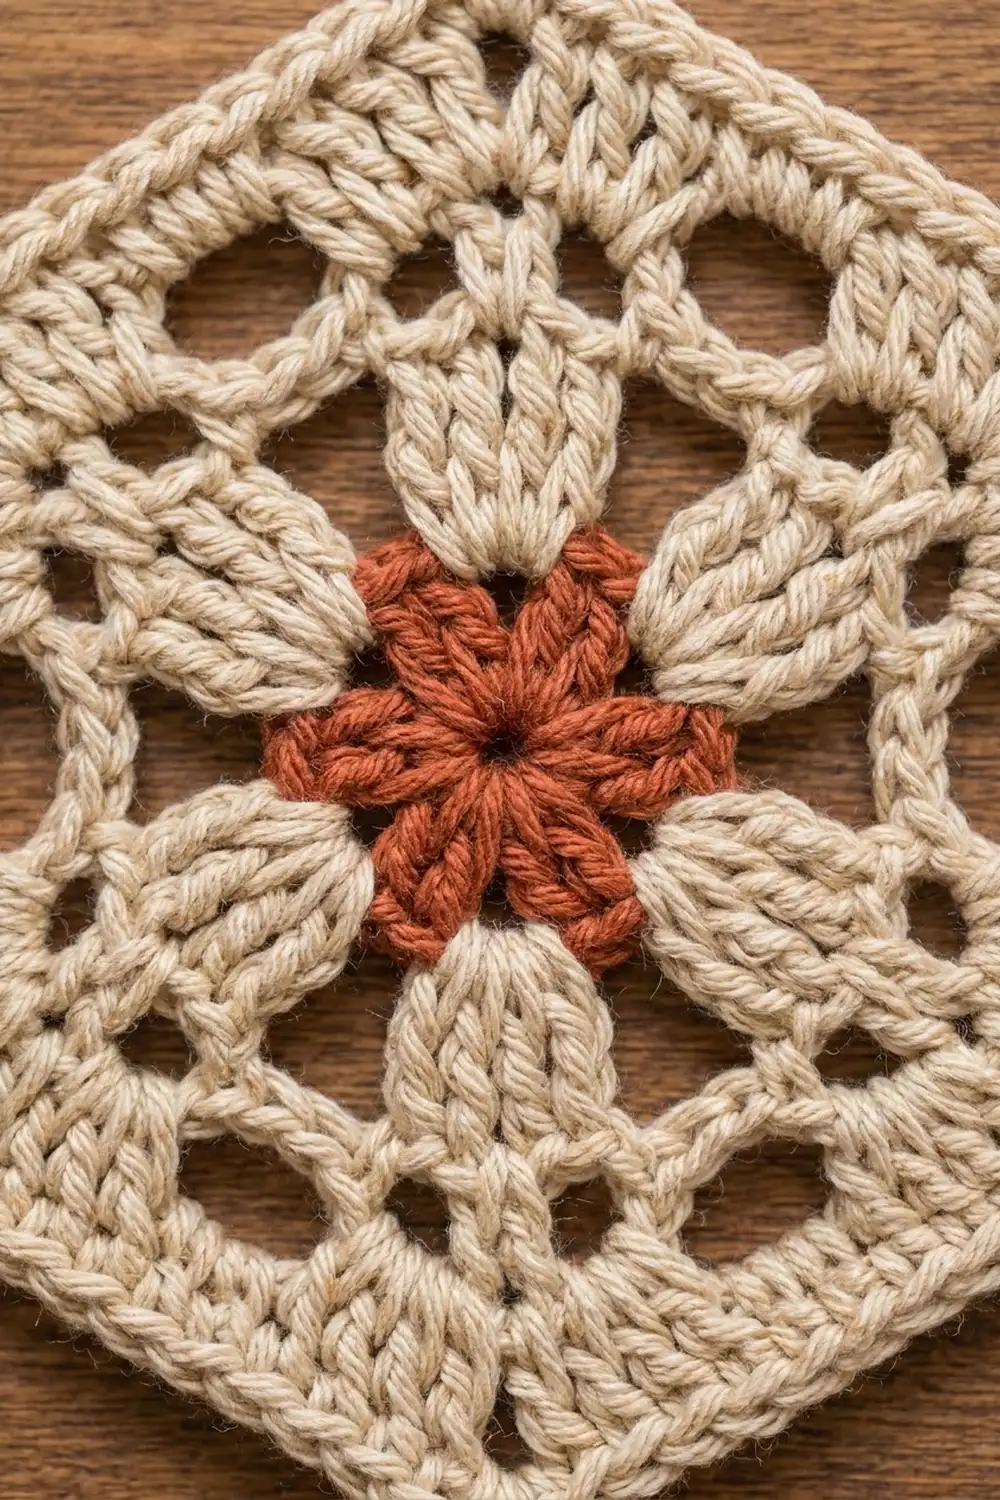
This Terracotta Star Hexagon is a single crochet motif with a six-petal rust star at its center and a soft cream frame around it. The pointed petals stretch out toward the six corners. A ring of open windows between them gives the motif a light, lacy look before the solid cream rounds close it into a neat hexagon.
The palette is warm and earthy: a terracotta rust for the star and a warm cream or oatmeal for the frame. It suits rustic, farmhouse and boho decor. One motif works on its own as a coaster, a small trivet topper or a table accent.
This pattern uses US crochet terms. The finished motif measures 7 in (17.8 cm) from flat side to flat side and 8 in (20.3 cm) from corner to corner, with sides of 4 in (10.2 cm).
Construction is simple. You work three rust rounds for the center disc and petals. Then you switch to cream for a round of chain arches, two rounds of double crochet and a two-round border. Everything is worked in the round from the right side, so you never turn.
Finished Size and Construction
- Finished size: 7 in (17.8 cm) flat to flat; 8 in (20.3 cm) corner to corner
- Side length: 4 in (10.2 cm)
- Skill level: Easy to intermediate
- Terminology: US crochet terms
- Yarn weight: Worsted (#4, medium)
- Hook: 5 mm (H-8)
- Number of pieces: 1
- Layout: One single hexagon motif; no joining
- Piece size before border: 6.5 in (16.5 cm) flat to flat; 7.5 in (19.1 cm) corner to corner
- Border depth: 0.25 in (0.6 cm) on each side
Materials
Yarn. Choose a smooth worsted-weight yarn. Cotton or a cotton blend gives crisp petals and a firm motif that lies flat, which is ideal for a coaster or trivet. Acrylic also works and blocks more softly. The quantities below assume roughly 200 m per 100 g.
- Color A, rust/terracotta: 8 g, about 16 m (18 yd)
- Color B, cream/oatmeal: 18 g, about 36 m (39 yd)
These quantities include a margin of roughly 25% for your gauge check, yarn tails and small tension differences.
Tools:
- 5 mm (H-8) crochet hook
- Tapestry needle
- Scissors
- Stitch markers (2 or 3)
- Ruler or tape measure
- Blocking mat and rust-proof pins
- Spray bottle with water
Abbreviations (US Terms)
- ch – chain
- sl st – slip stitch
- sc – single crochet
- hdc – half double crochet
- dc – double crochet
- tr – treble crochet
- sk – skip
- sp – space
- st(s) – stitch(es)
- rev sc – reverse single crochet (crab stitch)
Special stitch – reverse single crochet (rev sc): If you’re right-handed, work from left to right. Insert your hook into the next stitch to the right, yarn over, pull up a loop, then yarn over and pull through both loops on the hook. This makes a firm, corded edge.
Special stitch – petal: Ch 7. Working into the back bump of the chain, sc in the 2nd ch from the hook, hdc in the next ch, dc in each of the next 2 ch, and tr in each of the last 2 ch. That gives 6 sts along the chain, with a narrow, pointed tip at the far end and a wide base next to the round.
Gauge and Checkpoints
Make one complete test motif and measure it before you buy extra yarn or plan a use for it. Check the measurements below at each stage. They show you early if your tension is off.
Base gauge: 17 dc = 4 in (10.2 cm) and 18 sc = 4 in (10.2 cm) with a 5 mm hook.
Checkpoints:
- After Round 1: center disc about 1.25 in (3.2 cm) across
- After Round 2: disc about 2 in (5.1 cm) across
- After Round 3: about 5 in (12.7 cm) from one petal tip to the opposite tip
- After Round 4: corner to corner about 5.5 in (14.0 cm)
- After Round 5: flat to flat about 5.5 in (14.0 cm); corner to corner about 6.4 in (16.3 cm)
- After Round 6: flat to flat 6.5 in (16.5 cm); corner to corner 7.5 in (19.1 cm)
- After Round 8: flat to flat 7 in (17.8 cm); corner to corner 8 in (20.3 cm)
If your motif is too big: Go down half a hook size, to 4.5 mm. If only the petals are too long, keep the same hook and tighten your chains in Round 3.
If your motif is too small: Go up half a hook size, to 5.5 mm. If the chain arches in Round 4 pull the petal tips inward, loosen your chains there.
If the motif cups or ruffles: Check the stitch counts first. A cupping motif usually has a missing stitch. A ruffling motif usually has an extra one.
Pattern
Round 1 – Center (Color A, rust)
Make a magic ring with Color A.
Ch 3 (counts as dc) and work 11 dc into the ring. Pull the ring closed, leaving a small center hole. Join with a sl st to the top of the beginning ch-3.
Count: 12 dc.
Round 2 – Center disc (Color A)
Ch 3 (counts as dc), then dc in the same st. Work 2 dc in each remaining st around. Join with a sl st to the top of the beginning ch-3.
Count: 24 dc. This round increases from 12 to 24 because you work 2 dc in every stitch.
Round 3 – Petals (Color A)
This round makes six pointed petals around the disc. Each petal uses 4 sts of Round 2: the st it starts from, 1 skipped st and 3 sl sts.
Sl st in the first st (the joining point). Work 1 petal (ch 7, sc in 2nd ch from hook, hdc in next ch, dc in next 2 ch, tr in last 2 ch). Sk the next st of Round 2, then sl st in each of the next 3 sts. Repeat from * to * 5 more times. The last sl st lands in the joining st.
Count: 6 petals, each with 6 sts along its chain, plus 18 sl sts on the disc. All 24 sts of Round 2 are used (6 petals × 4 sts).
Fasten off Color A and weave in the tail. Lay the piece flat and nudge each petal so it points straight out. The petal tips will become the six corners of the hexagon.
Round 4 – Window arches (Color B, cream)
Join Color B in the tip of any petal. The tip is the unworked first chain at the pointed end.
Ch 1, then (sc, ch 2, sc) in the same petal tip. Ch 9, (sc, ch 2, sc) in the tip of the next petal. Repeat from * to * 4 more times. Ch 9, then join with a sl st to the first sc.
Count: 12 sc, 6 ch-2 corner sps, 6 ch-9 arches.
Each ch-9 arch crosses the gap between two petals. Together with the two petal edges, the arch frames an open, oval-shaped window, so you get six windows in all.
Round 5 – First solid round (Color B)
Sl st into the next ch-2 sp. Ch 3 (counts as dc), then (ch 2, dc) in the same sp to make the first corner.
Dc in the next sc, 9 dc in the ch-9 arch, dc in the next sc, then (dc, ch 2, dc) in the next ch-2 corner sp. Repeat from * to * 4 more times. To finish the last side, dc in the next sc, 9 dc in the ch-9 arch and dc in the next sc. Join with a sl st to the top of the beginning ch-3.
Count: 13 dc per side between corner sps (1 + 1 + 9 + 1 + 1). That’s 6 sides × 13 = 78 dc, plus 6 ch-2 corner sps.
Work the 9 dc over the whole chain arch, not into the individual chains, so the window underneath stays open. Space them evenly so the side lies straight.
Round 6 – Second solid round (Color B)
Sl st into the next ch-2 sp. Ch 3 (counts as dc), then (ch 2, dc) in the same sp.
Dc in each of the next 13 dc, then (dc, ch 2, dc) in the next ch-2 corner sp. Repeat from * to * 4 more times. Dc in each of the last 13 dc, then join with a sl st to the top of the beginning ch-3.
Count: 15 dc per side between corner sps (1 + 13 + 1). That’s 6 sides × 15 = 90 dc, plus 6 ch-2 corner sps.
This round adds 2 sts per side, 12 in total. That’s the usual rate for keeping a double crochet hexagon flat.
Checkpoint: The motif should now measure 6.5 in (16.5 cm) flat to flat and 7.5 in (19.1 cm) corner to corner.
Border
The border has two cream rounds. The single crochet round squares up the edge, and the reverse single crochet round gives a firm, corded rim. Together they add 0.25 in (0.6 cm) to each side.
Border gauge: 18 sc = 4 in (10.2 cm).
Round 7 – Single crochet round (Color B)
Ch 1. Work 3 sc in the first ch-2 corner sp, then sc in each of the next 15 dc. 3 sc in the next ch-2 corner sp, then sc in each of the next 15 dc. Repeat from * to * 4 more times. Join with a sl st to the first sc.
Count: 6 × (3 + 15) = 108 sc.
Mark the middle sc of each 3-sc group as the corner stitch. Each side has 19 sc, counting both of its corner stitches: 1 corner st + 1 sc + 15 sc + 1 sc + 1 corner st. Each corner stitch belongs to two sides, so the total is 6 × 19 − 6 = 108, which matches the count above.
Round 8 – Reverse single crochet round (Color B)
Don’t turn. Ch 1, then work rev sc in each sc around, moving from left to right. Work exactly 1 rev sc in each corner stitch as well. Join with a sl st to the first rev sc and fasten off.
Count: 108 rev sc (19 per side, counting both corner stitches).
Why the Math Works
The 19 sts on each side give 18 stitch widths between the centers of the two corner stitches. At 18 sc = 4 in (10.2 cm), each side measures 4 in (10.2 cm).
A regular hexagon with 4 in (10.2 cm) sides measures about 6.93 in from flat side to flat side, which rounds to 7 in (17.8 cm). It measures 8 in (20.3 cm) from corner to corner. That matches the motif: the border adds 0.25 in (0.6 cm) on each side, taking the 6.5 in (16.5 cm) motif to 7 in (17.8 cm).
In Round 7, the 3-sc corners add 2 sts per side, the same as the dc corners in Round 6. That keeps the edge flat so it doesn’t cup at the points.
Final Blocking
- Weave in all tails before blocking. Weave rust tails through rust stitches and cream tails through cream stitches so they don’t show on the other color.
- Lay the motif right side up on a blocking mat.
- Pin one corner, then pin the opposite corner so the motif measures 8 in (20.3 cm) corner to corner.
- Pin the other four corners. Check that each side is 4 in (10.2 cm) and that each pair of opposite sides is 7 in (17.8 cm) apart.
- Add pins along each side so the edges are straight, not scalloped.
- Use your fingers to shape the petals so they point straight at the corners, and open each window into a neat oval.
- Spritz the motif evenly until it’s damp but not soaked. For acrylic, you can steam lightly instead: hold the iron above the motif and never press down.
- Let it dry completely, usually 6 to 12 hours, before unpinning.
Final Quality-Control Checklist
- [ ] Round 1 has 12 dc, and the center hole is pulled tight.
- [ ] Round 2 has 24 dc.
- [ ] Six evenly spaced petals each point at a corner.
- [ ] Round 4 has 6 arches and 6 open windows.
- [ ] Round 5 has 13 dc per side, 78 dc in total.
- [ ] Round 6 has 15 dc per side, 90 dc in total.
- [ ] Round 7 has 19 sc per side counting corners, 108 sc in total.
- [ ] Round 8 has 108 rev sc, and the corners are crisp.
- [ ] The motif measures 7 in (17.8 cm) flat to flat and 8 in (20.3 cm) corner to corner.
- [ ] All tails are hidden, and the motif lies flat.
Troubleshooting
The petals twist or flop: Work the petal stitches into the back bump of the chain and keep your ch-7 even. Pin the petals flat when blocking.
The arches pull the petal tips inward: Your ch-9 is too tight. Loosen your chains, or work just those chains with a hook half a size larger.
The arches sag or ripple: Your ch-9 is too loose. Tighten your chains slightly. You can also work 8 dc over the arch instead of 9 and add 1 dc in each sc next to it, which keeps the count at 13 per side.
The motif cups: Recount the corners. Rounds 5 and 6 need (dc, ch 2, dc) at each corner, and Round 7 needs 3 sc at each corner.
The edges ruffle: You probably have extra stitches. Recount each side against the counts above.
The crab-stitch edge is uneven: Work slowly and keep the loops relaxed. Make sure you work 1 rev sc into every sc without skipping any.
Rust shows through the cream: Join Color B at the petal tip with a firm first sc, and weave tails only through stitches of the same color.
Care
Hand wash in cool water with a mild detergent. Roll the motif in a towel and press out the water without wringing, then reshape it and dry it flat. You can re-pin cotton motifs to sharpen the points again.

Final Notes
Here’s the full measurement sequence. The 2 in (5.1 cm) center disc grows to 5 in (12.7 cm) from petal tip to petal tip. The arches bring it to 5.5 in (14.0 cm) corner to corner. The two dc rounds take it to 6.5 in (16.5 cm) flat to flat. The 0.25 in (0.6 cm) border finishes it at 7 in (17.8 cm) flat to flat and 8 in (20.3 cm) corner to corner.
If your stitch counts match 12, 24, 78, 90 and 108 and your checkpoints line up, the motif will block into a clean, flat hexagon with a bold rust star.
Happy crocheting!