
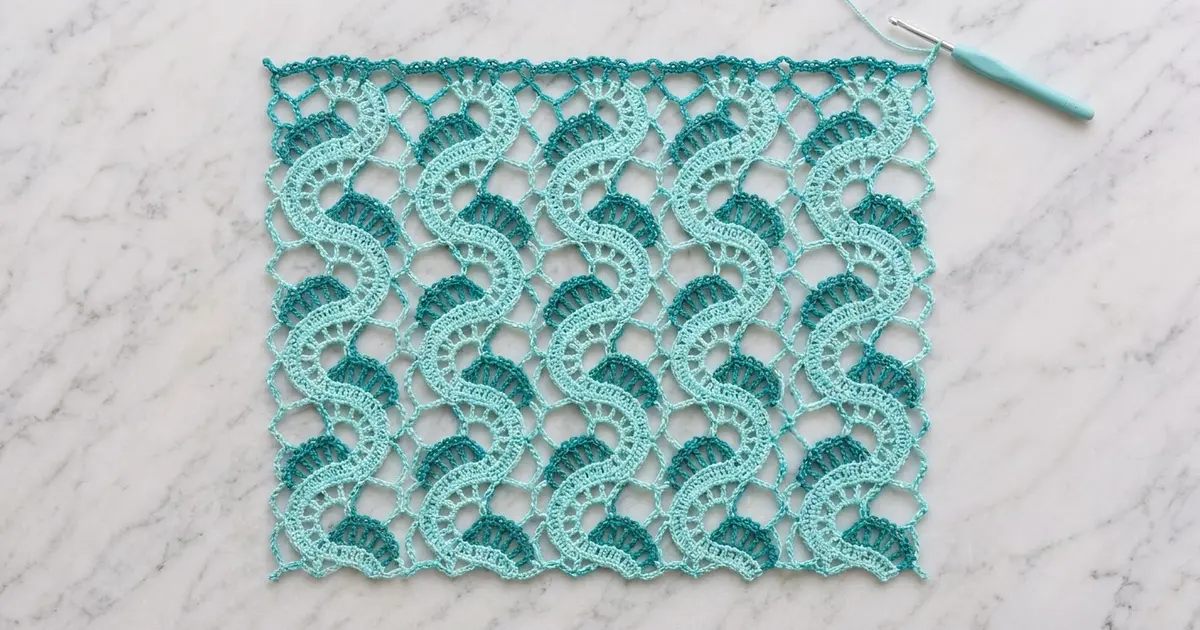
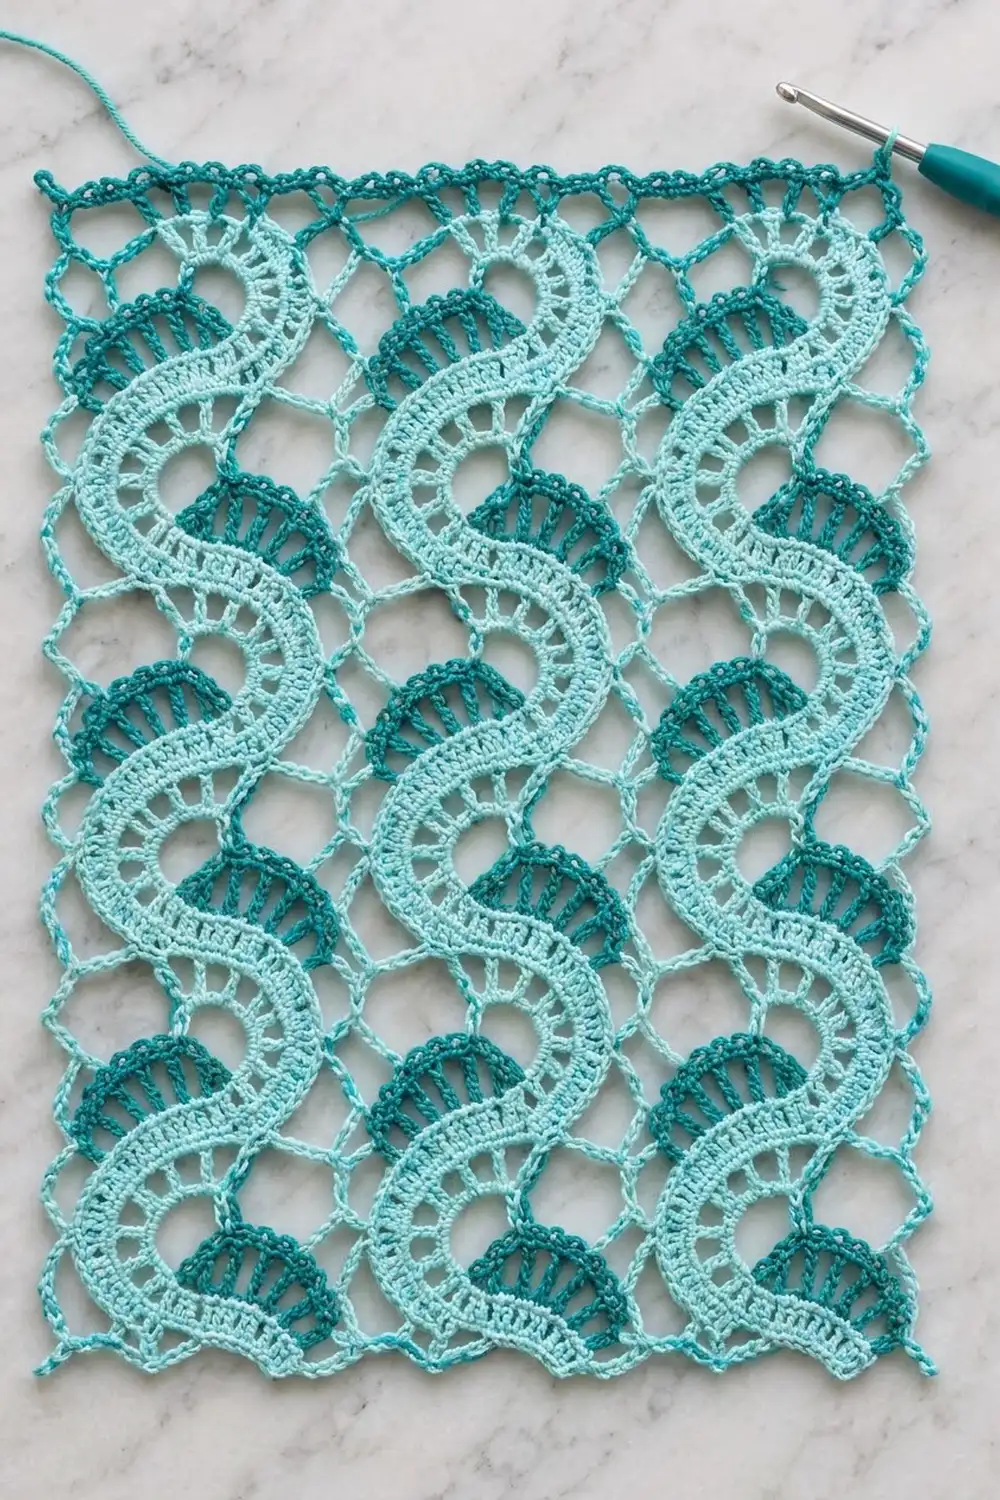
The Teal Tide Serpentine Lace Panel is an open, airy piece of tape lace. Three light aqua ribbons wind down the panel in soft S-curves. Each bend carries a deep teal fan with a picot rim, and a web of aqua chain loops holds everything together.
The palette is pale aqua for the tapes and mesh and deep teal for the fans and top edge. The style borrows from Bruges lace but uses only ordinary stitches. The pattern uses US crochet terms throughout.
After blocking, the panel measures 13 x 16.25 in (33.0 x 41.3 cm). That’s a good size for a window panel, a wall hanging, or a lace overlay.
You crochet one tape in short turning rows, using wedge-shaped rows to bend it, then add a teal fan outside each bend. Two rounds of aqua mesh turn the tape into a straight-sided strip. You join three strips as you go on the last mesh round, then finish the panel with a two-part border.
Finished Size and Construction
- Finished size: 13 x 16.25 in (33.0 x 41.3 cm)
- Skill level: Intermediate
- Terminology: US crochet terms
- Yarn weight: Sport weight (#2 fine) mercerized cotton
- Hook: 3.0 mm
- Number of pieces: 3 identical strips
- Layout: 3 strips side by side, 1 row high
- Piece size: 4 x 15 in (10.2 x 38.1 cm) per strip
- Size before border: 12 x 15 in (30.5 x 38.1 cm)
- Border depth: 0.5 in (1.3 cm) of aqua mesh on all sides, plus 0.25 in (0.6 cm) of teal picot edging on the top edge only
Materials
Choose a smooth mercerized cotton in sport weight, about 150 m (164 yd) per 50 g. It shows the tape bars and picots crisply and blocks well. Avoid fuzzy or stretchy yarns, because the curves depend on clean stitch heights.
- C1, light aqua: 50 g (150 m / 164 yd), for tapes, mesh, and border Round 1
- C2, deep teal: 20 g (60 m / 66 yd), for fans and the top picot edge
These quantities include a margin of about 30 percent for swatching and differences in tension.
Tools: 3.0 mm hook, tapestry needle, 6 locking stitch markers, scissors, measuring tape, blocking mat, rust-proof pins, spray bottle.
Abbreviations (US Terms)
- ch: chain
- sl st: slip stitch
- sc: single crochet
- hdc: half double crochet
- dc: double crochet
- tr: treble crochet
- st(s): stitch(es)
- sp: space
- rep: repeat
- RS: right side
- C1 / C2: color 1 / color 2
Special stitches and terms:
- Picot: ch 3, sl st in first ch.
- Edge loop: the ch-2 part of a turning chain that sticks out past the tape edge. The fans and mesh anchor into these loops.
- Wedge row: a row of graded stitch heights (sc, hdc, dc, dc, tr). The short side becomes the inside of a curve.
- Edge A / Edge B: Edge A is the long tape edge where Row 1 ends (the slip-knot end). Edge B is the other long edge.
Gauge and Checkpoints
Gauge: 20 dc and 10 dc rows = 4 in (10.2 cm), before blocking.
Make one complete strip before you start the others. It is your real gauge swatch, and every later measurement depends on it.
Checkpoints:
- Tape width: 5 sts = 1 in (2.5 cm).
- After Row 17: the tape spans about 4.5 in (11.4 cm) from top to bottom, measured straight down, with one bend each way.
- After Row 49: the tape is about 14 in (35.6 cm) long and 3 in (7.6 cm) wide, including fans.
- After mesh Round 1: the strip is about 3.5 x 14.5 in (8.9 x 36.8 cm).
- After mesh Round 2: the strip is 4 x 15 in (10.2 x 38.1 cm) when pinned.
If the strip is too big, go down 0.25 mm in hook size. If it is too small, go up 0.25 mm. If the size is right but the curves look shallow, your tr stitches are too short; pull up a slightly taller first loop on each tr.
Strip Pattern (Make 3)
Part 1: Serpentine Tape (C1)
Row numbers are given for the first repeat. For the second and third repeats, follow the same Rows 2 to 17 again.
Row 1: With C1, ch 7. Dc in 4th ch from hook and in next 3 ch. (5 sts; skipped ch-3 counts as first dc)
Bend A (inner edge = Edge A, outer edge = Edge B):
Row 2 (wedge, starts at Edge A): Ch 1, turn. Sc in first st, hdc in next st, dc in next 2 sts, tr in top of turning ch. (5 sts)
Row 3 (wedge, starts at Edge B): Ch 6 (ch-2 edge loop plus ch-4 that counts as tr), turn. Skip first st, dc in next 2 sts, hdc in next st, sc in last st. (5 sts, 1 edge loop on Edge B)
Rows 4 and 6: Work as Row 2.
Rows 5 and 7: Work as Row 3. (3 edge loops on Edge B, from Rows 3, 5, and 7)
Straight section:
Row 8: Ch 5 (ch-2 edge loop plus ch-3 that counts as dc), turn. Skip first st, dc in next 3 sts, dc in top of turning ch. (5 sts, edge loop on Edge A)
Row 9: Work as Row 8. (Edge loop on Edge B)
Bend B (inner edge = Edge B, outer edge = Edge A):
Row 10 (wedge, starts at Edge A): Ch 6, turn. Skip first st, dc in next 2 sts, hdc in next st, sc in top of turning ch. (5 sts, edge loop on Edge A)
Row 11 (wedge, starts at Edge B): Ch 1, turn. Sc in first st, hdc in next st, dc in next 2 sts, tr in top of turning ch. (5 sts)
Rows 12 and 14: Work as Row 10.
Rows 13 and 15: Work as Row 11. (3 edge loops on Edge A, from Rows 10, 12, and 14)
Rows 16 and 17: Work as Row 8. (Row 16 loop on Edge A, Row 17 loop on Edge B)
Rows 18 to 49: Rep Rows 2 to 17 twice more. (49 rows, 6 bends, 5 sts in every row)
Each repeat leaves 5 edge loops on each edge. Fasten off. Place a marker in the first outer loop of each bend so the fan positions are easy to find.
Why it curves: A tr is about 0.5 in (1.3 cm) tall and an sc is about 0.15 in (0.4 cm) tall. Across the 1 in (2.5 cm) tape, each wedge row turns the tape about 19 degrees, so 6 wedge rows make a bend of about 115 degrees. The 2 straight rows between bends keep the S-curve flowing smoothly instead of kinking.
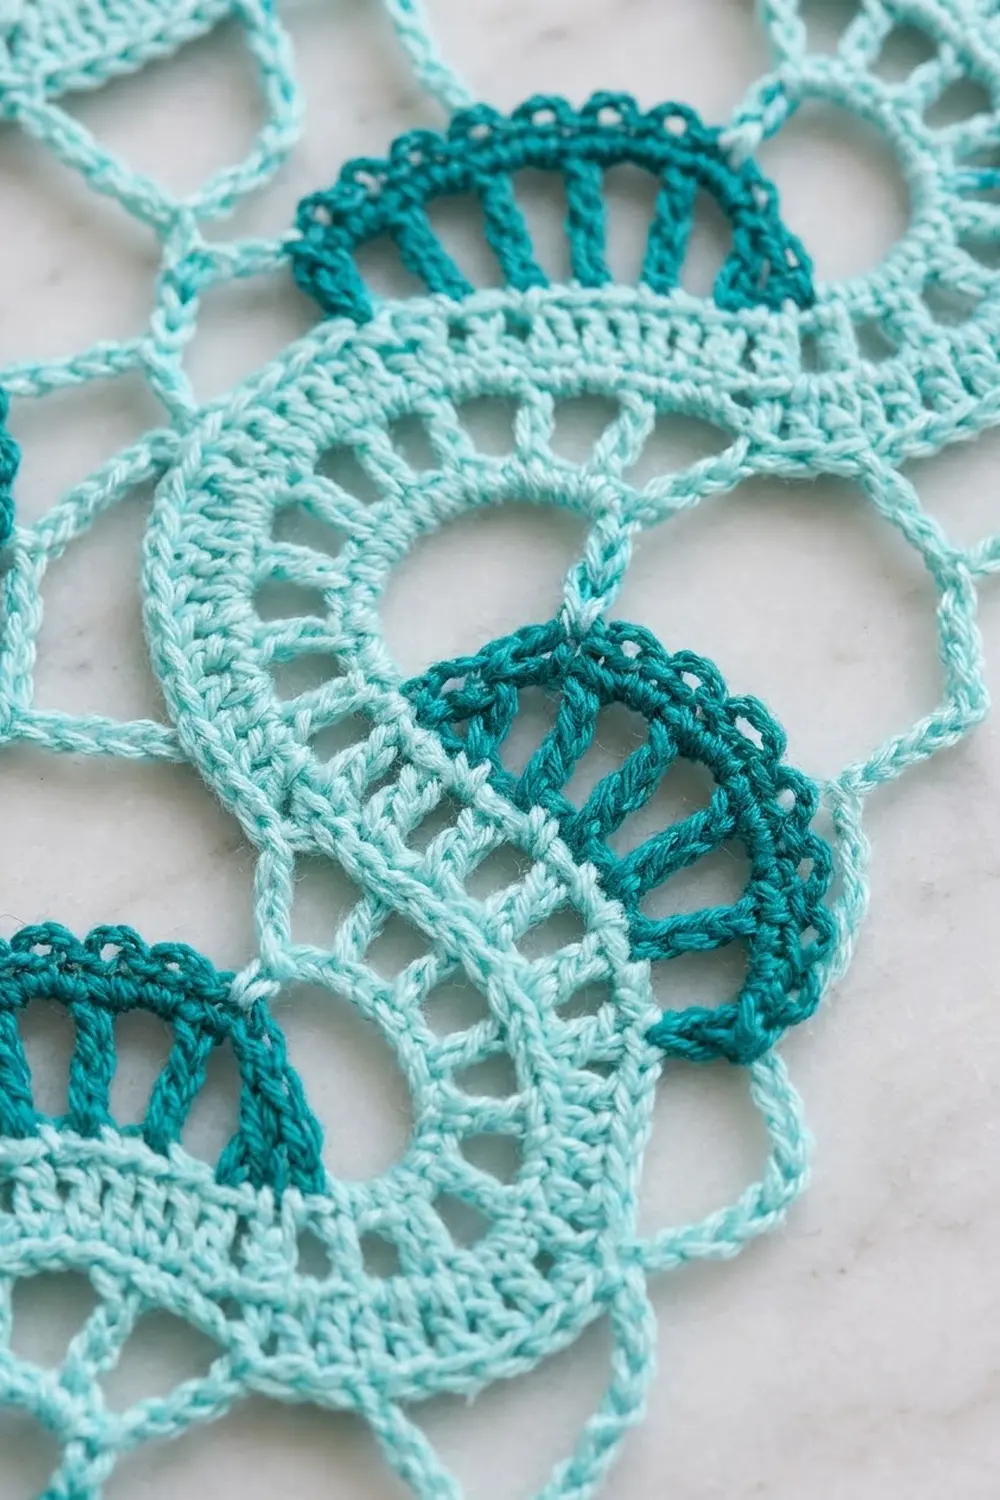
Part 2: Teal Fans (C2, 6 per strip)
Work one fan on the 3 outer edge loops of each bend. Bend A fans sit on Edge B, and Bend B fans sit on Edge A. With RS facing, work from the first loop of the bend to the last.
Row 1: Join C2 with sl st in first outer loop. Ch 4 (counts as tr), (ch 2, tr) twice in same loop; ch 2, (tr, ch 2, tr) in second loop; ch 2, (tr, ch 2, tr, ch 2, tr) in third loop. (8 tr, 7 ch-2 sps)
Row 2: Ch 1, turn. Sc in first tr, *(sc, picot, sc) in next ch-2 sp, sc in next tr; rep from * 6 more times. (22 sc, 7 picots)
Sl st into the tape edge next to the last loop to anchor the fan, then fasten off. The tr posts spread like spokes, and the picots form the dotted rim.
Part 3: Mesh Round 1 (C1)
In each repeat, one side of the tape holds a fan and the other side holds the inner pocket of a bend. For each pocket anchor, work into the side of the inner sc at the middle of that bend.
Start, bottom end: With RS facing, join C1 with sc in the base of the center (3rd) st of Row 1. Ch 5, sc in base of the Edge B corner st. (1 loop)
Edge B side, per repeat (work 3 times, bottom to top):
- Ch 7, sc in 1st picot of the Bend A fan.
- (Ch 5, sc in next odd picot) 3 times, landing in the 3rd, 5th, and 7th picots.
- Ch 7, sc in the Row 9 edge loop.
- Ch 9, sc in the side of the Row 12 inner sc (middle of the Bend B pocket).
- Ch 9, sc in the Row 17 edge loop.
(7 loops per repeat, 21 loops on Edge B side) The final sc, in the Row 49 loop, is the top-B corner.
Top end: Ch 5, sc in center (3rd) st of Row 49. Ch 7, sc in the Row 48 edge loop on Edge A; this sc is the top-A corner. (2 loops)
Edge A side, per repeat (work 3 times, top to bottom):
- Ch 7, sc in the 1st picot you reach on the Bend B fan.
- (Ch 5, sc in next odd picot) 3 times.
- Ch 7, sc in the Row 8 edge loop.
- Ch 9, sc in the side of the Row 4 inner sc (middle of the Bend A pocket).
- Ch 9, sc in the Row 16 edge loop of the repeat below. On the final repeat, sc in the base of the Edge A corner st of Row 1 instead; this sc is the bottom-A corner.
(7 loops per repeat, 21 loops on Edge A side)
Close: Ch 5, sl st to first sc. Fasten off. (2 loops on bottom end)
Round total: 2 + 21 + 2 + 21 = 46 loops.
Part 4: Mesh Round 2 (C1)
This round straightens the edges. Along the sides, work sc in ch-5 loops, dc in ch-7 loops, and tr in ch-9 loops. The taller stitches fill the deep pockets.
Round 2: Join C1 with sl st in the bottom-A corner sc. Ch 4 (counts as tr), ch 5. (Bottom-A corner loop made)
- Bottom end: (dc, ch 5, dc, ch 5) in each of the 2 bottom loops. (4 loops)
- Bottom-B corner: (tr, ch 5) in the corner sc. (1 loop)
- Edge B side: (matching st, ch 5) in each of the 21 side loops. (21 loops)
- Top-B corner: (tr, ch 5) in the corner sc. (1 loop)
- Top end: (dc, ch 5, dc, ch 5) in each of the 2 top loops. (4 loops)
- Top-A corner: (tr, ch 5) in the corner sc. (1 loop)
- Edge A side: (matching st, ch 5) in each of the 21 side loops. Sl st to top of beginning ch-4. (21 loops)
Round total: 54 ch-5 loops. Fasten off.
Per-side counts: Each end has 6 loops, and those 6 include that end’s own 2 corner loops. Each long side has 21 loops, not counting corners. Check: 6 + 6 + 21 + 21 = 54. Pin the strip to 4 x 15 in (10.2 x 38.1 cm) to confirm.
Make All Pieces
Make 3 strips. Finish Strip 1 completely. Strips 2 and 3 are joined to the previous strip as you work their Mesh Round 2.
- C1 per strip: about 40 m (44 yd); the border uses the remainder
- C2 per strip: about 16 m (17 yd); the top edging uses the remainder
Lay the strips with their bottom ends aligned and Row 1 at the bottom:
+---------+---------+---------+
| Strip 1 | Strip 2 | Strip 3 |
| A     B | A     B | A     B |
+---------+---------+---------+
Strip 1’s Edge B side meets Strip 2’s Edge A side, and Strip 2’s Edge B side meets Strip 3’s Edge A side. Each fan faces a pocket on the neighboring strip, so the curves interlock.
Joining
Join as you go on Mesh Round 2 of Strips 2 and 3, along the Edge A side only.
Method: Work Round 2 as written until you reach the Edge A side. For each of the 21 side loops, work the matching stitch. Then, instead of ch 5, work: ch 2, sl st in the corresponding Edge B side loop of the previous strip, ch 2.
Stitch-to-stitch logic: You work Edge A top to bottom, and the neighbor’s Edge B was worked bottom to top. Your first Edge A loop joins the neighbor’s 21st Edge B loop, your second joins its 20th, and so on. Each of the 21 loops is joined once, so both sides still have 21 loops.
Corner loops are not joined. They stay free and belong to the strip ends.
Tension: Keep the ch-2 halves at the same tension as a normal ch-5 loop. Tight joins make the panel cup, and loose joins leave gaps. Lay the work flat after each seam to check.
Checkpoint: The joined panel measures 12 x 15 in (30.5 x 38.1 cm) when pinned.
Border
Border gauge: Each border loop sits over one existing loop, so the border adds depth without changing the length of any edge.
Starting counts:
- Top edge: 3 strips x 6 end loops = 18 loops
- Bottom edge: 3 strips x 6 end loops = 18 loops
- Each long side: 1 strip x 21 side loops = 21 loops
No stitches are added at the seams. The two free corner loops at each seam are already counted in each strip’s 6 end loops.
Round 1 (C1, all around): Join C1 in any loop. (Sc, ch 5) in each loop around, but work (sc, ch 5) twice in each of the 4 panel corner loops. Sl st to first sc.
Round 1 counts:
- Top edge: 18 + 2 extra corner loops = 20 loops
- Bottom edge: 18 + 2 extra corner loops = 20 loops
- Each long side: 21 loops
- Total: 20 + 20 + 21 + 21 = 82 loops
Fasten off. Depth: 0.5 in (1.3 cm) on every side.
Row 2 (C2, top edge only): With RS facing, join C2 in the first top loop at the right-hand corner. Work (2 sc, picot, 2 sc) in each of the 20 top loops. (80 sc, 20 picots) Fasten off. Depth: 0.25 in (0.6 cm).
Why the math works: Each old loop gets exactly one new loop, so every edge keeps its length and neither ruffles nor pulls. The one extra loop at each corner gives just enough slack for the corner to lie flat. Width: 12 + 0.5 + 0.5 = 13 in (33.0 cm). Height: 15 + 0.5 + 0.5 + 0.25 = 16.25 in (41.3 cm).
Final Blocking
- Weave in all ends along the tape or chain paths so they stay hidden.
- Soak the panel in cool water for 15 minutes, then roll it in a towel to press out the water. Do not wring it.
- Lay it flat on the blocking mat, RS up.
- Pin the four corners to 13 x 16.25 in (33.0 x 41.3 cm).
- Pin each long side straight, with a pin in every second or third loop.
- Pin the top picot edge straight, then pin out the bottom loops evenly.
- Shape each tape into a smooth S-curve, and pin out the tip of each fan so the posts spread evenly.
- Leave the panel pinned until it is completely dry.
Final Quality-Control Checklist
- Each strip has 49 tape rows and 6 bends.
- Each strip has 6 teal fans on alternating sides, each with 7 picots.
- Mesh Round 1 has 46 loops per strip.
- Mesh Round 2 has 54 loops per strip: 6 per end and 21 per long side.
- All 21 side loops are joined at each of the 2 seams.
- Border Round 1 has 82 loops, and Row 2 has 20 picots across the top.
- The panel measures 13 x 16.25 in (33.0 x 41.3 cm).
Troubleshooting
The tape twists instead of curving. Make sure the sc and hdc always fall on the inner edge of each bend.
The bends look shallow. Make your tr stitches taller, or add one more pair of wedge rows to every bend on all strips.
The fans ruffle. Work the ch 2 between tr stitches more tightly.
The pockets pull inward. Use tr, not dc, in the ch-9 loops on Round 2.
A seam puckers. Rework those joins with slightly looser ch-2 halves.
The border waves. Check that you have exactly 1 sc per loop, except at the 4 panel corners.
Care
Hand wash in cool water with mild soap, and dry flat, pinned to shape. If needed, press lightly with a warm iron through a cloth.
Final Notes
The whole panel rests on one chain of measurements. A 5-stitch tape is 1 in (2.5 cm) wide, and three S-curve repeats make a tape about 14 in (35.6 cm) long. Two mesh rounds bring each strip to 4 x 15 in (10.2 x 38.1 cm). Three joined strips make 12 x 15 in (30.5 x 38.1 cm). The border adds 0.5 in (1.3 cm) all around and 0.25 in (0.6 cm) on top, for a finished size of 13 x 16.25 in (33.0 x 41.3 cm). Check each measurement as you go, and the panel will come together cleanly.
Happy crocheting!