

This hanging holder stacks three oval baskets on one long crocheted backing strip. A wooden ring at the top hangs it from a hook or towel ring, and a chunky tassel finishes the pointed bottom. Each basket holds one standard toilet roll.
The body is a warm rust or terracotta. A cream diamond lattice is worked in surface slip stitch across each basket wall, giving a relaxed boho look.
The pattern uses US crochet terms. Each basket measures 6.9 in (17.5 cm) wide, 4.7 in (11.9 cm) deep and 4.25 in (10.8 cm) tall. The bordered strip is 6 in (15.2 cm) wide. The holder hangs about 26 in (66.0 cm) from the top of the ring to the tip of the tassel.
You crochet three oval baskets in joined rounds and add the lattice. Then you work one long strip with a pointed bottom and a narrow top tab, and edge it. Finally, you sew the baskets onto the strip, fold the tab around the ring and attach the tassel.
Finished Size and Construction
- Finished size: 6 in (15.2 cm) wide strip, about 26 in (66.0 cm) total hanging length
- Skill level: Easy to intermediate
- Terminology: US crochet terms
- Yarn weight: Bulky (#5) cotton or cotton blend
- Hook: 6 mm (US J-10)
- Number of pieces: 5 (3 baskets, 1 backing strip, 1 tassel) plus 1 wooden ring
- Layout: 3 baskets stacked vertically on 1 strip, 1 row apart
- Piece size: each basket 6.9 in (17.5 cm) x 4.7 in (11.9 cm) x 4.25 in (10.8 cm) tall
- Strip size before border: 5.5 in (14.0 cm) wide x 18 in (45.7 cm) long, plus a 4 in (10.2 cm) tab
- Border depth: 0.25 in (0.6 cm) on each side
Materials
Choose a firm, smooth bulky cotton or cotton blend. Cotton holds the basket shape and shows the lattice clearly.
- Rust (main color): 350 g, about 420 m (459 yd)
- Cream (lattice): 30 g, about 36 m (39 yd)
These amounts include about 15 percent extra for your gauge swatch and small differences in tension.
Tools:
- 6 mm (US J-10) crochet hook
- 1 wooden ring, 3 in (7.6 cm) diameter
- Locking stitch markers (at least 6)
- Tapestry needle, scissors and measuring tape
- A piece of cardboard 5 in (12.7 cm) tall for the tassel
- Rustproof pins and a blocking surface
Abbreviations (US Terms)
- ch – chain
- sc – single crochet
- inc – 2 sc in the same stitch
- sc2tog – single crochet 2 together
- sl st – slip stitch
- BLO – back loop only
- rev sc – reverse single crochet (crab stitch)
- st(s) – stitch(es)
- rnd(s) – round(s)
Surface slip stitch: Hold the cream yarn behind the work. Insert the hook from the front into a gap between stitches, pull up a loop and draw it through the loop on your hook. Each new sl st makes one raised chain link on the front.
Reverse single crochet: Working from left to right (if you are right-handed), insert the hook into the next stitch to the right, pull up a loop, yarn over and draw through both loops.
Gauge and Checkpoints
Gauge: 11 sc and 12 rows = 4 in (10.2 cm) in sc.
Make a swatch of 15 sc for 15 rows. It should measure about 5.5 in (14.0 cm) wide and 5 in (12.7 cm) tall. Then make one complete basket before the others and check these points:
- After Rnd 7 (base): 6.9 in (17.5 cm) x 4.7 in (11.9 cm)
- After Rnd 19 (walls): 4 in (10.2 cm) of wall height
- After Rnd 20 (rim): 4.25 in (10.8 cm) total height
- Strip after Row 54: 5.5 in (14.0 cm) wide x 18 in (45.7 cm) long
If your base is too large, switch to a 5.5 mm (US I-9) hook. If it is too small, go up to a 6.5 mm (US K-10.5) hook. Get the base right first, because the walls keep its stitch count. Before making the other two baskets, try a toilet roll in the first one. It should slide in with a little room to spare.
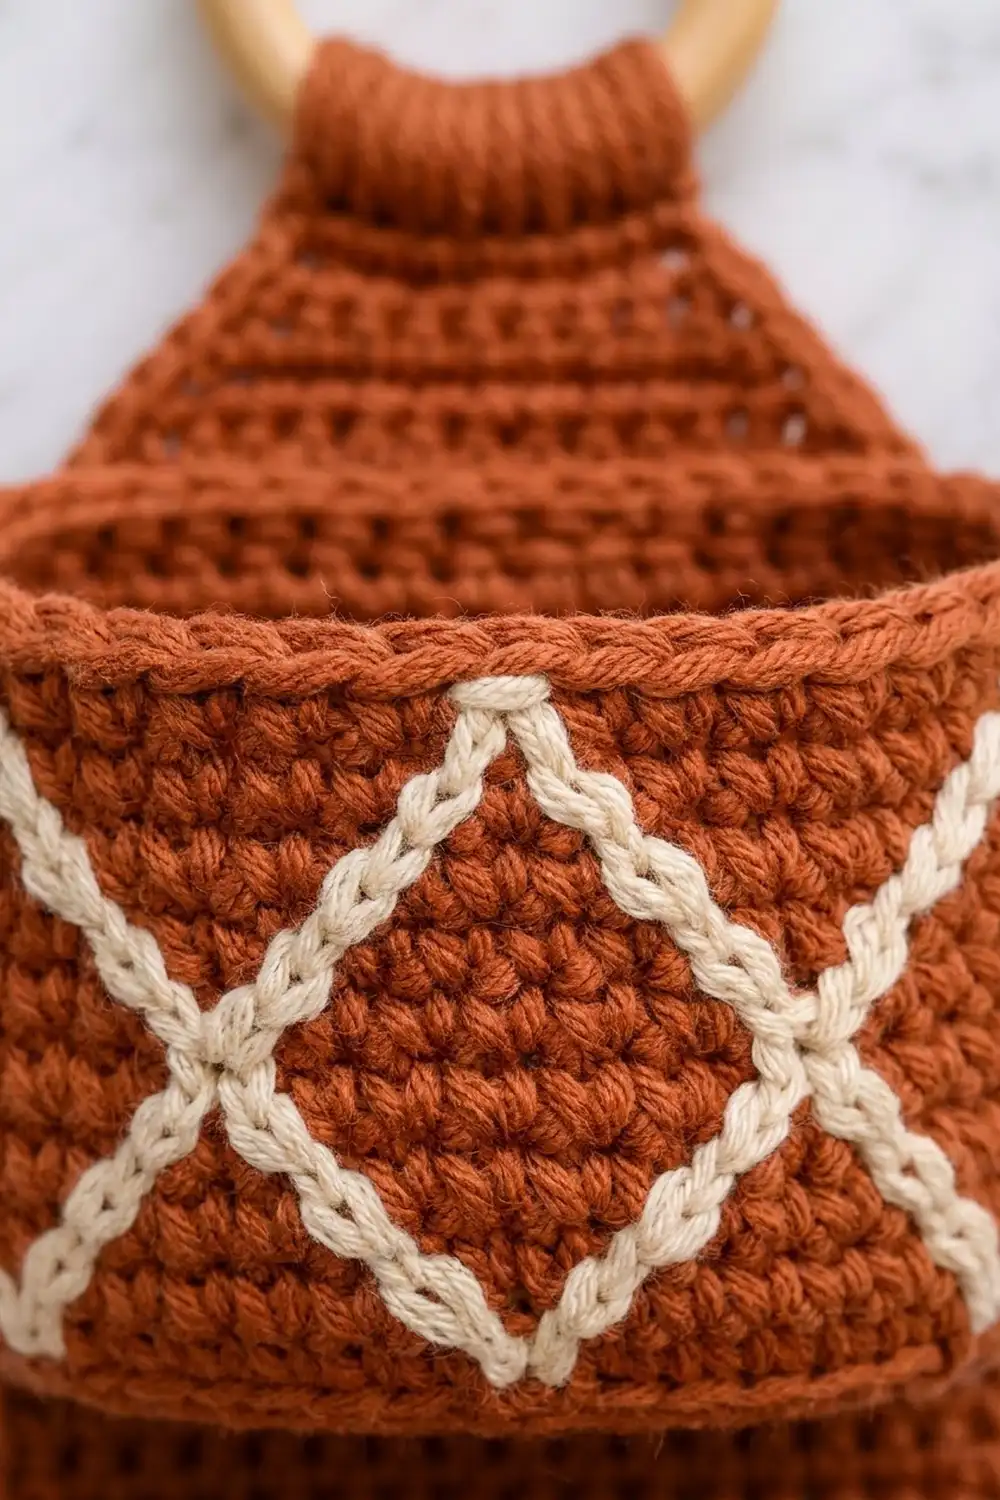
Basket (Make 3)
With rust, work in joined rounds. Join each rnd with a sl st to the first sc and ch 1. The ch 1 does not count as a stitch.
Oval Base
The base grows at the two curved ends only. The 6 straight stitches on each long side stay at 6 in every round.
Rnd 1: Ch 9. Sc in 2nd ch from hook, sc in next 6 ch, 3 sc in last ch. Working along the opposite side of the chain, sc in next 6 ch, 2 sc in last ch (the same ch as the first sc). Join. (18 sts)
Rnd 2: Inc in first st, sc 6, inc in each of next 3 sts, sc 6, inc in each of last 2 sts. Join. (24 sts)
Rnd 3: (Inc, sc 1) once, sc 6, (inc, sc 1) 3 times, sc 6, (inc, sc 1) twice. Join. (30 sts)
Rnd 4: (Inc, sc 2) once, sc 6, (inc, sc 2) 3 times, sc 6, (inc, sc 2) twice. Join. (36 sts)
Rnd 5: (Inc, sc 3) once, sc 6, (inc, sc 3) 3 times, sc 6, (inc, sc 3) twice. Join. (42 sts)
Rnd 6: (Inc, sc 4) once, sc 6, (inc, sc 4) 3 times, sc 6, (inc, sc 4) twice. Join. (48 sts)
Rnd 7: (Inc, sc 5) once, sc 6, (inc, sc 5) 3 times, sc 6, (inc, sc 5) twice. Join. (54 sts)
Each round adds 6 stitches, 3 at each curved end. Checkpoint: the base lies flat and measures 6.9 in (17.5 cm) x 4.7 in (11.9 cm).
Walls
Rnd 8: Sc in BLO of each st around. Join. (54 sts) The unused front loops form a crisp ridge where the base turns up into the wall.
Rnds 9–19: Sc in each st around. Join. (54 sts in each round)
The walls are now 12 rnds tall, which is 4 in (10.2 cm).
Rim
Rnd 20: Rev sc in each st around. Join and fasten off. (54 sts)
This makes the rolled, corded rim. Weave in the ends.
Diamond Lattice
Hold the basket with one straight side facing you. This is the front. Place a marker in Rnd 9 at the first of the 6 straight stitches and call it st 1. Count stitches to the right from there, all the way around (sts 1–54).
Each step of the lattice moves 1 rnd and 1 st. Each zigzag leg is 9 steps long and runs between Rnd 9 and Rnd 18.
Zigzag A: Join cream at the base of st 1 in Rnd 9. Work surface sl sts diagonally up and to the right until you reach Rnd 18 above st 10. Then work diagonally down and to the right until you reach Rnd 9 at st 19. Repeat this up-and-down path twice more. You finish back at st 1 after 54 steps. Fasten off on the inside.
Zigzag B: Join cream at the top of st 1 in Rnd 18. Work diagonally down and to the right to Rnd 9 at st 10, then up and to the right to Rnd 18 at st 19. Repeat twice more, finishing at st 1 after 54 steps.
The two lines cross halfway up the wall, between Rnds 13 and 14. Together they form 6 full diamonds around each basket, 3 on the front and 3 on the back. Each diamond is 9 sts wide and 10 rnds tall, about 3.3 in (8.4 cm) by 3.3 in (8.4 cm). Half-diamonds fill the spaces along the base ridge and the rim.
Backing Strip
With rust, work in rows. Ch 1 and turn at the end of each row. The ch 1 does not count as a stitch.
Pointed Bottom
Row 1: Ch 4. Sc in 2nd ch from hook and in next 2 ch. (3 sts)
Row 2: Inc in first st, sc 1, inc in last st. (5 sts)
Row 3: Inc, sc 3, inc. (7 sts)
Row 4: Inc, sc 5, inc. (9 sts)
Row 5: Inc, sc 7, inc. (11 sts)
Row 6: Inc, sc 9, inc. (13 sts)
Row 7: Inc, sc 11, inc. (15 sts)
Checkpoint: the point is 2.3 in (5.8 cm) tall and 5.5 in (14.0 cm) wide at Row 7.
Straight Section
Rows 8–49: Sc in each st across. (15 sts in each row)
These 42 rows measure 14 in (35.6 cm). On one edge, mark Rows 9, 21, 23, 35, 37 and 49 to show where the baskets go.
Top Taper
Row 50: Sc2tog, sc 11, sc2tog. (13 sts)
Row 51: Sc2tog, sc 9, sc2tog. (11 sts)
Row 52: Sc2tog, sc 7, sc2tog. (9 sts)
Row 53: Sc2tog, sc 5, sc2tog. (7 sts)
Row 54: Sc2tog, sc 3, sc2tog. (5 sts)
Checkpoint: the taper is 1.7 in (4.3 cm) tall. The strip now measures 18 in (45.7 cm) from the point to Row 54.
Hanging Tab
Rows 55–66: Sc in each st across. (5 sts in each row)
The tab is 4 in (10.2 cm) long. Do not fasten off. Go straight on to the border.
Make All Pieces
- Rust: 3 baskets, 1 backing strip, 1 tassel
- Cream: lattice on all 3 baskets
- Hardware: 1 wooden ring
Layout, top to bottom:
        [ wooden ring ]
        [ tab, rows 55-66 ]
        [ taper, rows 50-54 ]
[ Basket 3 on rows 37-49 ]
        [ gap, row 36 ]
[ Basket 2 on rows 23-35 ]
        [ gap, row 22 ]
[ Basket 1 on rows 9-21 ]
        [ row 8 ]
        [ point, rows 1-7 ]
        [ tassel ]
Border
Work one round of rust sc around the whole strip. Border gauge is 1 sc per row end, which is 3 sc per inch along the sides.
Border Rnd: Ch 1 and turn the strip so you can work down the long edge.
- Side 1: 1 sc in each row end from Row 66 down to Row 1. (66 sts)
- Bottom edge: Working into the foundation ch, 3 sc in first ch, sc in next ch, 3 sc in last ch. (7 sts, including both corners)
- Side 2: 1 sc in each row end from Row 1 up to Row 66. (66 sts)
- Top edge: Across Row 66, 3 sc in first st, sc in next 3 sts, 3 sc in last st. (9 sts, including both corners)
Join to the first sc and fasten off. (148 sts)
Why the math works: The strip has 66 rows, so each side has exactly 66 row ends. One sc per row end matches the row gauge of 3 rows per inch. The 3-sc corner groups turn each corner without cupping. The total is 66 + 7 + 66 + 9 = 148. The border adds 0.25 in (0.6 cm) on each side, so the strip grows from 5.5 in (14.0 cm) to 6 in (15.2 cm) wide.
Joining
Use rust yarn and a tapestry needle. Whipstitch each basket to the strip, one stitch to one stitch.
Back section: On each basket, the straight side opposite the front is the back. At the rim, mark 15 sts: the 6 straight sts, plus 4 sts on the curve to the right and 5 on the curve to the left. Mark the same 15 sts on the Rnd 8 ridge directly below.
Basket 1: Line up the 15 marked rim sts with the 15 sts at the top of Row 21 and whipstitch them together. Then whipstitch the 15 marked ridge sts to the 15 sts at the bottom of Row 9. Close the short sides of the back section against the strip edges.
Basket 2: Sew the base to Row 23 and the rim to Row 35.
Basket 3: Sew the base to Row 37 and the rim to Row 49.
Each basket wall is 13 rnds tall (Rnds 8–20), and each spot on the strip is 13 rows tall, so they match. The 1-row gaps at Rows 22 and 36 keep the rims from rubbing against each other.
Tension: Pull each whipstitch snug, but not so tight that it dimples the strip. The basket backs should lie flat while the fronts curve forward.
Ring and tab: Fold the tab through the wooden ring to the back. Whipstitch the edge of Row 66 to the back of Row 54.
Size checkpoint: The strip measures 6 in (15.2 cm) wide. Each basket sticks out past it by about 0.45 in (1.1 cm) on each side.
Tassel
Wrap rust yarn 20 times around the 5 in (12.7 cm) cardboard. Slide a 12 in (30.5 cm) strand under the loops at the top and knot it tightly. Cut the loops at the bottom. Wrap another strand 6 times around the bundle, 1 in (2.5 cm) below the top, and tie it off. Trim the ends evenly to 5 in (12.7 cm). Use the top tie strand to sew the tassel to the bottom point of the strip.
Final Blocking
- Lightly mist the strip and each basket with water.
- Pin the strip flat at 6 in (15.2 cm) wide, keeping the point and the taper even on both sides.
- Fill each basket with a toilet roll or a folded towel so the walls stand straight.
- Smooth the cream lattice with your fingers so every diamond looks square.
- Comb the tassel strands straight and let them hang.
- Let everything dry completely, then remove the pins.
Final Quality-Control Checklist
- Each basket has 54 sts in every round from Rnd 7 to Rnd 20.
- Each base measures 6.9 in (17.5 cm) x 4.7 in (11.9 cm).
- Each basket stands 4.25 in (10.8 cm) tall.
- Each basket shows 6 full diamonds, and the lines cross halfway up the wall.
- The strip border has 148 sts, and the strip is 6 in (15.2 cm) wide.
- The baskets sit on Rows 9–21, 23–35 and 37–49.
- The tab is sewn firmly around the ring.
- The tassel is secure and trimmed to 5 in (12.7 cm).
Troubleshooting
Base curls into a bowl: Your tension is tight. Go up a hook size for the base.
Base ruffles: You have too many stitches. Recount each round against the totals given.
Lattice lines drift: You skipped or doubled a step. Each leg should be exactly 9 steps.
Wall puckers behind the lattice: Loosen your slip stitches, or use a larger hook for the cream yarn.
Roll does not fit: Your base is smaller than gauge. Remake it with a larger hook.
Strip edge waves: Check that you worked exactly 1 sc per row end.
Care
Hand wash in cool water and lay flat to dry, reshaping the baskets while they are damp. Do not tumble dry, because cotton can shrink and pull the lattice out of shape.
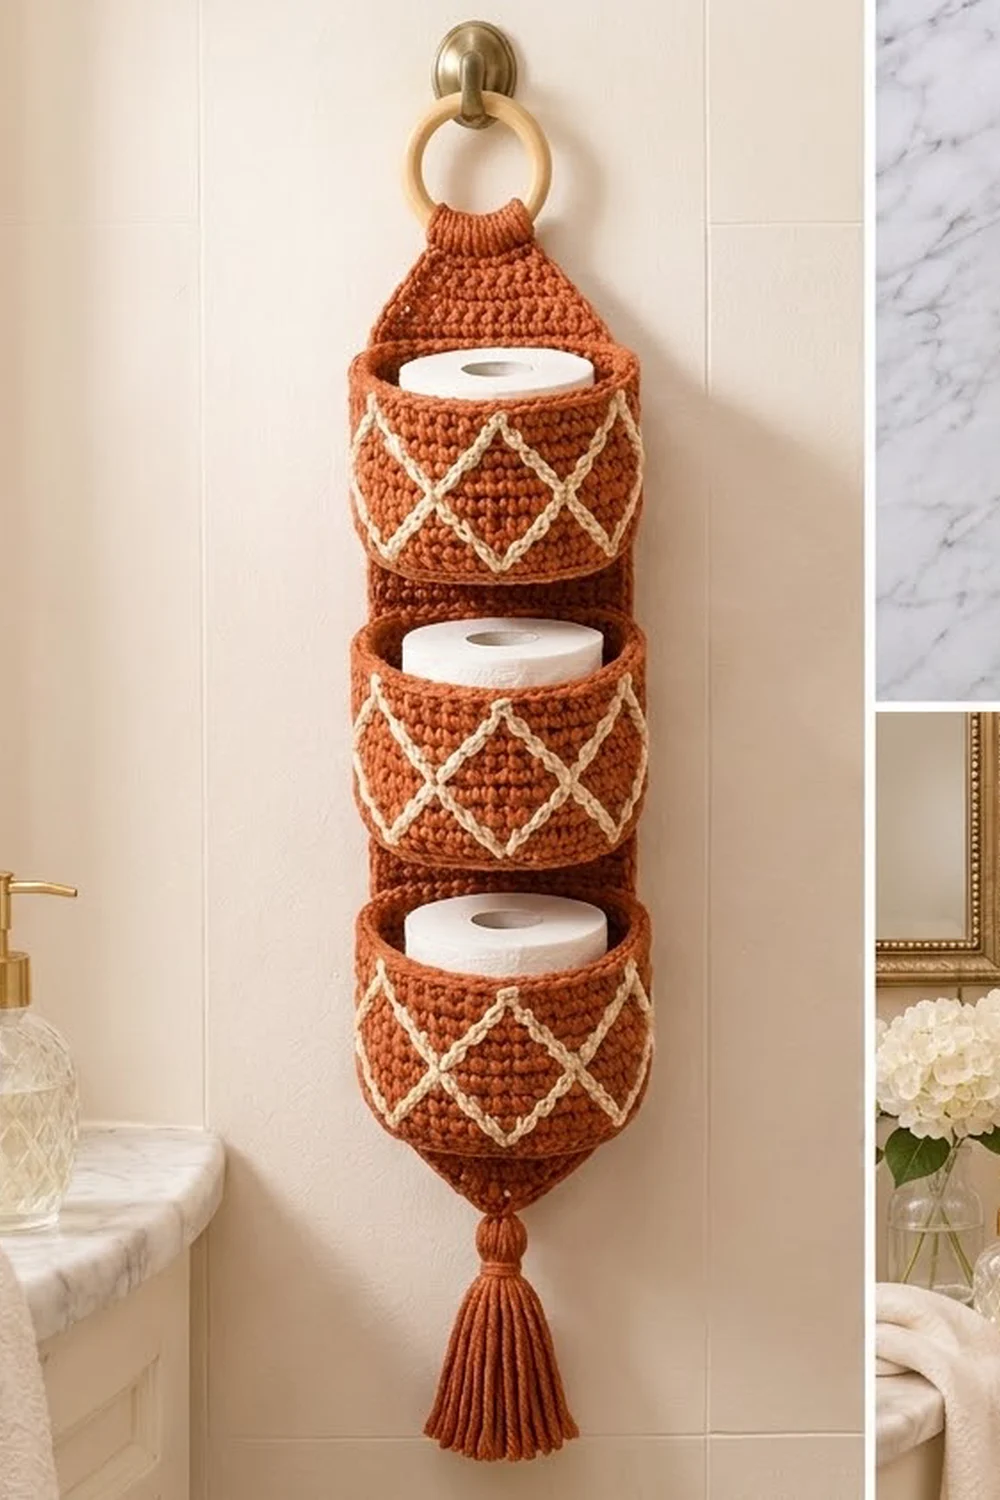
Final Notes
Every measurement in this holder builds on the one before it. A gauge of 11 sc and 12 rows per 4 in (10.2 cm) gives a 54-stitch oval base of 6.9 in (17.5 cm) x 4.7 in (11.9 cm). Thirteen wall and rim rounds bring each basket to 4.25 in (10.8 cm) tall. The 15-stitch strip is 5.5 in (14.0 cm) wide and grows to 6 in (15.2 cm) with its 148-stitch border. Each 13-row spot on the strip fits a 13-round basket exactly.
Make one basket first and check it against a real roll. The rest of the project will go smoothly from there.
Happy crocheting!